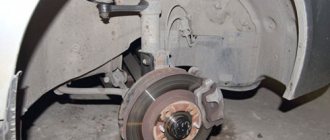
The suspension parts of the LADA “Kalina” wear out when driving on uneven roads and require periodic replacement. The Kalina anti-roll bar is a strong and durable part that requires replacement only as a result of an accident. The repair of this unit consists of replacing the bushings, the rubber of which does not withstand long-term use on our roads.
Stabilizer struts for Lada Kalina
Anti-roll bars are part of the vehicle suspension structure, the functional purpose of which is to equalize dynamic loads on the body during maneuvering.
Structurally, the struts are located between the stabilizer and the wheel hub, as a result of which they experience serious loads during vehicle operation - failure of faulty parts can provoke loss of controllability and an accident on the road.
| Manufacturer | vendor code | Structural arrangement | Component class | Approximate cost, rub. |
| AvtoVAZ | 1118-2906050 | Front axle | Budget | 450 |
| AvtoVAZ | 2190-2906050 | Front axle | Budget | 510 |
| AvtoVAZ | SS40111 | Front axle | Premium | 770 |
| AvtoVAZ | 2108-2906345 | Rear axle | Budget | 460 |
| AvtoVAZ | 1118-2906050 | Rear axle | Budget | 525 |
| SS20 | SS40134 | Rear axle | Premium | 750 |
Note! When selecting components for the Lada Kalina, it is necessary to check the part numbers with the VIN number of the car - otherwise there is a possibility of purchasing incompatible spare parts that differ in form factor and size from the stock version.
How much does a new resonator cost on a Priora?
Nowadays, there is a fairly wide selection of similar spare parts for Priora. But choosing a quality one is actually quite problematic. And the prices differ quite a lot. For example, below is a list of manufacturers and prices that you can find in stores or at the car market:
- EKRIS (Aliminized) - from RUB 2,250
- AvtoVAZ - 2000 rubles
- EKRIS (regular) — 1800 rub.
- Autostart (Aliminized) — 1950 rub.
Do not delude yourself by buying a “factory type” resonator. Quite often, when installing such parts, a problem occurs that it does not sit exactly in its place, vibration and extraneous sounds appear when the engine is running. This is primarily due to a defect in its bends - that is, they may differ from the original factory ones! This is exactly what you should be wary of when choosing new parts. To 100% protect yourself from such problems, it is better to remove your old resonator and compare them when purchasing, placing them next to each other so that there are no differences in shape, bends and places of attachment to the hangers on the body.
Today it is difficult to imagine a car without a muffler, but this is how the first cars were created. It is not surprising that in those early years the public had a negative attitude towards the car, considering it the cause of all disasters and problems. It was only in 1884 that the first noise-reducing device appeared; it was installed on the Panhard-Levassor model. From this moment a new history of the global automobile industry begins, which continues to this day. Next, we will talk about mufflers installed on the Lada Priora, about possible malfunctions of the part and how to replace the muffler yourself. So, let's go. What is a muffler? Design:
- an exhaust manifold;
- main muffler;
- auxiliary muffler.
All components are interconnected in such a way that they form a single, interconnected, hermetic system. But it is precisely because of this interconnectedness of individual components that the failure of one part to work negatively affects the operation of other components.
How to identify faulty racks: diagnostics at home with a guarantee of accuracy
The critical level of wear of the anti-roll bar struts on the Lada Kalina can be diagnosed by taking a closer look at the behavior of the vehicle - it is advisable to replace components in the following cases:
- When overcoming obstacles on the road, shocks are felt or extraneous sounds are heard in the suspension area;
- When moving in a straight line at low speed, the car spontaneously changes its trajectory;
- The car sways when reaching maximum speed or as a result of emergency braking;
- During maneuvering or when entering a turn, a strong body roll is observed;
- You feel a strong vibration load in the steering wheel or have difficulties in driving the car.
If several factors are similar, an urgent diagnostic inspection of the vehicle's chassis and suspension system is required. The best option would be to contact a certified service station, but you can detect the presence of worn-out struts at home - all you need is:
- Turn the steering wheel to the side all the way in any direction and, holding the disc, try to turn the wheel to the side - if you feel play, you need to disassemble the wheel liner and inspect the struts; you may have to change the struts soon;
- Next, we inspect the stabilizer bushings for mechanical deformation or leaks of technical fluid - detection of defects indicates depressurization of the structural unit, which will lead to moisture and small abrasive particles getting inside and grinding down the hinges in the future;
- Then we drive the car into the inspection hole and ask a partner to help - when periodically pressing on the car’s suspension under the fender liner, you need to place your palm on the outside of the strut - the feeling of play indicates the deterioration of the strut hinges and the formation of free space in the area of the wheel hub.
Note! The best option is to carry out a full diagnostic of the chassis every 15,000 km, which will prevent the possibility of accidental breakdown and promptly replace worn out parts.
Remember, if problems with the struts are identified, the parts must be replaced with new ones as soon as possible, otherwise the operation of the vehicle is not safe. Neglecting maintenance only makes the situation worse and increases the cost of future repairs.
Malfunctions
The main sign of a failed support bearing is a knocking sound (dull knocks) in the area of the shock absorber strut. It may indicate that:
- the rubber gasket is damaged or deformed;
- The bearing itself is damaged.
Failure of the support bearing may occur due to:
- resource spent;
- penetration of dirt and moisture;
- exceeding permissible loads;
- mechanical damage due to shock absorber malfunctions.
How to identify a malfunction
To diagnose a support bearing failure, open the hood and remove the “cup” cover. Place your palm on the shock absorber housing and rock the front of the car. If you hear a knock and feel the corresponding vibration with your hand, the bearing is clearly faulty.
When to change
The service life of the “supports” is on average 50-100 thousand km, depending on the conditions in which the car is operated. After this resource has expired, it is recommended to change them. Replacement is also necessary if any malfunctions are detected.
Late diagnosis, as well as ignoring bearing failure, threatens to destroy the shock absorber structure and other suspension elements.
Replacing stabilizer struts on a Lada Kalina with your own hands: detailed instructions for beginners
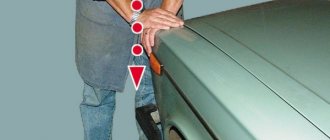
Dismantling and installing racks on Kalina occurs according to an intuitive scenario, however, if the vehicle maintenance instructions are not followed, inexperienced mechanics may experience some difficulties. The entire front of maintenance work can be easily performed with one pair of hands and will require no more than 40 minutes for each stand. Also, to replace components you will need a lift or a good jack, a set of wrenches or sockets, a hammer, Torx sockets and WD-40 fluid. To install new racks on Kalina you need:
- First, drive the car onto a level area with a solid foundation and place wheel chocks under the second axle of the car. Next, we stick the gearbox selector into the position of any gear and set the handbrake. If you have access to a lift, it will be safest to use it to service the chassis - since during repairs it is possible to pull out the jack from under the car;
Note! When preparing the car for replacing the struts, it is necessary to turn on the parking brake. When lifting the vehicle body, the suspension relaxes, as a result of which the struts lose dynamic tension, which lengthens the spring and interferes with comfortable dismantling. The clamped handbrake allows you to secure the suspension in a static position.
- Next, we release the fixing bolts and dismantle the wheel, after which we proceed to remove the brake mechanism. To make repairs faster, you can unscrew only the upper fastening, and simply release the lower one, which will allow you to turn the mechanism to the side without completely removing the structure;
- Then we clean the strut and bushings from dirt and treat them with WD-40, after which we leave the fixation points to remove any traces of corrosion. It is important not to try to dismantle the oxidized nuts, as this can lead to thread breakage - to remove a rack with a broken thread on the mount, you will have to disassemble the entire chassis of the car, which will significantly increase the repair time;
- After the parts are loosened, unscrew the fasteners and pull out the stand. Next, we clean the seats around the entire perimeter of the structure from dirt, and if desired, treat them with an anti-corrosion compound. It is also recommended to replace the bushings and sealing elements before installing a new rack;
- We install a new rack and assemble all the elements of the car according to these instructions in the reverse order. To increase the service life of components, it is recommended to lubricate all fixing fasteners with any technical composition before installation - this will prevent premature corrosion and reduce the rate of play formation between the connecting elements;
- A similar procedure is carried out with the remaining parts of the suspension. It is important to replace the anti-roll bar struts in pairs, that is, along the perimeter of the suspension axle - otherwise the service life of the new part is reduced and the controllability of the vehicle as a whole is deteriorated.
Replacing struts on a Lada Kalina will not cause difficulties even if you do the repair yourself, which will allow you to save a lot on car maintenance - the average price of this procedure at a service station is approximately $15-25, which is the cost of a full set of “Standard” class struts.
Source
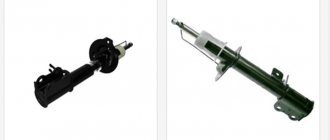
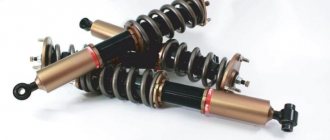
Which struts to take: oil or gas?
Since each person’s concept of good is different, each motorist has his own criteria for “good racks.” For example, some install only high-tech gas shock absorbers on a vehicle. Although they cost a little more than oil ones, they also have a longer service life. Some people prefer oil shock absorbers, which are softer. But these elements have one drawback - at low temperatures the racks become rigid. We have already talked in more detail about replacing struts on Lada Kalina here.
SAAZ oil struts were installed on Kalina from the factory. Some people immediately after purchasing a car purchase new racks of imported or domestic production. This could be, for example, ss-20 or Kayaba.
Shock absorber manufacturers
Today, many manufacturers make racks for cars that can also be installed on Kalina
Among the variety of racks and their manufacturers, attention should be paid to the following:
- SAAZ. Installed on the car at the factory. They are not reliable and have a long service life.
- Kayaba. Manufacturer – Japan. The racks have good performance. When choosing shock absorbers of this brand, you need to be careful, since most of them are currently produced in China, and therefore they are of worse quality compared to the original Japanese ones.
- ASOMI. Domestic manufacturer of racks for VAZ and GAZ cars. The manufacturer makes good racks, but the disadvantage of the product is that the warranty on it is one year, and then only on condition that the racks were installed at a specialized service station.
- SS. Domestic manufacturer. Makes spare parts for the chassis of domestic cars. Most Lada Kalina owners prefer to install shock absorbers from this particular manufacturer on their cars. With such struts, the car will be moderately rigid, and it will also hold the road well when maneuvering. Warranty – 2 years. You can install the racks yourself. In this case, the warranty also applies to them.
Currently, the following types of racks are sold for Kalina:
- Highway 1118.
- Standard 1118.
- Standard 1119.
- Sports 1119.
- Optima 1119.
Standard racks from these categories are practically no different from the factory ones. Highway and Sport are narrowly targeted, and therefore few people choose to install them on their car. The last option is the most common and popular. They are installed on cars that are used under normal conditions. They performed well when driving both on bad roads and on the highway. The driver will also find a warranty card in the package along with the racks.
It is recommended to buy all parts and spare parts for the chassis only from trusted sellers, and preferably from an official dealer of the manufacturer.
Stabilizer struts for Lada Kalina
Anti-roll bars are part of the vehicle suspension structure, the functional purpose of which is to equalize dynamic loads on the body during maneuvering.
Structurally, the struts are located between the stabilizer and the wheel hub, as a result of which they experience serious loads during vehicle operation - failure of faulty parts can provoke loss of controllability and an accident on the road.
Note! When selecting components for the Lada Kalina, it is necessary to check the part numbers with the VIN number of the car - otherwise there is a possibility of purchasing incompatible spare parts that differ in form factor and size from the stock version.
General information and piston design
During operation, the piston periodically accelerates to over 100 km/h and decelerates to zero with a frequency of up to 200 Hz at 6000 rpm. When the fuel-air mixture burns, the temperature in the cylinder reaches 1800-2600°C, which is several times higher than the melting point of the material from which the piston is made. In this case, the strength of the alloy decreases; thermal stresses arise along the piston body due to temperature changes, to which are added stresses from gas pressure and inertia during acceleration and deceleration at high frequencies.
The outer surfaces of the piston must be formed so that under no circumstances does it jam in the cylinder, so that hot gases do not penetrate into the crankcase. Given the difference in heating between the piston bottom and its skirt, the piston has a barrel-shaped shape when cold, which allows it to meet these requirements.
The top part of the piston is the head. It includes a bottom and grooves for installing O-rings. In order for the head to withstand the loads that fall on it, a protective coating is applied to it.
For better sliding, the piston surface is treated with various coatings. For better running-in, coatings are applied that wear out over time during running-in (tin, phosphating). They also reduce the occurrence of scratches when starting a cold engine. Anti-friction coatings (nickel plating, anodizing) remain for the entire period of operation, preventing cracking and erosion of surfaces.
The skirt is processed with cutters to create a micro-relief, which allows the oil to better adhere to the piston surface, reducing friction.
Replacing the anti-roll bar on LADA Kalina
The suspension parts of the LADA “Kalina” wear out when driving on uneven roads and require periodic replacement. The Kalina anti-roll bar is a strong and durable part that requires replacement only as a result of an accident. The repair of this unit consists of replacing the bushings, the rubber of which does not withstand long-term use on our roads.
- What is anti-roll bar LADA “Kalina”
- Signs of malfunction of the anti-roll bar LADA “Kalina”
- What is needed to replace the Kalina stabilizer
- How to replace the Kalina stabilizer
Tips for choosing
The first thing you should pay attention to when choosing a muffler is the material. The best option is aluminized steel, it is stronger than stainless steel or zinc-alumina steel and is resistant to rust.
This part will last about six years. The second is the node structure. Silencers are divided into several types
- by design;
- degree of noise reduction;
- dimensions;
- presence/absence of an additional body layer.
Third, you should pay attention to the manufacturer and the country of manufacture. As a rule, Polish and Turkish companies cannot please you with quality, while the Germans, Japanese, and even our domestic parts are quite suitable for work
And lastly, it’s worth remembering that each model is equipped with a certain type of muffler and you need to know this when buying a part. The price for a standard muffler for the Lada Priora is approximately 3,400 rubles.
How to identify faulty racks: diagnostics at home with a guarantee of accuracy
The critical level of wear of the anti-roll bar struts on the Lada Kalina can be diagnosed by taking a closer look at the behavior of the vehicle - it is advisable to replace components in the following cases:
- When overcoming obstacles on the road, shocks are felt or extraneous sounds are heard in the suspension area;
- When moving in a straight line at low speed, the car spontaneously changes its trajectory;
- The car sways when reaching maximum speed or as a result of emergency braking;
- During maneuvering or when entering a turn, a strong body roll is observed;
- You feel a strong vibration load in the steering wheel or have difficulties in driving the car.
If several factors are similar, an urgent diagnostic inspection of the vehicle's chassis and suspension system is required. The best option would be to contact a certified service station, but you can detect the presence of worn-out struts at home - all you need is:
- Turn the steering wheel to the side all the way in any direction and, holding the disc, try to turn the wheel to the side - if you feel play, you need to disassemble the wheel liner and inspect the struts; you may have to change the struts soon;
- Next, we inspect the stabilizer bushings for mechanical deformation or leaks of technical fluid - detection of defects indicates depressurization of the structural unit, which will lead to moisture and small abrasive particles getting inside and grinding down the hinges in the future;
- Then we drive the car into the inspection hole and ask a partner to help - when periodically pressing on the car’s suspension under the fender liner, you need to place your palm on the outside of the strut - the feeling of play indicates the deterioration of the strut hinges and the formation of free space in the area of the wheel hub.
Note! The best option is to carry out a full diagnostic of the chassis every 15,000 km, which will prevent the possibility of accidental breakdown and promptly replace worn out parts.
Remember, if problems with the struts are identified, the parts must be replaced with new ones as soon as possible, otherwise the operation of the vehicle is not safe. Neglecting maintenance only makes the situation worse and increases the cost of future repairs.
Why do racks fail?
On the Priora, the struts really fail quickly, you may not notice it, but hear it. Experienced mechanics say that there are three main reasons for this - poor build quality, carelessness of the owner and extreme driving. The fact is that when turning, the stabilizer tilts towards the angle of rotation, which is why the strut closest to it is compressed, and the farthest one is decompressed.
Constant cornering, drifting, and driving over artificial bumps at high speed cause the stabilizer struts to continuously compress and unclench. What happens to the springs during such experiments? Sooner or later they will become deformed. And with the racks, everything is a little more complicated, because they do not deform - they break immediately.
There are very few high-quality spare parts on the market; most components are supplied from China. Spare parts are no exception to the rule; they are also low quality - flimsy. The “cherry on the cake” from Chinese manufacturers is the replacement of good lubricant with ordinary technical petroleum jelly. Vaseline does not promote stable rotation of the joint, and the stabilizer does not perform its main function.
Lada Priora asks that its owner check the suspension more often for serviceability! Undoubtedly, you can replace the stabilizer bar, but this will not solve the problem if you install loose bushings and struts on it. If you change something in the suspension, then change it radically - so that the next knock in the suspension will not be heard very soon.
Replacing stabilizer struts on a Lada Kalina with your own hands: detailed instructions for beginners
Dismantling and installing racks on Kalina occurs according to an intuitive scenario, however, if the vehicle maintenance instructions are not followed, inexperienced mechanics may experience some difficulties. The entire front of maintenance work can be easily performed with one pair of hands and will require no more than 40 minutes for each stand. Also, to replace components you will need a lift or a good jack, a set of wrenches or sockets, a hammer, Torx sockets and WD-40 fluid. To install new racks on Kalina you need:
- First, drive the car onto a level area with a solid foundation and place wheel chocks under the second axle of the car. Next, we stick the gearbox selector into the position of any gear and set the handbrake. If you have access to a lift, it will be safest to use it to service the chassis - since during repairs it is possible to pull out the jack from under the car;
Replacing the stabilizer strut of Lada Kalina
Replacing Kalina stabilizer struts is a fairly common question among VAZ owners. Next, you will learn how to change stabilizer struts on a viburnum.
- First of all, remove the wheel. The front axle needs to be lifted. This means that both front wheels should not touch the ground. To do this, use two jacks or lift the car on a lift.
The stabilizer link is the connecting link between the stabilizer and the wishbone of the front suspension.
The rubber bushings in the stabilizer link wear out or it simply breaks in half. Let's treat it with WD40. A breakdown of the Kalina stabilizer bar is accompanied by extraneous knocking in the front suspension when driving over uneven surfaces and large rolls of the Kalina when cornering.
- Unscrew the lower part of the stabilizer link from the lever. To do this you will need two keys No. 17. With one we unscrew the nut, with the second we hold the bolt from turning.
- We remove the bolt.
- The upper part of the stabilizer is put on the stabilizer rod through a rubber bushing. We remove it by hand, turning it. Or, if it doesn’t give in, we knock it down with a hammer. You can also lubricate the rod with silicone grease.
→ Get useful materials for Lada Kalina
- In the same way, using silicone grease, we put the new strut on the stabilizer bar.
- Insert the bolt, aligning it with the hole in the transverse arm. And tighten the nut using two No. 17 wrenches.
Now we install the wheel. And we can go.
Operating principle
On the Lada Kalina, MacPherson suspension has improved ride quality. Starting with Kalina, all new AvtoVAZ models began to be equipped with MacPherson strut suspension. When driving, the level of impact of a bad road on the body is much more effectively reduced, making driving a car much more comfortable than, for example, a VAZ 2109, where a similar type of suspension is installed.
Thus, the independent MacPherson suspension consists of two axle shafts, allowing the wheels to be practically independent of each other. This means that the wheels, when one of them hits a bump, a depression or something else, do not change the level of inclination, as is the norm in semi-independent and dependent suspensions.
Differences between the front suspension of Kalina and previously produced AvtoVAZ cars
All AvtoVAZ cars had a MacPherson strut suspension at the front, but it was significantly different from those used in the 70s, 80s and 90s by Ford, Fiat, Volkswagen, etc. So, the main differences between the MacPherson strut suspension and the suspensions of Lada models until 2004 are concluded as follows:
- Instead of a bearing, a bushing is mounted in the MacPherson.
- In MacPherson, the ball bearing has a larger radius, and the design also differs. Now it is located in the upper part between the support and the spring element in a compressed state, which perfectly helps to remove knocks when moving.
- When the wheels turn, the front suspension strut, or rather its body, rotates with the spring simultaneously. When this happens, the shock absorber rod remains motionless.
What is anti-roll bar LADA “Kalina”
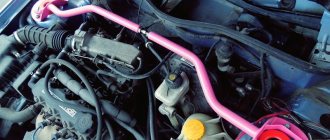
The suspension of the LADA Kalina, like any modern car, includes an anti-roll bar. This is a rod with a round cross-section. The part, made of high-strength spring steel, is attached to the body with clamps at two points through rubber bushings. Taking into account the location of components and assemblies located in the lower part of the car, the stabilizer has a complex shape, vaguely reminiscent of a U-shaped one. The ends of the stabilizer are connected by wheel suspension arms to redistribute the load between them. When a lateral body roll occurs, one end of the stabilizer goes down, the other goes up, and the middle part twists, providing resistance. The more the Kalina rolls, the stronger the counteraction of the stabilizer. The Kalina transverse stabilizer does not interfere with the vertical and horizontal vibrations of the body while driving. Its task is to reduce roll when turning and improve wheel adhesion to the road surface.
Causes of knocking in the front suspension
In total, there are four main reasons why noises and squeaks can annoy the Lada Kalina car owner, and three of them can be eliminated independently and everything can be returned to a safe state.
- The first reason why knocking occurs in the suspension is the poor quality of the road surface. A suspension that is in good working order can also produce some extraneous noise. If the noise disappears when you drive onto a good road, then everything is fine with your suspension, you can move on to the point below.
- If knocking and simultaneous vibration occur in the steering wheel, the reason may lie in a faulty steering rack. If you can tighten the steering rack yourself, then it is better to entrust its repair or replacement to professionals.
- The third reason is the front suspension strut spring that has lost its elasticity. Since the spring tone is significantly reduced, the suspension hits directly against the body. How to change the front struts, and along with it the spring, is described in detail in this article.
- And the last reason is cracked silent blocks, which are simply necessary to thoroughly dampen knocks and vibrations that occur while driving. Read below for information on how to properly replace these front suspension elements.
LADA > Granta
Signs of malfunction of the anti-roll bar LADA “Kalina”
Malfunctions of the suspension stabilizer appear when cornering and driving over uneven roads. The cause of the malfunction is broken bushings or poor tightening of the nuts of the clamps holding the stabilizer bar. This manifests itself as follows:
- there is a knocking noise under the hood when driving through potholes and potholes;
- the car begins to “go to the side” when driving in a straight line and you have to constantly adjust its trajectory (this is especially noticeable at speed);
- the car sways and rolls heavily when turning or braking;
- Excessive roll appears during maneuvering.
You can independently check the bushings and stabilizer mounts as follows:
- turn the wheels to the side until they stop, freeing up space in the wheel well;
- grab the Kalina stabilizer with your hand and pull strongly in different directions;
- If there is the slightest play, the stabilizer bushings must be replaced.
A more detailed analysis of the condition can be made by driving the car onto a pit or lift. This way you can determine exactly where the knocking is coming from and which part needs to be replaced.
What is needed to replace the Kalina stabilizer
To replace the anti-roll bar you will need:
- standard set of socket wrenches (socket wrenches can be used);
- WD-40 liquid;
- jack;
- special device (extension);
- hammer;
- stabilizer bushings “Kalina”;
- stabilizer's pole;
- stabilizer bar.
To access the mounts of the struts and stabilizer, you must place the car on a viewing hole or a lift.
Symptoms of faulty bushings
If the diagnostics showed that it was the bushings that were faulty, then, in fact, nothing bad happened. If the rod had been damaged, more costly repairs would have been required. Symptoms of the malfunction are eloquently evident when driving over uneven surfaces, and they are as follows:
- The appearance of a knock under the hood
- While driving on a straight road, the car begins to pull to the side
- The car sways and rolls to the sides when turning
You can also check the bushings yourself; to do this, you need to turn the wheel to the side until it stops, and then grab the stabilizer and start pulling it from side to side. If play is detected, the bushing must be replaced first.
Video - Replacing the stabilizer link
Stabilizer struts are quite important parts of the car. They are responsible for the connection between the car body and its suspension. For example, if you remove these racks, you can even drive a car. But it’s very uncomfortable and even dangerous. Handling will suffer greatly. Noticeable body roll will appear, both longitudinally and transversely. If the stabilizer links are faulty, knocking noises may occur. Usually, play appears in the hinges of the struts - hence the knocking. It is also possible for the joint to become sour. That is, the post finger loses mobility relative to the post itself, resulting in a rigid mount. Extra knocks in the suspension and impacts transmitted to the body are also possible. Well, the worst option is that the stabilizer link breaks. Here, in addition to incomprehensible sounds, control disturbances are possible.
In general, it’s better not to delay replacing the stabilizer struts on the Lada Vesta. They can become unusable for many reasons: fast driving over potholes, bad roads, speed bumps. Defective, low-quality struts, lack of lubrication, lack of boots on the struts - everything leads to damage to these same struts.
On the Lada Vesta, the struts connect the anti-roll bar and the shock absorber strut, which is assembled with a spring.
If you suspect knocking noises from the racks, it is advisable to have them diagnosed. If the stabilizer struts are condemned, it is worth replacing them with a factory original or an analogue that matches the parameters. Preferably in pairs if the racks are made by a different manufacturer. Different lengths are possible, for example. In our case, the already unusable factory stabilizer struts will be replaced with an analogue from the Toyota RAV4. These racks from the Korean manufacturer CTR have catalog number CLT-50. They are slightly longer than the original ones. But this is not a hindrance; many Wests have already “tested” such racks. There are many analogues with a huge range of prices - from a thousand rubles to several thousand per pair (original Toyota). There are also racks from Renault.
Why is a telescopic strut (shock absorber) needed in a car?
The telescopic stand is designed to absorb impacts and impacts from the wheels on the car body. The time comes and these parts fail. Therefore, they will have to be replaced. But what racks should I put on the Lada Kalina? This question interests many owners of this car.
When to change struts (symptoms and regulations)
If the strut is leaking, get ready to replace it!
This depends mainly on the conditions in which the car will be used and on the driving style. If the strut is out of order, then this can be determined using a special stand or a folk method, namely: the car has become worse on the road and is not so stable when maneuvering. When rocking, the car rocks more than once. If there is at least one of the above signs, then in such cases it is necessary to change the racks.
How to replace the Kalina stabilizer
To replace the bushings and stabilizer on a car, you need to perform the following steps:
- install the car on a lift or inspection hole (in the latter case, you need to place wheel chocks under the wheels);
- treat threaded connections with WD-40;
- unscrew the left and right nuts securing the stabilizer struts;
- unscrew the nuts holding the left and right stabilizer mounting clamps;
- dismantle the struts, bar and stabilizer brackets;
- Unscrew the nuts securing the stabilizer links to the arms;
- knock the stabilizer struts off the rod using a polymer or wooden hammer;
- inspect the stabilizer pads (bushings) and, if necessary, replace them with new ones;
- inspect the condition of the stabilizer bar;
- if the ends of the rod are in different planes or it has other signs of deformation, a new rod should be used;
Tip: when using split pads, the nuts must be tightened until the gap in them is eliminated. To do this, first tighten the front, then the rear fastening nut. - tighten the nuts holding the Kalina stabilizer struts;
- make a final tightening of the threaded connections of the clamps and stabilizer struts (4.5-5.3 kgf and 1.3-1.6 kgf, respectively).
if the replacement work was carried out on a lift, it is necessary to lower the car to load the wheels;
At this point, the replacement of the Kalina stabilizer is completed and the car is ready for use.
Standard bushings and struts
Everywhere you can hear the words that the standard stabilizer struts on the Priora are almost instantly replaced. But are they as bad as they actually say? The suspension of cars of the Prior family was modified after the “tenth” family - its service life has increased, and it allows it to go through bumps and holes more smoothly. The survivability of the suspension is reflected in the reviews of the owners - the Priora is more praised because it performs well in rural areas with original spare parts.
The stabilizer in the Priora is very different in size from the same part in the “tens”. But you won’t even be able to damage your car unintentionally. They may not be distinguishable visually, but the article number for the stabilizer link for the Priora 2170 contains the numbers 1118 or 0118, so it will not be easy to confuse them. The set for the “tenth” family is cheaper, but “the miser pays twice”!
The new generation, Priora, is a collection of the best tested developments of AvtoVAZ. Of course, compared to the SS20, the standard bushings and struts for the Priora have a shorter service life, but they cost “like originals.” They are stiffer than SS20, but over a period of multiple strut and bushing replacements, they will cost less to replace than SS20. Original parts are suitable for Priora. With their purchase, there will be no fear that instead of good lubrication of the joint there will be technical Vaseline.
Repair of the Priora suspension should always be carried out on time so as not to aggravate the condition of the car. Remember that stabilizer bushings are just a consumable item that can be replaced, but a total repair of the car’s chassis is already a big expense and a larger amount of work. Don't be lazy and take care of your Priora, check the suspension on time!
Do-it-yourself replacement of stabilizer struts for Lada Vesta
To change struts on Vesta, as on most modern cars, you do not need to have any special knowledge or skills. The work will go quickly and without problems if you apply a penetrating lubricant, for example, WD-40, to the threaded connections ahead of time, after first cleaning the threads and the nut itself from dirt and dust. The only tools you will need are a 16 mm spanner and a Torx T30 bit, as well as new stands.
Mounting the anti-roll bar strut for Lada Vesta: 1-Shock absorber strut; 2-Upper and lower hinges for attaching the stabilizer link; 3-Stabilizer link; 4-Anti-roll bar.
Removing the shock strut assembly with the steering knuckle
We carry out the work on a lift or inspection ditch.
Loosen the front wheel mounting bolts.
We remove the hub cap, unscrew the hub mounting nut with a 30mm socket and remove the washer.
Remove the front wheel.
We unscrew the nine screws and two bolts securing the engine mudguard and remove the middle engine mudguard.
Using pliers, undo the cotter pin and use a 19mm wrench to unscrew the nut 3 (Figure 2) securing the ball pin of the outer tie rod end 1.
We press the ball pin out of the swing arm 2 of the front suspension strut.
Using a 19mm socket, unscrew nut 3, Figure 3, securing the ball pin to the lower arm of the front suspension and press ball pin 2 out of lever 4 (article - Repair, removal of the ball joint).
Using a TORX E8 socket, unscrew the bolt securing the speed sensor (if the car has ABS) to the bracket on the steering knuckle and remove the sensor from the bracket.
We remove the sensor harness from the guide bracket on the front suspension strut.
Unscrew and remove the pad guide with the caliper and cylinder assembly.
We tie the bracket to the brake hose bracket (Figure 4).
We remove the outer CV joint from the wheel hub and fix it in a suspended state using a wire or a technological hook.
If after removing the shock strut you need to disassemble it, then use a 22mm spanner to loosen the tightening of the rod nut (Fig. 5), holding the rod from turning with a 6mm hexagon.
Using a 13 socket, unscrew the three nuts 2, Figure 5, securing the upper support of the telescopic strut 1 to the mudguard 3 of the body and remove the washers.
Remove the strut assembly with the steering knuckle and ball pin.
Remove the lower support from the upper support 1, Figure 6.
Installing the shock strut assembly with the steering knuckle
Install the speed sensor bracket onto the steering knuckle and secure it with a bolt. Bolt tightening torque 7 – 15 Nm.
We install the lower support on the upper support of the rack.
When installing the lower support, the direction of the arrow on it must coincide with the arrow on the upper support. On the left support to the right of the hole, on the right - to the left.
When installing the rack into the car body, the arrow on the support should be oriented in the direction of travel of the car.
We install the strut assembly with the steering knuckle, brake and ball pin into the car body, install the washers and tighten the three nuts securing the strut to the body mudguard. Nut tightening torque 20…24 Nm (2.0…2.4 kgf.m)
We insert the splined part of the outer drive joint into the wheel hub, put on the washer and tighten, without tightening, the new wheel hub nut.
We press the ball pin into the suspension arm and tighten the nut securing the ball pin. The tightening torque of the nut is 67…82 Nm (6.7…8.2 kgf.m).
We thread the front wheel speed sensor harness into the guide bracket of the front suspension strut, install the sensor in the sensor bracket and secure it with a bolt. The bolt tightening torque is 6…9 Nm (0.6…0.9 kgf.m).
Before installing the speed sensor, apply lubricant (LSTs-15 lubricant) to the surface of the mating hole.
We press the ball pin of the tie rod end into the swing arm of the front suspension strut and tighten the nut securing the ball pin. The tightening torque of the nut is 28…34 Nm (2.8…3.4 kgf.m).
We tighten the nut. If the cutout of the nut does not coincide with the hole in the ball pin, retighten the nut to an angle of no more than 60˚ to ensure cotter pinning.
Install the wheel and tighten it without tightening the front wheel mounting bolts.
We lower the car, tighten and lock the front wheel hub fastening nut, deforming the locking belt of the nut into the grooves of the shank of the outer drive joint housing. We install wheel caps. The tightening torque of the nut is 230 - 250 Nm (23 - 25 kgf.m).
Tighten the front wheel mounting bolts. The tightening torque of the bolts is 76 – 92 Nm. Install the engine splash guard.
Replacement of anti-roll bar elements Lada Kalina 1117 2004 - 2013
Tools:
- Straight box spanner 17 mm (2 pcs.)
- Driver for socket attachment
- Knob attachment 13 mm
- Soft metal drift
- Small flat screwdriver
- Knife
Parts and consumables:
- Soap
- Water
- Aerosol lubricant type WD-40
- Stabilizer bar cushions
We carry out the work on an inspection ditch or overpass. Removal of the right stabilizer bar link is shown. The left pillar is removed in the same way.
1. Using a 17mm spanner, unscrew the nut securing the stabilizer link to the front suspension arm, holding the bolt with a wrench of the same size.
2. Use a soft metal drift to knock out the bolt.
Soft metal knockouts.
3. To make it easier to remove the strut from the stabilizer bar, unscrew the two nuts securing the stabilizer pad bracket on the right side (as shown below). Lowering the right part of the stabilizer, remove the strut from the stabilizer bar.
Step-by-step instructions for replacing the resonator on a VAZ 2170
Priora with a leaky resonator
Replacing the Priora resonator by specialists is carried out quite quickly and without any particular difficulties. If we are talking about independent replacement, then you should familiarize yourself with certain step-by-step instructions, namely:
• it is necessary to unscrew the two nuts securing the muffler pipe clamp to the resonator pipe;
• remove the released clamp;
• disconnect the muffler pipe and the resonator pipe;
• remove the metal sealing ring;
• loosen the nuts securing the resonator pipe to the neutralizer;
It is worth noting that some Priora models do not have a neutralizer. In this case, the previous paragraph is replaced by the action of disconnecting the resonator pipe from the pipe that receives the liquid.
• lift the resonator;
• remove the suspension cushions from the bracket;
After the resonator is freed from all fasteners and connecting pipes, it is necessary to remove the car suspension cushions
Particular attention should be paid to the order in which the suspension cushions are removed. First of all, replacing the resonator on a Priora involves removing the rear airbag
The second is to remove the front airbag.
• finally unscrew the two nuts securing the resonator pipe to the neutralizer;
• remove the spring washers;
• remove the bolts;
If we are talking about the above-mentioned models without a neutralizer, then it is necessary to remove the bolts with springs.
• remove the resonator on the Priora.