I started the car in the evening, started it, and smelled something burning. The heater was turned on at first speed and when I started it, apparently all the energy was spent to start the engine, but the heater motor did not start. As a result, the heater heater resistor burned out. I turned on the 4th one, it works. And the stove fan works at 4 even without a resistor. Just don’t know why a turbo aircraft is needed at all)
The photo shows that the thermal fuse is located by bending it as close as possible to the heater resistor coil. If the resistor is heated to 117 degrees, its internal circuit melts and breaks. The same thing can happen when soldering a new one. But in fact, it burns out not from temperature, but from increasing current strength when the stove fan cannot move. When the fan cannot move, the load on this fuse increases to 17 amperes.
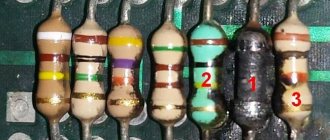
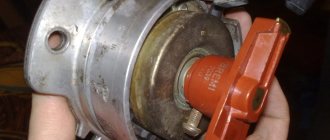
removed resistor In fact, the resistor itself rarely burns out; the shiny part soldered to pin 4, called a thermal fuse, burns out. Such fuses are still installed in irons and refrigerators. And since this is a fuse, it’s very easy to check whether the resistor itself is working; take any piece of wire and try to short it with a “bridge”. That's exactly what I did. I turned the heater on to first, shorted it out, it works at all speeds. If it works, then it's the fuse. We go to the radio parts store (“World of Electronics” SAMARA on Fizkulturnaya Street) and buy a new one for 15 amperes 117 degrees for 25 rubles. Solder in a new fuse. When soldering, do not overheat, overheating more than 117 degrees will cause the fuse to fail! You need to solder with a heat sink. Overheating will cause the part to become unusable. We put it in place under the glove compartment shelf. Voila, the stove works on all 4.
solder a new thermal fuse 15A 117*C How else can you stir it up, for example, if this crap burned out on the road? We take a large plastic 20A auto fuse, tear apart the body, cut off the thermal fuse from the resistor so that then, by bending the antennae, you can crimp the terminals. Just don’t turn it on immediately without pushing it into place under the glove compartment, it will melt without blowing. And it works with airflow.
quick option If you say that this is a collective farm option, then you can step it up like this, solder the mother terminals and insert a torn 20A fuse into the mother
option dad mom The option with soldering new fuses is the best. But they sell out quickly in electronics stores. I visited two stores. What do you think, where do the replaced resistors go in services? They sit and solder. Kalym!
Three main components of electric current
Electricity has become an integral part of our lives. It is used almost everywhere, including in vehicles.
This type of energy has three main components - voltage, current and resistance.
As for the last parameter, due to the possibility of creating additional resistance at any point in the electrical circuit, you can influence the first two parameters.
The main element for creating resistance is a resistor. This element is one of the most in demand, and not a single electrical circuit can do without it, and it will not be possible to replace it with anything else. And in any car there are plenty of electrical circuits.
Operating principle
The operating principle of all rheostats is similar. The slider rheostat has the simplest design and visually clear principle of operation. It is connected to the circuit through the lower and upper terminals. The design is made in such a way that the current does not pass across the turns, but through the entire length of the wire selected by the slider. This occurs due to reliable insulation between the conductors.
In most slider positions, only part of the rheostat is activated. In this case, changing the length of the conductor leads to regulation of the current strength in the circuit. To reduce wear on the turns, the slider has a sliding contact, often made of a graphite rod or wheel.
The rheostat has the ability to operate in potentiometer mode. To do this, when making a connection, you must use all three terminals. The bottom two are used as an entrance. They are connected to a voltage source. The top and one of the bottom terminals are output. When you move the slider, the voltage between them is adjusted.
In addition to the potentiometer, a ballast mode of operation of the rheostat is also possible, when it is necessary to create an active load for energy consumption. In this case, it is necessary to take into account what scattering abilities the device has. Excessive heat can damage the device, so it is recommended to connect the rheostat to the network, having previously calculated the power dissipation and, if necessary, ensure sufficient cooling.
Purpose
The main purpose of a resistor is to create resistance to be able to control and adjust the current and resistance. In fact, it is a kind of filter that allows you to obtain electricity with certain parameters at the output.
It provides all this by holding current, dividing and reducing voltage.
The main parameter of a resistor is the resistance it creates in the circuit, and it is measured in Ohms.
Resistors in the electrical circuit of a car.
It is precisely because of its function that this element is so often used in cars. Below we will look at some of the main components of a car, where a resistor is used and what specific function it performs there.
Design
One contact of the blower fan is connected directly to the negative terminal (also called "ground") of the battery, and the second contact is connected to the positive terminal of the battery through a resistor. The resistor is connected in series with the electric fan. This means that the current passing through the fan motor, and, accordingly, the speed of the latter is regulated using a resistor. Using the switch, the motorist sets the fan rotation speed he needs by including one or another resistor from the block in the circuit (each resistor has its own resistance). The control system also has two additional options - one of them turns off the fan altogether, and the second sets the maximum fan speed. When the fan is turned off, its motor is simply disconnected from power. When selecting the maximum rotation speed, electric current enters the electric fan motor directly from the battery, bypassing the resistor bank, which means maximum current. The lower the resistance of the resistor, the higher the current flowing into the fan motor, and the faster it rotates.
Cooling system
So, the load resistor is used in the car’s cooling system, or more precisely, in the radiator fan power circuit.
It is worth noting that previously this electrical element was not used in this circuit, and everything worked very simply - when a certain coolant temperature was reached, the temperature sensor closed the contacts of the fan power circuit, and it started working.
The use of a resistor made it possible to make the fan motor operate in two or even three modes.
The process of supplying power to the fan has changed somewhat. Relays have also been added to the system, and in modern cars the electronic control unit is already responsible for turning on the fan.
That is, the electronic unit analyzes the temperature readings of the sensor and sends a signal to the relay.
Depending on the temperature, the relay directs electricity through a specific circuit. If the coolant temperature is slightly exceeded, but it is already required to be reduced, and a signal from the ECU is received, the relay directs electricity through a load resistor, which creates resistance, and the fan begins to rotate at low speed.
If the temperature continues to rise and reaches a critical point, the relay will redirect the electricity through another circuit - bypassing the resistor, directly to the fan, which will ensure its operation at full power, with a high rotation speed.
This is a dual-mode fan operation circuit, which is ensured by the presence of a load resistor in the circuit. Moreover, it is simplified to make it more understandable.
In a car with three-mode fan operation, the principle remains the same, but it already uses two resistors - one is responsible for low fan speeds, the second for medium ones.
The third mode is emergency, in which the fan rotates at maximum speed, and is ensured by supplying power directly to it.
Repair and restoration of the stove damper
The deformed heater damper of the VAZ-2110 cannot be repaired; it only needs to be replaced. In this case, it is better to purchase a replacement metal part that is not so susceptible to temperature effects.
Whatever heater is installed on the VAZ-2110, to carry out repair work, the heater must be completely disassembled. In this case, the process of dismantling and disassembling depends on the design of the stove.
A positive aspect of the heater design on the VAZ - 2101 is its location - to get to it and the dampers you can from the engine compartment and you don’t have to remove the front panel.
Disassembling an old-style stove
For example, let's look at how to disassemble an old-style heater:
- Remove the terminal from the battery.
- We remove the windshield wipers, the seal, remove the air intake near the windshield (“jabot”) from the car, in the process you will need to disconnect the windshield washer nozzle tubes.
- We dismantle the insulation that separates the stove body from the engine compartment.
- We remove the gear motor.
- We divide the housing of the stove and air filter into two halves. To do this, unscrew the coupling bolts around the perimeter of the housings and remove the mounting brackets.
- Disconnect the fan power wires.
- Remove the outer half of the air filter and heater housing (along with the fan).
- We dismantle the inner part of the fan housing.
After this you will have access to the dampers. If you are only planning to repair or replace the heater dampers, there is no need to drain the antifreeze, since the heater radiator will remain in place and will not be removed.
Before removing the dampers, carefully inspect and remember their position and the way they are engaged. Further actions depend on the nature of the damage. Deformed damper parts cannot be repaired and only need to be replaced. As for damaged rods and levers, try to repair them or simply replace them. The damaged seal is replaced.
When assembling the stove, pay special attention to the engagement of the dampers. Do it as it was before disassembly, otherwise the dampers will not work correctly, which will affect the performance of the heater
Disassembly and repair of a new type heater
The new model stoves are disassembled differently:
- disconnect the battery terminal, drain the antifreeze;
- dismantle the frill and insulation;
- disconnect the power wires of the fan and micromotor gearbox;
- unscrew the fasteners that secure the stove body to the body;
- disconnect the coolant supply pipes to the heater radiator;
- We remove the heater from the car along with the filter housing.
Ignition system
The second element of the car where you can find a resistor is the spark plugs. But not all candles are equipped with it.
It began to appear in the design of these elements not so long ago, and its task is to suppress radio interference.
By the way, there is now a lot of debate about whether it is needed in candles. After all, the resistor creates resistance, which ultimately affects the spark. But the stronger the latter, the better the combustible mixture ignites.
But in fact, the presence of a resistor has a slight effect on the quality of the spark, but only positively on the spark plug. A very strong spark charge leads to the destruction of the electrodes, and the resistance reduces the spark voltage.
But this is not its main purpose. A powerful spark discharge creates quite strong interference in the radio frequency range, which can affect the operation of a car audio system, mobile phone and any other equipment that is sensitive to this type of interference.
Interestingly, it is not necessary to install spark plugs equipped with resistors on the car.
The fact is that in many models a noise-reducing element is installed in the tips of high-voltage wires. Also, some types of wires themselves have quite good resistance, which is enough to suppress radio interference.
The resistor can also be installed in the distributor slider, and it is found there on many models. Its task is the same as that of a spark plug or tip.
It is important to understand that resistors cannot be used simultaneously in all of the listed ignition elements.
When these elements are connected in series, all the resistance they create is summed up.
That is, if a resistor is installed in the distributor runner, tip, or spark plug, then they will create such a strong resistance that they will significantly weaken the spark charge, and it will no longer be able to properly ignite the mixture. And this will lead to interruptions in engine operation, loss of power, and increased fuel consumption.
Therefore, deciding whether to install spark plugs with a resistor on a car is necessary by carefully reading the technical documentation that comes with the car.
If the manufacturer indicates that the use of such candles is necessary, then it is better to use them.
How to install a new stove
VAZ 2110 (10th family)
The standard ten stove is noticeably inferior to the new type stove: both in power and in ease of use. The process of installing a new stove is described in detail below. The result is more advanced heating in every sense.
New sample stove
It has a radiator n/o installed accordingly
Modernization of the cooling system “Kalinovsky style”!!
Maybe the rest of you should skip this point.
But since the steam outlet seems out of place for us now, we take it out and install this one instead
The one that was in the stove was replaced by agreement with the new one
Then we stomp to disassemble the car, remove the toad, wipers, Shumka, and we get this picture
Next we need to remove the left half of the stove (if you look at it from the face), here it awaits us
In the form of a bolt twisted from the interior, three more such ambushes await us when removing the right half of the stove, numbered 1, 2 and 3
2
3
For those who want to preserve the old stove in its entirety, there are two options, both hemorrhoids:
1. Remove the panel and then calmly unscrew these bolts from the interior.
2. Use a screwdriver to bend the mustache of the mortgages
Since I didn’t bother with the integrity of the stove, I just broke it off, and as a result we get this look
Next, we’ll halve the new heater to insert it, insert it and try it on, we see that it needs fastening to the body where there isn’t one, we mark the place where the fastener should be
We take a drill, drill, insert the embed, the fastening is ready
These holes shouldn't exist
Since I was not ready for this, I had to get out of it using improvised means:
From the body of an old stove
And glue it here
We find material to plug the other two holes, plug them (adhesive tape on top just in case)
We install the stove, look at the wiring connections
The wiring to the engine comes in one block
The old one sits on ground at one end, the other (+) goes through the block to the automatic control system, the output was bitten off from the engine of the old stove and the terminals were soldered to the new one (it’s better to buy the block in advance)
Extend the short wires to the resistance block that regulates the speed of the rotator
On the old stove the fuse module was three-pin, and on the new one it was 4-pin.
Accordingly, there are only three wires
It is necessary to throw another wire into the cabin to the SAUO, but for the system to work correctly, you need to move the white-red end to a free place, and put a new one in its place, this can be done either in the SAUO block, or in the stove block, I changed it near the stove there better access
To conduct a wire you need the wire itself and two mothers
Insert into the block
We stomp into the cabin, remove the self-propelled guns
We take out the 6-pin block from it
We insert our wire into the free socket
Insert the block into the automatic control system
Who has an old self-propelled gun system to fix the glitch with the damper, you need to swap the red and brown wires on the 13-terminal block, pins 2 and 8 (view from the face of the connector)
and there is no need to run a fourth wire.
Thanks for the information Kachan
We connect and secure the stove
We connect the terminal blocks to the damper
We fasten the stove near the right wing with pre-purchased fasteners
I didn’t have this, I made a homemade one from it. cap fasteners 8ki
We fasten in other places, on top is the one we made a little earlier
And two more fastening points at the bottom, on the studs with which the Shumka is attached
Let's go check the operation of the engine, check the dampers and make sure everything is working.
Next we connect the pipes, install the frill, Shumka, wipers and fill in antifreeze
As a result of the replacement, the following were damaged:
- The old frill crumbled to dust when removed;
- Shumka mounting stud — unscrewed together with the nut almost effortlessly (replaced with a self-tapping screw);
- Well, the old stove itself - may it rest in peace!
It has become noticeably warmer in the cabin, all speeds of the turntable are working
Interior heating system
Another element in the design of a car where a resistor is used is the interior heating system, or more precisely, the control of the operation of the electric motor of the stove.
Every car uses a variable resistor to change the speed of the heater motor.
In it, using a rotating element, it is possible to change the resistance value.
When the electric motor is turned on to the 1st rotation speed, the resistor provides maximum resistance; when switching to the 2nd speed, it decreases, and when switching to the 3rd speed, it is almost completely removed.
Location of the heater resistor on VAZ 2110-2112
To replace a burnt-out resistor yourself, it is enough to know where the part is located, as well as to have a minimum set of tools on hand. Regardless of what year the car is, the location of the rheostat remains the same - in the engine compartment, near the heater fan. During a visual inspection, this resistance block cannot be seen, because it is hidden by a plastic cover (“frill”).
For an accurate understanding of where the part is located, here is a photo.
Lighting
Recently, resistors have begun to be used in conjunction with LED lamps. This type of lamps has increasingly begun to be used on cars.
But not all cars yet come from the factory equipped with LED lighting devices, but it is quite possible to buy them separately and install them instead of standard incandescent lamps for the same turn signals or brake lights, and many do so.
But here a problem arises that requires the use of resistors.
The fact is that the electricity consumption of these lamps is very small, which is why the electronic unit regards the operation of the LEDs as a malfunction of the standard lamp.
To correct the situation, resistors are used to create a load on the wiring lines that power those lighting fixtures in which LED lamps are installed.
As a result, the ECU perceives the resistance of the element as the work of an incandescent lamp, so no error code occurs.
It is interesting that when using such decoys, the main advantage of LED lamps - low energy consumption - is reduced to zero, and they have only one advantage over conventional incandescent lamps - a long service life.
Types of resistors, their features
Of the resistors described above that are used in the design of a car, two types can be noted - load, they are also constant and variable. In general, these are two main types that have fairly wide application in various fields.
Of course, there is a whole range of different resistors that differ in their design features. For example, thermistors, in which the resistance changes with temperature, or photoresistors, which change their parameters depending on the illumination. But we will not touch on them for now, but will consider only the two types indicated.
Fixed resistors are so called because the resistance they create is constant.
For example, if it is indicated that the main parameter of a given element is 30 Ohms, then it provides the resistance of exactly this value and it is impossible to change it.
In variable resistors, the resistance can be changed, manually. An example of this is the already mentioned control of the electric motor of the heating system.
Variable resistors also include trimmers.
In such resistors, you can also change the parameter manually, but its adjustment is not performed at any time, as is done in a variable one, but only when it is necessary to reconfigure the operation of the entire circuit in which it is included for a long period.
Trimmers are not used in vehicles, although they can often be found in household appliances.
Power dissipation
In addition to resistance, the resistor has another important parameter - power dissipation.
Any resistor acts as a kind of limiter and, due to its resistance, conducts only a certain voltage and current through itself. At the same time, the excess that it did not miss does not accumulate in itself, but converts it into thermal energy and dissipates it.
Therefore, resistors are designated by power dissipation.
The discrepancy between this element and its dissipation power will lead to its overheating and destruction. Power dissipation is measured in Watts.
The power dissipation can be determined both by the voltage passing through it and by the current strength.
As for voltage, the formula for calculation looks like this:
- P – power;
- U – voltage in the circuit;
- R is the resistance of the resistor.
To calculate the current strength, the formula looks like this:
- P – power;
- I is the current passing through the resistor;
- R – resistance.
An important condition when choosing a resistor for this parameter is that its power dissipation should be twice as large as that obtained in the calculations.
For example, we have a current of 0.1 A and a resistor resistance of 100 Ohms.
Based on the formula, we obtain a dissipation power of 1 Watt (0.1 2 * 100 = 1), but for normal operation of the element we select a resistor with a dissipation power of 2 Watt.
Note that all manufactured resistors have a strictly defined power dissipation value, which makes their selection easier.
In addition, you can even visually determine what power dissipation the resistor has. Everything is simple here, the larger the element, the higher the value.
Here we looked at resistors - one of the most common elements in any electrical circuit of a car. After all, they allow you to control the basic parameters of electrical energy by influencing just one of its characteristics.
Finally, we note that during calculations it is necessary to monitor the dimension of the parameters. That is, use only amperes, volts and ohms, and if it is indicated that the current is 20 mA, then you should convert this value into amperes, obtaining a value of 0.02 A for calculations.
Selecting a resistor by resistance
Most people, when an electrical appliance fails, send it in for repair or replace it, although in many cases it is the resistor that is to blame, especially since it is one of the most common elements in any circuit. But there are also those who undertake repairs on their own.
And often DIY repair enthusiasts have a question about how to choose the right resistor for a particular circuit.
To do this, let's take the simplest circuit, including a power source and one consumer.
Even at the beginning, it was indicated that electricity has three main characteristics - voltage, current and resistance. It is based on these parameters that all the necessary calculations are made using Ohm’s law.
According to this law, since we need to determine resistance, we should divide the voltage by the current.
For example, our power supply provides a 12 V circuit with a current of 0.02 A.
To determine the resistance, we carry out mathematical calculations - 12/0.02 and get a circuit resistance of 600 Ohms.
Now directly about how to calculate the resistance of a resistor for use in a particular circuit. For example, let's take a 12 V power source and a consumer (3.5 V incandescent lamp, 0.28 A).
First, the lamp resistance is calculated - 3.5/0.28 = 12.5 Ohms. Now we find out how much current will flow through the existing lamp - to do this, take the voltage of the power source and divide by the resistance: 12/12.5 = 0.96 A, which is 3.5 times the current required for the consumer to operate, and if you connect consumer, then the lamp filament will simply burn out.
To prevent burnout from occurring, a resistance in the circuit of 43.75 Ohms (12.5 * 3.5) is required. And since the lamp itself creates resistance, an additional 30 Ohm resistor must be connected to the circuit. During the calculations, we get - 12 V / 42.5 Ohm (lamp and resistor resistance) = 0.28 A.
That is, we received the current strength necessary for normal operation of the consumer. In this case, the element included in the circuit acted as a current limiter.
How to replace
The algorithm for replacing the heater resistor is as follows: 1. It is necessary to remove the negative terminal from the battery; 2. Remove the lining, then the windshield frame trim, remove the upholstery for sound insulation; 3. It is also better to remove the vacuum booster for ease of repair; 4. Disconnect the block with wires located on the resistor; 5. In order not to accidentally replace a device that is still in good working order (after all, the reason may not be in it), it is worth checking it with an ohmmeter, connecting it to the contacts one by one. If there are significant differences from normal readings, then it is necessary to change; 6. To remove a faulty heater resistor, simply unscrew the screw and remove the damaged part; 7. Install the new one in reverse order. Please also note that the block with wires can only be connected in one position.