September 14, 2016 Lada.Online 135 635 7
The car jerks, there is no traction, vibration is felt, or the engine is rough; all these are symptoms of improper operation of the individual ignition coil (IIC). Other signs of a faulty ignition coil are the presence of errors 0301, 0302, 0303 and 0304, indicating misfire in one of the cylinders. Let's look at a few simple ways to check the ignition coil with your own hands.
It is worth noting that the process of checking IKZ on modern Lada cars (XRAY, Vesta, Largus, Granta, Kalina and Priora) does not have significant differences. All actions are performed in the same way.
The procedure for removing and installing the ignition coil on a Lada Priora car with a 16-valve engine
Since the vast majority of cars are equipped with 16-valve engines, the whole process will be shown on this particular power unit.
So, first of all, open the hood of the car and disconnect the “-” terminal from the battery. Then unscrew the filler cap.
Also, disconnect the adsorber purge valve by bending its fastening clamp slightly to the side. This valve is located on the right rear side of the cover (in the direction of travel of the car).
Now you can remove the decorative engine cover, since nothing else holds it.
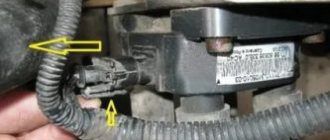
Using a ratchet socket, unscrew the bolt securing the coil we need, as shown in the photo below.
And then we remove this part from the spark plug well.
Since the coil sits quite tightly, you will have to apply at least medium force to remove it from there. And in order to completely release it, it is enough to disconnect the plug with the power wires, after first pressing the latch.
And disconnect it completely, as can be clearly seen in the photo below.
Now you can take a new, known-good ignition coil and install it in the reverse order. The price of a reel for Priora ranges from 900 to 2000 rubles, depending on the manufacturer.
Lada Priora has everything you need for ease of use of the car:
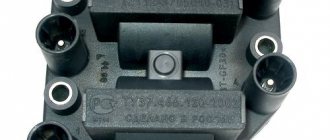
The ignition coil is the most important component of the car, and its failure will cause a huge amount of trouble. Mostly they will be associated with stopping and disturbances in the operation of the engine. The ignition coil is directly related to a unit called the “distributor”.
This is a distributor that receives low-voltage power from the vehicle's on-board network. The process of converting low-voltage into high-voltage power occurs. From the contacts of the distributor, the voltage is sent via a “slider” through a high-voltage wire to the spark plugs. The screwed-in spark plug of each cylinder supplies a spark to the combustion chamber of the fuel mixture, and ignition occurs. For ignition, current must be supplied to all spark plugs, only then will the engine start and the car begin to move. If not, the vehicle will not move.
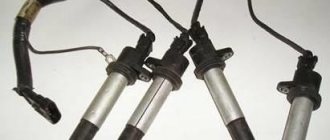
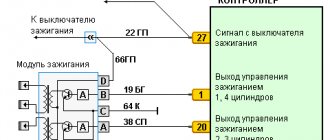
Sometimes the engine of a Lada Priora car starts to misfire, in other words, the engine does not perform its functions at full capacity. The reason for this behavior lies in the electric ignition coil. The ignition system of this car is unusual. Each spark plug has its own coil, therefore there are 4 of them. This means that the ignition can be slowed down four times more often than on other cars. Once one coil fails, the cylinder associated with it stops working. Individual ignition coils for any cylinder require no adjustment because they have no moving parts. In a Priora car, the ECU informs the driver about a malfunction and monitors the distribution and moment of spark formation. In the cylinders in which the compression strokes end, sparking occurs. Precise pulses are supplied to the ECU from the crankshaft and camshaft position sensors, after which the control unit detects the sequential firing of the ignition coils. The information transmitted to the system allows you to manage the entire process:
If you have problems with the coils, you need to seek help from a specialist. To check the ignition coil on a Priora you need a special tool - a multimeter.
HOW CAN YOU CHECK COILS
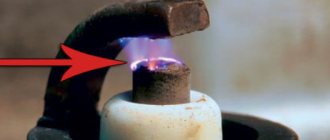
In any case, checking the ignition coil on a Priora always begins with its external inspection. Even very small cracks or tears in its elastic bands are not allowed. Their presence indicates that the device has been replaced. Cracks, chips and other damage to plastic parts indicate that the coil was overheated and it could simply “burn out”. Next, the internal parts are inspected, especially the spiral, its location. If the inspection does not reveal any visible defects, proceed to further inspection.
There are several ways to check the ignition coil, which will be discussed below. During the operation of the machine, it is not often, but there is a need to check it. Doing this when there are no obvious signs of failure is not easy without special equipment such as a spark gap or an oscilloscope. Let's look at how to check the ignition coil without instruments. To begin with, you can simply swap the devices and see how the engine behaves after that. If the interruptions move into the cylinder along with the coil, then there is a malfunction in it and it needs to be replaced.
You can check the high-voltage ignition coil directly on the car. To do this, you need to remove it from the engine, insert a working spark plug into the high-voltage terminal, turn off the fuel pump and, with the ignition on, crank the engine with the starter. A working coil will show itself as a spark on the spark plug . In this case, you must beware of high voltage and use protective equipment.
In cars that have an on-board computer installed, the system will report problems in the cylinders with a signal in the form of numbers from 0301 to 0304, where the last digit indicates the number of the “problem” cylinder. All that remains is to figure out who is to blame, the coil or the spark plug.
INSTRUMENTAL COIL CHECK
After visual inspection and control, you can begin checking using measuring instruments. It is best to use digital multimeters for these purposes, or devices such as MD-1 or AZ-1. They can be freely purchased, and their price is low. Now let's talk about how to check the ignition coil on a Priora using instruments.
Before checking, the device must be removed from the engine. This can be done this way:
- Disconnect the battery terminals;
- Remove the protective plastic casing from the engine;
- Squeeze the latch with your fingers and disconnect the connector with wires;
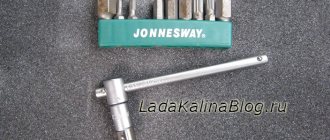
- Using a “10” wrench, unscrew the fastening bolt and remove the coil from the mounting socket.
We unscrew the coil with a key - it’s simple!
(naturally, the internal combustion engine has 16 valves, a coil of spark plugs in the well) Now you can start checking with instruments. First you need to check and calibrate the measuring device. To do this, set the measurement switch to the position for measuring resistance at “200 Ohms”, and connect the probes to each other. The readings should be close to “0”. These readings must be remembered or written down. They may be useful in the future. The device is calibrated, you can begin testing. Testing with a multimeter is carried out in the following order:
Determining a faulty ignition coil
An undeniable advantage of cars with an ECM is the possibility of computer diagnostics. But there are some tricks here too. The Priora ignition coil can have three types of malfunction.
- Winding circuit break.
- Winding short circuit.
- Mechanical damage to the tip.
And diagnostics clearly identifies only the first malfunction. In other cases, the computer indifferently reports that leaks have been detected in cylinder No. And here you need knowledge of the features of the Priora ignition system in order to determine the malfunction. The fact is that other breakdowns can also cause gaps. Such:
- Failure of the fuel injector.
- Inoperative spark plug.
- Loss of compression in the cylinder.
How to determine that the ignition coil is not working
This method is not new, but it is very effective and very simple. So, the alarm light came on, “Check.” But there are no diagnostics at hand. What to do? The procedure is as follows:
- Open the hood of the Priora.
- Remove the decorative plastic motor cover.
- Start the engine at idle.
- Remove the connector from the coil of the first cylinder. If this “boiler” is working, then its forced shutdown will cause the motor to work completely inadequately. The vibration will increase significantly, and noticeable interruptions will appear.
- If everything is in order in this cylinder, then the chip is put in place, and you need to move on to the next one. So, all the “boilers” in turn.
- But if the cylinder does not work, then removing the connector will not change anything. The level of work will remain the same, which means it’s all here. Now let’s clarify the degree of fault of the Priora ignition coil.
This is done as follows. The engine must be turned off. Take a 10mm head and a wrench. The spark generator mounting bolt is removed from the suspicious cylinder. Exactly the same from the neighboring one. Then they simply change places. They are fixed and the engine starts again.
Attention! If the signs of a malfunction, that is, the absence of a change in the cleanliness of the engine when turned off, have moved along with the ignition coil to another cylinder, then that’s it, it’s definitely the sparking module. This means that it needs to be changed, and that’s the end of it.
But if all the signs remain in place, then the coil is working properly, and other components need to be checked. But that's a completely different story.
Important! Trying to repair a faulty module is not worth even trying. This is impossible in conditions of even the best-provided service.
It can only be replaced. There are many videos and articles on the Internet about a certain possibility of repairing ignition coils for the ECM. It's really not worth the risk. As a result, you can burn your “brains.”
ABOUT SIGNS OF COIL MALFUNCTION
When the ignition coil on a Priora fails, it immediately lets the driver know about its “illness”. This will be evidenced by the following manifestations:
- The operation of the engine is disrupted, it vibrates, traction decreases, drivers say that the engine is “troubling”;
- The car jerks when accelerating or when driving in low gears;
- There are cracks or breaks in the insulation.
The first point may also indicate non-functioning spark plugs.
LADA 2170 Instrument panel diagram
1, 2, 3, – instrument panel harness connectors to the front harness 4 – instrument panel harness connector to the rear harness 5 – contacts of the mounting block connector 6 – brake light switch 7 – instrument cluster 8 – lighting control module 9 – driver airbag module 10 – sound signal switch 11 – diagnostic block 12 – on-board computer mode switch 13 – ignition switch 14, 15 – blocks to the electric amplifier control unit 16 – electrical package controller 17 – light alarm switch 18 – windshield wiper switch 19 – air flow distribution gearmotor 20 – block heater control 21 – heater electric motor switch 22 – rear window heating switch 23 – clock 24, 25 – instrument panel harness connectors to the radio 26 – hazard warning switch 27 – glove compartment lighting switch 28 – glove compartment lighting switch 29 – instrument panel harness connector to ignition system harness 30 – airbag system control unit
Rear door harnesses
The electrical wiring for the rear right and left doors is identical, using only two terminals. The rear door wiring harnesses are factory marked 2170-3724550-10.
| 1 | Block for connection to the rear wiring harness |
| 2 | Rear door lock motor |
Ignition system
An experienced car enthusiast who is faced with an engine running on three cylinders immediately begins to diagnose the spark plugs. The Lada Priora must cool well, otherwise there is a risk of getting burned when unscrewing it. If after a few seconds you turn off the ignition and check the spark plugs, one of them will be wet with gasoline. It is also recommended to separately check each part for the presence of a spark.
In the event of a malfunction, the problem is solved. Sometimes it is enough to press down the potentially faulty one with a cap - the machine will resume normal operation. In general, the ignition system in this car is the most problematic part. If the Priora engine (16 valves) is malfunctioning, you can look for the reasons for a very long time, and diagnostics will not yield anything, even if it is done correctly. And only by replacing all elements can a positive result be achieved.
Visual inspection of the IKZ
Remove the ignition coils from the engine using a 10mm or Torx E8 socket wrench (depending on the powertrain model). Carefully inspect the removed coils. There should be no cracks, damage to the rubber cap, melting or leakage of plastic. The spring located inside the coil must be in the correct position.
Assignment of contacts of the instrument cluster block
1 To the electric power steering 2 To the hazard warning lamp 3 To the emergency oil pressure sensor 4 To the parking brake switch 5 To the immobilizer control unit 6 To the airbag control unit 7 To the exterior lighting switch 8 To the turn signal switch (starboard side) 9 To the indicator switch turn (left side) 10 To the fuel injection system control unit 11 To the front passenger airbag deactivation sensor 12 To the seat belt sensor not fastened 13 To the control unit of the electronic brake force distributor 14 To the “RESET” button on the steering column switch (-) 15 To the level sensor brake fluid 16 To the anti-lock brake system control sensor 17 To the headlight high beam switch 18 To the instrument cluster lighting switch 19 Housing 20 To terminal “30” of the battery 21 To terminal “15” of the ignition switch 22 To the fuel consumption sensor 23 To the function switching mode key trip computer in a ring forward and changing the minutes (-) 24 To the mode key for switching the functions of the trip computer in a ring back and setting the clock (-) 25 To the outside temperature sensor (-) 26 To the outside temperature sensor (+) 27 To the fuel level sensor 28 To speed sensor 29 To coolant temperature sensor 30 Low-voltage tachometer input 31 Diagnostics during production of instrument cluster 32 To terminal “L” of generator relay regulator
Removing and installing a coil on a Priora
The device in a Priora car may fail if damaged from the inside, resulting in “piercing” into the body. If the ignition coil is working properly, a spark should always jump between the electrodes of the spark plug. If this is not the case, you need to check the power supply and coil control circuits.
Part replacement in progress
All actions are carried out using a socket head at “10”. Disconnect the negative battery, press out the plastic fastener, disconnect the wiring harness block from the coil terminal, unscrew the bolt securing it to the cylinder head cover, and remove the coil from the spark plug block. When carrying out repair work, you need to remember that the Priora is equipped with a microprocessor-based high-energy ignition coil (HEC). High voltage ignition wires produce a voltage of 40 thousand volts. Anyone testing a coil needs to be extremely careful as there is a risk of electric shock. When performing an inspection, wearing rubber gloves will save you from possible negative consequences. You can use pliers with insulated handles.
Spark plugs need to be changed every 30 thousand kilometers. The manufacturer recommends a certain type of spark plug for the Lada Priora, but you can use any with a suitable combustion heat. The diameter of the part is 14 millimeters. After turning the candles out, the wells where they are located are thoroughly cleaned. This procedure is necessary to ensure that no dirt gets in after removing the parts. In preparation for winter, before installing spark plugs, you need to check the gap between the side and central electrodes. If the gap does not correspond to the values of 0.7-0.9 millimeters, adjustment must be made.
Despite the huge amount of criticism against the Lada Priora, this is one of the most popular cars that have come out of the AvtoVAZ assembly line in recent years. The Priora is equipped with a fairly successful engine with good dynamics, and the interior is very comfortable. And the maximum trim levels offer useful options. But at the same time, from time to time the car brings minor problems to its owners. One of the most popular malfunctions is that the Priora engine (16 valves) is tripping. The reasons for this phenomenon are quite unpleasant. And besides, the motor eventually overheats.
When the driver starts his car in the morning, the engine does not run smoothly as before, but intermittently. At this time, dull sounds are heard from the exhaust pipe. At the same time, a persistent and strong smell of unburned fuel is felt. Vibrations are constantly increasing, and this is fraught with cracks in the pillows. So
Connecting and replacing VAZ short circuit
The procedure for removing and installing the ignition coil on old VAZ models:
- First, disconnect the central high-voltage wire leading to the distributor (ignition distributor).
- Disconnect all power wires from the coil contacts. Since they are fastened with nuts, you will need an 8 wrench for this.
- If you don’t know which wires to connect to which connector later, it’s better to immediately remember or mark them somehow, so that later during installation you can connect them correctly.
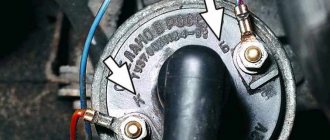
- Unscrew the coil housing. It is attached to a clamp (clamp), which is pressed to the car body with two nuts.
- After the work has been done, you can remove the ignition coil and replace it if necessary.
Electrical diagram of the LADA PRIORA car
For all owners of the domestic passenger car Lada Priora, as well as for service auto electricians who repair cars, we offer high-quality color electrical diagrams for your reference, indicating all fuses, relays, fans and other modules. The Lada Priora has a 1.6 liter 16 valve engine, an anti-lock brake system (ABS), and air conditioning. The material is intended for electrical equipment specialists and employees of enterprises involved in the maintenance and repair of automobiles, and can be used in training service station personnel.
Summary
So, we looked at why the car is tripping. These are not all possible reasons, but they help to accurately diagnose the operation of the motor and find the malfunction.
The ignition system is the weak point of the Priora, and not only it. The ignition coils in a Priora car are individual, one per cylinder, that is, 4 in total. It happens that one of them stops working, and along with it one of the cylinders falls out of the working rhythm.
This is accompanied by vibration and strange sounds under the hood. Experienced car enthusiasts in such situations understand that the car is tripping.
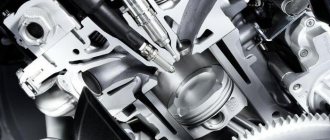
What is the coil for? To ignite the air-fuel mixture in the cylinder, you need a high voltage current, but in a car battery it is low voltage. Thus, the ignition coil is something like a transformer, generating a current with high voltage. Its primary winding consists of only 150 turns, and in the secondary their number is much larger, which allows it to generate pulses using the spark plug as a spark gap.
To make the magnetic field as strong as possible, an iron core is located inside the coil.
The main characteristic of a coil is the resistance value of its windings, which is taken into account when diagnosing ignition. Failure of such an important component threatens to completely stop the engine, not to mention interruptions in operation
DEVICE AND PRINCIPLE OF OPERATION
It is probably clear to all drivers that the main purpose of the high-voltage coil on a car was and remains one thing: to set fire to the air-fuel mixture. To do this, it generates high voltage, the value of which is about 40 thousand volts.
It is a transformer that increases the low voltage of the battery to high. The transformer consists of two windings, one of them is primary and the other will be secondary, which are wound with copper wire on an iron core.
The primary winding is wound on the core, and the “secondary” is wound on top of it. The entire structure is covered with a casing. If the low-voltage winding has only about 150 turns, then the “secondary” already has several thousand.
There are no high-voltage wires, since it is placed directly on the spark plug. When, at the right moment, an impulse is sent from the engine control unit to the “primary” of the coil, a magnetic field is excited around the core, which contributes to the appearance of high voltage in the “secondary”. In this case, the spark plug plays the role of a spark gap that ignites the working mixture in the engine cylinders. The coil has a protective shell, and inside it is additionally installed a spring and a diode, which is designed to quickly cut off high-voltage pulses.
List of elements of the electrical connection diagram of the rear wiring harness of LADA PRIORA
1 – rear wiring harness block to the instrument panel wiring harness block; 2 – rear wiring harness block to additional wiring harness block 2 (left rear door); 3 – rear wiring harness block to side door wiring harness block (right front door); 4 – left side direction indicator; 5 – electrical package controller; 6 – right side direction indicator; 7 – interior lighting unit; 8 – handbrake warning lamp switch; 9 – left lamp; 10 – right lamp; 11 – interior air temperature sensor; 12 – interior lamp switch in the driver’s door pillar; 13 – switch for the interior lighting in the pillar of the right front door; 14 – switch for the interior lighting in the pillar of the right rear door; 15 – interior light switch in the left rear door pillar; 16 – block of the rear wiring harness to the block of the wiring harness of the side doors 2 (left front door); 17 – block of the rear wiring harness to the block of the additional wiring harness (right rear door); 18 – blocks of the rear wiring harness to the rear right loudspeaker; 19 – blocks of the rear wiring harness to the rear left loudspeaker; 20 – cigarette lighter; 21 – electric fuel pump module; 22, 23 – rear wiring harness blocks to instrument panel wiring harness blocks 2,3; 24 – trunk lighting; 25 – additional brake signal; 26 – trunk lock drive switch; 27 – interior lamp; 28 – rear wiring harness block to the front wiring harness block; 29 – left rear speed sensor; 30 – right rear speed sensor; 31 – sensor for automatic glass cleaning system (rain sensor); 32 – rain sensor sensitivity regulator; 33 – rear wiring harness block to instrument panel wiring harness block 4; 34 – block of the rear wiring harness to the block of the wiring harness of the parking system sensors; 35 – alarm unit for safe parking system; 36 – driver’s seat belt pretensioner; 37 – passenger seat belt pretensioner; 38 – rear wiring harness block to side door wiring harness block 3 (right front door); 39 – airbag control unit; 40 – parking system control unit; 41 – block of the rear wiring harness to the block of the rear additional wiring harness (tailgate); 42 – rear wiring harness block to rear additional wiring harness block 2 (tailgate); 43 – left seat heater; 44 – switch for electric seat heaters; 45 – right seat heater. 46 – rear wiring harness block to the parking system switch.
Pinout for left front door
Most modern vehicles are equipped with a variety of driver comfort systems, one of which is the driver's door module.
The function of the button block located on the driver's door is to control the front windows and exterior mirrors, as well as the automatic locking of the car doors. The installed auxiliary left rear wiring harness (part number 21703-724551-90) comes complete with contact carriers made of electrically conductive materials.
| Contact no. | Decoding |
| 1 | Connector for the additional rear left harness to the rear harness |
| 2 | Rear left harness connector to front left speaker |
| 3 | Electric window lift |
| 4 | Armrest control module |
| 5 | Electric drive for locking the left front door |
| 6 | Left outer rear view mirror control chip |
Checking the performance of the coil
A multitester is a device that combines a voltmeter, ammeter and ohmmeter.
Before connecting the device to the coil, its internal resistance must be checked to take into account possible errors. Then we connect the tester to the primary winding
If the device shows no more than 0.5 Ohm, taking into account the measurement error, then everything is fine with this coil. I mean, with its primary winding. But there is also a secondary one. How can I check it?
You need to remove the coil from its place by disconnecting the negative terminal of the Priora battery. Decorative plastic is removed from the motor. Then you need to press out the plastic clamp and disconnect the coil from the wiring, after which the fastening bolt is unscrewed with a 10mm wrench and the device is removed from the spark plug well.
Problems with coils can lead to sudden jerks in engine operation, speed surges, and cylinder failures.
Therefore, if you have such symptoms, it is better to use the above information and replace the suspicious part before it completely fails. It also happens that the coil has not yet broken, but is already malfunctioning. This does not necessarily mean that a replacement is needed; some repairs will do, or rather cleaning of water condensation and dirt.
Sometimes coils fail when the spark plug gap is incorrect. Checking the performance of the coil on a Priora car can be easily done by turning the crankshaft. To do this, you need to relieve the pressure in the fuel system and remove the fuel pump fuse. Then we remove the coil, insert a spark plug into its rubber tip, and connect the wires to the coil itself.
You can check the coil power circuit. You need to take the multitester mentioned above and connect its probes to its terminals. If you turn on the ignition at this moment, the tester should show a voltage equal to that at the battery terminals. Otherwise, it is necessary to check the circuits for opens and shorts. If the power and control circuits are working properly, but when checking there is no spark on the working spark plug inserted into the tip, then the coil is faulty and will have to be replaced.
Trouble the engine: why is it dangerous?
This is a rather critical phenomenon, especially if the unit begins to vibrate during acceleration.
This behavior of the engine is especially dangerous when the driver decides to overtake, but there are cars in the oncoming lane. In the process, while the motor is running, the engine power is significantly reduced. The compression ratio decreases - there may not be enough dynamics to successfully complete the maneuver.
Considering that the Lada Priora has been manufactured since 2007, there are often instances where the engine knocks like on an old car 20 years ago. This is an engine running on three cylinders. It may have the latest firmware, but if the Lada Priora has a bad engine, then such a car will not have much life left.
Lada Priora fuse box under the instrument panel
F1 25 Electric radiator fan of the cooling system F2 25 Heated rear window Priors F3 10 High beam right F4 10 High beam left F5 10 Sound signal F6 7.5 Low beam (left) F7 7.5 Low beam (right) F8 10 Alarm signal F9 25 Heater Priors F10) 7.5 Interior lighting, instrument cluster, brake light F11 20 Windshield wiper F12 10 Terminal 15 devices F13 15 Cigarette lighter F14 5 Left side light, license plate light, trunk light F15 5 Right side light F16 10 Terminal 15 ABS F17 10 Fog light (PTF) left F18 10 Fog light (PTF) right F19 15 Heated seats F31 or F27 30 Electrical package control unit
Rear license plate light pinout
According to traffic regulations, the state license plate illumination must always be in working order. For lighting, W5W incandescent lamps are connected, each with a power of 5 W.
The small wiring harness for the rear license plate light (harness serial number 2170-3724214) consists of wires with cream ends and is located in the luggage compartment. The operation of the entire lighting system depends on its quality. The harness responsible for the rear license plate illumination has 3 terminals:
| № | Decoding |
| 1 | Supplying voltage to the lights illuminating the rear number |
| 2,3 | License plate lamps |
| 4 | Electric tailgate lock motor |