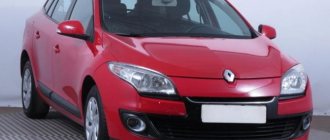
Skoda Rapid
— five-door liftback, belongs to golf class cars. Produced since 2013. In Russia and the CIS countries, official deliveries were carried out in 2014, 2015, 2016, 2022, 2022, 2019, 2022, 2022 and to the present. Rapid is sold with both gasoline and diesel engines. In our material we will present a description of the fuses and relays of the Skoda Rapid. We will show you the places where the blocks with fuses and relays are located, their photographs and diagrams with decoding of the elements. Let's highlight the fuse responsible for the cigarette lighter and windshield washer.
The purpose of the fuses and their number depends on the year of manufacture and the level of electrical equipment of the Skoda Rapid. In case of difficulty, please contact your nearest dealer.
Base-ex
Attention!
The purpose of the fuses listed below may differ from yours, it all depends on the year of manufacture of the car. Location of fuses in the vehicle interior The fuse box is located on the left under the instrument panel.
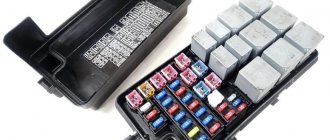
Fuse box diagram for a left/right hand drive car.
Explanation:
| № | Consumer |
| 1 | Contact S |
| 2 | START/STOP system |
| 3 | Instrument cluster, headlight range control, telephone, oil level sensor |
| 4 | AB5/ESC control unit |
| 5 | Petrol engine: cruise control |
| 6 | Reversing light (manual gearbox) |
| 7 | Ignition, engine control unit, automatic transmission |
| 8 | Brake pedal limit switch, clutch pedal switch, radiator fan |
| 9 | Heater control, air conditioning control unit, parking aid, power windows, radiator fan, washer nozzles |
| 10 | DC/DC converter |
| 11 | Adjusting the mirrors |
| 12 | Trailer recognition control unit |
| 13 | Automatic transmission control unit, automatic transmission selector |
| 14 | Headlights corrector |
| 15 | •not used |
| 16 | Power steering, speed sensor, engine control unit |
| 17 | Head unit (Start-Stop), daytime lighting mode |
| 18 | Heated mirrors |
| 19 | Egnition lock |
| 20 | Engine control unit, fuel pump control unit, fuel pump |
| 21 | Reversing light (automatic transmission), fog lights with CORNER function |
| 22 | Heater control, air conditioning control unit, telephone, instrument cluster, steering angle sensor, multifunction steering wheel, ignition key removal lock |
| 23 | Interior, glove box and luggage compartment lighting, side lights |
| 24 | Central control unit |
| 25 | not used |
| 26 | Rear window wiper |
| 27 | not used |
| 28 | Petrol engine: canister solenoid valve, electric auxiliary heater RTS |
| 29 | Injection, cooling pump |
| 30 | Fuel pump, ignition, cruise control |
| 31 | Lambda probe |
| 32 | Injection pump, pressure valve |
| 33 | Engine control unit |
| 34 | Engine control unit, vacuum pump |
| 35 | Switch illumination, license plate lighting, parking lights, headlight cleaning system |
| 36 | High beam |
| 37 | Rear fog lamp, DC/DC converter |
| 38 | fog lights |
| 39 | Heater fan |
| 40 | not used |
| 41 | Heated front seats |
| 42 | Heated rear window |
| 43 | Sound signal |
| 44 | Windshield wiper |
| 45 | Tailgate lock, central locking |
| 46 | Alert |
| 47 | Skoda Rapid cigarette lighter fuse, socket in the luggage compartment |
| 48 | A8S |
| 49 | Direction indicators, brake lights |
| 50 | DC/DC converter, head unit |
| 51 | Power windows (driver's door, rear left door) |
| 52 | Power windows (front passenger door, rear right door) |
| 53 | Washer |
| 54 | Start-stop system instrument cluster, steering column switch unit, multifunction steering wheel |
| 55 | control unit automatic transmission |
| 56 | headlight washer |
| 57 | Low beam left headlight |
| 58 | Low beam right |
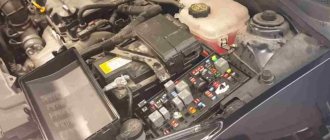
Fuse box under the hood.
To access the fuses, simultaneously press the cover lock buttons in the direction of the arrow: 1 Slide the cover in the direction of arrow 2 . Using a flat-head screwdriver, unlock the fasteners in the holes 3. Open the lid in the direction of the arrow up
Layout of block elements. Option 1/Option 2.
Explanation:
| № | Consumer |
| 1 | Generator |
| 2 | not used |
| 3 | Interior (option 1) Power supply to fuse box (option 2] |
| 4 | Additional electric heater (option 1) Interior (option 2) |
| 5 | Salon |
| 6 | Radiator fan, pre-glow system control unit |
| 7 | Electro-hydraulic power steering |
| 8 | ABS |
| 9 | Radiator fan |
| 10 | Automatic transmission |
| 11 | ABS |
| 12 | Central control unit |
| 13 | Additional electric heater |
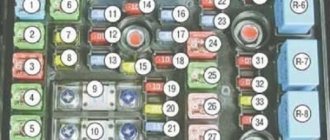
Explanation of fuses for models produced after 2021. Fuse box in the cabin...left/right hand drive
Explanation:
| № | Purpose |
| 1 | Light from the left |
| 2 | central locking |
| 3 | Ignition system relay |
| 4 | Light on the right |
| 5 | Driver's door power window |
| 6 | Central control unit - interior lighting |
| 7 | Sound signal |
| 8 | Towbar - left light |
| 9 | Steering column lever, engine control unit (only vehicles without KES5Y), automatic transmission (only vehicles without KESSY), automatic transmission selector lever (only vehicles without KESSY), ESC (only vehicles without KESSY), trailer hitch (only vehicles without KESSY), power steering (only vehicles without KESSY) |
| 10 | Rear left door power window |
| 11 | headlight washer |
| 12 | Head unit display, navigation system |
| 13 | Taxi equipment |
| 14 | Steering column lever, light switch, ignition key removal lock (vehicles with automatic transmission), light signal, SmartGate system, rain sensor |
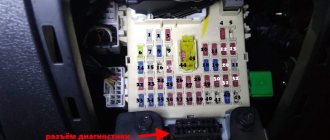
| 15 | Air conditioning, automatic transmission selector lever, diagnostic connector |
| 16 | Instrument cluster |
| 17 | Security alarm, sound signal |
| 18 | Not used |
| 19 | Not used |
| 20 | Not used |
| 21 | Not used |
| 22 | Windshield and rear window washer |
| 23 | Heated front seats |
| 24 | Air conditioning fan, heater, air conditioning, heater |
| 25 | Not used |
| 26 | Front seat heating button |
| 27 | Rear window wiper. |
| 28 | Not used |
| 29 | Airbag |
| 30 | Power windows, light switch, reverse light switch, air conditioning, parking assist, outside rearview mirrors, center keypad power, side keypad power, interior rearview mirror |
| 31 | Fuel pump, radiator fan, cruise control, windshield and rear window washer relay coil |
| 32 | Diagnostic connector, headlight range control, steering column switch, interior lighting |
| 33 | Starter Relay Coil, Clutch Pedal Switch |
| 34 | Heated windshield washer nozzles |
| 35 | Not used |
| 36 | Not used |
| 37 | Radar |
| 38 | Not used |
| 39 | Additional electric heater |
| 40 | Not used |
| 41 | Heated rear window |
| 42 | Power window, front passenger door |
| 43 | Towbar - contact in socket |
| 44 | Cigarette lighter, 12 V socket |
| 45 | Rear right door power window |
| 46 | Front and rear window washer, steering column lever |
| 47 | Towbar - contact in socket |
| 48 | Towbar - right light |
| 49 | Fuel pump |
| 50 | Head device |
| 51 | Heated exterior mirrors |
| 52 | KESSY |
| 53 | Steering column lock (KESSY) |
| 54 | ABS or ESC |
| 55 | Not used |
| 56 | Not used |
| 57 | Not used |
| 58 | Not used |
| 59 | Not used |
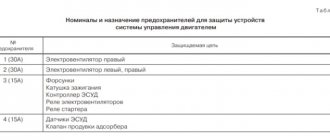
Fuse box in the engine compartment of Skoda Rapid (cars after 2022). Location.
Layout of fuses in the block.
Explanation:
| № | Description |
| 1 | Radiator fan |
| 2 | Pre-glow system |
| 3 | ABS or ESC |
| 4 | Electric auxiliary heater - circuit 2 |
| 5 | Electric auxiliary heater - circuit 3 |
| 6 | Automatic transmission |
| 7 | Engine control unit |
| 8 | Windshield wiper |
| 9 | Central control unit, battery monitoring module |
| 10 | ABS or ESC |
| 11 | Not used |
| 12 | Engine components |
| 13 | Brake pedal limit switch |
| 14 | Engine components, fuel pump relay coil, radiator fan, coolant pump |
| 15 | Engine control unit |
| 16 | Starter |
| 17 | Engine control unit |
| 18 | Engine components, electric auxiliary heater relay coils |
| 19 | Lambda probe |
| 20 | Pre-heating system, crankcase exhaust ventilation heating |
Block under the hood
Option 1. Models before 2015.
In the engine compartment, this block is located on the positive terminal of the battery and consists of 2 sections (fuse section and high power fuse section.) Depending on the engine version, the 1st block can be located either to the left or to the right of the battery.
Scheme
Purpose
| 1 | 175A Generator |
| 2 | 80A not used |
| 3 | 60A Salon (option 1), Power supply to fuse box (option 2] |
| 4 | 40A Additional electric heater (option 1) Interior (option 2) |
| 5 | Salon |
| 6 | Radiator fan, pre-glow system control unit |
| 7 | Electro-hydraulic power steering |
| 8 | 30A ABS |
| 9 | Radiator fan |
| 10 | Automatic transmission |
| 11 | 5A ABS |
| 12 | 40A Central control unit |
| 13 | Additional electric heater |
Cigarette lighter modification
Some drivers upgrade the device by installing an additional connector. To do this you will need to acquire a tool.
- Drill or screwdriver with a set of metal drills.
- A crown for cutting a hole, the diameter should match the diameter of the car cigarette lighter.
- File.
- Soldering iron with solder.
- Wire cutters.
- Screwdrivers.
- Multitester.
- Heat-shrink tubing.
- Wire of suitable cross-section. You should take extra cables to avoid the possibility of melting. The optimal cross-section would be 1.5-2 mm.
- A fuse that can withstand the amperage recommended by the vehicle cigarette lighter manufacturer.
Next, we proceed to installing the additional device ourselves.
- We turn off the power to the car and select a place to connect an additional car cigarette lighter. It is advisable that it be a flat panel - the device will not stick to corrugated or curved surfaces.
- We drill a hole of a suitable diameter and clean the edges with a file.
- We connect to the wiring by following the pinout and passing through the fuse.
- We check the functionality of the model and carry out assembly.
Replacement procedure
If the cigarette lighter does not work because the cartridge spiral has burned out or the socket is badly damaged, the best action is to replace the device with a new one or a used one from another Skoda car of the same modification.
When performing this operation, it is better not to deviate from the rules developed by experienced mechanics or experienced users.
- You need to disconnect the wire from the negative terminal of the battery by loosening its mounting bolt.
- Remove the cartridge and then the device socket. To do this, you will have to thread the connectors with the supply wires to it and to the backlight lamp through the facing partition of the tunnel in the floor.
- To remove the cigarette lighter itself, you need to squeeze the shielding rim of the backlight lamp so much that its legs easily slide out of the LED mounts.
- The latch of the connector itself must be pressed with a screwdriver to disconnect the LED. After this, the cigarette lighter socket itself can be easily pushed out.
- After this, the connector with the supply wires is easily removed from the resulting hole.
- Connecting and installing a new socket should be done in the reverse order. The protrusion on the LED must fit into a special slot on the cladding body.
After replacement, you need to check whether the new one works. This can easily be done by calculating the response time of the device - it should be 20 seconds. Only a small deviation from this parameter is allowed in normal operation.
If you liked the video, please click the "Like" button and subscribe to our channel and of course share this video, we really appreciate your help.
If the charger is not compatible with the cigarette lighter socket
Older cars often have long lighters that are not compatible with the car's electronics.
There is a simple solution without buying a new cigarette lighter.
Social network: Group Group VK / ☆ Instagram / ☆
Playlists: Trekking Reviews tourist tactical home
Why does the VAZ 21214 fuse blow out?
Niva 2121 Replacing the fuse box
Replacing protective covers on a VAZ 2121 Color scheme
Simple and honest 7% return when purchasing on Aliexpress and other sites.
See also: Simple pipe bender. wood processing. sandblasting. and my other videos.
Replacing a regular cigarette lighter with a Euro one) without experience or tools. Part 1
How to replace a lighter on a vase 2106. Garage everyday life.
How to change (remove) the cigarette lighter from the panel on a VAZ 2106. Lighter on a VAZ 2101-06.
Links to the GTRussia affiliate program:
Subscribe to my video channel:
On the theme of the railway.
Car repair and maintenance:
Garage and garage equipment:
Videos on various topics:
Removing the 4x4 tunnel
How to install window deflectors on NIVU 21213
Fuses for marking VAZ 2106
Replacing the cigarette lighter VAZ 2114
How to remove traction, steering wheel without washing and with washing.
Circuit Tester. allows you to quickly call up the wiring in your car and identify the problem area.
Windshield projector. A very useful device for traveling around the city and on the highway. Creates the settings you need on the windshield. He will show you. speed, time, weather and navigator maps.
Sun visor organizer. This is a place to store various plastic cards and documents. There is a slot for pens and glasses. Attaches to any visor using elastic bands. Fast, easy, convenient, cheap.
Metal SUV on console. offers more for less money.
Gift Stirling engine. it is an "external combustion engine" in a beautiful shell: a gas burner is mounted on the outside, which makes the piston move when the string is pulled.
IMAX Universal Charger. This is a device that allows you to charge, discharge and recharge any battery.
Tablets for cleaning glasses. To avoid flying on the puck in the summer, you can buy these tablets. They dissolve in plain water and allow you to quickly and effectively remove any dirt from car windows.
USB charging in cigarette lighter:
Humidifier for car air freshener! Has 2 functions: moisturizing, cleansing and aromatherapy. It provides relief from dry air, colds, flu, chapped winter skin and cold weather. The humidifier operates from a regular cigarette lighter.
Illuminated ignition switch. Suitable for any car and more popular among LED tuning enthusiasts. It is mainly used to illuminate the ignition switch and decorate your interior.
Voltage converter 12-220V. If you want to use a laptop or other device that consumes 220 volts, then this device will definitely come in handy. The car inverter converts standard voltage from 12 volts to 220. The converter has 4 ports for connecting your gadgets.
Replacing fuses inside the Skoda Rapid interior: briefly about the main thing
To replace a blown fuse inside the car, you will need 10 minutes of free time, and all you need to do is take a slotted screwdriver and pliers. To change the device you need to:
- Turn off the power to the vehicle by disconnecting the ground terminal from the battery;
- Next, open the fuse box - in the cabin the block is located on the left side under the steering wheel. To remove the plastic panel, you need to pry the casing towards yourself and pull it along the path indicated by the arrow on the plastic. If the panel cannot be pulled out, you need to pry the latches with the tip of a slotted screwdriver, and then repeat the dismantling procedure;
- To replace the corresponding fuse, it is recommended to use the diagram from their vehicle’s technical book - otherwise, the entire block panel will have to be tested with a multimeter;
- If the search result is successful, we disconnect the consumer devices connected to a specific product from the fuse box.
There may be several consumer devices per fuse, or several fuses may be installed per device. In order to completely disconnect the equipment, it is recommended to check the wiring diagram in the vehicle's technical book or test the contacts with a multimeter.
- Next, we take out the plastic grip from the panel cover and remove the burnt part. After installing the new spare part, we reconnect consumers and assemble the panel.
It is also important to know that, depending on the configuration of the Skoda Rapid, 2 options of the block panel can be installed in the car, differing in the number and arrangement of elements in the device. The plastic panel is mounted by lightly pressing along the entire perimeter until the characteristic sound of the latches clicking into place.
Replacing the fuse link
In the Skoda models of modifications A5 and A7, two electrical circuit protection units are installed - in the engine compartment and on the left under the steering wheel. Ours needs to be looked for in the cabin block. In different modifications, access to the circuit protection panel is somewhat different.
In the Skoda Octavia A5, the protective insert is located in the driver's compartment near the instrument panel under the steering wheel.
After unscrewing the screws, you need to open the panel using a flat screwdriver and find the desired element. In A5 it will be designed for a current load of 25 A. You can find it in the car’s operating instructions or in the diagram on the inner surface of the panel cover.
The “Electrical Equipment” section of the operating instructions also provides a diagram of the location of these elements.
After making sure that the thread has melted, you need to insert a new one and carefully close the panel cover with the latches.
If after this everything works, then the reason is clear - the circuit was overloaded. This can happen when high power consumers are connected to the socket or a short circuit occurs due to careless manipulation of the connectors.
The protection unit in the A7 is located slightly differently. To access it, you must first open the glove box cover on the left under the steering wheel.
The fuse here is indicated by the symbols F40 and it is designed for a maximum current of 20 A. After replacement, you must carefully, without excessive force, insert the glove box body into place.
It is best to install only original fuses. When installing “left-handed” products, you often have to face big problems. For example, instead of melting the thread, its body and contents melt. In this case, the molten mass flows into the slots of the connector and renders the entire safety block unusable.
Review of Probable Causes
So, first of all, let’s talk about what became the “culprit” for the improper operation of the dimmer.
Most often, the dimmer stops working after a light bulb in a chandelier or floor lamp burns out. At the moment of burnout, a short circuit may occur, as a result of which one of the most important circuit elements in the dimmer, the triac, burns out. If the triac does not work, the entire circuit fails.
The second reason why the device may not turn on, or vice versa, may not turn off the light, is that the dimmer works with an energy-saving lamp. We have already talked about the fact that for LED and fluorescent lamps you need to buy special dimmers, specifically designed to work with “housekeepers”.
What to do so that the device can adjust the brightness of the light
Another probable cause of the malfunction is incorrectly selected dimmer power, as a result of which it does not work as it should. We have already said more than once that the power of the dimmer should be 30-50% greater than the power of all the light bulbs it regulates.
If you missed this point and inserted too powerful light sources into the lamp, it is not surprising why the dimmer does not turn off the light or adjust the brightness of the lamps. We talked about how to choose a dimmer in a separate article. Well, the last thing that needs to be said is that perhaps the problem is in the electrical wiring on the site: the chandelier-switch.
Device and connection
The principle of operation of the cigarette lighter is the same for all cars. Inside the moving part there is a thin metal spiral. The rod is inserted into the cartridge to which the current is connected. When the button is pressed, the contacts close, and then electricity begins to flow through the system, heating the coil. After reaching a temperature sufficient for lighting a cigarette (15-20 seconds), the thermal relay is activated, which turns off the rod, returning it to its original position.
Three cables from the car's network are suitable for the Renault Duster cigarette lighter.
- The main plus. It goes from the cigarette lighter to the battery. Its task is to heat the metal thread. Connected through a special protective element with a rating of 15 amperes.
- An additional plus. Guarantees proper operation of the cigarette lighter light bulb. The light filter is located around the device socket, which helps to find it in poor lighting. Powered via yellow or white wire.
- The main disadvantage is the mass. One end fits to the car body, and the other to the cigarette lighter body. When these contacts are closed, current begins to flow through the device.
Fuses for Skoda Rapid: diagram where they are located
Fuses are electrical switching devices whose functional purpose is to prevent short circuits and damage to electrical equipment due to high voltage.
The use of fuses allows you to protect components from current overload, which increases the service life of the vehicle and reduces the cost of repairs in the event of a breakdown.
You should not skimp on the quality of fuses, as this directly affects the protection of the vehicle from short circuits. It is not recommended to purchase analogues of low-cost original components or devices from the secondary market - the optimal solution is to purchase dealer parts from VAG.
Manufacturer Article No. Device Compatibility by year of manufacture Approximate cost, rub.
| VAG | 6R0937550A | Block diagram of the salon | 2021-2021 | 1650 |
| VAG | 30244003 | Block diagram of the salon | 2021-2021 | 1750 |
| VAG | 6R0937550A | Block diagram under the hood | 2021-2021 | 1550 |
| Bosch | 50000046972 | Block diagram under the hood | 2009-2021 | 2100 |
| Bosch | N10424902 | Fuse | 2021-2021 | 180 for 10 pcs. |
| Novline | 50295010 | Fuse | 2021-2021 | 260 for 10 pcs. |
| Novline | 113774 | Fuse | 2021-2021 | 305 for 10 pcs. |
It is important to know! It is recommended to select fuses or a block diagram of devices for the Skoda Rapid only by the VIN number of the vehicle or by checking the compatibility of components on the official VAG website.
Otherwise, there is a possibility of purchasing parts of an incompatible fastening type or with incommensurate throughput, which negates the entire security of the electrical equipment and can cause a short circuit or spontaneous combustion.
Fuse is to blame
Burnout of the protective element is one of the most common causes of Renault Duster cigarette lighter failure. The fuse is rated for a maximum current of 15 amps. Due to a short circuit or other issues, this parameter is out of scope. Then the fuse blows, maintaining the insulation of the wires, eliminating the risk of fire. If it breaks down, the power supply for the sound signal will also fail when the ignition and engine are turned on.
The mounting block is located in the cabin, on the left end side of the front panel. Its location is indicated in the photo. To get to it, you need to open the driver's door and remove the decorative cover. In pre-restyling models, the element with index F38 (15 amperes) must be replaced. In cars after restyling, fuse F33 must be changed.
When replacing, it is important to install an element of the appropriate rating (15 amperes). Otherwise, in the event of a short circuit, the cables will overheat, the insulation will melt, and there is also a danger of the wiring catching fire and the fuse will blow again.
Read also: How to sew on a Toyota machine
Location of blocks and replacement of fuses skoda rapid
Parts and consumables:
- Fuse of the required rating (replacement if necessary) (VAG 8L0998131)
Notes:
Depending on the version, the Skoda Rapid car may be equipped with fuse blocks in the cabin with different circuits. This article describes both options.
A description of the Skoda Rapid fuse circuits and their interpretation are given in this article.
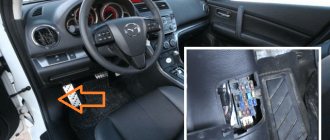
Skoda Rapid fuse box inside the car
1. Before replacing a fuse, turn off the ignition and the corresponding consumer.
2. The fuse box in the car interior is located under the steering column. To gain access to the fuses, you must remove the cover of the block. Pull it from the bottom of the cover and fold it in the direction of the arrow.
3. Set the lid aside. To check or replace the required fuse, you need to find it in the block by checking the list diagram. Find the required vehicle component in the list and determine the number and location of the corresponding fuse. A description of the circuits and their decoding are given in this article.
Note:
Depending on the configuration, the fuse box may have two options.
1st version of the fuse box in the Skoda Rapid interior
2nd version of the fuse box in the Skoda Rapid interior
Note:
Several consumers can belong to one fuse.
Several fuses may belong to one consumer.
3. Remove the plastic fuse grip from the fastenings in the block cover.
4. Place the pliers on the desired fuse and remove it.
5. Insert a new fuse.
Warning:
Never “repair” fuses or replace them with fuses of a higher rating - risk of fire! In addition, a malfunction may occur elsewhere in the electrical circuit.
If the new fuse quickly blows again, have the relevant electrical circuit checked by a workshop as soon as possible.
A blown fuse can be identified by a burnt-out metal wire. Replace the faulty fuse with a new one of the same rating.
6. Return the grip to its original place. Place only the top edge of the cover into the front panel and press the cover down gently.
Helpful advice:
Purchase a set of spare fuses in advance. They should always be in the car.
Fuse set VAG 8L0998131
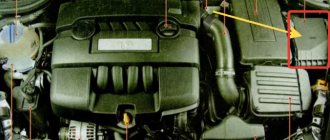
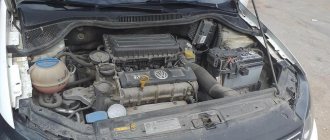
Skoda Rapid fuse box under the hood of a car
1. Before replacing a fuse, turn off the ignition and the corresponding consumer.
2. The fuse box under the hood of the car is located near the battery. Depending on the engine version, the block may be to the left or right of the battery. The images show two of the four block options, but the other versions are similar in layout.
Fuse box under the hood of Skoda Rapid with 1.6 MPI engine
Fuse box under the hood of Skoda Rapid with 1.2 TSI engine
3. Simultaneously squeeze the lid lock keys on both sides of the unit and lift the lid up.
4. Replace the appropriate fuse. Follow the same recommendations as for the vehicle's interior fuse box. The Skoda Rapid fuse diagram and its explanation are given in this article.
5. Install the cover on the fuse box, press down and secure the cover locking keys.
Warning:
Always install the fuse box cover correctly in the engine compartment. If the cover is not installed correctly, water may enter the fuse box - risk of vehicle damage!
The article is missing:
- High-quality photos of repairs
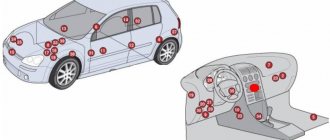
Location of modules and provision of access to them
The modules of these devices in Skoda Octavia A5 (A7, Tour) cars are located in the engine compartment and in the cabin. To access devices located in the engine compartment, you need to lift the hood cover and lock it. If you look at the car from the front, the fuse box is located on the right near the front pillar of the car. In order to remove the top plastic cover of the module, you need to move two brackets in the downward direction and pull the part towards you.
In addition, the described module also contains two relays - the electric motor of the Skoda cooling system fan and the automatic transmission control.
The fuse box, which is located in the passenger compartment, can be found at the end of the front console. To do this, you need to open the front driver's door and use a flat-head screwdriver to pry off the module cover from the bottom.
Location of fuses in the engine compartment
| No. | Energy consumer |
| 1 | Radiator fan |
| 2 | 2021-2021: Glow plug system 2022: Not assigned |
| 3 | ABS or ESC |
| 4 | 2021-2021: Additional electric heating, heated windshield 2022: Heated windshield |
| 5 | 2021-2021: Additional electric heating, heated windshield 2022: Heated windshield |
| 6 | Automatic transmission |
| 7 | Engine management system |
| 8 | Windscreen wipers |
| 9 | Battery data module |
| 10 | ABS or ESC |
| 11 | Not assigned |
| 12 | 2021-2021: Injectors, fuel metering valve, fuel pressure control valve 2021: Injectors, fuel metering valve, fuel pressure control valve, engine components |
| 13 | Brake pedal switch |
| 14 | 2021-2021: Fuel Pump, Radiator Fan, Cooling Pump, Intercooling Pump 2021: Fuel Pump, Radiator Fan, Intercooling Pump, Engine Parts |
| 15 | Engine control system, voltage stabilizer for taxi cars |
| 16 | Starter |
| 17 | Engine management system |
| 18 | 2021-2021: Auxiliary heater, intake manifold valve, supercharger regulator, oil temperature, activated carbon filter valve, oil pressure control valve 2021: Intake manifold valve, wastegate valve, oil temperature, activated carbon filter valve, oil pressure control valve , engine components |
| 19 | Lambda probe |
| 20 | 2021-2021: Glow plug system, crankcase ventilation heater 2021: Ignition coils, engine components |
Replacing the cigarette lighter in Duster
To work, you will need to stock up on suitable tools:
To repair the cigarette lighter you will need:
- soldering iron;
- pliers;
- insulating tape;
- tester;
- heat shrink tubes;
- spare parts.
You can buy different goods at the market. The cheapest devices, including fuses, should be discarded - they are made of low-quality materials, therefore, they will not work for a long time. The best replacement option is the original Renault Duster cigarette lighter. The product code is 8200046338, and its price fluctuates between 600 – 900 rubles.
Location of fuses in the engine compartment of the Skoda Octavia A5
PURPOSE OF FUSES IN THE INSTALLATION BLOCK LOCATED IN THE ENGINE COMPARTMENT OF THE CAR
| № | Consumer |
| F1 | Not used |
| F2 | Automatic transmission control unit |
| F3 | Test lead |
| F4 | ABS valves |
| F5 | Automatic transmission control unit |
| F6 | Instrument cluster, wiper arm and turn signal switch |
| F7 | Terminal 15 power supply, starter |
| F8 | Head device |
| F9 | Not used |
| F10 | Engine control unit |
| F11 | Autonomous heating and ventilation control unit |
| F12 | Data bus control unit |
| F13 | Engine control unit |
| F14 | Ignition |
| F15 | Lambda probe, pre-glow system |
| F16 | Onboard power supply control unit, right headlight, right rear light |
| F17 | Sound signal |
| F18 | Digital Audio Processor Amplifier |
| F19 | Windshield wiper |
| F20 | Coolant pump, fuel metering valve |
| F21 | Lambda probe |
| F22 | Clutch pedal switch, brake pedal switch |
| F23 | secondary air pump, air flow meter, high pressure fuel pump |
| F24 | Canister, EGR valve, radiator fan |
| F25 | ABS pump |
| F26 | Onboard power supply control unit, left headlight, left rear light |
| F27 | Secondary air pump, pre-glow system |
| F28 | Not used |
| F29 | Terminal 30 power supply |
| F30 | Terminal Xa) |
Nuances when replacing fuses:
- We only change the fuse of the same rating! In no case more than that, to avoid the risk of fire and problems with electrical faults.
- - if the fuse is changed, but it quickly burns out, you need to check the electrical circuit, preferably at a service station.
- — You should always carry a supply of fuses with you.
- — one consumer of electricity can be protected by several fuses.
- — one fuse can protect the circuits of several electrical consumers.
- — electrically adjustable seats are protected by automatic fuses that automatically turn on after the load drops.
Purpose
The layout of safety elements is quite extensive and to accurately determine the location of a particular device, it is necessary to carefully study their features and characteristics. Thus, the safety element module, which is located in the passenger compartment of the A5 (A7, Tour), provides protection for such electrical circuits as the ABS and ESC control module, airbag circuits, climate control and heating circuits, automatic transmission control, rear window wiper, heating seats and central light switch. The circuits listed are equipped with 5 amp fuse elements. 10-amp devices provide protection for the central locking control, light switch, and powertrain control module. 20-amp are used in the circuit of the trunk socket (not to be confused with the trunk lighting), and the lighting washer circuit. The complete diagram is shown in the illustration below using the Skoda Octavia Tour 1.6 model as an example.
The safety element module, which is located in the engine compartment of Octavia models (including Tour), is equipped with fewer devices. Thus, 5-amp protect the electrical circuits of the diagnostic wire, the turn signal and windshield wiper switch levers, the power unit control module, and the clutch pedal switch. 10 amp cells are used in the cooling fan, exhaust gas circulation valve, secondary air pump, and fuel pump circuits. 15-amp protect the circuit of the lambda probe, horn, automatic transmission control unit, trunk lighting.
The ignition, on-board network control module and right-hand lighting fixtures of Octavia models are protected by 20-amp devices. Higher load circuits such as the starter, power terminals, ABS valves are equipped with 30 to 50 amp circuit breakers.
A complete map of the location of fuses in Skoda Octavia A5 / 7, (Tour) cars can be found in the vehicle’s operating manual or in special teaching aids.