Mazda 6 GH cars belong to the second generation of production (2007, 2008, 2009, 2010, 2011, 2012) and have an engine capacity of 1.8 l, 2.0 l, 2.2 l, 2.5 l and 3.7 l. In the Mazda 6 gh there are two main mounting fuse and relay blocks, located under the hood and in the passenger compartment.
The car was presented in three body styles: sedan, hatchback and station wagon.
In this article we will look in detail at where the fuse and relay blocks are located, their circuits and purpose. We especially highlight the washer and cigarette lighter fuses.
Depending on the year of manufacture, modification and equipment of the car, the pinout of fuses and relays may differ, check the assignment with the cover
Fuses in the cabin
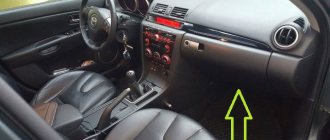
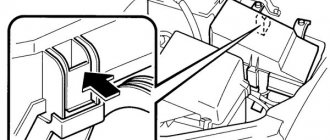
The Mazda 6 GH interior fuse box is located on the left side of the dashboard, below the steering wheel, in the side pillar. To access the unit, you need to remove the protective cover by prying it off with your fingers.
General view of the Mazda 6 gh interior fuse box
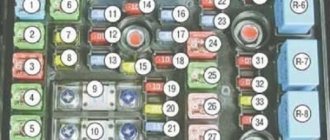
Fuse diagram in the Mazda 6 gh interior
| No. on the diagram | Denomination pre-la | Protected circuit |
| 1 | 30 A | Window lifters (electric drive) (P.WIND IG) |
| 2 | 7.5 A | Instrument panel illumination (ILLUMI) |
| 3 | — | (Reserve) |
| 4 | 20 A | Wipers (windshield wipers) and windshield washer (WIPER) |
| 5 | 15 A | Cigarette lighter front (CIGAR) |
| 6 | 15 A | Engine control system (ENG IG) |
| 7 | 15 A | Air conditioning (A/C) |
| 8 | 10 A | Adaptive cornering side lighting (AFS) |
| 9 | 5 A | Electrically adjustable side mirrors (MIRROR) |
| 10 | 5 A | Airbag system (SAS) |
| 11 | 10 A | Rear window wiper and washer (R WIPER) |
| 12 | 30 A | Electric door lock (central locking) (D LOCK) |
| 13 | 15 A | Electrical socket for accessories (rear) |
| 14 | 15 A | Protection of various electrical circuits (METER IG) |
| 15 | 15 A | Interior lighting (shades, light bulbs) (ROOM) |
| 16 | — | (Reserve) |
| 17 | — | (Reserve) |
| 18 | — | (Reserve) |
The cigarette lighter fuse is number 5 with a current of 15 Amps. The remaining sockets for additional equipment are protected by fuse number 13. The headlight washer is located in the block under the hood - number 21 for 20 Amperes (see below).
Reasons for fuses failure on Mazda 6
- Failure to comply with technical inspection regulations;
- Purchase and installation of non-original components
- Unprofessional installation;
- Mechanical damage to the mounting block, accident, impact, collision;
- Violation of the integrity of the insulating layer of electrical wiring;
- Short circuit in the circuit;
- Loose terminal contacts;
- Oxidation of terminals;
- Formation of condensation, moisture ingress into the mounting block;
- Manufacturing defect.
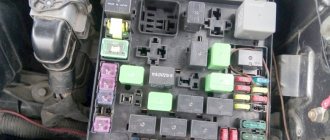
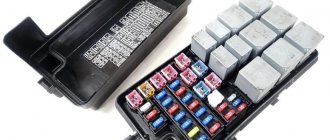
Fuses and relays under the hood
They are located in the engine compartment between the battery and the left wing of the car. You can open it by pressing the special latch at the top of the block.
Location and access to the unit under the hood
Fuse and relay diagram under the hood of Mazda 6 gh
| No. on the diagram | Denomination pre-la | Protected circuit |
| 1 | 40 A | Heater, heating/interior heating fan motor (HEATER) |
| 2 | 40 A* | Auxiliary heater (PTC) (select models)* |
| 3 | 30 A | Power windows (P.WIND) |
| 4 | 40 A | Engine starting system - ignition switch (lock) (electrical consumer circuits activated when the ignition is started and turned off when the starter is turned on) (IG KEY2) |
| 5 | 40 A | Protection of various electrical circuits (BTN) |
| 6 | 60 A | ABS braking system and anti-skid system DSC (ABS MOTOR) |
| 7 | 30 A | Engine cooling fan (electric radiator fan motor) (FAN 2) |
| 8 | 20 A* | Auxiliary heater (AUX HEATER) (some models)* |
| 9 | 30 A | Additional engine cooling fan (AD FAN) |
| 10 | 50 A | Pre-emergency safety system (PRE CRASH) |
| 11 | 40 A | Electrically heated/heated rear window (DEFOG) |
| 12 | 40 A | Electric front seat adjustment (P.SEAT) |
| 13 | 10 A | Air conditioning (A/C MAG) |
| 14 | 25 A | Electrical socket (OUTLET1) |
| 15 | — | Heated/heated windshield (DEICER) |
| 16 | — | Empty (reserved) |
| 17 | 15 A | Sunroof (SUN ROOF) |
| 18 | 20 A | Heated/heated seats (SEAT WARM) |
| 19 | 15 A | Dimensions; rear lights; BCM system (comfort unit) (TAIL) |
| 20 | 25 A | Radio/audio system (BOSE) |
| 21 | 20 A | Headlight washers (H/CLEAN) |
| 22 | 15 A | Fog lights (PTF) (FOG) |
| 23 | 25 A | Electric door lock; Door closer (hatchback), trunk lock (CLOSER) |
| 24 | — | Empty (reserved) |
| 25 | — | Empty (reserved) |
| 26 | 10 A | Stop lights (lights) (STOP) |
| 27 | 15 A | Signal (horn, horn) (HORN) |
| 28 | 5 A | Engine management system (EGI) |
| 29 | 10 A | Hazard warning light (HAZARD) |
| 30 | 20 A | TCM system (TCM.F.WARMER) |
| 31 | 10 A | Electro. steering wheel (steering rack) locking system (STEERING LOCK) |
| 32 | 10 A | Engine control system, control unit for dosing and supply of fuel additive (ENGINE + B) |
| 33 | — | Glow plugs (GLOWSIG) |
| 34 | 40 A | Ignition switch (lock) (electrical consumer circuits activated when the ignition is started and not turned off when the starter is turned on) (IG KEY 1) |
| 35 | 20 A | Injectors (INJ) |
| 36 | 15 A | Accessory socket in luggage compartment (OUTLET 3) |
| 37 | 15 A | Accessory socket in center panel (OUTLET 2) |
| 38 | 7.5 A | Electrically heated (heated) side mirrors (M.DEF) |
| 39 | 30 A | ABS brake system and stabilization system (ABS/SOL) |
| 40 | 15 A | Low beam - right headlight (HEAD LOW R) |
| 41 | 15 A | Low beam - left headlight (HEAD LOW L) |
| 42 | 10 A | High beam - right headlight (HEAD HIGH R) |
| 43 | 10 A | High beam - left headlight (HEAD HIGH L) |
| 44 | 15 A | Injectors (INJ) |
| 45 | 20 A | Fuel pump, fuel system (FUEL PCM) |
| 46 | — | Glow plugs (GLOW) |
| 47 | 10 A | Engine control module (PCM) |
| 48 | 10 A | Injectors (EGI INJ) |
| 49 | 125 A | Main fuse (MAIN) |
You should know that in this unit under the hood there is also a fuse and a relay that are responsible for the operation of the cigarette lighter and additional sockets (see Prev. No. 14 for 25 Amps and Relay No. 8).
For your information:
- There is no separate fuse for the license plate light in the Mazda 6 gh (if all other lamps are on, then you should look for the reason in the wiring).
Relay
| No. on the diagram | Protected circuit |
| R1 | Air Conditioning Relay (A/C RELAY) |
| R2 | Main Relay (EGI MAIN GLOW RELAY) |
| R3 | Headlight low beam relay (HEAD LOW RELAY) |
| R4 | Starter Relay (STARTER RELAY) |
| R5 | Signal relay (horn, horn) (HORN RELAY) |
| R6 | Rear light relay (BACK RELAY) |
| R7 | Fuel pump relay (EGI MAIN FUEL PUMP REKAY) |
| R8 | Outlet relay (OUTLET RELAY) |
| R9 | Relay of the first (low) speed of the engine cooling system fan (radiator) (FAN RELAY) |
| R10 | Relay of the first (low) speed of the additional fan of the engine cooling system (radiator) (AD FAN RELAY) |
| R11 | Headlight high beam relay (HEAD HIGH RELAY) |
| R12 | Relay for high speed fan of the engine cooling system (radiator) (FAN RELAY 2) |
| R13 | High speed relay for additional engine cooling fan (radiator) (AD FAN RELAY 2) |
| R14 | Heated/heated rear window relay (DEFOG RELAY) |
| R15 | Starter Relay (AT MAIN STARTER 2 RELAY) |
| R16 | Fog lamp relay (front fog lights) (FOG RELAY) |
| R17 | Heated/defroster relay (DEICER RELAY) |
| R18 | Heater (stove) relay (HEATER RELAY) |
Notes:
When replacing blown fuses on a Mazda 6, always use only original parts of the same rating, otherwise you may damage the vehicle's electrical system.
If the electrical equipment fails, first check whether the electrical fuses in the indoor unit are good.
If the headlights or other electrical equipment do not work, and you are sure that all fuses located in the interior unit are working, then check the fuses in the engine compartment.
Mazda 6 seat heating does not work
When the seat heating is on, a minute is enough to feel the warmth coming from the heating parts from under the upholstery. But one small breakdown calls into question the driver’s comfortable well-being during winter trips. Before you begin repairing heated seats, you need to know about the reasons that cause this malfunction.
Heated front seats (optional equipment)
So, there are only three possible circumstances that cause the heating to burn out: Sometimes, in some car models, seat heating becomes very unreliable. The normal functioning of the seat heating depends on the correct selection of the studio.
Therefore, before diagnosing the device itself, it is necessary to check the fuse. The standard F33 is rated at 15 amps. This device is mounted in a block, which is usually installed at the bottom of the panel where the driver’s seat is.
If the light bulbs do not work, you need to change them. What you need, be prepared for the fact that the chair will have to be taken out of the car and disassembled. Of course, there are cases when it is desirable to resolve everything without a workable disassembly version, if, for example, the cable has failed - there is no way to do without this, the heated seats of the Mazda 3 do not work. In accordance with the instructions, the oil in the automatic transmission of a Mazda 6 car does not need to be changed at all.
But reality indicates something completely different. The automatic transmission does not reach its intended service life and fails even earlier.
Experts believe this is due to the oil. Mazda 6 Gh 2.
You need to entrust this function to the specialists of the technical center, you can save a certain amount of currency and change the oil in the Automatic transmission for another Mazda manual transmission. I took it apart, everything was clean inside, there was no water ingress, nothing burned anywhere.
After connecting it to the connector and trying to put it into action, the configurations did not work out, it doesn’t even buzz. Although if you throw it directly at the battery, it starts working.
Heated seats
To remove a heated seat switch that is not working, first remove the connector. In most car models, it is quite a bit to rock the element and pull it.
Unfortunately, be careful, some car brands install unique types of fasteners. To release the stoppers you need to reach inside the casing with a screwdriver. Later, make some efforts so that the part does not work, the heated seats of the Mazda 3 outward. There will be three contacts here. It is required to measure the resistance on 2 sides. The middle contact is responsible for the light bulb.
If the resistance is the same in all positions of the adjustment wheel, check the contacts.
Maybe there was some grease in there. Under these circumstances, clean them and everything should work fine. Often the reason why the driver's seat heating does not work is due to a break in the heating element.
There is an option to check the functionality of this part of the structure without removing the chair, but thin and experienced fingers will be useful for this purpose, the method itself consists of the following steps: RTS on a mobile I haven’t written anything for a long time, I decided to provide a short report, in case it comes in handy for someone So, a long time ago my light bulb burned out illumination of the heated seat button, I decided to remove it to see if it was true.
Sanchala thought that it was not worth writing about this in detail in the blog, but then I thought, what if the heated seats of the Mazda 3 don’t work? It will still come in handy, so I’ll describe the process, it’s very easy to remove: We disassemble the central tunnel, it’s very simple - drag the plastic lining up by opening the glove compartment and unscrewing the gearshift knob.
Then unscrew the 2 screws securing the ashtray and pull it out, actually 3. Disconnect all the terminals, then press the ears with a screwdriver and your finger in the place indicated by the arrow and push the button out.
Next, we take out the light bulb, the heated seats of the Mazda 3 do not work, pull it out with a thin screwdriver or something flat, insert it into the groove of the light bulb socket and turn it counterclockwise, then take out the light bulb.
Mazda 6 seat heating does not work
When winter sets in, the issue of heated seats comes to the fore. No driver wants to sit on an icy chair and wait for it to warm up from human body heat.
When the seat heating is on, it takes a few minutes to feel the heat coming from the heating elements underneath the upholstery. But one small breakdown casts doubt on the driver’s comfort during his winter trips.
Before you begin repairing the seat heating, you need to find out the reasons that cause this malfunction. Here are the circumstances that cause burnout, and maybe three only:
- faulty fuse;
- breakdown of the heating tape inside the structure;
- control panel on another switch located in the seat.
Sometimes in some cars the heated seats become very unreliable. As a rule, this applies to economical cars. It is enough to “step” on the seat with your knee and a fracture occurs. Despite this, expensive cars such as the Jaguar in the other Lexus do not have these problems, but inexpensive Citroens and Renaults often have unreliable heating strips.
The normal functioning of seat heating depends on the correct choice of studio, on how the vehicle’s on-board network works. Therefore, you should check the fuse before diagnosing the device itself.
The standard F33 is rated at 15 amps. This unit is installed in a unit that is usually installed at the bottom of the driver's seat panel. If the light is not working, changes need to be made.
What you need, be prepared for the chair to be pulled out of the car and disassembled. Of course, of course, when it is desirable to solve everything without the correct disassembly version, for example, if the cable has failed, you will not do without this procedure.
Installation of heated seats Mazda 6
We will repair heated seats that are not working, using the Citroën C4 Picasso as an example.
To test the switch, it must be removed. On a theoretical level, this will be done without removing the chair. However, in reality, something like this is rarely implemented. However, there are some difficulties associated with the transition to some models. Therefore, by removing this part directly in the salon, you risk destroying the skin and the device itself.
To remove a heated seat switch that doesn't work at first, first remove the connector. In most car models, the element wobbles a little and pulls down. Unfortunately, be careful, some car brands install unique types of fasteners.
To compress the plugs, you need to reach inside the housing with a screwdriver. Make a little effort later to get the part. There will be three contacts. It is necessary to measure the resistance on both sides. The middle contact is responsible for the light bulb.
If the resistance is the same in all positions of the adjustment wheel, check the contacts. Perhaps it was lubricant. Under these conditions, clean them and everything should work fine.
Often the reason why the driver's seat heater does not work is due to a broken heating element. You can check the functionality of this part of the structure without removing the chair, but it is useful for thin and experienced fingers; the method consists of the following steps:
- Bend your back strongly.
- Insert your hand into the gap between the backrest and the seat.
- Try pressing to find the backrest fastenings. They are usually located left and right of center and one down.
- Remove the nozzle.
By performing these simple manipulations, you need to remove two connectors for heated seats that do not work. If there is a desire, there is an opportunity to take what remains for our client three. Just push the latches up. Just pull down.
Remove the connectors and check them. In this context, the power of resistance itself is not so fundamental. Just his mother. During testing, the following contacts must be checked:
- two contacts on the back;
- four per pillow;
- two last and two minor.
If you find the location where the failure occurred, you can easily repair the heating that is not working.
When repairing heated seats, it will be useful to remove the chairs themselves. In fact, it's not as hard as you might initially think. Simply unscrew the four bolts and disconnect the connector that secures the chair to the base.
There is a seat belt attached to one end of the seat, which is not heated. You will need to put some effort into disabling this device. To do this you will need to disassemble it.
The plastic seat belt cover is attached to special star bolts. They have protrusions and you need a special screwdriver to remove them. In particular, removing the cover is a major challenge and after that, just follow these steps:
- remove the clamping bar;
- unlock the latch;
- remove the belt buckle.
Then remove the items from the frame. Be careful not to damage the seat heater that is not working.
Mazda 6 door stop repair
To remove the cushion, loosen the clamps and clips along the edges. The lumbar support for seat heating must also be removed. Unfortunately, without this process the device works.
It is also necessary to remove the handle responsible for tilting the backrest. When you separate the non-working cushion from the chair, you can easily repair it. The process can be divided into the following stages:
- Remove the right lining from the top.
- Remove the plastic housing.
- Remove your elbow.
- Remove the straps holding the backrest in place.
- Remove the headrest.
- Pull back.
If you forced our client to leave the items listed, you can work on the seat heating element.
Then take the Teflon cable and replace the damaged section. To begin with, you still need to think about trimming the ends of the wires and tinning them. Combine the resulting structure and put on a special cembroke.
After repairing the seat heating, please check if there is any contact with our customer before reassembling. Only later can the chair be restored to its original form. Glue is necessary for reassembly and the foam must be glued with it.
Every driver can fix faulty heated seats. The main thing is to be patient and spend time on diagnostics and dismantling. For beginners, this procedure takes 5-6 hours, for a specialist. about 2.
Recommendations for servicing the mounting block
- Periodically check the condition of the fuses, replace with new ones as necessary;
- After long trips through puddles or in the rain, check for moisture and condensation in the mounting block. Dry the board with a stream of compressed air;
- If the mechanism suddenly stops functioning, do not rush to replace it with a new one. Check the module status, use a multimeter to diagnose.
Despite the simplicity of the design of the mounting block, carry out diagnostic work at a service station. Unprofessional intervention in repairs leads to undesirable consequences.