At high speeds, a carburetor engine suffers from a lack of both air and fuel. If you pay attention to the spark plugs, you will notice that cylinders 1 and 4 suffer from a lean mixture, and cylinders 2 and 3 from an over-enriched mixture. The thing is that one carburetor cannot cope with the supply of the mixture, so the idea of installing two was born.
Design features of the Solex carburetor for Niva 2121
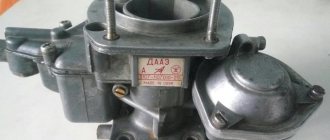
The carburetor device of the Solex model with serial number 21073-110-7010 is perfect for the Niva 2121 all-terrain vehicle. According to reviews from experienced auto mechanics, the carburetor of this model has a high level of reliability, as it is easy to adjust. Let's look at its features:
- emulsion type;
- two-section float chamber in which the sections are connected to each other;
- two chambers equipped with throttle valves and dosing systems;
- transition systems for both cameras;
- An idle system is provided for the first chamber.
The Solex device is divided into two halves - lower and upper. The lower one includes the carburetor body, and the upper one includes its cover. The lower parts of each half have mechanically operated butterfly valves. And in the upper part there is another damper for air supply. It begins to function using a special cable connected to the vacuum starting system.
Solex is convenient because its adjustment requires a minimal set of tools, so it can be done in almost any conditions.
Vehicle mounting
After adjustment and modification, the manifolds are fitted to the cylinder head. Slots for threads are made in the required places. You can control the connection of the manifold to the cylinder head either with or without removal. For reliable fixation, a central fastener is required. A strip of steel about 4 mm thick is suitable for these purposes.
Fixation is done with three nuts. One of them is located in the center, and two are located at the edges. It is recommended to prepare in advance two plates that secure the intake manifold at the bottom. Performing this operation will prevent coolant from entering the combustion chamber.
Upon completion of the installation of the manifold, it is necessary to connect the cooling system and vacuum brake booster. If the latter is missing, a plug should be installed. After this, the carburetors are installed.
VAZ-343: diesel engine for Lada and Niva
VAZ-343 is a promising diesel engine that was supposed to go into production back in the 2000s. But unfortunately for various reasons this never happened.
Back in the late 80s, specialists from the Volzhsky Automobile Plant created a 1.5 liter VAZ-341 diesel engine. Based on it, the plant decided to create a whole line of motors of varying power and volume. So the engine with a volume increased to 1.8 liters received the index VAZ-343, and the version with a turbocharger VAZ-3431.
Base engine
VAZ-341 The VAZ-341 was a 1.45-liter diesel engine with a power of only 53 hp.
In 1988, the motor passed acceptance tests and was ready for production. But the collapse of the country prevented the plans and the project was postponed until better times. In 1995, the Barnaultransmash plant became interested in pestilence. There, together with engineers from Tolyatti, the engine was slightly modernized. Specialists increased the working volume to 1.52 liters, optimized valve timing and fuel equipment settings. In 1999, small-scale production of the engine began in Barnaul.
VAZ-343 for Lada and Niva
It was assumed that in 2002, production of the VAZ-343 engine would begin. It was based on the 341 engine, which increased the working volume by increasing the cylinder diameter to 82 mm. Otherwise they were identical.
Characteristics of the VAZ-341 engine
As a result, the engine power increased to 63 hp, and the torque amounted to 114 Nm. Also, by installing a NAMI turbocharger, power increased to 75 hp and 147 Nm of torque. A little later, the engines were supposed to receive an intercooler, which would increase their service life and performance.
Successful tests and prospects
Tests of the motors showed their high performance. To carry them out, a naturally aspirated engine was installed in the VAZ-2104, and a turbocharged VAZ-3431 was installed in the VAZ-21315 Niva.
The cars moved confidently in the traffic, especially the Niva. Thanks to the turbocharger, which started working as early as 1800 rpm, it had very good dynamics. In addition, the engines had a moderate appetite. For example, the Quartet consumed no more than 6 liters per 100 km, and the Niva eight. But despite this, serial production was never established.
VAZ-2131 Niva
There were several reasons. Firstly, the low interest of the Volga Automobile Plant. The management of the enterprise did not anticipate high demand for the engine, therefore investing in production was not considered feasible. Secondly, the low reliability of motors, especially at first.
In 2003, Barnaultransmash produced the last VAZ-341 engine, at which point the program for diesel engines for VAZ passenger cars was closed.
| Specifications | VAZ-341 | VAZ-343 | VAZ-3431 Turbo |
| Full working volume, l | 1,52 | 1,8 | 1,8 |
| Rated power, hp | 53 | 63 | 75 |
| Torque, (Max) Nm | 90 | 113,7 | 147 |
| Minimum consumption, g/l. | 190 | 187 | 184 |
| Average consumption l/100 km | 5,5 | 6 | 8 |
| Engine weight, kg | 130 | 132 | 145 |
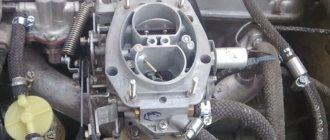
Installing a Solex 2108 carb on a classic
Now we got around to the carburetor.
I have a 2106 engine with a 2105 carb, the carb is poorly tuned and overflows, when I switched the engine I immediately knew that I would install a Solex with a 2108 because on it the car drives much more cheerfully!
So we purchased: - Solex 2108 carburetor - Transition kit from 2108 to classic (platform, rods) - Gaskets (only 2 pieces) - Check valve - Choke cable from 2109 - New spark plugs
So I bought a carb from an old friend at a great price, new ones are expensive and there’s no point.
I also immediately purchased an adapter kit for it. there is a thick platform and rods included.
The rods are different because on the carb the rods are screwed on the other side, not like on the classics, and they need to be lengthened and they are attached to the valve cover.
I also purchased a set of gaskets (only 2 pieces, I didn’t take the one in the center).
I also bought a new choke cable from 2109, because the factory classic one is not enough and has a different stroke.
A tee was also purchased to install the return line.
The essence of the return flow is that excess fuel is sent back to the tank. It cuts through the tee into the fuel hose, and a check valve is placed on the hose:
It looks like this:
Well, not many photos of the process:
And lastly, we changed the spark plugs, because the old ones were not in the best condition...
There will be more BZs next and I think there won’t be any new BZs until New Year’s Eve because I’m flying away on vacation.
See photos that don’t make it to the drive and videos on my Instagram dewar_inst
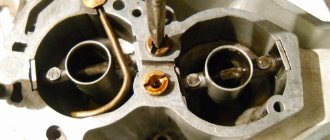
Features of the Niva 2121 carburetor
If we are talking about a carburetor, then you should know that this part is so named because its main functional purpose is carburetion or mixing. Indeed, fuel liquid and air are mixed in the carburetor. In addition, the supply of the resulting mixture to the engine cylinders is regulated.
The carburetion mechanism depends on the design of the carburetor device itself. Thus, the “native” carburetor on the Niva 2121 consists of:
- float chamber (the optimal functioning of the idle system and transition systems of all chambers depends on the level of fuel liquid in this device);
- jet (the main metering part through which fuel liquid and air enter the carburetor in metered quantities, they are also called nozzles or plugs);
- diffusers (they are narrowings in the carburetor pipes of both chambers; they are needed to increase the speed of air passage to the mixing chambers);
- throttle valve (mechanical type channel flow regulator, which is intended to change the amount of fuel liquid or gas passing through this channel).
The fuel supply mechanism through the carburetor device on the Niva 2121 has the following diagram:
- From the fuel tank, fuel liquid in optimal quantities enters the float chamber.
- Under the weight of the fuel liquid, the float chamber lowers.
- As the fuel liquid moves, the float chamber rises.
- After the fuel liquid passes through the float chamber, it enters the nozzle.
- From the nozzle, fuel is supplied to the atomizer (it is located in a narrow place in the diffuser).
- Air enters the carburetor device through the outer pipe.
- Through the intake manifold, a certain amount of fuel fluid is supplied by the throttle valves directly into the engine.
How to set the ideal settings yourself
To work, you will need the usual set of tools that are found in almost every garage. To eliminate fuel overflows, you need to correctly set the float in the chamber. This operation can be done using a special template. Experts recommend not using this template, since the number and thickness of gaskets in carburetors do not always match. Fans of various improvements often replace factory gaskets with better ones. It happens that the factory settings of the template do not suit everyone. Although Solex carburetors are the same, the fuel pump can deliver gasoline differently. A lot also depends on whether the return line is plugged, so specialists use a different method.
- The mixture quality adjusting screw is tightened by hand until the end;
- Next, unscrew it back five turns;
- Turn on the engine, remove the choke and use the mixture screw to bring the engine speed to 750 rpm;
- By turning the quality screw, we bring the engine speed to the maximum;
- Using the quantity screw, reduce the speed to 800 rpm;
- We tighten the quality screw a little until instability appears;
- We unscrew the same screw back one turn;
- We turn the quantity screw until the idle speed reaches 800 rpm (in winter they can be raised to 900).
It is worth remembering that adjusting the carburetor not only eliminates floating engine speeds. A well-tuned carburetor will consume a minimum amount of fuel at stable idle speeds.
It happens that when unscrewing the quantity and quality screws, the engine practically does not react. This happens when a large stream of gasoline flows from the idle hole and the screw is unable to influence it. It is possible that the valve is poorly closed or the jet is deformed. It happens that when replacing jets, they mistakenly choose a larger diameter than required. The plug may be loose. It is worth conducting a thorough inspection of all carburetor elements, this will help avoid such problems. When cleaning, the jets must not be cleaned using abrasives.
If the solenoid valve malfunctions, unscrew it and check for deformation. The mounting hole may also be deformed. If the thread of the mounting hole is torn off, you will have to replace the carburetor cap with a new one. If no defects are found, simply lubricate the O-ring before screwing in the nozzle.
You can determine whether the carburetor needs adjustment by the engine's response to pressing the gas pedal. An engine receiving a balanced fuel mixture responds to pedal pressure without hesitation, in a split second. The speed should be smooth at idle. There should be no jerks or failures. If the engine runs smoothly at idle, but when you press the accelerator it begins to act up, you need to tighten the quality screw, enriching the mixture.
The quality screw directly affects CO emissions into the atmosphere. Drivers are familiar with the situation when, before going for a scheduled inspection, they need to tighten the quality screw. The emissions become smaller and the car easily passes inspection, after which the position of the quality screw returns to its place. Some people are perplexed why their neighbor’s car consumes less fuel, although both have identical models. It's all about the settings and adjustments of the quality screw.
Setting up a carburetor is a rather complicated procedure. Don't expect everything to work out the first time. It may take a couple of weeks to complete the full cycle of eliminating all deficiencies. It is better to listen to the engine, quickly respond to the slightest interruptions in its operation and carry out regular carburetor flushing. The main thing when washing is not to use nameless Chinese-made cleaning products. And if you refuel with high-quality fuel, the carburetor will thank you for years of trouble-free operation.
Specifications
The Niva engine has high technical characteristics, and the car itself has increased cross-country ability, since there is a 4x4 option. Over the history of production, the VAZ 2121 has had different engine versions installed, from a carburetor version to an injector and even a diesel version.
So, let's look at the main characteristics of modifications to the Niva power unit:
VAZ 2121
| Name | Index |
| Engine capacity | 1.6 liter (1580 cc) |
| Number of cylinders | 4 |
| Number of valves | 8 |
| Fuel | Petrol |
| Injection system | Carburetor |
| Power | 80 horsepower |
| Fuel consumption | 12.2 l/100 km |
| Cylinder diameter | 79 mm |
| Valve mechanism | SOHC |
VAZ 21213
| Name | Index |
| Engine capacity | 1.7 liter (1690 cc) |
| Number of cylinders | 4 |
| Number of valves | 8 |
| Fuel | Petrol |
| Injection system | Carburetor |
| Power | 82 horsepower |
| Fuel consumption | 11.0 l/100 km |
| Cylinder diameter | 82 mm |
| Valve mechanism | SOHC |
VAZ 21214
| Name | Index |
| Engine capacity | 1.6 liter (1580 cc) |
| Number of cylinders | 4 |
| Number of valves | 8 |
| Fuel | Petrol |
| Injection system | Injector |
| Power | 83 horsepower |
| Fuel consumption | 8.4 l/100 km |
| Cylinder diameter | 82 mm |
| Econorm | EURO-4 |
| Valve mechanism | SOHC |
VAZ 2131
| Name | Index |
| Engine capacity | 1.8 liter (1779 cc) |
| Number of cylinders | 4 |
| Number of valves | 16 |
| Fuel | Petrol |
| Injection system | Injector |
| Power | 94 horsepower |
| Fuel consumption | 9.2 l/100 km |
| Cylinder diameter | 82 mm |
| Econorm | EURO-4 |
| Valve mechanism | SOHC |
Engine XUD9SD manufactured by Peugeot
| Name | Index |
| Motor type | Diesel |
| Engine capacity | 1.9 liter (1905 cc) |
| Number of cylinders | 4 |
| Number of valves | 8 |
| Fuel | Diesel fuel |
| Power | 75 horsepower |
| Fuel consumption | 7.1 l/100 km |
The power units of the VAZ 2121 were equipped with 4-speed manual and 5-speed manual transmissions.
How to choose a carburetor and what to install on a VAZ-2106?
Those who like to make improvements to classic models from AvtoVAZ and simply owners who want to improve the performance characteristics of the car most often choose Solex. Models used are DAAZ-21083. Installing them on classic models is impossible without significant modifications. When thinking about which carburetor is best to install on a VAZ-2106, you need to take into account the engine size. For 1.3-liter units, the DAAZ-2018 option is perfect. For engines with a volume of 1.6 liters, the best choice is DAAZ-21083. The differences between these two models are in the cross-sectional diameter of the diffusers, as well as in the sizes of the fuel and air jets. If you install this carburetor as it is, then at speeds close to 4 thousand, the air emission speed can reach supersonic, which is not acceptable. But this will not affect acceleration in any way. It is necessary to enlarge the diffusers on the first and second chambers and install other jets. After this, fuel consumption will be the same as on 21053, and the dynamics will be better than on 21073. For VAZ-2106 cars, the price of such a carburetor will be about five thousand rubles.
Scheme and principle of operation
The types and modifications of carburetors for a given car can be very different, but the principle of operation remains the same.
When starting the engine cold, the driver closes the choke to limit the flow of air and increase the amount of gasoline. This makes it easier to start and brings the speed necessary for stable operation.
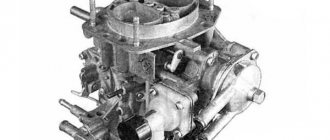
Carburetor 21073 DaAZ device and principle of operation: diagram of the design and operation of the carburetor I - first chamber; II - second chamber; 1 — accelerator pump drive lever; 2 — adjusting screw of the starting device: 3 — diaphragm of the starting device; 4 — air channel of the starting device; 5 - solenoid shut-off valve; 6 — idle fuel jet; 7 — main air jet of the first chamber; 8 — idle air jet; 9 — air damper; 10 — sprayer of the main dosing system of the first chamber; 11 — accelerator pump nozzle; 12 — nozzle of the main dosing system of the second chamber: 13 — econostat nozzle: 14 — main air jet of the second chamber; 15 — air jet of the transition system of the second chamber; 16 — channel for balancing the float chamber; 17 - float chamber; 18 — needle valve; 19 — calibrated hole for fuel bypass into the tank; 20 — carburetor fuel filter; 21 — fuel supply fitting; 22 — power mode economizer diaphragm; 23 - fuel jet of the power mode economizer; 24 — ball valve of the power mode economizer; 25 - float; 26 — econostat fuel jet with tube; 27 — fuel nozzle of the transition system of the second chamber with a tube; 28 — emulsion tube of the second chamber: 29 — main fuel jet of the second chamber; 30 - outlet of the transition system of the second chamber; 31, 33 — throttle valves: 32 — slit of the transition system of the first chamber; 34 — outlet of the idle system; 35 — carburetor heating block; 30 - adjusting screw for the composition {quality} of the idle mixture; 37 — engine crankcase ventilation fitting; 38 - fitting for supplying vacuum to the vacuum ignition regulator; 39 — vacuum selection fittings for the recirculation system; 40 — main fuel jet of the first chamber; 41 — emulsion tube of the first chamber; 42 - ball valve of the accelerator pump; 43 — accelerator pump diaphragm.
During the warm-up process, air intake is increased to reduce speed and eliminate interruptions. Thus, the air damper opens completely and the amount of gasoline is reduced. Other methods of warming up are not provided for by the design.
Gasoline is supplied through the fuel filter to the float chamber, and then to the main metering system of the mixing chamber. The scheme for pumping air and mixing it with gasoline in the diffuser occurs due to the vacuum that occurs during the operation of the valve mechanism and pistons, compressing and pushing out the working mixture.
The second chamber system is designed to increase air flow to the nozzle when the engine is running under heavy load, when the speed is high.
To ensure that the engine runs stably at idle, and at low speeds to prevent it from stalling and eliminate interruptions, an idle system is provided. And to maintain the level of fuel used in the Solex 21073 carburetor, there is a whole scheme for the operation of the float system. Let's consider the operation of each system separately.
Which carburetor should I choose? Solex or DAAZ 2105 or 2107?
#1 vilinman
Moderators 939 messages Registration 22-February 08
#2 Iari
Super moderators 3,699 messages Registration 03-December 05
vilinman I would take Solex. regarding problems with the XX - I haven’t heard about the widespread nature of such a problem; I can say to myself that there was a problem with the XX, but the whole problem was not with the carburetor as a whole, but with the solenoid valve (the first time the valve itself malfunctioned, and the second time the EPHH block was covered) both the first and second are easily diagnosed and treated on the road in 5 minutes.
1st by simply biting off the needle on the faulty valve 2nd by connecting the valve to the “+” contact of the battery charge relay (you need to make a wire 50 cm long at one end “female” and at the other end parallel to “female” and “male”)
There is an opinion that Solex gets more clogged, but if you change filters on time and monitor cleanliness during work, then this argument is absolutely untrue.
Another advantage of Solex (all except 21053) is the ability to make a return flow (both to the tank and just a ring for bleeding air plugs)
#3 Subbotin
Users 456 messages Registration 08-December 07
Adjustment
If the installed Solex 21073 carburetor on the Niva fails, repairs and adjustments help bring the device back to life. The settings allow you to restore optimal modes in which the motor will operate as efficiently as possible. Fuel consumption is at an average level. First of all, start the engine and warm it up a little. Next, you need to remove the fuel hose and the device cover.
It is recommended to remove the latter with extreme caution so as not to damage the float. Next, using a measuring tool, measure the distance in each of the carburetor chambers
Measure from the mating surfaces to the edge of the fuel. This size should be approximately 24 mm. If this distance is less or more, then it is adjusted by bending the float. Then you need to start and warm up the engine again. When the level adjustments are successfully completed, you can proceed to adjusting the idle speed.
The engine is turned off. To set up, you will need a flathead screwdriver and a little time. There is a hole on the base of the device in which there is a screw that regulates the quality of the fuel mixture. It is twisted all the way. Then from the extreme position the same screw is unscrewed by about five turns. Then the engine is started. There is no need to use a suction. If you unscrew the “quality” screw, then the carburetor will change the engine speed. Then it is twisted again. It is required to rotate until the operation of the motor is stable and stable. When the engine starts to run smoothly, then the element is unscrewed no more than one turn. As a result, the idle speed will be set at 900. If the engine starts to stall, it is better to slightly increase the idle speed.
Features of the installation DAAZ-2108, -21083
To install any of these models on the “Classic”, it is necessary to prepare a new set of gaskets, hoses for the carburetor heating system, a tee for connecting to the fuel system, a valve and rods for the accelerator. To get the maximum result from this procedure, it is advisable to replace the ignition. It is better to install a more technologically advanced, electronic one. Contact ignition is a thing of the past. The system is very unreliable and often causes operational problems. The installation of contactless electronic ignition is one of the most useful improvements for domestic VAZs, in particular for the Six.
NIVA CARBURETOR: WE SET UP AND REPAIR YOURSELF
The carburetor on models 2121, 21213 and other cars has basically the same device. Functionally, it is located in the propulsion system, and with its help the fuel is mixed to the state of a combustible mixture. A carburetor, as a rule, consists of several main elements - a float chamber, a so-called jet (with a spray), a diffuser, and a throttle valve. It can have from one to four cameras on different cars, sequential or simultaneous opening of the throttle valves, horizontal, downward or upward movement of the working mixture.
Elements of the carburetor on Niva models
The carburetor circuit also includes: a drive lever from the accelerator pump, a diaphragm, an adjusting screw and an air duct from the starter, a shut-off valve (solenoid), an air damper, a needle valve, a fuel supply fitting, an economizer for power modes, a carburetor heating unit, fittings for crankcase ventilation, for supplying vacuum for the vacuum regulator in the ignition, and other elements.
Niva 2121 has the following sequence of passage of fuel elements through the carburetor chamber. First, fuel moves from the fuel tank to the float chamber in a controlled amount. The float rises or falls as the fuel moves.
Further, the fuel path lies through the nozzle into the atomizer, located in the narrow part of the diffuser, with simultaneous air entering the carburetor through the outer pipe. The throttle valves then deliver varying amounts of fuel into the engine cylinder through an intake manifold cast from aluminum alloys. The manifold is attached to the engine with studs through gaskets that have heat-resistant properties.
"Solex" and "Ozone"
The VAZ 2121 Niva model can be equipped with an “Ozone” carburetor with the serial designation 2107-110-7010-10 or 2107-110-7010-20. They differ from each other in that the first option has an old-style breaker and does not have a vacuum corrector. The second carburetor does not have a microswitch from the economizer, which affects the environmental friendliness of emissions and has some impact on fuel consumption.
The Niva 21213 is equipped with Solex type carburetors (model 21073-110-7010). They are considered quite “capricious”, which is primarily due to the negligence of the owners themselves. The incorrect operation of the device is primarily affected by low-quality fuel with a large amount of impurities, since in this model the fuel is taken through holes in the bottom of the float chambers (in other models these elements are raised above the bottom).
In addition, problems arise for those “nivovods” who do not promptly change the fuel or air filter, and also do not pay attention to proper cleaning of the carburetor from oil soot emissions through the ventilation system. Adjustment of the VAZ carburetor is usually carried out in the float mechanism or in the starting and idle systems
These are very important operations that are best left to the experts.
Adjustment of the VAZ carburetor is usually carried out in the float mechanism or in the starting and idle systems. These are very important operations that are best left to the experts.
The float mechanism on the Niva 2121 is adjusted in terms of the position of the floats relative to each other and relative to the walls of the float chamber. In addition, the mechanisms in the open and closed positions of the needle valve may need to be adjusted. In order not to disturb good adjustment, the car owner needs to carefully handle the carburetor cover when removing it, monitor the level of wear of the shut-off cone from the needle (its seat and tongue), as well as the axis of the mounting bracket.
We carry out the adjustment ourselves
Niva 21213 can be subject to adjustment of the starting system by the gap at the edges of the valves, if the carburetor is removed, or by the crankshaft speed directly on the car. In the first case, the gap at the location of the lower edge (in the direction of air movement) from the throttle valve is set to a width of 1.1 mm. It is adjusted with a screw that has a 0.7 cm hexagon on the head and a slot from the shank. This operation is carried out with the cam lever turned counterclockwise from the starting system control (all the way). In the same position, the gap at the lower edge of the air damper is set to 3 mm using a screw in the cover from the diaphragm mechanism in the starting system (you need to loosen the lock nut). At the same time, the rod from the diaphragm must be forcibly recessed completely into the adjusting screw. After adjustment, the screw is fixed with a locknut.
Modification results
The main concern that car owners have when tuning is the appearance of excessive fuel consumption. The engine, working with two carburetors, consumes fuel within normal limits, since the increase in power occurs mainly due to a more optimal ratio of fuel to air in each cylinder.
The increase in gasoline consumption occurs only due to a more aggressive driving style, which is observed after an increase in torque and power. Car owners provide maximum fuel supply to the cylinders when starting at traffic lights, since dynamic characteristics, as a result of this modernization, increase by 10-15%.
The reliability of this system is at a high level. Although the presence of additional components increases the risk of breakdown, if installation and adjustment operations are performed correctly, carburetors will not require owner intervention for a long time.
Installing a second carburetor cannot be considered an easy tuning. The car owner should realistically assess his strength before starting modernization. If you take a risk, the result will not take long to arrive. The significant improvement in low-end thrust thanks to the high torque and increased top speed are well worth the effort of installing two carburetors.
I ordered 2 times, the packaging was top notch, I was extremely surprised when I saw the hard ceiling I ordered for a classic vase. (Who is wondering if it fits 2106, then relatively speaking it fits) packed in a wooden “coffin”. 50 kg of wood were used to pack a 5 kg part. And this was not done in vain, the ceiling was a really fragile product, but despite this it arrived in perfect condition. In other respects, as well as other decorative tuning parts))) They threw in a counter part for the Stinger muffler for free. In a word, it’s a pleasure to work with such people) Where can I send my photos?
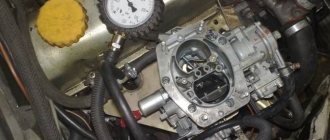
Engine starting
The engine needs to be sufficiently warmed up after the first start. By the way, it may not be possible to start right away and this is quite normal. Next, you should adjust the motor. You can turn to specialists or even bikers who have extensive experience in regulating multi-carburetor motorcycles using a vacuum gauge plate. It is possible to make such a thing yourself from econometers, although they have a very high error and require calibration. The quality sensor is placed in place of the spark plug and the color is checked - there should be a blue mixture at idle. The color should be like this everywhere - in the first, in the second, in the third, in the fourth. All that remains is to set the required speed using the quality screw, and that’s it. The suction is very easy to adjust, although in the summer it already works fine.
Operational indicators
There is an opinion that if you install two carburetors on a VAZ, then fuel consumption increases two or even three times. This is a very big misconception or even self-deception. In fact, the volume of fuel consumed does not exceed ten liters per hundred in the city, on the highway - a little more than eight liters. And these are very good indicators, if not simply excellent. The car's dynamics improve significantly, acceleration becomes faster and smoother.
Of the disadvantages of such a structure, only one can be noted - the price. The cost of two carburetors for a classic, as well as all additional and consumables, is quite a significant expense, especially if you own a Zhiguli. And if the car is far from new and has survived more than one decade, then it may not survive such innovations. It’s worth upgrading the whole thing to make sense of all this.
We would be interested to know how useful you found this material.
Features of the Niva 2121 carburetor
If we are talking about a carburetor, then you should know that this part is so named because its main functional purpose is carburetion or mixing. Indeed, fuel liquid and air are mixed in the carburetor. In addition, the supply of the resulting mixture to the engine cylinders is regulated.
The carburetion mechanism depends on the design of the carburetor device itself. Thus, the “native” carburetor on the Niva 2121 consists of:
- float chamber (the optimal functioning of the idle system and transition systems of all chambers depends on the level of fuel liquid in this device);
- jet (the main metering part through which fuel liquid and air enter the carburetor in metered quantities, they are also called nozzles or plugs);
- diffusers (they are narrowings in the carburetor pipes of both chambers; they are needed to increase the speed of air passage to the mixing chambers);
- throttle valve (mechanical type channel flow regulator, which is intended to change the amount of fuel liquid or gas passing through this channel).
The fuel supply mechanism through the carburetor device on the Niva 2121 has the following diagram:
- From the fuel tank, fuel liquid in optimal quantities enters the float chamber.
- Under the weight of the fuel liquid, the float chamber lowers.
- As the fuel liquid moves, the float chamber rises.
- After the fuel liquid passes through the float chamber, it enters the nozzle.
- From the nozzle, fuel is supplied to the atomizer (it is located in a narrow place in the diffuser).
- Air enters the carburetor device through the outer pipe.
- Through the intake manifold, a certain amount of fuel fluid is supplied by the throttle valves directly into the engine.
Main malfunctions of the Ozone carburetor
Like any mechanism, the VAZ 2107 carburetor sooner or later begins to act up, reduces its productivity and, in the end, may completely fail. The driver will be able to promptly notice the onset of a breakdown or malfunction if he carefully monitors the operation of the engine and carburetor. Thus, the following signs are considered symptoms of future breakdowns for Ozone:
- sharp pops when pressing the gas pedal due to detonation;
- high engine speed at idle;
- “floating” engine speed at idle, which indicates the need to adjust the idle speed;
- a long period of time between pressing the gas and accelerating the car. This is a sign of a malfunction in the drive of the second chamber of the carburetor or accelerator pump (or more often, both);
- black exhaust from the muffler, which is the first sign of clogged jets.
Engine won't start
The biggest problem with the carburetor is that the engine may simply not start - both cold and hot. This may be due to the following faults:
- valve depressurization;
- trigger wear;
- damper drive jamming;
- air damper axis play;
- ruptures in the diaphragm.
Video: what to do if the engine does not start
Overflows fuel
This malfunction is visible, as they say, to the naked eye. Spark plugs filled with gasoline do not produce a spark, and there may be puddles of fuel under the engine crankcase. The reasons lie in the following defects in the carburetor:
- breakdown of the starting device;
- instability of the accelerator pump;
- throttle valve sticking;
- clogging of jets;
- high fuel level in the float compartment.
Video: correct setting of the fuel level in the carburetor
No idle
Another problem typical for Ozone 2107 carburetors is the inability of the engine to idle. This occurs due to the solenoid valve being displaced from the workplace or due to its severe wear.
The solenoid valve on the Ozone carburetor is responsible for the idle speed of the engineHigh idle speed
With this problem, there is a jamming of the throttle valve axis of the second chamber. The damper must always be in a strictly defined position, regardless of the operating mode of the carburetor.
Preparing to modernize the engine power system
Connecting the carburetor to the manifold is not done on the car. This type of work is carried out in good lighting. Having connected the carburetors one by one to the intake manifolds of the Oka, you need to open both chambers and check the condition of the joint. It is strictly forbidden to allow the edges of the collector to protrude above the joint. The air-fuel mixture will swirl at the junction at high speed and the engine will starve.
Fitting intake manifolds
To eliminate protruding edges, use a metal cutter inserted into a screwdriver or drill. The transition between parts should be as smooth as possible. For better results, you can use sandpaper or special sanding pastes.
Installation of a polished engine power system
During a visual inspection, it is possible to detect sagging and casting defects in both the carburetor and the manifold. A car owner who independently installed and tuned the fuel system knows about the need for modifications, but a newbie may be surprised by the protruding pins inside the manifold. This creates strong resistance to air flow, which significantly reduces the effect of installing two carburetors.
Tools and components required for installing two carburetors
To carry out installation work you will need:
- wrenches ranging in size from 8 to 14;
- screwdrivers with flat and Phillips blades;
- pliers;
- drill, but you can also use a screwdriver;
- angle grinder;
- vice;
- metal cutter;
- vacuum gauge bar.
The following components will be required:
- 2 carburetors of a suitable model. It is advisable to use new ones, since the old ones are unable to produce the same mixture. The more identical the composition is supplied to the cylinders, the greater the increase in power will appear in the engine. Old carburetors can only be used during the experimental phase;
- When installing two carburetors on a classic, two intake manifolds from Oka will be required;
- Gas drive parts. Since one carburetor was previously installed, the throttle drive will need to be upgraded;
- Fuel lines and other technical hoses;
- To ensure greater effect from installing two carburetors, you will need to install an additional air filter.
2 carburetors
When installing carburetors, it may be necessary to secure the hoses, so it is advisable to purchase a set of clamps before starting work.
The meaning of replacing a standard unit
The factory equipment of Niva 21213 is a famous headache for owners. It is not bad, but many parts are strongly recommended for replacement. Their combination significantly reduces the possible potential of a domestic SUV. As for the carburetor, it is replaced for the following reasons:
- Installing a couple of parts. Two carbs are installed by those owners who do not have enough power. This arrangement is quite rare, because the same effect can be achieved by tuning or installing a more advanced carburetor.
- The second reason for changing the unit is to reduce the normally high fuel consumption. Rare use of an all-terrain vehicle for its intended purpose and city driving provoke excessive fuel consumption without using all the capabilities of the vehicle.
Read more: Replacing the rear wheel bearing of a Hyundai Sonata
Choosing a carburetor for VAZ 2101-2107
If you are the owner of a VAZ model (from 2101 to 2107), then you have probably wondered more than once how to increase the dynamics of the car or how to reduce the amount of fuel you consume. These two parameters depend on what kind of carburetor is installed on the car, how much it is adjusted, and whether it is suitable for adjustments at all. So, if this device is unusable or you just want to buy a new one, then you should know that there are many of them. Each is designed for specific conditions (environmental friendliness, dynamics, economy) and is designed for engine cubic capacity.
Tuning and boosting VAZ classic engines Lada Zhiguli 2101, 2103, 2106, 2107
How to increase engine power on “classic” VAZ models
The VAZ 2101, 2103-06 or Niva models, well known in the CIS, are usually called “classics”. The power units on these machines are carburetor and today are very outdated, however, given their prevalence, there are many who want to modify these internal combustion engines. The result may be boosting the engine to 110-120 horsepower. There are even examples with a power of about 150 hp. (depending on the quality and depth of modifications). In this article we will look at how to increase the engine power of a VAZ classic.
Increasing the displacement of the VAZ engine
As you know, one of the most important parameters in relation to internal combustion engines is the working volume. The engine’s power, throttle response, etc. depend on the volume of the engine.
It is more comfortable to operate a more powerful car, since the reserve of torque and power allows you to not “turn” the engine too much, since acceptable traction appears at lower speeds.
When it comes to increasing working volume, there are two main ways:
These methods are actively practiced for tuning AvtoVAZ serial engines, which are found under the hoods of different models. More precisely, we are talking about the very first engine on the “penny” 2101 with a power of 60 hp. or the “eleventh” engine 21011, and the VAZ 2103-06 power unit with a power of 71-75 hp. Also, do not forget about the carburetor 80-horsepower 1.7 liter engine on the Niva model and other modifications of the above-mentioned internal combustion engines.
So, let's look at a specific example. If you have a VAZ 2101 engine, you can bore the cylinders to 79 mm, and then install pistons from the 21011 engine. The working volume will be 1294 cm3. To increase the piston stroke, you need to have a crankshaft from 2103 so that the stroke is 80 mm. Then you will need to purchase shortened connecting rods (by 7mm). As a result, the volume will be 1452 cm3.
It is quite obvious that if you bore the cylinders and at the same time increase the piston stroke, the end result will be a “penny” engine volume, which will be 1569 cm3. Note that similar operations are carried out with other motors on “classic” models.
It is also important to consider that after installing a different crankshaft and increasing the piston stroke, the compression ratio increases, which will require the use of gasoline with a higher octane number. Additional adjustments to the compression ratio may also be necessary. The main thing is to choose the right shortened pistons, connecting rods, etc.
We also add that the simplest and cheapest method can be considered boring for repair pistons. However, even if the block is bored to the last repair size, the volume increases by no more than 30 “cubes”. In other words, you shouldn’t count on a significant increase in power in this case.
Sports junction box
To tune the VAZ 2103 engine, you can install a sports camshaft. You just need to remember that the exhaust cam must open the valve so that the cylinder has time to clear itself of combustion products. Otherwise, unburned gases will mix with the incoming fresh mixture.
If the closure is too early, the exhaust gases will not have time to escape and the mixture will be pushed into the exhaust. “Valve overlap” can occur due to the fact that as the piston passes through TDC, the intake and exhaust valves are open simultaneously during the transition from the exhaust stroke to the intake stroke. You should also remember about the timing of the camshaft.
Using a Vernier pulley or an adjusting pulley, you can set the camshaft to “advance”, then at its top dead center the intake valve will rise more than the exhaust valve.
What's the result?
As you can see, engine tuning, including classics, in terms of the scope of work largely affects the BC and cylinder head. However, we should not forget that the carburetor will also need tuning. It is not surprising that a forced engine requires more gasoline and air, that is, the carburetor also needs to be upgraded and tuned.
As for the parts for the internal combustion engine, everything will depend on the specific tasks. If the budget allows, it is best to install special connecting rods, replace cast pistons with forged ones, replacing bearings, etc. is also recommended.
Finally, I would like to add that if all the work is done correctly, then even a significant increase in engine volume does not greatly affect fuel consumption. Moreover, consumption may drop. The fact is that better traction, elasticity and throttle response of the engine after modifications allow you to spin the power unit less in lower gears for acceleration and maintaining the usual driving pace.
The main thing is to correctly configure the carburetor and ignition system, taking into account the changed working volume of the internal combustion engine. As a result, a forced engine increases the operating comfort of the vehicle, and the procedure itself is often cheaper than swapping an engine or, moreover, installing a turbocharger on a carburetor with minimal modifications to an existing power unit.
Possibility of installing a turbocharger on an engine with a carburetor. The main advantages and disadvantages of turbocharging on a carburetor car.
Refinement and modernization of the carburetor. The main disadvantages of the carburetor injection system and how to eliminate them, settings. Intake manifold tuning.
Boosting the engine. Pros and cons of modifying an engine without a turbine. The main methods of boosting: tuning the cylinder head, crankshaft, compression ratio, intake and exhaust.
Selecting a mechanical supercharger or turbocharger. Design, main advantages and disadvantages of solutions, installation on an atmospheric tuning engine.
Features of installing gas equipment on a turbocharged engine. What gas equipment is best installed on engines with a turbine. Tips and tricks.
Tuning the fuel system of atmospheric and turbo engines. Performance and energy consumption of the fuel pump, choice of fuel injectors, pressure regulators.
Maintenance schedule
The official manual explains the design of the internal combustion engine and the timing of replacing consumables when servicing the engine:
| Maintenance object | Time or mileage (whichever comes first) |
| Timing belt | replacement after 100,000 km |
| Battery | 1 year/20000 |
| Valve clearance | 2 years/20000 |
| Crankcase ventilation | 2 years/20000 |
| Belts that drive attachments | 2 years/20000 |
| Fuel line and tank cap | 2 years/40000 |
| Motor oil | 1 year/10000 |
| Oil filter | 1 year/10000 |
| Air filter | 1 – 2 years/40000 |
| Fuel filter | 4 years/40000 |
| Heating/Cooling Fittings and Hoses | 2 years/40000 |
| Coolant | 2 years/40000 |
| Oxygen sensor | 100000 |
| Spark plug | 1 – 2 years/20000 |
| Exhaust manifold | 1 year |
Thanks to its simple design, oil changes and even major repairs can be done yourself. In Soviet times, car enthusiasts practiced engine modernization, the options for which are discussed below.
Tuning the VAZ 2106 engine
The VAZ “six” began to be produced back in 1976. This model is long outdated both in appearance and technical characteristics. However, to this day there are still many adherents of using such cars. Some owners try to keep the car in its original form, others equip it with modern components and mechanisms. One of the primary units that undergoes tuning is the engine. Let's look at its modifications in more detail.
Summarize
Finally, we add that there are single-chamber and two-chamber models of foreign-made carburetors. The disadvantages of this choice include high cost, difficulty in setting up and maintaining, as well as not always better dynamics and efficiency compared to the DAAZ, Solex or Weber carburetor models listed above.
Features of adjusting the Solex carburetor. How to set the fuel level in the float chamber, adjust the idle speed, select jets, remove dips.
Carburetor cleaning: when to clean the metering device, signs and symptoms. Available methods for cleaning the carburetor without disassembling and removing it from the car.
Why does the engine shoot into the carburetor and into the exhaust system. Causes of popping sounds in the carburetor, additional symptoms, troubleshooting.
Carburetor structure, types and design features. Float carburetor, advantages and disadvantages.
Installing a carburetor instead of an injector, features of the process of replacing the injection system. Replacing the carburetor with electronic fuel injection. Recommendations.
The main reasons that lead to a lean mixture. A lean mixture on carburetor and injection internal combustion engines, as well as on engines with gas equipment. Diagnostics, repair.