November 26, 2015 Lada.Online 92 487 33
During the operation of the vehicle, various malfunctions may occur, which are recorded and stored in the engine electronic control units (ECU) in the form of error codes. Using diagnostic adapters and scanners, you can read errors from memory and determine the cause of problems.
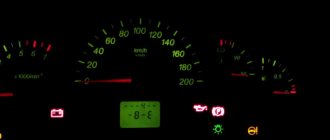
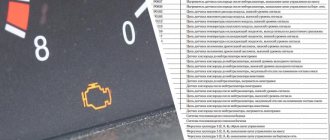
If errors occur, the Check Engine indicator lights up on the dashboard. For computer diagnostics of Vesta or XRAY, you should connect to the OBD-II connector and use a special program to download error codes. They can be decrypted as follows:
- first character (B - body; C - chassis (suspension); P - engine (ECM), gearbox; U - data exchange bus.)
- second character (0 - standard (SAE); 1, 2 - factory (OEM); 3 - reserved.)
- third character (1, 2 - fuel system; 3 - ignition system; 4 - reduction of exhaust gas toxicity; 5 - idling; 6 - ECU or its circuits; 7, 8 - transmission (automatic transmission).)
- the fourth character is the error code.
Advice
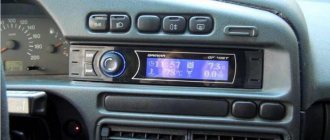
: To read errors in electronic units, car owners often use the ELM327 adapter (buy on Ali) and the OpenDiag application in their smartphone.
List of control system sensors
KSUD - vehicle control system controller, is a complex device with its own operating algorithm. It accumulates signals coming from all vehicle systems. The following types of sensors are installed on Vesta:
| Abbreviation | Decoding |
| DDTV | Air pressure and temperature sensor |
| DTV | Air temperature sensor |
| DBP | Absolute pressure sensor |
| DPKV | Crankshaft position sensor |
| EPA | Electronic gas pedal position |
| DPPA | Accelerator pedal position sensor |
| TPDZ | Throttle position sensor |
| UDC | Control oxygen sensor |
| DTOZH | Coolant temperature |
| DD | Knock sensor |
| DF | Injection phases |
| DSA | Linear speed of the car |
| DDH | Air conditioning system pressure |
When the vehicle is equipped with an automatic transmission, the system additionally receives signals from the transmission. Sensors for transmission oil temperature, end positions of switching and spool mechanisms, and hydraulic unit rotation speed are located directly on the gearbox housing.
Where is DPRV located?
In cars of the Lada family, the phase sensor is installed in the upper part of the cylinder head (cylinder head), behind the camshaft pulley.
Access to the controller for maintenance is through the top of the engine compartment. No additional dismantling is required.
Operating principle of the controller
The ECM has its own RAM and is capable of storing error codes. It is, in fact, a central processor that controls the actuators. The controller is located in the engine compartment on the left shock absorber support.
Functions:
- car ignition control;
- internal system diagnostics;
- turning on the warning indication on the instrument panel;
- storing error codes in memory;
- emergency warning.
The M86 controller exchanges data with vehicle system sensors by transmitting a signal via a high-speed CAN bus. Due to this, the data is updated every 0.05 seconds, and the car is always under complete control.
The device, like a personal computer, has 2 types of memory:
- constant - ROM;
- operational - RAM.
It is important to remember that the controller is powered by reduced voltage. Any surges are detrimental to microprocessor boards. Therefore, before starting any work, you must disconnect both terminals of the battery.
Other automaker definitions for P1602
- Engine Control Module (ECM) Anti-lock Braking System (ABS) / Traction Control System (TCS), CAN Data Bus - Communication Failure (GM).
- Battery Voltage Monitor - Malfunction (Toyota).
- Engine Control Module (ECM) - Low Battery Voltage (Volkswagen).
- Engine control module (ECM) - low battery voltage (Audi).
- CAN Data Bus - Anti-lock Braking System (ABS) / Traction Control System (TCS) (Buick).
- CAN Data Bus - Anti-lock Braking System (ABS) / Traction Control System (TCS) (Cadillac).
- CAN Data Bus - Anti-lock Brake System (ASS) / Traction Control System (TCS) (Chevrolet).
- Engine Control Module (ECM) Unprogrammed (Chrysler).
- Engine Control Module (ECM) Unprogrammed (Dodge).
- Transmission Control Module (TCM) - Serial Communication Problem (Hyundai).
- ECM communication with ABS - circuit malfunction (Isuzu).
- Engine Control Module (ECM) Unprogrammed (Jeep).
- Transmission Control Module (TCM) - Communication Lost (Kia).
- Battery voltage monitoring - malfunction (Lexus).
- Immobilizer control module/engine control module (ECM) - communication error (Mazda).
- ECM for LSI system - communication failure (Mitsubishi).
- CAN Data Bus - Anti-lock Brake System (ABS)/Traction Control System (TCS) (Oldsmobile).
- Engine Control Module (ECM) Unprogrammed (Plymouth).
- CAN data bus. Engine Control Module (ECM) Anti-Lock Braking System (ABS)/Traction Control System (TCS) - Signal Malfunction (Pontiac).
- Engine control module (ECM) - faulty (Saab).
- CAN Data Bus, Anti-Lock Brake System (ASS), Traction Control System (TCS) to Engine Control Module (ECM) - Lost Communication (Saturn).
- Engine Control Module (ECM) - Programming Error (Subaru).
- Electronic Throttle System (ETS), Throttle Return Spring - Malfunction (Volvo).
Sources
- https://voditeliauto.ru/poleznaya-informaciya/to-i-remont/kod-oshibki-p1602.html
- https://elm3.ru/diagnostika/oshibka-p1602
- https://remontvazov.com/oshibka-1602-na-vaz-2114
- https://kody-oshibok.ru/avtomobili/vaz/oshibka-1602-na-avtomobilyakh-vaz.html
- https://etlib.ru/blog/1166-oshibka-r1602
Diagnostics
Diagnostics of the Lada Vesta car control system is a simple and understandable process. Part of the work is performed by the ECM, independently determining the current state of the main components. In a situation that requires the driver's attention, it can turn on the "Mil" signal mnemogram. This will mean that the diagnosis needs to be performed soon, but the fault is not critical.
In many ways, the correct behavior of the car depends precisely on the condition of the internal combustion engine. The main deviations that can be mistakenly identified by a diagnostician as an electronics failure are:
- reduction of compression in cylinders;
- presence of air leaks in the air tract;
- violation of gas distribution;
- low fuel quality;
- wear of friction pairs in engine mechanisms.
In each case, it is necessary to investigate the error in detail and check all the systems that contribute to its occurrence.
Review of Manufacturer Prices
| Name/catalogue number | Price in rubles |
| Original 21120-3706040 | From 350 – 400 |
| Original 21120-3706041(1) | From 350 – 400 |
| *prices are as of 05/01/2019 | |
Conclusion
The performance of the entire vehicle depends on the functionality of the controller. It is important to carry out systematic diagnosis and prevention. The replacement process is not at all complicated, but it requires attentiveness on the part of the master. Don't break the rules. When purchasing spare parts, carefully check the catalog numbers.
Fault codes
In the process of assessing the technical condition of a car, it is necessary to be able to decipher not only error codes, but also use diagnostic cards. Detailed information about the operating logic of the M86 electronic controller is presented in the operating manual and technical description of the product.
The most common errors that occur during vehicle operation are presented in the table below.
| Error | Meaning |
| P0106 | The pressure sensor is faulty. Air intake section |
| P0101 | There is no signal from the air pressure sensor |
| P0130 | Malfunction of the oxygen sensor in front of the converter |
| P0140 | No common oxygen sensor circuit |
| P0201 | Cylinder No. 1 injector faulty |
| P0202 | Cylinder No. 2 injector faulty |
| P0203 | Cylinder No. 3 injector faulty |
| P0204 | Cylinder no. 4 injector faulty |
| P0217 | Engine temperature limit |
| P0300 | Engines have misfires |
| P0327 | Low signal from knock sensor |
| P0340 | Incorrect signal from the crankshaft position sensor |
| P0363 | Misfire, cylinder forced off |
| P0422 | Low efficiency of the neutralizer, possible clogging |
| P0459 | Canister purge valve malfunction |
| r2103 (2105) | Cylinder failure, misfire |
| P1602 | No power to the controller |
| P1559 | Throttle valve malfunction |
| P1570 | Immobilizer faulty |
| P2101 | Malfunction of the electric damper drive |
| P0901 | Electric clutch malfunction |
| P1303 (13 03) | Extremely low engine speed |
| P2187 | Low gasoline content in the air mixture |
| P2188 | Excessively rich air mixture |
What are misfires?
Even a poor student knows that ignition without a flash is impossible. Moreover, under pressure and in difficult conditions, such as the combustion chamber. A whole complex is responsible for the quality of spark formation, from spark plugs to the firmware of the electronic engine control unit.
The four-cylinder engines VAZ 21129 and 21179 with a volume of 1.6 and 1.8 liters, which are installed on the Lada Vesta, can hardly be called problem-free. Misfires in them are quite common, and it is expressed as follows:
- engine tripping;
- vibration at idle, unstable idle speed;
- difficult starting when cold;
- failures in engine operation at medium speeds;
- failures in traction during acceleration;
- high fuel consumption;
- the appearance of errors when scanning the system and a number of other symptoms.
Therefore, misfire is a temporary cessation of sparking at one or more spark plugs while the engine is running.
Passes can be either floating or stable. That is, the spark may disappear only on one specific cylinder, or it may appear alternately on several or all cylinders at once.
Features of the manifestation of error P0901
Many motorists have experienced severe clutch failure. The first signs are the blinking of the “gear” icon on the instrument panel. This is followed by uncontrolled shutdown of the transmission. This is very inconvenient for the driver, as he loses the opportunity to even pull over to the side of the road, often not understanding what is happening to the car.
If a similar situation arises on the way, it is recommended to turn off the engine and wait 2-3 minutes for the RAM to reset. After restarting the engine, the error disappears for a short time. This is enough to leave the lane or stop on a traffic island.
Error P0901 is a malfunction of the clutch actuator in 99% of cases and only 1% is a software failure. A licensed car service determines the malfunction quickly enough. Error sign “4b” indicates overheating of the couplings and the entire mechanism. The cost of the actuator ranges from 5,000 to 8,000 rubles. To replace it, you will need to drain the oil from the gearbox, disconnect part of the intake tract and sensors.
As a rule, the first signs of malfunction appear after 60-70 thousand km of intensive mileage during the first two years of operation. You should not downplay the significance of this error, since a faulty actuator will sooner or later lead to the need to replace the entire Vesta clutch mechanism.
Lada Vesta alarm installation with can bus
Ignition switch: +12 – brown ign1 – blue/black starter – red Instrument panel: turns – blue and blue/black handbrake – brown/blue (in the diode)
Driver’s threshold: driver’s limit switch – red/green, we connect the rest to it doors
Under the hood: Tahoe - white/black on the ignition module, the hood tip is in its normal place
Trunk limit switch – we install the connector on the trunk (the limit switch is already in the lock).
central locking .
Robot error indication
The phenomenon of indicating a malfunction in the Lada Vesta robotic gearbox is a common phenomenon even on new cars. But according to the statements of AvtoVAZ designers, it is not a malfunction. The car can continue to be used in normal modes.
The main reason is said to be a “conflict between the box control system and additional equipment,” including the security alarm. Sometimes the alarm appears when the battery is low. During winter periods, cold transmission oil also causes an error.
With frequent stops along the route and the nominal load of the machine, temperature sensors send signals to the security system. The clutch periodically slips briefly, which causes the information indicator to light up. The same situation can arise when driving along a long climb.
As a measure to stabilize the operation of the gearbox, it is recommended to set the shift lever to the “neutral” position in all possible situations: stopping in a traffic jam, parking at traffic lights, waiting for a passenger. During this time, the transmission oil has time to “calm down”, foaming decreases, and the automation begins to operate normally.
The first engine starts after frost are often accompanied by the appearance of an indication. It disappears when you start moving or the oil temperature in the “robot” reaches 40-500C.
On which cars is this problem most common?
The problem with code P0342 can occur on different machines, but there are always statistics on which brands this error occurs more often. Here is a list of some of them:
- Cadillac (Cadillac CTS)
- Chery (Chery A15, Amulet)
- Chevrolet (Chevrolet Aveo, Captiva, Lanos, Lacetti, Optra, Rezzo, Spark)
- Chrysler
- Citroen (Citroen C4)
- Daewoo (Daewoo Lanos, Leganza, Matiz, Nexia, Nubira)
- Ford (Ford F-150)
- Hyundai (Hyundai Accent)
- Opel (Opel Corsa, Frontera)
- Peugeot (Peugeot 308, 3008)
- Skoda (Skoda Octavia, Fabia)
- Toyota
- Volkswagen (Volkswagen Passat)
- VAZ 2110, 2112, 2114, 2115
- Gazelle
- Lada Vesta, Kalina, Niva, Priora
- UAZ
With fault code P0342, you can sometimes encounter other errors. The most common ones are: P0008, P0022, P0335, P0340, P0341, P0343, P0345, P0346, P0347, P0348, P0349, P0365, P0366, P0367, P0368, P0369, P0390, P0391, P0392, P039 3, P0394, P1133, P1396 .
Checking the serviceability of the instrument console
The owner of Vesta can promptly notice deviations in the normal operation of the systems only if the dashboard is in full working order. The built-in automatic diagnostic function can prevent up to 90% of failures. Timely intervention and repairs save money on expensive replacement of components, parts, and mechanisms.
The test is performed automatically every time the engine is started. To assess the serviceability and readiness of devices, it is enough:
- turn off the car ignition;
- press and hold the “up” button on the on-board computer for several seconds;
- Set the ignition to the “On” position.
After this, all the arrows on the instrument panel should deviate to the maximum amplitude, and all indicator lights should light up at full intensity. This indicates the serviceability of the electrical system and its readiness to initiate readings.
Checking Vesta ignition coils
In the case when all the symptoms of misfires are confirmed by the presence of errors P0300 or others except P2301 (2302, 2303, 2304), first of all we unscrew the spark plugs and inspect their condition. If the error code does not indicate a specific cylinder, change the set of spark plugs and perform a test run.
Lada Vesta is equipped with AU17DVRM spark plugs from the factory, and we figured out how to choose a replacement for them here .
If replacing the spark plugs does not lead to anything, we look for a non-working coil. There are two options here - if we suspect a specific cylinder, we simply swap the coils with a known working one. This will show if the problem is in the coil.
That is, having error P2302 with misfires in the second cylinder, we swap the coils of the second and first cylinder. If the error remains unchanged, the problem is not with the coil; if the error changes to P2301 , then the coil is to blame.
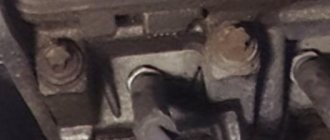
Suspicious coils can be tested in another way. To do this, you need to have the same diagnostic tools ( ELM 327, OpenDiag ), a piece of wire about a meter and a faulty spark plug.
We will carry out the test using the method of increasing the spark gap by 16-17 times. If the coil is faulty, it will not be able to generate a spark at that distance. The professional device MM-VR-01, shown in the photo, works on the same principle.
It allows you to increase the spark gap to 15-16 or 6-7 mm , which corresponds to a voltage of 24 and 16 kV , respectively. Therefore, if sparking at a distance of 16 mm is noticed, the coil is considered conditionally working. “Conditionally”, because in real operating conditions in the cylinder both high pressure and high temperature also affect sparking.
Using a grinder, cut off the threaded part from the candle. We select a piece of powerful wire to connect the spark plug to the negative terminal of the battery.
It is important that the contact of the wire with the spark plug and with the terminal is perfect. To do this, we use a threaded clamp on the spark plug, and a good washer on the battery terminal.
We insert the test device into the coil that we will test. Now we launch the diagnostic adapter and the OpenDiag program. On the first tab of the program we find a button with the number of the coil being tested. All that remains is to press the button and evaluate the quality of the spark at the spark gap.
Spark when checking the ignition coil.
Then everything is simple: there is a spark, the coil works, there is no spark - the coil is definitely faulty.