To prevent the engine from detonating, special rubberized parts were invented - supports. They reduce vibrations at any speed. The cushion, also known as the engine support for the Lada Priora with 16 valves, can be: lower, upper, left and right - they provide connection between the power unit and the body and limit its movement.
The price of parts starts from 500 rubles. Read the article to the end, it will tell you about which companies produce Priora engine mounts. Let's talk about analogues, their article number and price. How to replace supports on a 16 valve motor and what keys to prepare for the job!
The top guitar looks like this
Standard engine mount - article number and price
On Lada Priora with 16 valve engines, four types of airbags are installed:
- The top support is also a guitar;
- Bottom.
- Right (front);
- Left(back);
By the way, engine mounts for Lada Priora are available in several versions. New sample parts have the best performance.
Some car enthusiasts additionally install another cushion attached to the gearbox. The VAZ-2110 with an 8-valve engine was standardly equipped with this element.
Right
The right (upper) front engine mount on the Priora is attached via a bracket to the engine, it is used for:
- Transferring the weight of the power unit to the body;
- Limitations on longitudinal movements of the motor.
Part number – 2110-1001240. In retail stores it costs 300-600 rubles. On sale you can find one pillow (only a rubber part) or assembled with metal stops.
Left
The left one, when viewed in the direction of travel, is the car engine mount, installed between the gearbox and the body, and performs the same functions as the right one. Another name is posterior (lower).
The rubber part of the cushion is identical to that used on the right, catalog number: 2110-1001240. But the fastening of the front and rear parts of the Lada Priora power unit is different, so the spare parts supplied assembled with limiters come as two different parts.
Upper
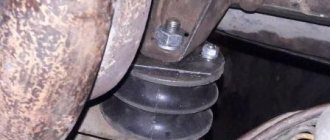
The upper support of the Priora power unit prevents the lateral movement of the motor. This part is a rod, along the edges of which there are large-diameter holes; rubber cushions are installed in them to dampen vibrations. Because of its shape, the top rod was popularly nicknamed “guitar.” In some repair manuals the part is called a rod.
The upper “guitar” is available in several modifications. A special aluminum frame and improved damping pads used on new parts increase the service life of the unit.
The catalog number of the upper rod of the motor is 2112-1001300. The price, depending on the specific modification and manufacturer, ranges from 600 to 1000 rubles. You can find it cheaper in online stores.
Replacing the upper support (rod) of the Lada Priora engine is easier and therefore faster than replacing other mountings of the power unit of this car.
Lower
The lower engine mount, also known as the right rod, in the Lada Priora is the same as the upper one, these are two identical parts. Therefore, everything that is said about the upper “guitar” is true for her. Sometimes the lower engine mount is called the rear engine mount, which in the Lada Priora spare parts catalog is designated as the left engine mount.
Additional at the checkpoint
Additional support is not provided for the 16-valve Lada Priora engine. But Prior owners often install it themselves. This does not require any modifications; the design of the gearbox housing and body of the Priora is similar to the VAZ-2110.
Its installation makes the engine mount more rigid, jerking when driving in low gears, and “nodding” of the power unit during sudden accelerations and stops stop. But the vibration transmitted to the body increases.
The rear gearbox rod is designated in the catalog number 2110-1001280 and is supplied assembled with a mount. Price – 500–800 rub.
Chassis
Many drivers believe that the suspension has become too soft, that is, there is no “feedback”. For decades, the car owner has become accustomed to feeling every bump on the road in a VAZ - this gives confidence in driving, since the driver “feels” the road and the car.
This effect appeared due to the modified suspension system
Nevertheless, the car handles perfectly, and this is felt even with a slight turn of the steering wheel. But at low speeds and during maneuvers at the very beginning of the movement, the steering wheel is a bit heavy. ABS is not provided.
The brake system is still the same:
- front disc brakes (with vacuum booster);
- drum brakes at the rear;
- Braking is confident and effective, and the system itself is simple and easy to maintain.
The car, with all its existing shortcomings, is still quite successful, especially if you take into account its reasonable price
Manufacturers and prices of analogues
Powertrain cushions for Lada Priora are produced by many manufacturers. The most common brands are:
- BRT - parts from the famous Balakovo Rubber Products Plant;
- Lada Detal – original Lada spare parts from conveyor suppliers, in particular AvtoVAZ subsidiary VIS;
- Riginal is a fairly young brand of PKF Niagara.
Technologies of the future - rods of a new type are produced under this brand.
The cost of spare parts from these manufacturers is approximately the same, the difference in price depends mainly on the specific store. Some companies supply kits for replacing all suspension elements of the power unit at once. Such a purchase is usually more profitable than purchasing spare parts separately.
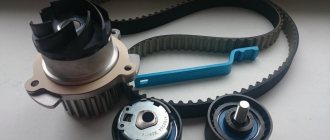
Replacement: removal and installation of Priora engine mounts
To replace the power unit suspension, you will need the following tool:
- Socket wrenches with heads 13, 15, 17, Torx E10, preferably with extensions;
- Open-end or ring wrenches for 13, 15, 17;
- Jack.
It is not necessary to use a complete set of spanner and socket wrenches of the same size. However, the presence of all the listed keys will significantly simplify and speed up the work. When replacing side rods, the power unit must be jacked up to unload the components being replaced.
Replacing the left support is done in two ways
The first involves removing the part assembled with limiters. To complete it you need:
- Tighten the nut from the bottom of the car, which secures the part to the gearbox bracket;
- Unscrew the bolts securing the rod to the body and remove it.
To implement the second option, in which the consumable is disassembled, you will need:
- Unscrew the pillow nut from above;
- Remove the upper limiter;
- Unscrew the bolts securing it to the body;
- Remove the part, then the lower stop;
- Assembly is performed in both cases in reverse order.
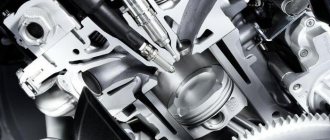
Assembly of a 16 valve VAZ 2112 engine
EXECUTION ORDER
|
| EXECUTION ORDER |
We assemble the engine in reverse order.
| previous page 4.35. Removing the engine from the car | to contents | next page 5. Cooling system |
Copyright 2007-2019 All rights reserved. All trademarks are property of their respective owners.
VAZ 2110 engine assembly
Assemble the engine on a VAZ 2110 car as follows. Place a clean cylinder block on the stand and screw the missing studs into the cylinder block. Install the generator mounting bracket and secure it with two bolts. Lubricate the bearing shells and thrust half rings of the crankshaft, as well as the pistons and oil seals with engine oil. When assembling the engine after repair, install new crankshaft oil seals. Install liners with a groove in the 1st, 2nd, 4th and 5th seats of the cylinder block, and liners without a groove in the 3rd seat of the cylinder block and in the main bearing caps. Place the crankshaft in the main bearings and insert the thrust half-rings into the seat of the middle main bearing (Fig. 2-18).
Warning The half rings must have their grooves facing the thrust surfaces of the crankshaft (an antifriction layer is applied to the surface of the half ring on the side of the grooves).
A cermet half-ring (yellow) is placed on the rear side of the crankshaft middle support, and an aluminum-steel half-ring is placed on the front side. Install the main bearing caps in accordance with the marks on their outer surface (Fig. 2-19).
Replacing the right (upper) engine mount of a Priora car is carried out in a similar way:
- The central nut securing the support to the engine bracket is unscrewed.
- The two bolts securing the part to the body are unscrewed. As a rule, they have heads - Torx E10, but on some Priors there are ordinary hexagonal 13 keys;
- The front upper rod can be removed together with the bracket by unscrewing the three bolts located on the inside of the wheel arch.
- It will be more convenient to get the consumable with the bracket if you remove the generator belt;
- For replacing the upper and lower rods. It is enough to unscrew two bolts: one from the side of the power unit, the other from the body.
When replacing the top cushion, the nut of the bolt securing the rod to the body can cause difficulty: it is hidden from view and sometimes turns. To unscrew the bolt without any problems, you need to fix the nut with a flat screwdriver.
To achieve the effect, it is better to simultaneously replace all elastic suspension elements of the power unit.
Interior of the car
The interior of the twelfth model collected all the best from its previous “brothers”. Changes:
- The rear seatbacks are separated. Each of the backrests folds (moves forward as needed).
- The trunk has become significantly larger. Due to these changes, it became possible to transport long items, which summer residents like so much.
- Car owners complain that it is a bit dark in the cabin and the dashboard is not very visible.
- The assembly seems to be of high quality, but there are still pure VAZ noises and panel squeaks when driving.
- The power windows are controlled by buttons in close proximity to the handbrake, and this is not entirely convenient: it would be more appropriate to place them on the car door cards. In addition, such a drive is only on the front windows, and the rear windows are opened with “oars” - handles, and even then not in the basic configuration.
- There is an almost complete lack of sound insulation. However, almost all VAZs suffer from this. Even with loud music, you can hear the engine, chassis and rustling wheels in the cabin.
- As for the front seats, their performance is good, although the adjustments are very inconvenient. People of large build feel comfortable in this car - both the driver and the passenger on the right.
- The trunk is very convenient when loading - there is no shelf in the way.
- The driver has an excellent view.
- The rear seats are comfortable for passengers, although the gap between the roof and the passengers' heads is small.
The pedals are quite closely spaced. The driver experiences the greatest inconvenience from this in winter, when the shoes are wider.
This is interesting: Miss Tuning 2014 winner Veronica Klimovits
From the edge of the brake pedal to the console there is just over 100 millimeters, and many drivers have to press the accelerator pedal while keeping their right foot in an unnatural position, otherwise it can get caught in the brake pedal. The most interesting thing is that there are no such shortcomings in the “ten”. It is very possible that the convex panel on the side of the tunnel is to blame.
The interior looks much more modest in comparison with foreign cars of the same class.
Installing an additional gearbox cushion
The Priora already has the holes necessary to install this pillow, so in addition to the spare part itself with article number 2110-1001280, you will only need fasteners:
- 2 bolts M12x75.
- 2 self-locking nuts M12.
- 4 washers for M12 bolts.
- 2 bolts M10x30 with a thread pitch of 1.25 (for some cars a thread pitch of 1.5 is suitable).
- 2 engravers for M10 bolts. 8 wide washers for M10 (can be replaced with a smaller number when using thick washers, for example, from the cylinder head).
The replacement technology itself
- The part is attached to the gearbox bracket using M12 bolts with self-locking nuts.
- The washers are placed under the bolt head and under the nut.
- M10 bolts are screwed into the body. Between it and the rod body, you need to place washers so that the rubber rod does not touch the body.
To replace this rod, which will also be required over time, just unscrew the fasteners and replace the old one with a new one.
The good condition of the Priora engine mounts is the key to comfortable movement. At the same time, if you have a suitable tool, replacing components will not be difficult.