How to set up Lovato 4th generation HBO?
I decided to install gas equipment on my car and contacted a specialized office. They supplied me with Lovato equipment, but they couldn’t set it up correctly. My city is not large and the other companies that I could find did not install and service Lovato.
Main problems:
- the car barely pulled on the gas
- gigantic gas consumption
- Along with gas,
gasoline was consumed at the same time - after installing the gas system, the car started on gasoline with explosions in the exhaust system
After many attempts, I realized that they couldn’t adjust the gas for me like that and I would have to figure it out myself. Hopelessness is the engine of progress, we had to look for options. After googling a little, I found a huge number of manuals, but all of them were in one way or another incomplete and did not reveal the essence of the setup. I had to figure out a lot of things myself.
Lovato Easy Fast
Lovato Easy Fast is the official software for setting up Lovato LPG. To run the software, you do not need a license key, and it can work with both an original and a homemade cable. It is strange that the manufacturer does not distribute its product on the official website.
I used Lovato Easy Fast 1.7.4, it was easy to google and download.
Lovato Easy Fast - main menu
Main parameters of the “Configuration” section
Configuration Tab
- This tab contains the characteristics of your engine and gas system. Make sure all parameters are correct.
Switching
Lovato Easy Fast - “Switching” section
- Allow injectors to warm up - in this mode, in case of frost, the injectors will first turn on, work for a while, and only then gas will be supplied. This parameter will increase gasoline consumption.
- Idling Which fuel system will provide idle speed. Feel free to put on the gas.
- for switching : when decelerating, which corresponds to decreasing pressure on the gas pedal, and when accelerating, which corresponds to increasing pressure on the gas pedal. Most often, switching occurs without these actions, but sometimes in order to switch the car to gas, these conditions must be met.
- Reducer temperature for switching: Until the reducer warms up to the set temperature, the system will not switch to gas. If the gearbox is in good condition, we set as little as possible.
- Starting on gas with a warm engine after turning the ignition key, if the engine is warmer than the specified temperature, it will automatically switch to gas.
- Switching delay when the engine is hot: if the engine is hotter than the gearbox, but not hotter than the starting temperature on gas, then this rule works.
- Operation at high speeds.
- Gas In this menu you can configure the addition of gasoline when gas injectors cannot cope.
- Adding gasoline is a more detailed setting of the “Gas” option.
- Gasoline, everything is simple here, we exceeded the speed, turned off the gas, turned on gasoline.
Map
Lovato Easy Fast - “Map” section
- The Time/Rpm table is the most interesting part, this is where the settings will be made
- Sensitivity of additional injection - adding gasoline to the gas-air mixture during sudden acceleration.
Main parameters of the “Self-configuration” section
Lovato Easy Fast - “Self-configuration” section
- Time Gas time of opening of gas injectors
- Benz time. petrol injector opening time
- D.Gas gas pressure
- Self-tuning button automatic idle speed adjustment
HBO Lovato (Lovato)
We all know that one of the first countries producing LPG is Italy. It was in this country that gas-cylinder equipment became widely known and began to spread throughout the world. HBO Lovato has been produced in Italy since 1958.
During this time, the equipment of the Italian company has become widespread in more than 50 countries around the world. And every year the brand produces more than one million units of components for gas equipment. What is the reason for Lovato’s popularity all over the world, and in particular in our country? Let's figure it out.
About the brand
The brand was originally created as a family business. In post-war conditions, when fuel shortages played a big role, engineers were faced with the question of finding alternative fuel sources to gasoline. It was at that time that the founder of the company, Ottorino Lovato, drew attention to gas as an alternative to gasoline.
It was at Lovato’s production base that a model of a working gas multi-valve was first developed and constructed.
In modern realities, Lovato supplies its products to many countries around the world. A wide dealer network allows the end consumer to find the necessary units of Lovato gas equipment even in the outback of our country. Setting up equipment from an Italian company is not difficult.
Therefore, many specialists prefer to install equipment of this particular brand on cars.
In our country, the manufacturer provides a guarantee of up to three years for all its products. This is an excellent indicator that other brands cannot boast of.
Lovato manufactures all equipment in its own factories. This means that during installation there cannot be any problems with compatibility and subsequent operation. The standard delivery package includes:
- gas control unit,
- injectors,
- gearbox,
- multivalve
Advantages
- All components for the equipment are produced at one plant in Italy. After production, the units are tested, calibrated and adjusted part by part, each in its own set. This guarantees the quality of the products and their full compatibility during installation.
- Each equipment unit is marked with the date of manufacture and serial number of the unit. Using this data on the manufacturer’s website, you can check whether this item was actually produced at Lovato factories and is original.
- Lovato equipment is prepared for the climatic conditions, roads and gas quality of different countries. This is why Lovato injectors have a fairly good service life. According to the manufacturer, the injectors are capable of traveling up to 300,000 kilometers without replacing the repair kit. The manufacturer notes that some motorists managed to drive half a million kilometers. Although there were cases of failure even after 40,000 km.
- The manufacturer states that if at least one defective element is detected in a batch, it sends the entire batch of products for write-off and recycling.
- The company trains specialists in installing gas equipment at its factories. This guarantees the professionalism of certified installers.
Jet selection
There is a misconception that the jets are located at the end of the hose and are installed in the manifold; in fact, the jets are installed directly into the gas injectors.
Where can I find Lovato LPG jets?
Make sure you have the correct jets selected. Here is a table of diameters, depending on the power of one cylinder.
| Power per cylinder, hp | Diameter, mm |
| 13-20 | 1,6 |
| 20-26 | 1,8 |
| 26-29 | 2,0 |
| 29-34 | 2,2 |
| 34-39 | 2,4 |
| 39-45 | 2,6 |
If necessary, drill out the jets.
Gas equipment for carburetor
HBO of the first generations was intended for carburetor cars.
1st generation LPG was intended for carburetor cars
Last century? No, considering that 50 percent of the vehicle fleet in Russia consists of vehicles older than 10 years. More than 30 percent are cars produced by the Lada concern, plus a certain percentage of GAZ, UAZ, KAMAZ, and so on. And VAZ stopped producing carburetor models just 10 years ago.
For carburetor engines, gas cylinder equipment is the simplest. No electronics or sensors, just like the carburetor engines themselves. If you remove all the sensors and bells and whistles from fourth-generation gas equipment, you will get the first. The only negative is that if you install it on a carburetor, it needs adjustment periodically.
The carburetor engine or Otto power unit was popular in the world for a very long time until it was supplanted by a more economical and environmentally friendly injector. The injector was controlled by a computer; the adjustment of all systems and engine modes was entrusted to it. The carburetor was much simpler and more reliable than the injector. The carburetor of Hemi and other brands works quietly and after 50 years of operation, there is nothing special to break. An old American classic car with a huge multi-liter engine and a consumption of over 20 in quiet mode will come in handy with gas equipment.
DON'T WASTE MONEY ON REPAINTING! Now you can remove any scratch from the body of your car in just 5 seconds.
An old American classic car will come in handy with gas equipment
The carburetor did not have any electronic control systems, much less the injector. The carburetor regulates all the work with two holes and adjusting bolts, with the help of which the adjustment was made.
In the first generation, the dispenser is manual; it requires adjustment, just like the carburetor.
Diagram of gas cylinder equipment for a carburetor car
- Balloon. Usually mounted under the bottom of the car or in the trunk. And unfortunately, it takes up useful space.
- Multivalve. A special device located on the valve. Through it, liquefied gas enters the system.
- Refilling mechanism. Since the fuel is not liquid and is under pressure, it will not be possible to “pour” it into the neck. For these purposes, a special mechanism is used to safely connect the cylinder and the filling station.
- High pressure gas line. It's just a pipe through which gas flows.
- Gas filter. The gas is fairly clean, but it could contain debris.
- Gas valve. Locks or unlocks the gas supply.
- Reducer-evaporator. It is here that the gas returns to its normal state.
- Dispenser. They make the adjustments.
- Mixer. If it was not installed directly into the engine.
Self-tuning
Before tuning, it is recommended to drive a little on gasoline, this is necessary so that the gasoline brains “feel” the normal mode and correct the correction factors.
All self-tuning can do is accurately determine the timing of gas injection at idle. All other engine modes require manual adjustment. It’s a pity, most often gas workers limit themselves to only this mode.
We connect the cable to the car, turn on the Lovato Easy Fast program, initialization occurs, which takes some time. In the lower right corner the cable icon is displayed with a green check mark. From this moment you can start setting up.
Let's start setting up:
- Go to the Self-Configuration menu.
- Close the gas screw of the gearbox completely and open it a few turns. The gas pressure should be within 1.2
-
1.4
bar (indicator in the program at the top). - Click the auto-tune button.
Self-tuning start button
Self-tuning in progress
During tuning, the engine may stall or stall altogether, which indicates an incorrect injector diameter.
After successful completion of auto-tuning, press the “Gasoline” button (upper right corner), the car switches to gas, compare the “Gas time” and “Gasoline time” indicators, these 2 times should be approximately the same, as a rule, gasoline time is less than gas time by 1- 2 ms. The closer these indicators are, the better the engine will perform at high loads and at idle. If the gas time is too high, it is necessary to drill out the injector jets or increase the gas pressure; if it is too low, then reduce the gas pressure.
Gas reducer Lovato
In gas-cylinder equipment, the gearbox is given the greatest importance among all components. Its task: to provide the driver with the opportunity to reduce the pressure coming from the cylinder. Repair, namely adjustment, on a car gearbox involves working with one or two regulators: this is the main difference.
In principle, a gas reducer is a primitive pressure regulator designed to independently maintain a standard pressure value based on fuel consumption. As practice shows, the device supports it with minor fluctuations. The pressure decreases slightly with increasing gas flow. This is not a very significant point, but requires attention.
Manufacturer's offer
The Lovato gearbox design is characterized by versatility, simplicity and reliability. For Turkish artisanal producers, the manufacturer is a role model. Almost all generations of Turkish gearboxes have adopted the design of a flattened “drum”, at the ends of which there are two stamped covers. belongs to a family-type enterprise that was founded in the post-war period in conditions of acute fuel shortages. In modern conditions, Lovato is one of the leaders in the global gas cylinder system market. Repair, namely adjustment, of Lovato analogues depends on the following factors:
- generation of mechanism,
- number of regulators,
- fuel system.
Manufacturer product range:
- Lovato propane vacuum reducer for 90 and 140 kW. The device is intended for 1st generation LPG systems on carburetor-type cars with a power of up to 123 horsepower. The reducer is intended exclusively for conversion to propane.
- Lovato electronic propane reducer 90, 140, 170 kW. The device is intended for 1st, 2nd and 3rd generation HBO systems on cars of injection, mono-injection and carburetor types with engine power up to 123 horsepower. The reducer is designed for propane-butane.
- Lovato methane gearbox. The 2nd generation device is used for converting cars and buses to methane fuel.
Gear settings
Repair, namely adjustment, of the gearbox requires orientation in its settings. Propane analogues usually have two regulators, but there are also one. Methane type gearboxes are almost always characterized by one regulator. In their management, these settings are the most problematic.
Repair for the gas generation of gearboxes with one unique setting involves manipulation exclusively with the pressure of the transmitted gas.Lovato gearbox Vehicle owners with particular enthusiasm prefer to “tighten up” the pressure themselves. Having set the only correct and, what is very important, true pressure value, the fuel reducer alone will make it possible to limit gas consumption at operating power due to an element called the greed screw.
Repair has some difficulties when the screw is in the “closed” position. To maintain idle speed in this case, it is necessary to increase the pressure, the process of which involves:
- Checking the gearbox before tuning, namely, whether the “greed screw” is open.
- After the previous stage has been completed, adjustment work can begin.
Lovato gearbox design
Adjustment process
The Lovato gas regulator itself is presented in the form of a screw compressing a spring. In order to install it, you should consider:
- when tightening, the gas supply will be reduced by the reducer,
- when unscrewing, it will grow.
Sometimes screws are found with left-hand threads, most often they are right-hand threads. This moment depends on the designer’s imagination of the manufacturer. To simplify this task slightly, it is necessary to take into account: with any rotation it is characterized by the above characteristics of changes in gas pressure.
Adjusting the idle speed on vehicles is explained by the degree of engine shaking. His calm work indicates that the gearbox repair was carried out competently and efficiently.
So, start the engine and hold the throttle open. Then we smoothly release it and slow down until the power unit stalls. At the same time, do not forget the condition: the gas reducer of the car engine must continue to work. For “dummies”, an explanation: the engine will not stall completely if you start twisting the throttle valve in an arbitrary direction. If worse motor performance is observed, you will have to change the direction of rotation of the gearbox and restore its stable operation.
gear lovato
Setting up HBO yourself. Setting up the gas reducer
Description: Instructions on how to quickly and correctly set up LPG in your car. Normal gas consumption for Lanos... Highway 7.5l, city 11-11.5l. Mixed mode 10l. Regular spark plugs A17DVRM clearance 0.9.
If you liked the video, don’t forget to subscribe to the channel, this will help us make more interesting videos for you. Thank you for watching!
The essence of correct settings
The fourth generation of gas brains, unlike all previous ones, uses the native signal from gasoline injectors and adapts it into a signal for gas injectors, taking into account special coefficients that are stored in the fuel map. This allows you to take into account all the individual characteristics of any engines and install LPG on them without much effort. The whole point of good tuning comes down to the fact that you need to force the gasoline brains to work on gas and continue to think that they are running on normal gasoline.
Many people believe that using a fuel gas card you can “strangle” the engine and thereby save fuel, or add gas and make it more powerful. You need to understand one simple connection.
Problems, as with auto-tuning, arise from different adjustments throughout the fuel map. Somewhere the engine overfills, somewhere it underfills, and in the end this results in poor traction, high consumption and the gasoline brain gradually forgets how to work with gasoline correctly and when you switch to it, jerks, failures, and explosions occur in the exhaust system. It follows from this that there is only one correct throttle setting. If you want to tune your car, flash the petrol brain.
Design and operating diagram of gas equipment
Today, about 70 percent of gas cylinder systems sold in Russia are the 4th generation of gas equipment.
All manufacturers of gas cylinder installations produce identical configurations based on the principle of operation, but there are significant differences in gearboxes, nozzles, and additional controller options. The highest accuracy when supplying fuel is demonstrated by the 4th generation Lovato LPG.
In the 4th version of the gas system, the designers shifted the responsibility for controlling the fuel supply from gas equipment to the gasoline controller of the car.
HBO 4th generation Lovato, the connection diagram is as follows:
- The gasoline electronic control unit receives input pulses from the vehicle’s sensors and controls the fuel supply circuit, that is, it issues commands to gasoline injectors.
- At the moment when the vehicle switches to gas fuel, the ECU program turns off the supply of gasoline fuel, blocking the impulse passing through the wires to the standard injectors.
- The outgoing impulse from the gasoline controller to the standard injectors is modified according to the characteristics of the gas fuel (temperature and compression ratio are taken into account) and is sent to the gas injectors.
The 4th generation Lovato gas equipment scheme has become revolutionary in the way of converting injection cars to alternative, economical fuel.
With the development of the fourth generation, gas devices began to rapidly conquer the market, pushing aside carburetor equipment.
4th generation gas equipment is in greatest demand today. It can be installed on almost any injection vehicles. The connection diagram for Lovato 4th generation LPG to the injector is simple in principle and produces good results during operation.
On a note! The evolution of gas equipment today has reached the point where gas “brains” are already able to exchange information with gasoline ones. The map sensor actively uses an information exchange protocol; such an electrical circuit makes it possible to improve the accuracy of gas supply to the internal combustion engine.
Fine tuning(Online tuning)
After successful completion of self-tuning, you can proceed to the precise configuration of the fuel map.
Fuel correction:
Install the ODB adapter in the car's diagnostic socket, connect to it via Bluetooth from your phone using Torque (or a similar program). Display graph information about long-term and short-term correction. The essence of these parameters is to adjust the fuel. If any situation arises when the engine is supplied with a mixture that is too lean or too rich, then the opening time of the injectors is compensated by this coefficient. For example, clogged injectors will make the mixture leaner and the correction factor will increase. As a rule, this parameter cannot go beyond ± 25%. If a mixture problem persists for too long, the short-term correction is included in the long-term correction.
When setting up LPG, we will need to check the fuel correction coefficients for gasoline and gas and “press” the gas correction to the gasoline one in different operating modes.
Setting algorithm:
Setting up is best done with two people. Driver and adjuster. A more or less flat section of the road is selected, on which the same engine speed can be maintained for a long time.
Each cell in the fuel map corresponds to an injector opening time of 20 ms. Each injector is 8-bit, which means it has 256 time levels. 0-minimum value means that the injector is closed, 255 maximum value means that the injector is open full time.
It makes sense to make adjustments only in operating modes; say, if you do not “turn” the engine more than 4500, then there is no point in adjusting the map higher. The setting is carried out in stages, at each stage the engine speed increases by 500 rpm. The car moves for a long time at an adjustable speed.
Let's start setting up:
In the Lovato Easy Fast program, go to the “Configuration” section in the “Map” tab.
- Gasoline supply is turned on (using a button in the program)
- The driver sets a constant engine speed and precisely maintains it during tuning.
- At these revolutions, correction factors are read out via ODB.
- The gas is turned on (by button in the program)
- The correction factors are read again.
- The cell under the point on the fuel map is configured. If the correction factor is too large, the cell value is reduced, if small it is increased. I recommend selecting the entire column and changing it by several units at once. (After highlighting, press the Enter key.)
HBO lovato fuel correction map
After setup, the card is inspected for sudden changes in modes. A well-tuned map is smooth, i.e. neighboring cells do not differ much in value. If there are uneven lunges, I recommend manually “straightening” the area around them.
If everything is configured correctly, you will get minimal gas consumption and maximum thrust.
Why is it worth installing gas equipment?
- The price of gas is significantly lower and does not change so dramatically depending on the situation on the global economic market.
- Propane, butane and methane are cleaner than gasoline.
- The gas burns almost completely and leaves no harmful emissions behind.
- The octane number of the gas is higher, detonation does not occur when using it, and the load on the engine is less.
- When the fuel tanks are fully filled, the car will be able to travel 200-500 kilometers more.
After installing LPG, the car will be able to travel 200-500 kilometers more
Setting up HBO without an ODB adapter
It’s a shame, but it’s not always possible to read the correct values from ODB. Sometimes the adapter is not just not compatible with gasoline brains. Let's consider the option of setting up Lovato HBO, when for some reason it is not possible to read the correction coefficients.
This method is not accurate; you will not be able to set ideal fuel map coefficients, but the adjustment error will be within acceptable limits.
Setting up without ODB is very similar to setting up with an adapter, but in this case, we will not be checking the correction factor, but the gas supply time. This is perhaps the most unstable value and it changes several times per second, one way or another, this is the only thing we can work with now. You need to read the average value of this value, for example, the parameter jumps from 4.5 to 5.0, in this case the average value is 4.75. To correctly adjust the timing of gasoline, it is important to drive on the smoothest possible road, with extremely equal speeds; any deviation is critical.
Let's start setting up without ODB:
- Gasoline supply is turned on (using a button in the program)
- The driver sets a constant engine speed and precisely maintains it during tuning.
- At these speeds, the average value of the gasoline injection time is read from the Lovato Easy Fast program.
- The gas is turned on (by button in the program)
- The average gasoline injection time is read again.
- The cell under the point on the fuel map is configured. If the gasoline injection time when operating on gas is longer than on gasoline, the cell value increases, if less it decreases. I recommend selecting the entire column and changing it by several units at once. (After highlighting, press the Enter key.)
Gasoline injection time
Gas injection time
8.4. MAIN MENU
From this menu you have access to all submenus of the calibration software, listed and separately described below:
The following information is provided at the bottom of the page:
1) Indicates whether the control unit is connected or not to the calibration software. It is important to remember that all settings and settings made when the control unit is not connected are lost at the time of connection, unless they are
saved in advance to a configuration file.
When the program opens, it automatically tries to connect to the control unit.
If the program does not connect, a window with an error message opens. At this point you need to check:
- serial interface connection,
— connecting the control unit to the battery and ground
— if the ignition key remains open for more than an hour, to connect, you need to turn on the ignition for a few seconds, or start the car.
By clicking the mouse button on icon 1, you can turn on (Ctrl+C) or turn off (Ctrl+D) the message.
2) Indicates the software version.
3) Indicates the firmware version; To update it, go to the “NEW BUILT-IN PROGRAMS” submenu and select the desired built-in programs from those offered.
ATTENTION: This operation is only possible if INTERNET EXPLORER version 5.5 or later is installed.
4) This is the name of the vehicle configuration. If a previously saved configuration is loaded into the control unit, the name of this configuration will appear. If the control unit is new, the message “StandardLovato#1” will appear, followed by the designation “LPG”.
5) Click on this icon to exit the program.
8.5. VEHICLE CONFIGURATION
This menu is created from 4 video pages on which you can set the parameters responsible for the operation of the gas control unit. At the top of all pages is a summary display of the current values of the general system operating signals.
1) This section shows whether the car is powered by GASOLINE or gas, the gas level indicator is displayed; In addition, there is a button that allows switching through the software.
2) This section displays:
REVS is the engine speed, which is read by the gas control unit in real time.
T. GAS is the gas temperature measured by a temperature sensor installed on the filter.
3) This section displays the injection time of gas (gas time) and gasoline (petrol time). Each variable can have one or two values, depending on the number of cylinder banks set in the Number of main bearings pop-up menu in the Sensors window.
4) This section displays:
G. PRES. This is the difference in pressure between the gas in the gas injectors and the gas in the suction manifolds, measured by a pressure sensor installed in the filter.
5) Inside this panel there are three indicator lights that light up when the vehicle is in EXTRA-INJECTIONS, CUT-OFF and DIAGNOSTICS states.
EXTRA-INJ. If the program detects additional injections, the corresponding indicator light illuminates YELLOW and turns GREEN for 2/300 ms to allow the operator to see the moment of the additional injection.
CUT-OFF The indicator light turns RED when the vehicle is in CUT-OFF state.
DIAGNOSTICS The indicator light turns RED when an error is detected by the installation diagnostic system. Clicking the mouse button on “Diagnosis” opens a diagnostic window to monitor the type of error.
8.5.1 CONFIGURATION
In this window you can set parameters that characterize the car.
ATTENTION
ALL PARAMETERS IN BLUE ARE SUBJECT TO MODIFICATION WITH THE IGNITION OFF AND THE SWITCH OFF.
• FUEL TYPE
This selection allows the control unit to be initialized with preset characteristic parameters to ensure correct operation for the type of fuel used. Choose:
LPG for cars running on LPG fuel (liquefied gas).
METHANE for vehicles running on METHANE.
In addition, when you select LPG or METHANE, the directory where the configuration files are saved also changes (see Loading the configuration).
• INJECTION TYPE
This function allows you to select a strategy for activating gas injectors, depending on the type of system:
SEQUENTIAL (RECOMMENDED OPTION) The GAS injector turns on with each injection of GASOLINE
FULL GROUP The GAS injector turns on with every two injections of GASOLINE,
• INJECTOR TYPE
This window allows you to select the type of GAS injectors supplied in the installation kit. If a previously saved configuration is loaded, this window indicates the type of gas injectors provided in the configuration file.
If the types of gas injectors previously stored in the control unit do not match the types specified in this window, a warning message will appear. To solve the problem, you need to load a configuration file that specifies the installed injectors, or replace the type of gas injectors installed in the control unit. If the injectors installed on the vehicle do not match the selected injectors, they will be controlled by incorrect parameters, causing incorrect gas operation or damage to the injectors themselves.
• REV SIGNAL TYPE
Prepare the control unit in advance to detect the speed signal through the BLACK wire:
STANDARD Select this option when connecting the BLACK wire to one of these signals:
- revolution counter wire with square wave signal 0? 12 V;
- the negative pole of the coil.
WEAK SIGNAL Select this option when connecting the BLACK wire to one of these signals: rev counter wire with square wave signal 0 ? 5 V;
— static switching signal with a square wave signal 0? 5 V.
These signals can only be determined using an oscilloscope.
• IGNITION TYPE
This parameter is used by the control unit to correctly calculate the engine mode, which changes depending on the type of ignition to which it is connected
BLACK wire. Install:
SINGLE COIL for vehicles with one coil per cylinder, if the BLACK wire is connected to the negative terminal of one of the coils;
DOUBLE COIL For vehicles with one coil for every two spark plugs, if the BLACK wire is connected to
the negative pole of one of the bobbins;
REVOLUTION COUNTER for vehicles with one bobbin and mechanical distributor, if BLACK wire
connected to the negative terminal of this bobbin, or in all machines where the BLACK wire is connected to the rev counter signal wire.
REVOLUTION COUNTER 2 not used
• NUMBER OF CYLINDERS
This parameter is used to show the control unit the number of cylinders present in the vehicle and therefore the number of gas injectors it must control; install 3 CYLINDERS (3 CYLINDERS) or 4 CYLINDERS (4 CYLINDERS) depending on the number of cylinders of the car.
• RESET _
When you click the reset button with the mouse, the program cancels all settings of the control unit and loads the standard setting.
8.5.2 SWITCHING
This window allows you to select the switching mode from gasoline to gas and vice versa.
• SWITCHING
In acceleration (during acceleration)
The transition from PETROL to GAS occurs during acceleration when the vehicle exceeds the speed set in “REV THRESHOLD FOR SWITCHING”.
In deceleration (when reducing speed)
In this case, the transition from PETROL to GAS may occur due to one of the following conditions:
- when the engine speed exceeds the value set in “REV THRESOLD FOR SWITCHING” and then falls below this value.
- when a Cut-Off occurs with a speed higher than the set value in “REV THRESOLD FOR SWITCHING”.
• REV THRESOLD FOR SWITCHING
Determines the engine speed at which the switch from gasoline to gas should occur.
• SWITCHING DELAY WITH WARM ENGINE (DELAY IN SWITCHING WHEN THE ENGINE IS WARM)
Defines the minimum time from the moment the engine starts until the transition from PETROL to GAS.
It is recommended to set the time to at least 25 seconds to ensure proper operation of the system.
• SWITCHING TO PETROL FOR LOW GAS TEMPERATURE (SWITCHING TO GASOLINE DUE TO LOW GAS TEMPERATURE)
If the GAS temperature drops below the set threshold, the control unit switches to gasoline and the corresponding diagnostics are activated (code S110). As soon as the GAS temperature allows this, the control unit automatically switches to gas again.
• ANTICIPATE INJECTION SEQUENCE
This is a controlled procedure that allows you to achieve automatic advance of the injection sequence and phase shift of gas injection; The size of the phase shift also depends on the "Number of main bearings" command on the F3 Sensors page.
This advance can improve machine performance, especially if the gas injectors are located far from the suction manifolds. This function is used only in cases where it is really necessary, since it disables the GRADUAL PETROL-GAS transition characteristic, effecting the transition immediately.
• IDLE OPERATION
GAS – when this function is enabled, the car always runs on GAS at minimum speed (default and recommended option).
CHANGE BACK TO PETROL - when returning to minimum speed, the car switches to gasoline power for a few seconds, then back to gas, in some cases avoiding shutdown during this phase. It is recommended to use this function only when absolutely necessary. The value "Revolutions for indications of the minimum" sets the number of revolutions below which this strategy is activated.
PETROL (PETROL) – operation at minimum speed, below the set speed value – is always carried out on gasoline. The gas operating mode is restored when the speed exceeds the set value. This function should
be used only if operation at minimum speed on gas is practically impossible, is unstable or leads to frequent shutdowns.
The fact that the system is running on petrol is not detected on the switch, which continues to indicate running on gas, but it can be detected on the computer by the gas injection time being reset to zero.
By the way, during this phase the switch continues to indicate the gas operating mode, and the gas solenoid valves remain on. In the case of the presence of an advance converter, the power of which continues in this phase, attention must be paid to ensuring that the specified advance does not interfere with the operation of the system.
• OPERATION AT HIGH REVS
GAS - The machine operates on gas. When the gas injection time limits are reached (gas exceeds the cycle time), a small portion of gasoline is simultaneously added. The instructions on the switch remain as when operating on gas.
By removing the “checkbox” in the window, it is possible to disable this function, and if the gas time limit is reached, the car switches to gasoline with a corresponding message on the switch.
PETROL (PETROL) – The machine operates temporarily on gasoline at high engine speeds and high loads.
It is possible to set both the speed and the injection time, exceeding which the machine will switch to gasoline: to operate on gasoline, both conditions must be met. In this case, the switch displays readings for gas mode.
PETROL CONTRIBUTION - you can introduce a small portion of gasoline while running on gas. You can set the injection time, after which a portion of gasoline is supplied, and set the milliseconds of this supply. This flow rate is then subtracted from the petrol injection time before calculating the corresponding gas injection time.
8.5.3 SENSORS
In this window you can configure the level sensor.
• NUMBER OF BANKS
This selection is used to set the number of cylinder banks into which the engine is divided.
• SECOND BANKS CORRECTOR (SECOND ROW CYLINDER CORRECTOR)
When setting the number of cylinder banks to two, this position will appear. In cars equipped with two front lambda probes, this function allows you to linearly change (strengthen or weaken) GAS carburetion relative to the second row of cylinders if the two rows are slightly unbalanced.
In particular, using this parameter, on 4-cylinder vehicles, the carburetion of gas injectors B and C is unbalanced relative to the carburetion of gas injectors A and D.
• GAS LEVEL INDICATOR TYPE
Tells the gas control unit what type of level sensor was used:
LOVATO1050 — install LOVATO/AEB 1050 if a sensor with a standard LOVATO1050 output signal is connected to the gas control unit. To connect, refer to the wiring diagram of the gas control unit.
LOVATO 526025 - install LOVATO if a sensor with a standard LOVATO output signal is connected to the gas control unit. To connect, refer to the wiring diagram of the gas control unit.
0 - 90 ohm - set 0-90 ohm if a sensor with an output signal from 0 to 90 ohm is connected to the gas control unit. To connect, refer to the wiring diagram of the gas control unit.
Not standard - Set this option when connecting a resistive LPG or METHANE sensor with a variable DIRECT signal (lower value (Ohms) at zero level and higher value (Ohms) at full level).
Not standard inverted - Set this option when connecting a resistive LPG or METHANE sensor with a variable REVERSE signal (high value (Ohms) at zero level and low value (Ohms) at full level).
References for the not standard indicator
— This option only appears if the TYPE OF GAS LEVEL SENSOR window is set to NOT STANDARD or NOT STANDARD INVERTED.
Set the control values required to configure the sensor as follows:
— move the sensor indicator manually, starting from full, and write down the specified data for all control values (RESERVE, 1/4, 2/4, 3/4);
— enter the recorded values in the appropriate fields
— press the ACCEPT button
The following changes are visible on the switch:
Reserve = LEVEL value when LED 1/4 is turned off and reserve indicator is turned on
Reference 1/4 = LEVEL value when LED 2/4 turns off
Reference 2/4 = LEVEL value when LED 3/4 turns off
Reference 3/4 = LEVEL value when LED 4/4 turns off
• GAS PIPE FILLING TIME
Typically, to prevent a possible shutdown of the machine during the transition from one type of fuel to another, the gas control unit turns on the gas electrovalves 5 seconds before the switch is made: this allows for greater filling of the pipes.
It is possible to disable this feature. In this case, the gas solenoid valves are only turned on for approximately 1 second.
ATTENTION
IT IS RECOMMENDED TO NEVER DISCONNECT THE PETROL PUMP
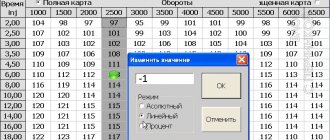
8.5.4 MAP
This menu allows you to display a digital display of the multiplication factors, called K, used by the control unit to calculate the gas injection time. The table shows the petrol injection time on the vertical axis, and the engine speed on the horizontal axis. The red dot indicated on the map determines the speed and time of gasoline injection at which the engine operates (when operating on gas, the dot turns green).
By increasing the value of the K coefficients, at the same time of PETROL injection, the time of GAS injection increases; when the values of the K coefficients decrease, the opposite happens, that is, the mixture becomes leaner.
To change the values of the K coefficients, you need to select one or more map fields and press the enter button; A window will appear with the following modification options:
ABSOLUTE – allows you to enter the entered value into the map
LINEAR – increases or decreases (if a number is entered with a negative sign) the value in the selected field or fields of the map by the entered amount.
PERCENTAGE —Increases or decreases the percentage value in the map field or fields by the amount entered.
• EXTRA-INJECTION SENSITIVITY (SENSITIVITY TO ADDITIONAL INJECTIONS)
EXTRA-INJECTIONS are very short injections performed in addition to the normal injection when running on gasoline, usually during acceleration, to slightly enrich the carburetion and improve engine performance.
Additional injections can be determined by the light indicator or by the movement of the point.
During gas operation, if additional injections are carried out in the same way as conventional ones, excessive enrichment of carburetion will occur; in this case, there is a risk of jerking when increasing engine speed (this occurs especially in installations with methane, and in installations with LPG this problem is usually less obvious).
When enabled, you can change the parameters regarding additional gas injections, increasing or decreasing the opening time of the gas injectors during additional injection. When the slider is moved to the negative sign (-), the additional gas injection time is reduced and carburetion becomes weaker. When the slider is moved to the positive sign (+), the additional gas injection time increases and the carburetion becomes richer. Without turning on the mark, additional injection is not considered as such, and the gas control unit considers the impulse as normal fuel injection.
• LEANING ON MAZDA
On some MAZDA models, when running on gasoline during acceleration, a transition is detected from a SEQUENTIAL type injection strategy to a semi-group, with gasoline injectors opening in pairs.
This condition can be easily recognized by observing the progress of the RED dot on the map or the timing of the PETROL injection when accelerating.
When changing from one injection strategy to another, it will be seen that the normally displayed injection time will become approximately half the value previously obtained (e.g. a value of about 8 ms becomes approximately 4 ms) and a constant change in the RED dot between these two values will be evident or, in some machines, the above point will remain stationary until a certain number of revolutions, and then return to the initial time of PETROL injection.
When operating on gas, this operating condition can lead to incorrect operation, since at the moment of transition of the injection strategy from a sequential strategy to a semi-group (low injection time), the carburetion on GAS tends to become excessively rich,
causing jerking.
Therefore, to avoid this problem, it is enough to enter a suitable value into “Leaning on MAZDA” to counteract this trend.
• TARGET _
By pressing the REC button, PETROL time (petrol time) can be stored on the screen in a specific map area for easy comparison with PETROL time (gas power) under the same conditions.
8.5.5 ADJUSTMENTS
GAS TEMPERATURE ADJUSTMENT
Moving the cursor towards LESS results in a decrease in temperature correction. On the contrary, a shift towards PLUS (MORE) leads to an increase in the correction. Using the correction vectors, you can see, when moving the sliders, how the correction coefficients change in percentage terms, which are then plotted on the map.
DELAY FOR FIRST SWITCHING TO GAS
This vector expresses (in seconds) the waiting time for the first switch to gas, which is related to the gas temperature read at the moment the machine starts. The time delay can be changed if necessary. In any case, by comparing the vector value with the “switching delay with warm engine” (section 8.5.2), the system will take the larger value into account.
ADJUSTMENT RE-ENTRY FROM CUT- OFF
By recovery after shutdown (CUT-OFF), you can enrich or deplete the carburetion for a certain number of injections. You can increase or decrease the card coefficients in percentage terms by influencing the “Adjustment re-entry” parameter
from cutoff" (Adjustment of re-entry after shutdown). This change will be maintained for the number of injections specified in the “Number of injected phases” parameter.
8.5.6 DIAGNOSTICS
This page displays all parameters monitored by the control unit during diagnostics. When the gas installation detects a diagnosis error based on the read parameter, it takes an action corresponding to the detected error.
• ERROR MESSAGES
| STATE | ||
| S101 | Connection of petrol injectors | No |
| S104 | Gas pressure sensor | switch to gasoline |
| S106 | Gas temperature sensor | switch to gasoline |
| S108 | Switch Presence | No |
| S111 | Gas temperature too low | Switching to petrol with a system ready to switch to gas |
Detected diagnostic errors can be cleared from the installation memory by simply pressing the “Reset errors” button at the bottom right.
A detected error will be signaled to the driver by turning on the YELLOW indicator and slowly flashing the green indicator on the switch. In addition, to make it easier to identify abnormal conditions, a buzzer will be activated.
inside the switch itself. To turn off the sound signal, it will be enough to press the switch button, thus switching the operation of the machine from gas to gasoline.
In order to return to operation on GAS, you need to turn off and start the car again.
In the case of the diagnosis “Gas temperature too low” (S111), the signal is sent differently: the switch signals a changeover to petrol, but the system is ready to switch back to gas as soon as the conditions for switching to gas are restored.
• INJECTORS TEST
Petrol injectors signal diagnosis - a signal is sent about an incorrect electrical connection of gasoline injectors (checking the wiring of the injector emulator).
Correspondence verification of gas/petrol injectors – When the machine is running on gas, it is possible to exclude one gas injector and activate the corresponding petrol injector: if the connection is not made correctly,
one cylinder will not receive power, while the other will receive dual power (gas and gasoline), and anomalies in engine operation will be obvious. At the end of the test, previously disconnected gas injectors are automatically reconnected. When the injection sequence advance is enabled, this check cannot be performed.
• TIMERS _
Operating gas time – Displays absolute and partial gas operating time. The partial time counter can be reset by the user after maintenance.
Operating petrol time – Displays the absolute petrol operating time.
Forced gas start – Displays the number of forced gas starts. When 10 forced starts (!) on gas are reached, this function is disabled to ensure the safety of proper carburetion of the machine. Only using a computer can you reset the counter and resume this function.
8.6. DISPLAY
This page displays all signals controlled by the control unit.
1) Displays engine speed in real time (rpm);
2) Displays gas temperature (expressed in °C);
3) Displays the gas pressure in the filter (bar);
4) Displays gas injection time in real time (ms);
5) Displays gasoline injection time in real time (ms);
6) Displays the level of gas in the tank;
7) Allows switching from gasoline to gas using a computer;
Shows whether the car runs on gas or gasoline;
9) Provides useful information on the correct determination of the parameters of injectors installed on gas injectors;
10) Provides visual guidance on certain operating conditions of the machine and installation when turning off (CUT-OFF) gas, additional injections, diagnostics or to activate the data collection function.
11) Return to the main menu.
12) Indicates the possible absence of the “key” signal. A red cross will appear on the “key” symbol when there is no signal.
8.6.1 ACQUISITION
When you click on the Acquire function in the “displays” window, the following window opens. By pressing the REC key, the program begins recording tracks of the various specified variables. When you press the “STOP” key, the program stops registration and a window opens for saving the received data.
Pressing the RUN key displays signals in the SCOPE window, while pressing the STOP key stops data collection. You can save the data you just received by using the SAVE key. Using the LOAD key, you can get a video image of the previously saved graph
In the settings window you can set the time scale and amplitude, while in the legend you can enable or disable the function of displaying individual tracks. The program also offers the ability to enlarge part of the graph and print it out.
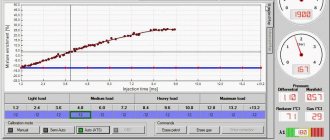
8.7 SELF-CALIBRATION
In this section, you can automatically calibrate the gas control unit to obtain the average correct carburetion of the machine while operating on gas. Before starting the auto-calibration procedure, it is necessary to check that the machine runs well on gasoline, since the gas power system is based on the gasoline power system.
Pressing the “Self-calibration” button opens the following window.
To perform auto-calibration, you must perform the following steps:
1) Start the car on gasoline
2) Start the auto calibration procedure by pressing the ENTER key and follow the instructions displayed on the monitor.
The system monitors the operating time from the moment the engine starts. If the engine has been started recently, the program will display the following windows:
During auto-calibration on methane, you should remember the maximum gasoline injection time at the minimum speed. To do this, press the accelerator pedal all the way 4-5 times. Wait between presses until the speed stabilizes to a minimum value.
After completing AUTOCALIBRATION, check the machine on gas, making sure it is operating correctly and, if necessary, adjusting the carburetion according to the map as shown above. During auto calibration, the machine automatically switches to gas and the slider indicates the progress status of auto calibration. The slider will move quickly during the first calibration and then slowly during the last calibration.
8.8. SAVE CONFIGURATION
In this submenu you can save all calibration parameters set in the “car configuration” menu in one file.
This file can later be used to configure other settings on machines of the same model with the same type of fuel, METHANE or LPG.
Note: the selection of the number of cylinders (at the bottom of the window) appears only if the unit is not connected to a computer. If the unit is connected to a computer, this information is saved automatically.
To save, you need to select the car brand in the pop-up menu, if you want to archive the configuration in a special folder for this brand; specify “Name of file to save” and click on “SAVE”.
By selecting a configuration from an existing list, you can also send a file by email, which will automatically be attached to the message.
8.9. LOAD CONFIGURATION
From this submenu you can load an existing configuration into the control unit. The configuration files are contained in two separate directories: one for LPG configurations, and the other for methane configurations.
Before loading the configuration, you need to enter “VEHICLE CONFIGURATION” and select “Fuel type”: methane or LPG, depending on the configuration to be loaded.
The selection of the number of cylinders (at the bottom of the window) will only appear if the installation is not connected to a computer.
If the unit is connected to a computer, the list only offers configurations available for the model that the unit automatically recognizes. Select the file to download and click on “LOAD”.
8.10. NEW FIRMWARE
Allows you to update the built-in program (firmware) of the engine control unit.
Select the built-in program to enter and follow the instructions.
8.11. LANGUAGE
You can select the language of the software by choosing from the menu provided.
8.12. DIAGRAMS
Electrical and pneumatic wiring diagrams of various configurations can be displayed by selecting from a menu provided.
| Back | Back to contents | Further |