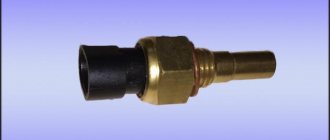
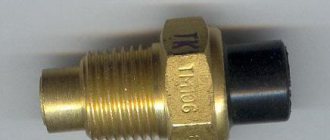
Operating principle and temperature characteristics of the device
The operating principle of the engine cooling radiator fan switch-on sensor is based on the difference in the linear expansion of metals. When the coolant heats up, the bimetallic plate of the device changes its position. At a certain moment, the contact group closes. A signal is transmitted to turn on the fan. In some sensors, when the engine overheats, the circuit breaks.
Depending on the model, the sensors have different temperature response limits. So, to turn on the fan of the VAZ 2114-2115, a temperature of 102-105 ° C is required. The shutdown signal comes when the engine temperature drops to 85-87°C. When choosing a new sensor for his car, the car owner should focus on the old device. In the absence of the original, previous device, the necessary information can be obtained from special catalogs.
Most modern fan control systems do not have sensor limits. It does not operate in relay mode, but constantly transmits information about the engine temperature to the electronic control unit. The ECU itself sets the limits for turning the fan on and off. Changing the operating range will require brain reprogramming.
Necessary tool
The choice of tool used will directly depend on the nature of the breakdown. Often it is enough to open the relay box and replace the blown fuse with a new one, which will restore the fan’s functionality. Whereas in case of significant breakdowns, when the cooling fans of the VAZ 2114 do not turn on, it is necessary to dismantle the radiator, remove the fan, or change the relay and corresponding temperature sensors. To remove the fan you will need:
- Crosshead screwdriver.
- Socket wrenches 8 and 10
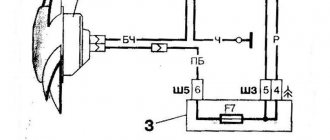
Connection diagram for the fan switching sensor in injection engines
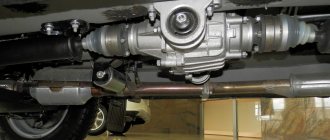
Unlike carburetor cars, where the sensor directly closes and opens the cooling fan circuit, in injection engines the device operates only with an information signal. After processing the received data, the ECU sends a control action to the fan relay installed on the radiator. The main advantage of this scheme is the possibility of emergency operation of the cooling system in the event of a loss of communication with the sensor or its failure. The ECU can also adjust the engine operating mode by influencing the injectors.
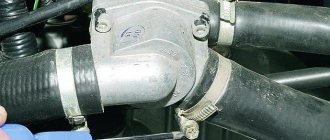
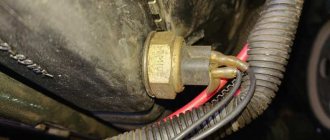
To determine where the fan switch sensor is located, you need to pay attention to the thermostat. In injection engines they are located next to each other. In some car models, wires go from the sensor to the dashboard to indicate the status of the device or to display the current coolant temperature.
Is it possible to pour water into the cooling system?
Besides the fact that this is only permissible in the hot season, water will be very reluctant to live at a temperature of 110 degrees. Modern engines are designed specifically to work with antifreeze. So you can add water only in extreme cases
- when, for example, you use a liter or two of fluid in a day, and you still have a month to go before repairs (this happens, after all).
Then yes - in order not to go broke, you will have to pour water. But only distilled
! It is sold in spare parts stores and is inexpensive. Ordinary tap water contains all sorts of salts and other impurities that cause active corrosion of the cooling system channels. Once you fill it with tap water, you run the risk of encountering a bunch of unpleasant surprises after a while.
Checking the functionality of the sensor
Checking the functionality of the device should begin with monitoring the response temperature. To do this you will need a thermometer and a multimeter. All actions can be performed independently, without resorting to a visit to the service center. If the multimeter is equipped with a thermocouple, then there is no need for a thermometer. To check the sensor, follow the instructions below:
- Switch the multimeter to resistance measurement mode. For convenience, you can select the dialing mode;
- Immerse the threaded part of the sensor in water;
- Start gradually heating the water. You can control the temperature using a thermometer, or temporarily switching the multimeter to the thermocouple mode;
- Wait for the device to respond;
If there is a critical deviation of the response limit, the sensor must be replaced. After purchasing a new device, you must check its suitability. Defective products are very common on sale, so checking whether the sensor turns on correctly is the responsibility of every car owner.
Replacement with draining antifreeze
If you discover that the device is not functioning correctly or is completely inoperable, you need to replace it with a new one. To perform dismantling, you must follow the instructions:
- If the engine is hot, it must be allowed to cool;
- De-energize the vehicle ground by disconnecting the negative terminal of the battery;
- Remove the expansion tank cap;
- Remove the radiator cap;
- To prevent contamination, it is necessary to place a container under the drain hole;
- Drain the antifreeze from the radiator. There is no need to drain antifreeze from the cylinder block. To unscrew the drain plug, just a hand is enough, so no tools are needed;
- When the liquid stops flowing out, you should return the plug to its place to avoid its loss;
- Remove the terminal with wires;
- Use a wrench to carefully unscrew the sensor.
To install a new sensor you must:
- Check the condition of the copper sealing washer. In most cases, it will require replacement with a new one. Using an old gasket is fraught with antifreeze leaks;
- Screw in the new sensor, making sure that the sealing washer fits evenly;
- Connect the terminals with wires;
- Pour antifreeze into the expansion tank. If the drained antifreeze is of good quality, you can return it. Otherwise, fresh fluid must be used;
- To eliminate air pockets in the cooling system, it is necessary to purge it;
- Replace the radiator cap;
- Close the expansion tank;
- Connect the negative terminal of the battery;
- Warm up the engine until the sensor responds.
If after these steps the fan does not turn on when the required temperature is reached, it is necessary to continue troubleshooting in other possible places. Before continuing to search for a breakdown, it is advisable to read the error log from the ECU using a diagnostic scanner.
Step-by-step instructions for replacing the VAZ-2114 heater motor
Cooling fan does not work
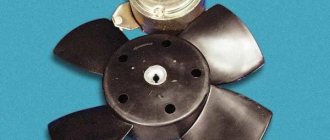
To force the air flow in the interior heating system, a fan driven by an electric motor is used. Thanks to this fan, the heater's operating efficiency increases.
Of the entire stove design, the fan is the most complex element, since it uses an electric motor. The electric motor itself is a direct current motor with excitation from permanent magnets. Despite its structural simplicity, the motor gradually wears out and stops working or functions incorrectly, which affects the performance of the interior heater.
Causes of malfunction
Note that the reason that the fan does not turn on is problems with the power circuit. Oxidation of wiring contacts, blown fuse, faulty resistor - all this leads to the cessation of operation of the electric motor. Therefore, if it does not turn on, first of all you should check the components of the power circuit. Common problems with the fan motor are the occurrence of extraneous sounds during operation - squeals, rattling, interruptions in operation - spontaneous stopping, difficult starting, etc.
The reason for the appearance of third-party sounds:
- Deterioration in the landing bushings into which the electric motor rotor is installed, lack of lubrication in them. Because of this, the rotor becomes loose during operation, which creates increased vibrations and rattling, and “dry” friction is accompanied by squealing.
- Interruptions in operation are caused by critical wear of the graphite brushes and contact plates of the rotor. Because of this, the brushes and plates cannot make normal contact with each other, which leads to problems in the operation of the fan motor - it does not spin up when turned on and may stop spontaneously.
Troubleshooting the electric motor of the stove is a problematic process and not always advisable; it is easier to purchase a new fan and replace it.
Video: Repairing the VAZ 2114 stove motor
How to replace a heater motor
Due to the fact that the fan is fixed on the heater housing and is accessible from the engine compartment, replacing the VAZ-2114 heater motor is a simple process and does not require disassembling the interior heating system and draining the coolant. Therefore, you can replace the fan yourself, without seeking help from a service station.
To replace the motor, you will need screwdrivers and a 8-10 wrench from the tools. The algorithm for dismantling the heater fan on a VAZ-2114 is as follows: 1. We turn off the power to the on-board network by removing the “positive” terminal from the battery.2. In the passenger compartment, on the driver's side, behind the pedal unit, we find the fan power wires - black (“ground”, pressed with a nut to one of the bolts) and blue (“plus”).
3. Unscrew the ground nut, find the blue wire connector and disconnect it.4. Open the hood.5. Remove the fan casing with the filter installed in it. To do this, unscrew the 4 fastening screws.
6. Unscrew the fastening screws of the air intake grille installed near the glass. Remove the grille.7. Unscrew the 2 bolts securing the fan housing.
8. Using a “pull” motion, remove the body from the support.9. Rotate the body 90 degrees. and remove it from the niche.
Further actions depend on what exactly was purchased for replacement - the assembly with the housing or just the electric motor with the impeller. If a fully assembled structure is available, we install a new element using the reverse technology to that described above.
Fan disassembly
In the case where there is a motor with an impeller, we disassemble the fan housing. To do this, remove the foam seal from the outlet socket, then remove the housing clamps, after which it will split into two halves.
We extract the email. motor, for which we unfasten the spring clamps of the motor cover, remove this cover and remove the electric motor. the engine together with the impeller from half the housing. The electric motor is replaced only assembled with the impeller, and it is not recommended to disconnect them so as not to disturb the alignment. When assembling, be sure to stick a foam rubber seal around the perimeter of the outlet socket, otherwise the air flow will dissipate due to the cracks, which will reduce efficiency of the stove. If the electric motor of the stove made a strong squeal during operation, you don’t have to change the electric motor, just disassemble the fan and put grease in the bushings. But these measures will help eliminate the squealing for a short period of time and ultimately the stove motor will have to be replaced.
Installing a new sensor without draining the coolant
In the injection engine of most car models, the sensor is located high in the cooling system, which allows it to be removed without a significant spill of antifreeze. To do this, you must follow the instructions below:
- Do not unscrew the sensor completely. In this case, a slight leakage of antifreeze will begin;
- Check the copper washer on the new sensor;
- Unscrew the old device with one hand and quickly bring the new one in with the other;
- After tightening the regulator, thoroughly wipe the area from any coolant drips;
- Check the quality of installation for leaks.
With this method, the car owner can significantly save time. The disadvantage of this method is the need to make a replacement quickly, which can cause difficulties for inexperienced car enthusiasts. If the circumstances are unfortunate, a large amount of antifreeze may spill from the cooling system.
Keeping all elements of the cooling system in working order will protect the engine from overheating and unpleasant consequences. It is necessary to carry out timely monitoring of the operation of the regulator, especially when the first symptoms of overheating appear. Since the work requires the presence of heated fluid, all manipulations should be performed on a cooled engine. This will protect the car owner from thermal injuries.
Source
Is it possible to drive if the cooling fan is faulty?
Oddly enough, in some cases it is possible.
The fan sucks air through the radiator grille onto the radiator itself, that is, when you drive, the incoming air flow cools the engine in the same way as the fan does. You just need to turn off the air conditioner - it generates excess heat, and without a fan the incoming air flow may not be able to cope. In addition, in this case, it is highly not recommended to get into dense traffic jams - as soon as you stop, the cooling disappears, and the engine will immediately “boil”.
Source
Sensor layout
The sensors under the hood of the VAZ 2115 are located as follows.
1. Phase sensor; 2. Coolant temperature sensor; 3. Knock sensor; 4. Oil pressure sensor; 5. Oxygen sensor; 6. Crankshaft position sensor; 7. Speed sensor; 8. Idle speed sensor; 9. Mass air flow sensor; 10-11. Gasoline level sensor; 12. Antifreeze level sensor; 13. Throttle position sensor