03/04/2022 11,173 Electrical package
Author: Ivan Baranov
If the car's power window does not work, this entails inconvenience, especially in hot weather and for drivers who are accustomed to smoking while driving. The article discusses the types of window lifters, as well as the window lifter cable, its structure, operation and malfunctions, and provides replacement instructions.
[Hide]
Types of window lifters
A window regulator is designed to raise and lower the side windows of a car. There are several types of these devices, which differ in their operating principle and location.
According to the principle of operation, lifting devices are divided into:
- Mechanical. The windows are lowered and raised by rotating the handle located on the car door. The movement is carried out thanks to gears. This type of device can only be found on older car models.
- Electrical. In order to lower or raise the window, you need to press the switch button located either on the door or on the handrail.
There are also so-called automatic ones - this is an addition to the electric one. The glasses are automatically activated. At the same time, the door locks are blocked. Most often they are installed on cars with an anti-theft system, in parallel with electric windows.
The design of all types is the same: using a button or handle, the mechanism of the device raises or raises the bar on which the glass rests. The glass moves only vertically. Movement is limited by a window seal at the top and a rubber damper at the bottom.
Mechanism design
Depending on the type of window lifter, there are two types of drive mechanisms: mechanical and electric. In the first case, the drive mechanism is activated using a handle/lever located on the inside of the door. By rotating the handle, the driver transmits movements to the drive gear, which begins to move.
Automotive window regulator
The electric drive is driven by a reversible motor. It, in turn, starts when you press a button located on the driver’s or passenger’s handrail. The drive uses a worm gear; with its help, the engine drives the gear of the drive mechanism (the author of the video is Sergey Zukol).
The drive is connected to a device that moves the glass. The lifting mechanism can be lever or rack type.
Lever has three subtypes:
- single lever;
- double lever;
- double wishbone wheel.
Lever devices are compact and reliable in operation. Another advantage is their ease of installation and dismantling. The versatility of the mechanism allows it to be installed on any car. The disadvantage is the inability to move the glass evenly. At first it moves quickly, then more and more slowly, and at the end even with jerks.
In a rack-and-pinion device, a plate of glass moves up and down along a vertical toothed rack. A gear is mounted on the plate, which meshes with the drive gear. Thus, the movement is either down or up. The advantage of a rack and pinion window lifter is the reliability and smooth movement of the glass. The disadvantage is the massive design, which limits its use.
Rack type device
The third type is a cable mechanism, which will be discussed in more detail below.
We check the quality of work
As you can see, this work is not at all difficult, it can be done independently, saving a lot of money on a car service, which will charge you a tidy sum for it.
In addition, since we had to remove the door trim, we can also carry out sound insulation, which in the Lada Kalina is also not at the highest level.
At the end, a small bonus on how to make the power windows work without the ignition.
I went through all the window regulators on my luxury car (sedan 2011). Periodically wedged on the starboard side in the upper position. Especially the front one. The last time I stopped so much that I didn’t want to move with any kicks. When you pressed the buttons, you could hear a clicking sound from behind and you could hear (if you put your ear to the door) that the engine was trying to pull back and forth, but it couldn’t, it was stuck. I decided to tackle this thoroughly. I read in this thread that I have one of two things: either in the uppermost position the sliders (to which the glass is screwed) bite the rollers, or the cable jams on the volute reel.
Details below. I apologize for the lack of photos. I did it alone. My hands were dirty and busy—there was no time for photos. I tried to describe it in as much detail as possible.
I took off the door trim, punched it in the area of the gearbox, and the lift moved. I took off the mechanism, put it on the table by the door, connected it, and drove it. A slight crunching sound was sometimes heard inside the gearbox when starting from the extreme position. The rollers have no signs of damage or bites.
I took the gear out of the gearbox, pulled the slider to drive and listen to the system manually, without connecting it - bam the cable flew off. It turns out that if you remove the gear (and with it the axle), the reel with the cable begins to dangle slightly in the housing and when rotating without an axle, the cable flies off. If you don't twist it without an axis, it won't fly off. It was necessary to remove the gear and put the axle back. Well, nonsense. I opened the gearbox housing with the coil. There are only barely noticeable traces of lubrication in the mechanism. Apparently there is a terrible shortage of lubricants in Russia. And it costs a lot of money. I wound the cable (described below how, quite simply). I filled the cavity with the coil until it was full and closed this part. I removed the metal housing of the motor, took out the anchor, added some lithol to the seats for its axle, and assembled the motor.
I inserted the gear with the axle, also filled it with lithol in the area of the worm and added it on top, and closed it. I lubricated the skis where the sliders run, checked it on the table - it works great.
I put it in place. I adjusted the glass, following the advice on the forum, so that it would be in the highest position on the sliders. You need to loosen the 4 bolts securing the glass to the sliders, raise the lifter until the glass stops and a little more up, press the glass with your hand from bottom to top so that it fits against the frame along the entire top and front inclined edge, then lower the window lifter a little at a time, holding the glass from below until the bolts reach the edges of the slots in the sliders. Most likely it will only be one bolt. The rest will remain with a gap of varying sizes. Tighten in this position.
Everything works great. Now I’m thinking, maybe it would have been better to use Fiol-1 instead of lithol. Fiol is noticeably thinner. Litol thickens very much in the cold. The loads on the mechanics will increase.
Yes, even when opening the rear right door, I discovered that the canvas curtain had fallen off and was hanging on the slider only due to the fact that it was impossible to fall off it. It’s good that the cable didn’t wrap around the rollers. I had to take out the glass, clean off the bitumen snot on which it was all stuck, and re-glue the curtain. I glued the glass and the curtain, having previously degreased it with acetone, using double-sided tape, the so-called “car” tape. I don't know how long it will last.
On the back left only the edge has fallen off. I pressed it into place with my fingers, it seemed to be holding tightly.
Before disassembling the mechanism, place it on the table, carefully examine it in different positions and remember how its parts are located relative to each other, and how the cable passes and where it crosses. You can take a photo.
If the cable is unwound, winding it onto the reel is quite simple. First, familiarize yourself with the design of the gear motor and the cable tension device. The geared motor consists of the following parts: 1. Electric motor in a metal casing. 2. The main, larger half of the gearbox housing. The metal housing of the motor is attached to it with three screws. 3. Smaller, outer half of the body. Tubes come out of it for attaching cable jackets, with longitudinal slots for installing the cable. 4. A metal cover covering the cavity with the installed gear and the metal axis of the gear-reel system. The cover is secured with four screws. The halves of the gearbox housing are secured with four screws (3 short and 1 long) and additionally three composite rubber-metal studs, which secure the gearmotor to the door. Small stud nuts are hidden inside the housing under a metal cover and plastic bushings. You need to unscrew the studs using pliers or a 19mm wrench, and the nuts will fall out of the body. Pay attention to how they are installed so as not to get confused during assembly. One side of each nut has a cylindrical projection. The nuts must be inserted into the body with the protrusions forward, towards the studs.
The tensioning device consists of two thick plastic bushings at the ends of the cable jackets, placed on tubes with longitudinal slots coming out of the gearbox. There are springs inside the bushings. They are normally compressed and keep the cable taut. *By the way, one of the possible reasons for the cable jamming is insufficient operation of the tensioners plus the presence of distortions in the position of the glass (when one edge of the glass rests on the frame before the other). When the glass reaches the stop, one of the tensioners is compressed to the limit, and the second, on the contrary, is released. If free play appears on this side, then part of the cable is not tensioned, sags, and may begin to warp inside the housing on the reel, slightly creeping turn upon turn. In the absence of lubrication and a decent roughness of the cable, this leads to jamming of the sagging turn between the adjacent turn and the gearbox housing.
The cable is welded to the reel diagonally, so that it extends to the edges of the reel. The reel has spiral grooves, quite small. The spiral goes from the edges of the coil to the center on both sides. When the mechanism operates, the cable unwinds from one half of the reel, coming out of the gearbox, and at the same time is wound onto the other half of the reel, entering the gearbox from the other side.
We take the smaller half of the gearbox housing, the one with the lugs for attaching the cable jackets, and apply lubricant in the cavity for the reel and cable. Then we place the body on the table. We put the ends of the cable jackets with spring tension bushings on the output tubes with slots, inserting the cable into the slots. We check that the cable is positioned as expected on all the rollers and lightly tighten it so that it does not fly off.
We wind the cable onto the reel simultaneously in opposite directions, starting from the edges of the reel towards the center, placing the turns of the cable in the grooves and holding them with your fingers so that they do not fly off. If the sliders on the “skis” are in the middle, then the cable will be wound approximately equally on each side of the reel. If moved to one edge, the cable will be wound predominantly on one side of the coil (several turns) and only one turn on the other side. After winding the cable, you need to position the reel so that the cable comes out crosswise from it in opposite directions into the output tubes, without creases or strong bends. dikkid showed how to do it here &postcount=526 In this case, the cylindrical protrusion on one side of the coil should look down, towards the half of the body into which we will insert the coil. This protrusion fits into a special place in the body and allows the reel to be held in the desired position without much effort. Then we pull the coil in the direction of its normal position in the housing. In this case, the cable is tensioned, and the tension springs in the end bushings of the jackets are compressed. A decent amount of effort is required, probably 10 kilograms. We pull the coil, aligning its center with the center of the cavity and at the same time immerse it in this cavity. Once the coil is in place, you can hold it with a little force, pressing it down against the body half. Then we take a screwdriver, thread it through the hole for the axis of the large half of the body, and place this half over the lower one so that the screwdriver presses through the hole on the coil, holding it in place. Correctly position the upper large half above the lower one. Gradually combine the halves, simultaneously holding the coil in place with a screwdriver and pressing the halves together. When the halves are securely compressed, remove the screwdriver and, holding the halves together with your hands, turn the case over and tighten them with screws. All. The cable and reel are in good order, well lubricated and laid out.
You can fill the cavity of the snail coil with lubricant without unwinding the cable. It is necessary to open the case, having first unscrewed 3 studs and 4 screws, holding the halves from opening with your hands, put it on the table up with the side where the gear stood, hold the coil pressed to the wall with a screwdriver through the hole for the gear axis. Carefully lifting the half of the body, hold the coil with your fingers, and remove the half of the body together with the screwdriver to the side. Slightly lifting and tilting the coil, fill it with grease. It is convenient to do this when the lubricant is in a tube with a long spout. Then we press the coil and apply lubricant on top.
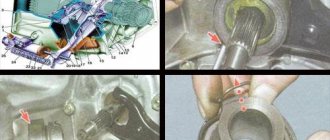
After this, lubricate the seats of the electric motor armature axis in the gearbox housing and in the motor housing. It is better to apply litol into the seat in the metal body of the engine with a wooden or plastic stick or non-ferrous metal wire (aluminum, copper). The steel instantly sticks to the magnets (they are very strong) and everything is smeared with grease.
It is inconvenient to insert the motor armature into the gearbox housing. The brushes get in the way. It is necessary to move the brushes apart simultaneously with inserting the armature into the gearbox. It will be much easier if the anchor is inserted into the gearbox without the metal housing of the engine. Then the brushes are easily accessible for “splitting”. When the anchor is inserted into the gearbox all the way, you can safely put the metal case on it and tighten the screws. Finally, we lubricate the teeth of the plastic gear, put the gear on the axle, combining the rubber inserts with the metal hooks, look at how the square hole of the reel is located, add a little lubricant to the hole, put the spring washer with its hump towards the gear, and insert the axle into the body, placing its splines approximately just like the hole in the coil. We press on the metal pad of the axle, at the same time slightly twisting it left and right to get the axle splines into the coil. The gear needs to be held, for example, with a screwdriver. If it drops before the axle, it will be impossible to align the axle with the gear and the coil splines at the same time. We pressed the axle into place, smear the worm a little and close the lid. The gearbox is ready. We temporarily connect and check. I pushed the grease around the gear until it was full. Now I regret it. I'm afraid that it will climb along the axis of the motor into its body and get on the commutator and brushes. There is no oil seal there.
My window regulator gave up its life after one winter I spent a long time trying to lower the tightly frozen glass. An autopsy showed that the electric motor cut off the teeth on the worm gear.
If you decide to tamper with your window regulator, then this information will help you save a lot of time, nerves and effort.
So, a cracking sound when the window lifter is turned on clearly indicates that the teeth of the worm gear have been cut off, and the gearbox will have to be replaced. The gearbox and electric motor are a single unit, i.e. we buy the unit assembled.
Throw out of your head the thought that you can turn the gear N number of degrees so that the worm lands on good teeth, because this gear rotates more than 360° during operation.
First, we remove the door trim; it is attached to plastic clips around the perimeter. I strongly do not recommend removing the skin in the cold: the pistons will be very hard, and most likely you will tear off their fastening from the skin itself.
We glue the torn fasteners back with epoxy glue, not the one for 120 rubles called EDP20, but the one for 60 rubles in the form of two syringes of 1.5 mg each. The caps themselves are sold in auto stores; there is a huge selection.
I don’t see the point in explaining in detail how to remove the trim; there are plenty of manuals on the Internet, for example here: wiki.zr />I’ll copy here only the location of the pistons on the back of the door trim:
Don’t forget to unscrew the lock lock pin, the self-tapping screw inside the small upper pocket, two self-tapping screws under the bottom of the large pocket and the screw securing the inner door opening handle. Carefully pull back the casing, taking your time so that the pistons are slowly released, unhook the wires to the buttons and the speaker.
We unscrew the four screws of the honeycomb element (green arrows) and the screw securing the rod of the inner handle (red arrow).
Then we unscrew the glass from the guides, the glass is fastened with four bolts, the key is 10. It is convenient to use a head with a small extension.
After unscrewing the bolts, carefully lower the glass to the bottom of the door. Before lowering, it will be convenient to remove the protective curtain, which is glued to the bottom of the glass with mastic and threaded through the fastening points using slots. The curtain is installed on one side only, i.e. it is not symmetrical.
Then we unscrew the window lift nuts directly: four nuts on the left guide, four nuts on the right guide (green arrows) and three nuts securing the gear motor (yellow arrows).
All. Now carefully pull out the entire mechanism through the technological hole, first the left guide, then the gear motor, then the right guide.
This is what the entire window lift mechanism looks like:
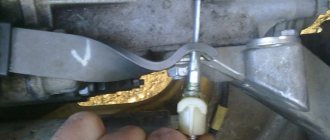
Two guides, on each guide there is a carriage, through both guides there is a steel cable driven by a gear motor. In two places on the cable, thick rings are crimped, which are secured in the carriages; one of the crimps at the same time secures both ends of the cable.
Actually, we are only interested in the gearbox itself.
The gear motor consists of two parts, pulled together by three damper pins. We unscrew these damper pins and very carefully slowly halve the geared motor. The part on which the electric motor is mounted has a large worm gear gear, and the other part has an aluminum drum with grooves for the cable. The cable is wound onto the drum strictly along the grooves and has a retainer in the form of a thick crimped tube inserted into a recess on the drum. This is what it looks like:
In general, the most important thing is that you need to halve the geared motor so that the aluminum drum with grooves does not jump out of the housing. Carefully, slowly shaking, we halve the gear motor housing. It is necessary for the square axis of the gear to come out of the aluminum shaft on which the cable is wound.
The cable has a strong tension, carried out by two springs located at the cable entrance to the gear motor.
Inside the gearmotor, where the drum with the cable wound around it, there should be a lot of grease - this is the key to a very, very long serviceable operation of the entire mechanism. We inspect the cable for damage and generously coat the cable with new grease.
We insert the new gear motor with its square shaft into the drum, align the three mounting holes, and tighten the damper studs.
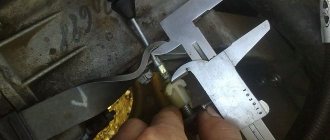
Now is the time to talk about why the front windows in the Lada Kalina do not go down completely. I have heard several opinions on this matter, the most common is that the glass rests on the amplifier pipe.
Take a close look at this photo:
The amplifier pipe is located on the outside of the glass, and the glass in the fully lowered position falls below the amplifier pipe.
The guides themselves do not allow the glass to go down, but AvtoVAZ did not think of making them longer.
The only thing we can do is shorten the rubber bumpers at the bottom of the guides a little:
I just broke it off with wire cutters, shortening the elastic bands by about a centimeter. There is no point in breaking it out anymore, because... the carriages will simply rest against the rollers.
You can also gain a little by adjusting the fastening of the glass itself on the carriages, because the holes there have a longitudinal shape, but this shape is made to adjust the glass from distortion.
We lubricate the entire cable, move it to the other extreme position, lubricate it again, and assemble everything in the reverse order.
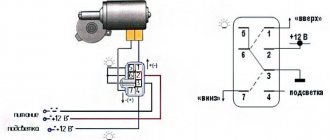
If the new gear motor works in the other direction, then do not rush to cut the wires to change the polarity; this is done simply by pulling out the pins in the connector. To do this, insert something like a thin screwdriver (blade width approximately 1...1.5 mm) into the recesses indicated in the photo with yellow arrows to recess the pin latches.
Disassembling the window lifter is a convenient reason to clean the velvet seal from dirt and dust, lubricate the lock, treat the lower inner part of the door with anticorrosive, and apply sound insulation.
If the car's power window does not work, this entails inconvenience, especially in hot weather and for drivers who are accustomed to smoking while driving. The article discusses the types of window lifters, as well as the window lifter cable, its structure, operation and malfunctions, and provides replacement instructions.
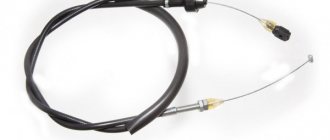
The operation of the window lift cable, or the cable mechanism for raising the glass in a car
The cable window lifter consists of the following components:
- The cable is a flexible part that ensures the reliability of the device. Some car models use a chain or belt instead of a cable; they are more reliable. The tension of the flexible part is carried out using 3-4 rollers. The rollers are attached to the inside of the door.
- The guide pipe on which the rollers are mounted.
- Drum. This is the part on which the cable is wound.
- The plate on which the glass is attached.
- Rollers. Among the rollers, one is spring-loaded, which allows you to adjust the tension of the cable: tighten it if it is too stretched. Can be used to tension a spring.
Cable driven device
The mechanism works as follows:
- The plate is attached to a cable and moves along a guide pipe located vertically.
- The lower edge of the car glass is connected to the plate.
- When a knob is rotated or a key is pressed, the drive gears are activated, and these movements are transmitted to the drive drum. In this case, one branch of the cable is wound onto the drum, the other is unwound.
If the glass is too wide, distortions are possible, since one cable will not hold it. To avoid this, two guide pipes are installed. The cable runs through them and holds the glass in two places.
The design resembles two triangles, the vertices of which are the rollers and the drum. The cable mechanism is more popular. It is compact because it can be installed on any car model. Its big drawback is the stretching and breaking of the cable, which makes it impossible to move the glass.
Electric windows for VAZ 2110
Replacing the power window of a VAZ 2110
Today, many car owners are trying to save money on repairs, especially for owners of VAZ cars. Instead of contacting an authorized dealer, they carry out the repairs themselves. In this case, it is recommended to buy new electric windows in specialized stores.
Right choice
When producing the “nine” or “ten”, the plant did not equip them with electric windows; this could only be allowed in the most rare cases. Before moving on to the process called replacing a power window on a VAZ 2110 or installing power windows, you need to choose them wisely. Many car enthusiasts most often give preference to the well-known “Berkut”. There are three types of such parts:
- The cheapest option is cable power windows. This is perhaps the oldest method of lowering and raising windows, which has many disadvantages. Firstly, the glass moves very slowly. In winter, the glass may freeze, causing the cable to break and the drive to fail;
- As for rack and pinion windows, they also often break, especially when the glass freezes. In this case, you need to lubricate the mechanism more often so that it does not jam;
- The most expensive and best option are articulated-lever window regulators. In this case, the glass moves relatively quickly, no noise is heard during the movement, and such mechanisms practically do not fail, even if the glass is frozen.
Typical cable faults
There are three main cable faults:
- chafing and breakage;
- twisting;
- stretching
In addition to the listed malfunctions, cable wear can occur for a number of other reasons. For example, if the device is installed incorrectly or foreign objects get into the glass groove.
A malfunction of the mechanism can be determined by the following signs:
- glass jams in one position;
- difficulty moving glass;
- there is no reaction when you press the button;
- jerks when moving.
The cable can weaken not only due to long-term use, but also when the plastic clamps break, which should be replaced. If the window lift cable is broken, it must be replaced.
DIY replacement instructions
To replace the window lift cable, you must prepare the following materials and tools:
- new window lift cable;
- flat and Phillips screwdrivers;
- side cutters;
- aluminum clamps;
- awl;
- lithol.
Photo gallery “Changing the cable with your own hands”
Before changing the window lift cable, you need to turn off the door drive and handle rod.
The replacement procedure consists of a sequence of steps:
- First, remove the door trim by unscrewing the fasteners and removing the control buttons.
- Next, disconnect the power wires if an electric drive is installed.
- Then we remove everything that might get in the way: the motor, speakers and hatches.
- At the next stage, we take out the glass and put it aside so as not to accidentally break it during work.
- After removing the glass, the cables will loosen and can be easily removed. First of all, the cable is removed from the side rollers. Then you need to push the cable mount out of the glass mount. Now you can remove the cable from the drum.
- The new part is installed in the same way as the old one was installed. Before installation, clean all rollers and the drum from dirt and lubricate them with lithol. This will extend the life of the device.
- To tension the cable, you need to remove the nail from the spring block.
- After installing the new part, the door is assembled in the reverse order.
After the replacement has been completed, it is necessary to check the operation of the glass lifting mechanism.
Door glass lifts VAZ 2113-2114-2115
Electric windows of the Lada Samara 2 for lowering and raising the windows of the front doors are equipped with some of the manufactured ones.
In the window lift mechanism, instead of a gear reducer used in mechanical window lifters, there is only a drum into the hole of which the output shaft of the motor reducer is inserted.
The gearmotor consists of a worm gearbox and a DC electric motor with excitation from permanent magnets. Its design is similar to that of the windshield wiper gearmotor. Gearmotor (reversible, the direction of rotation of the output shaft depends on the direction of the current in the armature winding. To protect against overloads, it has a built-in thermobimetallic fuse.
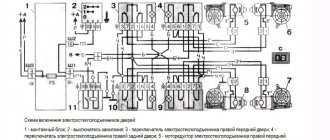
- Wiring diagram for power windows
- 1 – mounting block
- 2 – right front door power window switch
- 3 – electric window motor reducer of the right front door
- 4 – electric window motor reducer of the left front door
- 5 – left front door power window switch
- 6 – ignition switch
- K5 – relay for turning on electric windows
- A - to power supplies
- B - to the external lighting switch
Switching diagram for electric windows Motor gearboxes 3 and 4 are switched on by switches 2 and 5 located on the armrest handles. The supply voltage is supplied to the switches when the ignition is turned on through fuse F6 and power window relay K5, located in mounting block 1.
If the power windows do not work, then it is necessary to remove the door trims and check whether voltage is supplied to the gearmotors, check the fuse and relay of the power windows, restore broken connections in the wires, and replace the faulty gearmotor with a new one.
Source
Concept and types of window lifter
First of all, it should be noted that window regulators are a necessary attribute of every car. With its help, you can effortlessly raise or lower the glass. The main parts of the window regulator are the drive and the lifting mechanism. Today, window regulators differ from each other in the way they work, as well as in their location. According to the first characteristic, there are several types of window lifters. The first type is called mechanical, the operation of which is carried out by unscrewing the lever by hand. Its design contains gears that press on the mechanism and set the glass in motion. The second type is called electric and is more modern than mechanical. In this case, the driver only presses the window switch button to lower or raise the window.
In addition to the drive, there are also different types of lifting mechanism. The first type is cable. This is what we will talk about next. The operation of the cable mechanism is based on the rotation of the cable and pressure on the glass mechanism. This type is quite common and has many advantages. However, there is also a drawback, which is that with constant and long-term operation of the window lifter, the cable wears out or loses its shape and properties. The second type is called rack and pinion. It is based on gears that move using a special electric motor.
How much will it cost
As you understand, you can go to the service, and then you will get the maximum possible amount for this work. But if you do everything yourself according to these instructions, then it will not be expensive for you. The fact is that the cable costs about 500 rubles, and a complete repair kit costs a little more than 1,000 rubles. The replacement is simple and will take you about 30 minutes, especially if this is not your first time doing this.
In general, we told you everything in sufficient detail, but if something was not clear to you, then watch the video below. Everything will be done there clearly. Don’t forget that you can save a lot of money by repairing simple mechanisms yourself, so we recommend that you also
Cable mechanism
The cable of the window lift mechanism is wound on a drum and tensioned with special rollers that regulate the tension. The rollers themselves are attached to the door. In turn, the drum is connected to the lower part using a plate and moves along with the cable. If the car has wide glass, a cable holds it on both sides in order to avoid distortion.
Cable replacement process
You can replace the cable yourself by following the rules and instructions. First of all, the replacement begins with disassembling the door. To do this, you must first unscrew the screws and mark the places where they were. The power window buttons are also removed and their placement is also noted. Next, all adjacent wires are disconnected and the door inserts are removed. You should carefully check that all parts are disconnected from the glass frame. After all the operations performed, the motor will be in front of you. It should also be removed. It is based on a frame that needs to be removed by unscrewing bolts and screws. After everything, you need to remove the glass itself. This should be done carefully so as not to damage the glass and adjacent parts.
We measure the required distance, place these parts and place the cable washers to the casing. Having collected all the parts, we check the correct operation of the cable. We rotate in all directions, check the movement of the pads, and it is also necessary to cut the spare cable size. After making sure that everything is securely and correctly fastened, install the washer body. After everything, you should reassemble the door in reverse order.
Installation
As you can already guess, installing the window regulator is carried out in exactly the reverse order of dismantling it; the only thing is that you first need to treat the guide of the device with lubricant.
The installation procedure for the front lifts is as follows:
- We fasten the new device with nuts (11 pieces);
- We connect the wires and the motor;
- We find the bolt securing the inner handle of the lock and tighten it, using a key, tighten the glass fasteners.
- We remove the now unnecessary tape and check the work.
You need to look at how the window opens and closes, whether there are any distortions, whether all the screws are tightened well. If a mistake was made, what to do, you will have to repeat the work again. If everything goes well, you can praise yourself for a job well done.
The rear window lifters are installed in the same way, in the reverse order.
- Through the niche at the bottom of the back door, we put the device in place of the old one.
- Using a 10mm wrench, tighten the bolts and nuts.
- Using a size 8 wrench, secure the mechanism with three nuts.
- We remove the tape.