Electric windows in modern cars are no longer a rare system that many can only dream of. Even AvtoVAZ installs this system from the factory on new models. But any mechanism has wear and tear, which is why from time to time you need to know the pinout of the VAZ 2114 window lifter button, the complete system diagram, etc. Car owners are used to repairing cars themselves, and despite the fact that the mechanisms change, they still try to study them and get rid of faults on their own.
Video: How to connect power windows yourself easily and quickly:
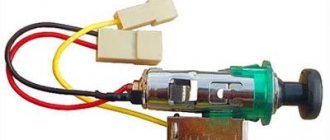
Button pinout
Let's take a closer look at the power window button pinout diagram and figure out which connector is responsible for what.
Each button has 7 contacts:
- 2 is responsible for the 12-volt power wire;
- 4 is responsible for connecting the lights from the side lights;
- 5 is responsible for connecting the ground;
- The green wire is responsible for raising the window (On the driver's door No. 1, on the passenger's door No. 6);
- The blue wire is responsible for lowering the window (On the driver's door No. 7, on the passenger's door No. 3).
To understand the detailed operation of each of the buttons, it is better to consider the diagram of the system as a whole, this way the essence of the mechanisms will be visible (the diagram is presented below).
Useful : 6 reasons why the power windows on a VAZ 2114 may not work
The button itself works according to the following principle:
- Contacts 1-6 and 7-3 are normally closed;
- Contacts 1-2 and 7-2 are normally open;
- When you press the up button, contact 1-6 opens and contacts 1-2 (window up) close;
- When you press the down button, contact 7-3 opens and contacts 7-2 (window down) closes.
Types of mechanism, design of window lifters
Some internal mechanisms are different. There are rack and cable drive types. Each device differs in technical characteristics and has its own advantages and disadvantages:
- The rack and pinion device is more reliable. The risk of glass distortion is minimized even after long-term use. The movement of the device is carried out thanks to gears that run along a belt rack. However, the carriage requires regular lubrication, which is why you have to disassemble the door card at least once a year.
- The cable device breaks more often. It often jumps off the rotating mechanism. Slow movement and resistance of the rubber seals can cause the cable to come off. This happens if you turn the handle sharply. The main advantage of the mechanism: good maintainability without serious financial costs.
The devices have the same location. The window regulator of the front right door of the VAZ 2107 car is located identical to the mount in the driver's side panel. The design includes:
- handle;
- cladding with a lock;
- socket, roller bracket;
- screws;
- mechanism with gears;
- pressure plate;
- glass;
- cable;
- roller: upper, tension;
- fasteners.
The listed components are present in a mechanical device. The electric version is distinguished by the presence of connecting wires that lead to the start button.
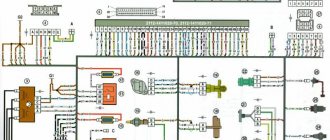
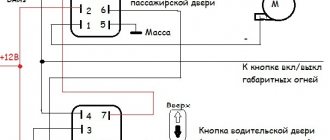
VAZ 2114 window lift diagram
Understanding the mechanism further, you may need a complete electrical circuit for the VAZ 2114 power windows.
Voltage to the power window buttons is supplied via wire A from the generator after turning the ignition key to the first position. The circuit is protected by two fuses F6 and F16 , and also has a built-in relay K5 . This is shown as number 1 in the diagram.
The mechanism is controlled using buttons. According to the diagram below, the driver's door is shown; there are two buttons on it, numbered 2 and 5. Button 2 is responsible for the right passenger door, and 5 for controlling the driver's door. From the top, the diagram shows the passenger door, on which there is only one power window control button.
The window lift motors are marked with numbers 3 and 4. Number 3 is responsible for the passenger door, and 4 for the driver's door. They are reversible, which means that depending on the change in polarity, they can rotate clockwise or counterclockwise.
Output B is responsible for the operation of the backlight; accordingly, it is connected to the external lighting of the car.
There are different ways to connect power windows in a VAZ 2114, but this one is considered to be a factory solution. The circuit is considered serial; there are also examples of parallel connection of the mechanism, but other buttons are used there. Sometimes you can find connection diagrams with glass closers, but all this can already be attributed to tuning.
What can be useful when installing an ESP?
First of all, you need to purchase a set of various devices, including: controls and an actuator. You should decide in advance on the choice of window lifters, their quantity and price. Naturally, if you choose better and more efficient lifts, the price will be significantly higher.
Conventionally, the following types of electric windows can be distinguished:
- Slat window lifters are among the most reliable. In addition, they have high operating speed and minimal noise levels during the process of lowering and raising the glass. Their only drawback can be considered only the high cost of the kits.
- Cable devices are the lowest level in the line of window lifters, as they have lower characteristics. However, their cost and ease of installation significantly outweigh their disadvantages.
- Rack and pinion electric windows include the disadvantages and advantages of other types of devices, and therefore are a connecting link between them. That is why many drivers make their choice in favor of the rack.
Once you have decided on the type of window lifters you want, you need to decide on the manufacturer. To do this, you can use various tests and reviews, of which there are quite a lot on the Internet. Differences in design also have a big impact on the installation process, as many vehicles are already equipped with mounting hardware to install the appropriate devices, while others will need modifications to the inside of the door. However, redesigning the fastening parts does not seem difficult.
A further choice will be the number of window lifters. Typically, car enthusiasts limit themselves to two and install them only on the front doors of the car. You can also mount them on the rear doors.
Window lifters without ignition on the VAZ 2114
From the diagram it can be seen that the power wire goes to relay K5, through fuse F6 to pin 30 and is open. When you turn the ignition key, voltage is applied to contact 85, the electromagnet turns on and closes contacts 30 and 87, after which a plus is supplied to the window lift system.
To eliminate the operation of the ignition switch in the system, it is enough to remove the relay from this circuit and close contacts 30 and 87.
How to do this safely?
- In the VAZ 2108-09 mounting blocks for the high beam, a similar jumper was installed from the factory. If you can find it somewhere, you can install it instead of the power window relay. The result is almost a factory solution, and this method can be considered the most reliable in such a case.
- You can make a similar jumper yourself using a piece of wire and a 6.4 mm male connector terminal. It is enough to strip the ends of the wire and crimp them with terminals, then install the resulting part into the mounting block, closing contacts 30 and 87.
- And the last method is to make the power window relay itself as a jumper. We take it out and close the necessary contacts with a piece of wire, after which we install it in place. This method is not the most reliable, but it works.
If you decide to understand the system of operation of the window regulators or want to equip the car, then, guided by the information from the article, it will not be so difficult to do this. AvtoVAZ has never complicated the mechanisms in its cars, and the same thing happened with electric windows. All components have a simplified design, which allows for quick maintenance in case of problems, but also helps to equip your car with modern mechanisms.
Important points
- The sequence of installing the Granat ESP in the rear doors of a VAZ 2107 is similar to that described above, since the rear doors differ from the front doors only in the location of the window lifter handle: it is shifted 4 cm to the left. Accordingly, the drilled mounting holes will be offset by the same distance. In addition, if a car owner wants to install ESP on all 4 doors, he will have to buy not one, but two sets of ESP “Granat” (since 1 set is designed for only 2 doors);
- The ESP installed in the door must, firstly, be completely assembled, and secondly, the ESP mechanism itself must be in the lowest position, at the very end of the vertical rail. Otherwise, the ESP simply will not pass through the technological hole in the door;
- when unbending the lock washer on the window lifter handle with a screwdriver, you should not make much effort: this is a fragile part that breaks easily;
- This rule also applies to the plugs on the door trim: they also break easily when removed. And finding new door plugs for a VAZ 2107 on sale today is almost impossible;
- When checking the operation of the ESP, special attention should be paid to the smooth movement of the glass and the sound it makes. If the moving glass creaks piercingly, it means that it is necessary to loosen the mounting bolts on the vertical rail. If the creaking does not disappear, you need to unscrew the bolts on the rail, place a couple of 2 mm high washers under them and screw the bolts into place. If the problem does not go away even after this, you should apply silicone grease to the seal from which the glass extends. Moreover, it is recommended to lubricate only the inner half of the seal (the one located in the cabin);
Installing electric windows is a task that is quite within the capabilities of the average car enthusiast, provided that he has not yet forgotten his school physics course and has an idea of what an electrical circuit is. Then there should be no problems with installing and connecting the ESP, especially since each kit is supplied with very detailed installation instructions. Well, if you had problems with physics at school, there is only one way out: contact specialists at the service center. But in this case, the car enthusiast will have to fork out a fair amount.
- Author: Alexey Stepanov
Rate this article:
- 5
- 4
- 3
- 2
- 1
(5 votes, average: 4.2 out of 5)
Share with your friends!
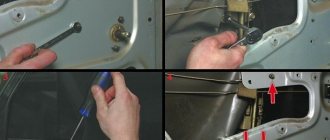
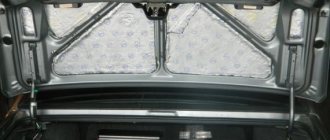
Step-by-step replacement sequence on the front door
To install a new window regulator, you must first dismantle the old mechanism.
Preparatory work:
- Remove the three bolts that secure the handle to the door.
- Remove the handle.
- Remove the door trim.
Before dismantling the factory lift, tie the two branches of the cable with wire.
This is necessary so that the cable does not fly out of the grooves in the drum, and the mechanism can be reused.
Removal of the structure is performed as follows:
- Lower the glass within one turn of the glass lift handle so that you can reach the cable clamp and the glass supports through the technological door openings.
- One fixing screw needs to be unscrewed completely, and the other one should be slightly loosened at the bracket securing the cable to the supporting protrusion. Take him out.
- Raise the glass to its highest position and secure it using a regular screwdriver. You can use other available means for this.
- Take a 10mm wrench and slightly loosen the nut that secures the tension roller. It is located at the bottom center of the door.
- Remove the cable from the tensioner and three guide reels.
- Remove the three nuts that secure the window regulator to the door.
- Unscrew the 2 nuts securing the guide groove and move it to the right.
- The final stage is the removal of the window regulator from the door.
After the mechanism is removed, you can check how the rollers rotate.
About the design of window lifters
The device of a cable window lifter on a VAZ 2107
The operating principle of both rack and pinion window lifts is approximately the same: the glass is secured to the lifting mechanism, activated by rotating the handle, with special clamps. By rotating the handle, the driver either moves the gear along a vertical rack (in the case of a rack and pinion window lift) or pulls the cable, which causes the glass to slide out of the door.
Power windows (ESP) are the next step.
Articulating-lever window lifters "Granat"
The most popular among car enthusiasts are articulated-lever ESPs, which have a number of advantages:
- ESP has a reasonable price;
- ESP is easy to install;
- ESPs, as a rule, have excellent equipment: the driver does not have to look for activation buttons and wires to them - everything is already there;
- ESPs are reliable, work quickly and make almost no noise;
DIY repair
If after checking it turns out that the entire mechanism is working, then repair of the window lifter button is necessary (the author of the video is Nik86 auto-construction).
You need to know how to remove the power window button to repair it.
To disassemble you need to perform the following sequence of actions:
- First, the door panel is dismantled.
- Next, you need to disconnect the connector and unscrew the fastener that holds the key board.
- There are four contacts on the board. If they have oxidized, they should be carefully cleaned.
- When a key is pressed, it presses on a plastic pad, which in turn presses on its rubber shell. As a result of these actions, the contacts on the board are closed. It is also advisable to check the springs and each part for serviceability.
- Next, you should apply conductive glue to the surface of the rubber key shell in the place where the contacts and the printed part of the board come into contact.
- After waiting for the glue to dry, you need to reassemble in reverse order.
During repairs, it is important not to mix up the contacts when connecting switches.
Typical faults
Keys are used to control the power windows. Over time, it may fail. You need to know what malfunctions can occur and how you can fix them yourself.
Causes
The reasons why the power window key may not respond to pressing may be different:
- glass froze during severe frost;
- glass lift failure.
It is almost impossible to detect a breakdown without disassembling the window lifting mechanism. Therefore, you need to remove the casing and disassemble the mechanism.
Removing door trim
When removing each part, you should check it for integrity.
The main causes of breakdowns can be divided into two groups:
- Problems with the key's power supply.
- There may be situations where everything is fine electrically, but the power window switch still does not work.
Remedies
If problems arise due to the power supply, then first of all you should check the fuses. If they are in good condition, the next step is to carefully inspect the motor of the beet lifting mechanism and check what voltage is supplied to its terminals. The test can be done using a multimeter or a regular 12 V light bulb. If there is no voltage, you need to check the relay, wiring and control unit.
Removing the Switches from the Door
If the button works periodically (it works, then it gets stuck), the problem is most likely in the button itself. It is necessary to disassemble the window regulator, remove the button and clean the contacts if they are oxidized.
Preparatory activities and door disassembly
To provide access to the mechanism, it is necessary to dismantle the upholstery; the operation is performed as follows:
- Using a screwdriver, unscrew the screws securing the door handle, remove it and put it aside.
- Carefully remove the mechanical window handle and the opening handle.
- Inserting a flat-head screwdriver into the gap between the upholstery and the door, press it out, overcoming the resistance of the plastic latches.
- We unscrew the screws holding the parts of the drive and the executive part of the standard mechanism and remove them along with the glass.
The preparatory activities for installing electric windows on a VAZ 2107 model car are completed and you can move on to the next stage.
conclusions
Installing electric windows on a VAZ-2107 is a completely feasible task for car enthusiasts who have worked with electricity at least once. If you can’t cope with it, you can contact a car service, where high-quality installation will be carried out for the appropriate fee.
Sources
- https://legionerov.ru/avtomobili/samostojatelno-ustanavlivaem-jelektricheskie/
- https://bumper.guru/klassicheskie-modeli-vaz/stekla/steklopodemniki-na-vaz-2107.html
- https://vazweb.ru/desyatka/elektrooborudovanie/samostoyatelno-ustanavlivaem-elektricheskie-steklopodyomniki-na-vaz-2107.html
- https://motorsguide.ru/system/elektrosteklopodyomnik-na-vaz-2107
- https://www.autoposobie.ru/ustanavlivaem-elektrosteklopodyomniki-na-vaz-2107-svoimi-rukami/
- https://avtozam.com/vaz/2107/montazh-i-ustanovka-jelektrosteklopodemnikov/
[collapse]