In what cases is it necessary to replace the inner CV joint?
Replacing the internal CV joint on front-wheel drive VAZ vehicles is required if the following symptoms are present:
- Crunching and knocking noises when driving and accelerating in a straight line;
- Vibration and shock when changing gears;
- Significant play when testing by hand;
- If the “grenade” fails completely, the vehicle cannot move further.
» alt=»»> The main reason for the malfunction of the VAZ “grenade” is the entry of water and dirt through the hole in the torn boot. The second possible cause of failure is a sharp press on the gas with the wheels fully turned, although in this case you risk killing the external rather than the internal grenade.
In addition to the above, replacing the internal CV joint on VAZ-2110 and other models may be necessary if the quality of the previously installed joint is poor.
We are looking for faults in the CV joint boot
Even fine dust or slight ingress of moisture into it can damage the CV joint. The characteristic sound of a breakdown will be a crunching sound when the car wheel is turned all the way. This is the first sign of a breakdown and a signal that you need to urgently check the CV joint and its components.
This happens when you don't often look at the rubber boots or known as boots. Inspecting the boot and identifying its malfunction is very easy and can be done without special equipment; just look at it by eye to see if there is any damage or holes on it.
Replacing the inner CV joint with your own hands
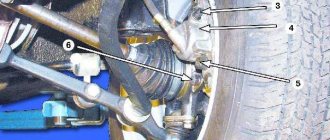
» alt=»»> The procedure for replacing a “grenade” is the same for the entire front-wheel drive VAZ line, starting with 2108 and ending with VAZ-2115, “Kalina”, “Priora”, “Grant”. Before removing the inner CV joint, the oil is drained from the gearbox. Then proceed according to the following algorithm:
- Unlock and unscrew the hub nut. To make the work easier, a piece of pipe about 1 meter long should be put on the key.
- The desired side of the car is hung on a jack or lift.
- Remove the wheel.
- Remove the washer located under the hub nut installation site.
- Disconnect the steering tip.
- The CV joint is removed from the hub.
- Using a pry bar, remove the drive and internal joint from the gearbox.
Note: when removing both drives at the same time, a suitable mandrel should be installed in their place.
How to change the “grenade” with the drive removed? To do this, clamp the shaft in a vice, loosen the clamps and remove the boot. After this, the hinge is knocked off the splines with hammer blows.
The new CV joint should be hammered by applying light blows to its end with a hammer. For this it is better to use a wooden mallet. The “grenade” is first filled with a special lubricant.
Before installing a new constant velocity joint, it is necessary to clean its seat from old grease and install a new boot. Assembly is carried out in reverse order.
The repair is considered complete after successful sea trials. In this case, there should be no extraneous sounds from the drive side in all modes of vehicle movement.
Replacement
When faced with a situation where a fault in the outer joint cannot be corrected by repair, the entire outer joint will need to be replaced. Since there are quite a lot of features associated with removing and installing a grenade on the shaft for each specific make and model of car, we will analyze the replacement using the example of one of the most popular and widespread cars on the Russian market. Next, we will talk about replacing the outer CV joint with a Hyundai Solaris, but this does not mean that the described process will not be useful to owners of cars of other brands.
To replace you will need
First of all, you need to purchase a new front outer CV joint. They are usually sold as a set, that is, the hinge itself, boot, clamps, retaining ring, lubricant and sometimes even a hub nut. The original outer CV joint on the Hyundai Solaris has article number 495261R001 or 495261R002. This is what the new outer CV joint kit will look like:
Also during the replacement process you will need: a jack, a spray bar, a set of keys, a screwdriver, pliers, a hammer and WD-40.
Replacement process
Find a dry room with a flat floor; ideally, carry out work in a garage equipped with an inspection pit or a lift. Remove the wheel nuts and hub nut. Jack up the car, and for greater reliability, install another support under it. Then unscrew the nuts and remove the wheel (by the way, it can be used as an additional support). Now, using a screwdriver and pliers, remove the retaining ring and unscrew the hub nut.
Unscrew the wheel speed sensor mounting bolt and remove the sensor.
Next, you need to unscrew the strut and the brake hose fastenings.
Advice! Most likely, the nuts are stuck, so before unscrewing them, treat them with WD-40.
Next, you have to unscrew the steering rod and press the ball joint into the knuckle. To do this, first unscrew the ball pin mounting nut and then remove the tie rod end. You can see the process of removing the tie rod end in more detail in the video tutorial on replacing them:
Now pull the ball joint out of the steering knuckle and remove it. Again, you can see the process of removing the ball joint in more detail in the video of replacing it on a Hyundai Solaris car:
Since we unscrewed the strut for greater convenience when accessing the outer CV joint, now we need to take care of securing the brake disc caliper (so that it does not hang on the brake hose, as it can simply break). To do this, find a wire, make a hook from it and secure the caliper to the shock absorber. Naturally, you first need to remove the drive shaft shank from the hub. It probably won't go, so use a hammer and knock it out.
In order not to drain the oil from the gearbox and not to touch the fit of the shaft in the differential gear, we will not remove the CV joint drive. It is quite possible to replace all elements while the shaft is on the car. To do this, we freed up the working space as much as possible and made it easier to access the external grenade.
Important! Place some support under the drive shaft to prevent it from falling.
So, cut off the boot clamps and cut the boot itself for easier and faster removal. Next, remove the retaining ring.
Next, you need to remove the hinge itself. Since the old one is no longer useful to us, use a hammer to knock out the outer CV joint from its seat. Next, carefully clean the shaft from traces of dirt and old grease with kerosene and put on a new boot and a new lock ring.
Fill the new outer CV joint with grease, the more the better. A large amount of lubricant will extend the life of the joint.
Then pull the boot onto the grenade and tighten the clamps securely. The car is assembled in the reverse order. If you still have questions about replacing the outer CV joint on a Hyundai Solaris, watch the following video:
- What is the best way to decarbonize an engine?
- External grenade: disassembly and repair
- The best engine flush before changing the oil
- How to repair a CV joint with your own hands
Boot replacement and repair
The boot can be changed without removing the grenade if you have special equipment. His work is demonstrated on video. » alt=»»> If you do not have such a device, to remove and replace it, you must perform the above-described procedure for removing the drive and dismantling the hinge. The procedure is necessary if there is even minor through damage on the boot.
Temporary repairs to the CV joint boot can be made without removing it from the vehicle. To do this, you need to thoroughly clean and degrease the damage, then seal it with a piece of rubber and cyanoacrylate-based glue (superglue).
An alternative repair method is to seal the holes with silicone caulk. It should be remembered that it takes a day to completely polymerize.
Note: express repair is a temporary measure. Replacing the inner joint boot may be delayed for a short time, but not completely cancelled. Typically, these types of repair methods are used to get to the point of repair.
Replacing anthers
KAMAZ Oka Lucy Logbook Removing the crunch of the outer CV joint
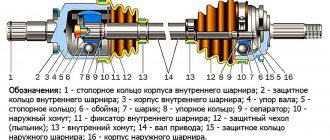
The hinges are protected from the negative influences of the external environment by special anthers, which are a corrugated cover made of rubber or flexible polymer. The boot material is resistant to moisture, freezing temperatures, as well as stretching and twisting, but this particular part turns out to be the weakest point of the assembly. It is necessary to regularly visually inspect the anthers of the external and internal hinges. Cracks and breaks in the protective corrugation are unacceptable, because the slightest ingress of dust, water and dirt will significantly speed up the failure of the CV joint. Also a reason to replace the boot are splashes and leaks of lubricant, indicating a loss of tightness of the connection.
The cost of the protective boot is low, however, replacing it requires dismantling the hinge, and for the inside, also the drive assembly, which increases the cost of repairs at service stations.
A suitable option may be to replace the CV joint boot yourself, which is performed in the following sequence:
The car is secured with a parking brake, and stops are installed under the rear wheels. The hub nut is loosened, after which the car is raised on a jack. The front wheel is removed, the bolts securing the ball joint to the steering knuckle are unscrewed. The hub, together with the front strut, is carefully moved to the side and the axle of the outer CV joint is removed from the hole in the hub.
Replacing the outer joint boot is done directly on the car; in the case of the inner boot, it is necessary to remove the drive completely, disconnecting it from the gearbox.
To replace the boot, the corresponding CV joint must be dismantled, which makes it possible to assess the condition of the grenade and, if necessary, replace the part.
You can get a visual representation of the procedure for replacing CV joints and their boots from the following video:
VAZ cars: repair, maintenance, tuning
Depending on the manufacturer and quality of the CV joint, its service life ranges from 30 to 60 thousand kilometers. Replacement of the external grenade is usually done more often, especially on the right side. It is more susceptible to stress from bad roads. How to replace the outer CV joint in Grante and which one is better to buy, we will figure it out now.
What are anthers and from what material are they reproduced?
In most cases, such elements are installed on almost all light-duty cars, or on the rear and front axles of SUVs. As a rule, such vehicles are characterized by an irreplaceable suspension.
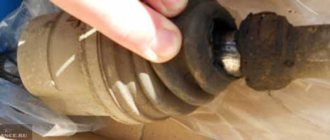
The boot is a special cover designed to perform a reliable protective function. It is made of rubber and is made in the form of a corrugated pipe. This case is an almost irreplaceable item that serves as good protection against dust or dirt of any kind. The developers planned that the period of reliable operation of this type of structure would be identical to the service life of the entire vehicle. As time has shown, long-term operating conditions of such elements have made serious changes, so the boot became the most unreliable link. Especially to create the boot, a number of special materials have been developed, which are characterized by excellent resistance to moisture and low temperatures. Before replacing the CV joint boots, you first need to study the conditions under which replacement is necessary.
New rubber boot
Choosing an outer CV joint for the Lada Granta
There are enough hinges from different manufacturers on sale, it’s bad that sellers treat them like all Zhiguli spare parts - everything is the same. In practice, for the first generation Grants there are two types of external (and internal) CV joints - for cars with manual transmission and for Grants with automatic transmission. In a word, grenade 2215012-00 (21 teeth) .
For Lada Granta with a manual transmission there is a CV joint with catalog number 2215012-86 . In order not to be confused with numbers, let’s look at the differences between CV joints for Grants with automatic transmission and manual transmission:
- The spline connection in the outer hinge has changed in size, the number of teeth is 21 . A CV joint with 22 splines is suitable for a manual transmission.
- The geometric dimensions of the body have also been changed.
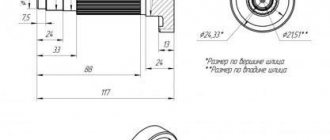
- The length of the outer spline part for manual transmission is 76.5 mm , for automatic transmission - 77 mm .
- height (without spline) 55 mm for automatic and 52.2 mm for manual .
- The number of teeth for the ABS ring does not change and remains 43.
Therefore, before purchasing an outer CV joint, we first look at the number of splines on the inside of the joint body. Among the manufacturers on the market, AvtoVAZ, Belmag and Triall dominate. The price of an outer CV joint on a Lada Granta is around $20.
It is important that the kit includes a locking ring, molybdenum disulfide-based lubricant and a neoprene boot. It should not be too hard, but a boot that is too thin will not last long.
“CV joint - 4” lubricant is a very important element of the entire replacement process
Before tightening the boot onto the CV joint, its middle must be properly lubricated with the substance “CV joint - 4”. After this process, the boot must be put on the grenade and secured well with clamps. At the final stage, the drive needs to be driven in using a hammer and a wooden stand. You need to put the hub on the splines and tighten the nut properly to securely fasten it. The ball joint is put in place and the wheel is put on.
Important: carefully check that all bolts that you have previously unscrewed are properly tightened. Don’t forget to also screw on the crankcase protection and pour a small amount of oil into the gearbox. In order to avoid significant changes in the position of the vehicle gears, it is not necessary to practice removing the drive on both sides at the same time.
«>
We change the outer CV joint of the Lada Granta with our own hands
There shouldn’t be any difficulties when replacing the CV joint yourself if you use simple instructions and have a basic set of tools. It’s also a good idea to have a puller on hand for side dishes of equal angular velocities. It doesn't seem to have an article number, but that's what it looks like.
Alternatively, you can use a simple impact puller with a welded hub nut, but any extra shock loads on the transmission will not be very useful for it.
- While the car is on the ground, unscrew the hub nut using a 30mm socket with a long wrench.
- Raise the car, remove the wheel and unscrew the hub nut.
- We unscrew the caliper without disassembling it.
- Unscrew the ball joint bolts.
- We remove the hub from the CV joint and at the same time from the ball joint, and move it to the side.
- We loosen the clamps and move the boot further along the drive, closer to the gearbox.
- Using a puller or hammer, we ask the CV joint to leave its location.
- Remove the retaining ring.
- We fill the internal cavity of the CV joint with the lubricant that comes with the kit.
- We put the remaining grease into a new boot and put it in place.
- Screw the nut onto the new CV joint and install it in place.
- With light blows of a hammer on the nut, we move the hinge all the way until the stopper snaps into place.
- We install the boot, check that it is without distortions and tighten the clamps.
We put everything back together in reverse order, core the hub nut and do a test drive.
Diagnosis of anthers
As a rule, these joints are common in passenger cars that have independent suspension. They can also be found in the rear wheels and front axles of SUVs. As for the boot itself, it is a kind of protective cover made of rubber. Its shape is a corrugated pipe. This cover is indispensable in protecting against various contaminants and dust.
The CV joint itself is a rather complex structure, which is much more demanding than the same ball joint, so it requires exceptional care. If there are dust particles in it, a peculiar crunching sound appears, which means huge problems. In this case, this part will completely fail quite soon, but there are ways to extend its life a little.
To figure out whether the outer CV joint boot needs to be replaced, some work needs to be done. First of all, you should literally turn all the wheels all the way in the required direction and see what is happening behind the front wheel.
The aforementioned corrugated rubber should be located in its very center and it is desirable that it be without damage. A good sign is also the fact that there is not a single trace of grease on it. If there are such marks or the rubber is damaged, or both, then replacement is inevitable.
However, a small crack on the boot is allowed, which does not mean its final failure, but does mean that the hour of judgment is quickly approaching. Still, it’s better not to be lazy, go to the appropriate store and immediately buy a similar new part for your car. It would be a good idea to have a few of these anthers in reserve. You cannot ignore even the slightest cracks in the structure of the boot, because through them not only dirt, but also the same dust can get into the system, which is why the CV joint will certainly not last long. All this also strongly supports the formation of a special development on its parts, which leads to the already mentioned crunch.
There is also a way to check without inspection. To do this, you need to find a road with as sharp turns as possible, and if the corresponding sound is heard on it, then problems cannot be avoided. This method is effective due to the fact that the CV joint itself is a special angular velocity joint that forces the front wheels to rotate and turn.
In other words, it is capable of transmitting rotations to axle shafts located at different angles. This hinge is created from very, very strong alloys, because a huge load is transferred to it when the car moves.
Assembly procedure step by step
We carry out the entire list of assembly operations in a Lada Kalina car in strictly reverse order. During the procedure, it is necessary to take into account some nuances.
- First, we put the boot on the axle shaft. If this is difficult, then its surface can be lubricated with the grease supplied with the new hinge kit.
- Now we fill the same grease into the CV joint bearing, and the remainder into the internal cavity of the boot.
- We install the hinge on the axle shaft. We also use a hammer, applying a shock load to the body. The retaining ring should be replaced.
- When the “grenade” “sits” in its place, we push the boot, after squeezing it with our hands to remove excess air. We install clamps.
- We do the same when replacing the internal hinge.
- Now we install the axle shaft into the transmission housing until the shaft engages with the side gear. Don’t forget to fill the unit with oil afterwards.
- We insert the outer joint into the steering knuckle until it fully engages with the splined race of the hub. Screw on the central nut (do not tighten it).
- We return the ball joint to its place.
- We hang the wheel and do not tighten its fasteners too much.
- We lower the car (we do not unload the jack completely). Tighten all fasteners to the required torques. We remove the jack and stops. Replacement of the outer CV joint is complete.
The owner of LADA Kalina will spend no more than 3 hours of his time to complete the full list of replacement actions. We check the correct installation of the hinges. To do this, we start driving the car with the wheels turned out as far as possible. We observe the absence of crunching and other characteristic sounds from the axle shaft. Now you know how to change a faulty CV joint.

