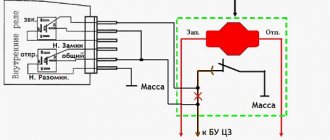
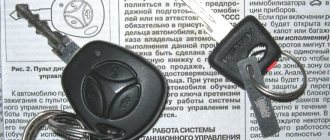
On the very first day, my hands itched, I smoked the group vk.com/ladammc In the group, I think you can find everything, and if you don’t find it, good people will definitely help, admin Alexey Voloboev helped me a lot, I thank him very much for that. The software version on the radio label is 2.0.2.32 stock - a completely stock version of the software (compatibility with other software is unknown) The radio was flashed with firmware for Prior/Kalin 23.0.2.38 I installed 21.0.2.38. Then I flashed the Can module with mms version 1.10. Then I installed the alternative menu Newmenu 8.4.8. It didn’t work out the first time, I took the instructions and firmware from the group, chose the menu on a whim, now I want to put singlemenu, because of the many skins, but I’m thinking a little later. I didn’t have any connectors for subwoofer/camera/channel bus. In the city of Tovarah Prikamye I found mini iso separately - 898 rubles, for the camera 1290 rubles, for the cable bus there is no. I think fuck you with your prices. I bought a Mini iso on Avito for 250 rubles, + two empty pads, green and blue. I somehow got out one pin with a thin wire, went to the store, bought “small pins”, one large pin for the camera, heat shrink, 3 meters of wire, and 2 plugs for obd2. Everything came out to 133 rubles.
I decided to do it in a simple way - Homeless Can) I attached a terminal for mms to the wire on one side, and a plug for obd2 on the other side. First wire: connect the mms terminal to pin 10 of the green block, obd plug to pin 6. Second wire: mms terminal in K12, obd terminal in K14. Now you can view and reset errors, it shows: instantaneous consumption, trip cost, speed, rpm, amount of fuel and much more, you can set the rpm to XX, turn on the Carlson at 95g, etc.
Firmware for radio Kalina 2/Granta
You will need an SD card up to 4GB formatted in FAT. In the future, it will be possible to use a card in exFAT format.
Attention!
| The author is not responsible for all your actions. In addition, flashing the MMC leads to loss of warranty. |
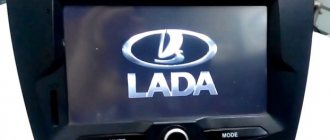
Procedure: 1. Copy the firmware to an SD card (up to 4GB in FAT). 2. Copy files from the “FirmWare” folder to the root of the memory card. 3. Remove the flash drive from the USB port. 4. Insert the SD card into the radio. 5. Reboot the GU by long (about 15 seconds) pressing the power button (for Lada Kalina 2) or the volume button (for Lada Granta). 6. A flashing will occur (4 status bars will run through) and the radio will reboot itself into the desktop.
https://youtube.com/watch?v=gCFqgFoW4F4
7. Without rebooting the radio, press the “Recalibrate” button and calibrate the screen. At the end, during the countdown, click on the screen.8. Reboot the radio with the memory card inserted. The new menu will load.
If, after flashing the radio, the download freezes at the “Lada” logo, then most likely there is a problem with the SD card. Try formatting the memory card to other file systems (FAT32/exFAT/FAT) and flashing it again. You can also try using other SD cards, 4GB or 2GB in size.
How to return to the standard menu of the Kalina 2/Grant radio:
- Click on the “Media” icon in the alternative menu.
- Reboot the radio, first remove the SD card.
Nothing changes in the standard shell, everything remains the same.
Exterior
Initially, Lada Kalina was considered exclusively as a “workhorse”. Consequently, the attitude towards design was largely characterized by the residual principle. They say that this is not the main thing for such a machine. But after the restyling, the model began to look much more lively and aggressive.
Initially, the Lada Kalina was a simple car. Rather, even too simple.
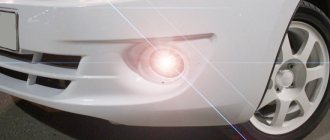
The front bumper is decorated with a huge air intake supporting a small radiator grille. And under the spectacular headlights there are small foglights located in massive seats.
The new Kalina looks much more interesting from the front!
However, there are an order of magnitude fewer changes in the profile. The same modest and proportional doors, a round tank flap with a recess for opening, front fenders and so on. Perhaps the changes affected only the rims and rear fenders.
On the side, other than the different rear wings and rims, no changes are observed.
The situation is similar with regard to the stern. There are no fundamental changes observed, with the exception of the rear bumper, which has become more massive and powerful, and has also acquired new reflectors and a trim at the bottom.
At the rear, the changes are more noticeable, but they are not fundamental.
The image of Lada Vesta is fundamentally different. She was not a nondescript machine, to which they later tried to instill pseudo-aggressive features. Initially, Lada Vesta was created as a landmark and expressive car - the first representative of AvtoVAZ’s new corporate style. That’s why it looks more harmonious – the headlights, chrome, air intake, foglights, “X” lines and other elements of the front end combine perfectly.
Vesta's front end is much more harmonious.
From the side the impression is the same. A solid, complete product, with logical lines and transitions, stylish rims and considerable ground clearance.
The ground clearance of the Lada Vesta can be the envy of some crossovers.
And the food didn’t disappoint. The chopped lines of the stops are impressive, especially against the background of a modest bumper and a proportional trunk lid, decorated with large letters of the brand name.
Vesta looks great from behind!
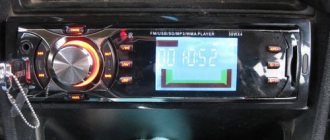
Review of the standard radio (MMC) of Lada Granta, Kalina 2 and Priora (luxury)
Currently, depending on the vehicle configuration, several types of 2 din radio can be installed.
The first is called “2 DIN audio system, without CD drive, without TouchScreen”, the other “multimedia system without CD drive, with a 7-inch display with TouchScreen” (MMC).
In the review we will talk about the MMC with a touch screen (LCD display), which is installed on the Granta (sedan and liftback), as well as on the Lada Kalina 2 and Lada Priora.
Catalog numbers MMS Lada:
Monoblock 2190-7900010-00 - MMC Lada Granta (luxury) and Lada Kalina 2 (standard) The screen is separated from the buttons 2192-7900200 - MMC Lada Kalina 2 (luxury) and Lada Priora (luxury)
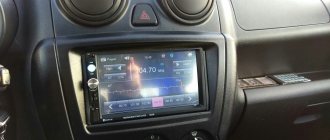
MMC runs on the Windows CE 6 operating system. This is specially optimized for devices with a minimum amount of memory, by the way, in our case the memory is only 128MB. Despite this, turning on the radio does not take much time (about 2-3 seconds).
MMS screen
The display on the Granta and Kalina radio is resistive. Unlike a capacitive screen, it is able to work without failures in more severe conditions, for example, frost or heat. The display itself is quite bright and pressure sensitive. Due to the lack of a visor, there is glare in sunny weather, but not critical.
radio cassette player lada granta lux radio cassette player lada kalina 2 lux
Audio, video and photo
The radio supports audio formats: MP3, WMA and WAV. While a tune is playing, the display shows information about the album, artist, and cover art (if any). You can adjust the shades of sound using the equalizer (there are 6 pre-programmed settings for Jazz, Rock, Voice, etc.). The sound quality is not bad, quite clear, without audible cuts in the highs or lows.
MMS supports only one video format: WMV with a resolution of 320*240px. To play video files you will have to use a converter, for example, Xilisoft Video Converter Ultimate. It will not be possible to play a video without conversion, for example, in 720p resolution, the picture will slow down, and the sound will lag behind the video, due to the insufficiently powerful processor.
Review of MMC Lada Granta (luxury) and Lada Kalina 2 (standard)
Review of MMC Lada Kalina 2 (luxury) and Lada Priora (luxury)
It is worth noting that after purchasing a car, the antenna comes as a gift. You will have to install it yourself.
Phone, Hands free
Standard MMS allows you to connect your phone via bluetooth and download the phone book. In addition, it is possible to play music from your phone. There are also disadvantages; if you use several phones, it will be difficult to save settings.
Connecting external data sources
You can connect a USB flash drive to the radio, which must have the FAT16 or FAT32 file system. The radio connector is located on the back of the radio, which you will have to move yourself to a specially designated place in the glove compartment.
You can also connect an SD card to the radio; with a capacity of 32GB there were no problems.
Conclusion
The radio cannot be called a “finished” option.
It copes with the basic functions of the multimedia system, and for advanced capabilities (for example, connecting a rear view camera, playing files of other formats, making the radio display more functional, installing navigation, etc.) the radio will have to be modified by hand. Perhaps if the stock radio ran Android and had a more powerful processor and memory capacity, then the situation would have been much better.
There are also positive aspects. User-friendly interface, support for USB and SD cards, as well as playback of video files (albeit of low quality), which many middle-class foreign cars do not have! Such a multimedia system is the first step in this direction, so we can only hope that the next MMC models will be more productive and functional.
Let us remind you that it is possible to install this radio with an LCD display instead of the standard radio in the “norm” configuration. We discuss all the problems with MMS in another article.
Search
Not long ago, AVTOVAZ began producing the Lada Kalina with a head unit. Previously, radio installation in Kalina was offered only by dealers in car showrooms as an additional service that was paid for by the client. Now the buyer has a choice between installing a music system with his own hands or buying a car with a head unit already installed.
Kalina sound installed
Technical characteristics of the head unit in the Kalina Lux selection:
- 2DIN touch screen;
- presence of stereo radio;
- ability to play multimedia files;
- ability to synchronize with a mobile phone;
- works with bluetooth.
Device development - WindowsCE 6.0. RAM - 128 MB. 5th generation CPU. These features cannot but please fans of AvtoVAZ products, because now driving a car has become much more enjoyable.
Kalina Radio Recorder: The Norma's technical specifications differ from the luxurious lack of a touch screen, Bluetooth connectivity and mobile phone synchronization. The size of the radio is 1DIN, removable panel. Some trim levels have 4 speakers and an antenna. The radio receives a wide range of radio waves, can play discs of different sizes, and work with USB drives and SD cards.
It's also funny that the car with the walkie-talkie went through all the special tests before going to the masses. They have been tested at extremely low and very high temperatures, and electrical compatibility has been verified by simulating the radio interference range.
When choosing a radio in your car, you must decide which media to use as the main one. This will save money. If, for example, a car enthusiast is sure that he does not need a CD or tape recorder, then why pay for a radio using these functions.
How to install a 2 din radio receiver Pioneer AppRadio SPH-DA110 in Lada Granta (OK)?
For those who choose CD players, there is one small drawback that manufacturers are trying to combat - loss of music fragments due to shaking while traveling. But progress is not in place, and the mechanics are improving. Having an ISO in the car and, accordingly, in the audio device will simplify the connection. The presence of a USB adapter allows you to play music from different media.
When choosing a radio, you should pay attention to the power characteristics. They have the most and a low threshold
Higher power is rarely used except in extreme situations. The choice should be made according to the rated power, in other words, the one that is used in most cases. Often, manufacturers indicate only the highest values on the packaging, so when choosing, you should carefully consider the annotation (passport), and not the box.
You may also like
It is also worth paying attention to the control panel. It should be as simple and convenient as possible, because in most cases it will be used while driving
Exquisite design can distract the road. Convenient and understandable buttons and backlight adjustment will only be useful. Be sure to check the spectrum of perceived frequencies. Since radio stations mostly broadcast in the frequency range from 80 to 110 MHz, it is better to have a tuner.
Video on how to prepare an SD card for flashing the radio
Firmware order:
- Copy the firmware files (Chain.bin, chain.lst, NK.bin, TINYNK.bin) to the root of the SD card.
- Remove the flash drive from the USB port.
- Insert the SD card into the MMC.
- Restart the radio (for Lada Kalina 2/Priora - hold down the power button for 15 seconds, for Lada Granta hold down the volume button for 15 seconds).
- During the download, an update will occur, after which the radio will boot into desktop mode.
- Without rebooting the radio, go to the screen calibration mode (Start/Settings/Control Panel/Stilus/ to the Calibration/Recalibrate tab), then press the screen during the countdown.
- Reboot the MMS with the SD card inserted.
- The firmware of the radio is complete, the SD card can be removed.
Nuances of multimedia firmware Grants (2190)
It is quite easy to carry out the firmware itself when installing the mms 2190 firmware. To do this, it will be necessary to use an SD card.
Among the common flaws that occur after the dashboard firmware is installed, even if it is the latest version, is the Lada logo freezing on the display of the head unit.
This moment can be provoked by the following factors:
- failure to comply with required formatting principles;
- the presence of an outdated version of the SD card that differs from “SDHC”.
After successfully formatting the card and selecting software (for example, “New Menu V7.391 Nitro”), you will need to acquire the latest firmware and unpack the product onto a previously prepared SD media.
Regarding the “Firm Ware” folder, note: the files located in it will need to be redirected to the root directory of the card itself. Upon completion of the copying process, disconnect the flash card from the PC, not forgetting about the safe removal technique.
Now we confidently insert the SD card with the prepared files present on it directly into the MMC. Then turn on the head unit. We wait for the full download to complete and by long pressing the volume button, we reboot.
The act of rebooting is characterized by four stages, the display of which is implemented in 4 lines of process status. After filling out these lines, the device starts in the usual mode, as evidenced by the appearance of the corresponding original menu. After a few seconds, the device transitions to the altmenu.
The USB splitter “DNS ATH-08” has acquired a significant advantage – multi-polarity. The GPS receiver and other USB modules connected to the “head” are combined with the altmenu, but become inactive.
Other features and firmware
Tampering with car radio
In addition, there are a number of manipulations that help improve the devices. Often these interventions are also called flashing and they are aimed at improving the capabilities of the device. Below is a table showing these manipulations.
| Remaking car radios | D864 is unsoldered (if Toshiba) |
| Decoding | The code (9507) is dialed and then BAND |
| If the laser loses sensitivity and is unstable | The variable resistor RV14 is soldered |
| Stereo reception has deteriorated, the mechanics fail, there is no sound | The electrolytes in the red shells on the board are removed, the space under them is washed, and then new electrolytes are sealed in |
| If you need to change the range from Asian to European | Diode D701 is unsoldered. Resistor R752 is changed to 2.2K. After this, the voltage is set on FM VT |
| If you hear a gurgling sound in one or even more channels | Electrolytes near the amplifier are to blame. They began to flow because the paths underneath them collapsed. |
| The quality of playback of recordings from a cassette decreases. The sound is getting quieter, but the radio is coming through normally | Electrolytes are replaced with conventional small-sized ones |
| The changer does not accept the disc and only works to eject | LED emissions are reduced. Typically, the limiting resistor is halved |
| FM receiver does not pick up even-numbered stations | A 2Kohm resistor is placed on R824 and the capacitor is discharged to power the car radio |
| 4 linear outputs of the amplifier fail, but the subwoofer continues to work (trouble often happens on standard Toyota car radios) | The electrolytes in the red shells change again |
| The car radio does not pick up the FM range or does so only after warming up | The reason lies in the communication coil |
| Some buttons do not work when you need to enter a code | The firmware is changed, the code is installed. If that doesn’t help, look for the oxide under the buttons |
| Receiver frequency tuning | Switch the broadcast network or change the local oscillator frequency in the tuner |
| Transferring the car radio to European mode | Solder in diode D2 instead of D1, which is located closest to the processor on the board |
Flashing Japanese car radios
Firmware for radio
It should be taken into account that the FirmWare folder and the files that are in it should be located in the root of the SD card. After the files needed for the firmware have been written, the card should be removed from the computer. You need to remove the card from the computer correctly, through a special safe removal menu. If this is not done, the card may fail.
You need to connect the SD card via USB to the multimedia system. Then you need to enable MMS. After the software starts, reboot the Lada Grant's head unit by pressing the volume key.
There are four steps that the reboot program must complete. After the MMC turns on in normal mode, an alternative menu will appear on the radio screen.
This completes the preparatory process for the firmware. If everything went as it should, a new WinCE desktop will appear. Now all that remains is to configure the new software that you installed on the Lada Grant's head unit. This is done by clicking the Start button, after which you need to go to the StartSettingControl Panel.
Sometimes there is a slight freeze when opening the control panel. You can get rid of this by performing a forced reboot of the multimedia system. Once the panel opens, click on the Stylus/Calibration icon - this will allow you to calibrate the screen sensor. For the most accurate calibration, you should use a stylus. If everything is in order, a timer will appear. You don't have to wait until the countdown ends; you can tap on the screen.
Now you need to do a forced reboot. You must press and hold the volume key for at least 10 seconds. One point to take into account: the flash drive with the software must be connected to the multimedia system.
It should be noted that during the reboot, the ATH-08 GPS USB DNS splitter with the Globalsat BU-353S4 receiver must be active. In order to turn on the standard menu, press the “standard” key. In order to be able to customize the menus needed to configure the radio, audio, and video, you will need to install the configuration module. This is done manually.
- You need to open the soft/radio folder.
- And then run start.exe.
This will allow the system to recognize the files that are installed on it. Installing these extensions will allow you to achieve stable operation of the multimedia system, as well as complete the equalizer settings while you listen to the radio.
How is GPS configured after flashing MMC Lada Granta firmware? In order to set up GPS, you need to take a few simple steps. This is necessary so that the Globalsat BU-353S4 module can fully perform its functions.
- You need to use the “Tools” item.
- Go to the screen keyboard menu.
- The module must be connected.
- Specify the path staticstoredll2usb.dll.
- After this, information about searching for a driver will appear, then you need to click “OK”.
- You need to press it until the menu disappears from the display.
After the work has been done, you can fully enjoy the capabilities of the Lada Granta multimedia system.
voice
Article rating
How to set up "GPS" on the firmware version of the multimedia?
This action will not be difficult. The procedure involves preliminary switching with the GPS module and consists of the following algorithm of actions:
- go to the corresponding “Tools” menu;
- activation of the display keyboard;
- direct switching of modules;
- path spec: "staticstoredll232usb.dll";
- Continuously pressing the "OK" button after the time has elapsed when the screen displays a driver selection request.
If these steps are completed correctly, we proceed to the manipulations of setting up the navigation software. In the program, select the “COM 5” port and the corresponding speed - 4800 bps.
Upon completion of the entire list of manipulations, we observe the operation of the system. We draw your attention to the availability of a personalized Navitel program."
Nuances of multimedia firmware Grants (2190)
It is quite easy to carry out the firmware itself when installing the mms 2190 firmware. To do this, it will be necessary to use an SD card.
Among the common flaws that occur after the dashboard firmware is installed, even if it is the latest version, is the Lada logo freezing on the display of the head unit.
This moment can be provoked by the following factors:
- failure to comply with required formatting principles;
- the presence of an outdated version of the SD card that differs from “SDHC”.
After successfully formatting the card and selecting software (for example, “New Menu V7.391 Nitro”), you will need to acquire the latest firmware and unpack the product onto a previously prepared SD media.
Regarding the “Firm Ware” folder, note: the files located in it will need to be redirected to the root directory of the card itself. Upon completion of the copying process, disconnect the flash card from the PC, not forgetting about the safe removal technique.
Now we confidently insert the SD card with the prepared files present on it directly into the MMC. Then turn on the head unit. We wait for the full download to complete and by long pressing the volume button, we reboot.
The act of rebooting is characterized by four stages, the display of which is implemented in 4 lines of process status. After filling out these lines, the device starts in the usual mode, as evidenced by the appearance of the corresponding original menu. After a few seconds, the device transitions to the altmenu.
The USB splitter “DNS ATH-08” has acquired a significant advantage – multi-polarity. The GPS receiver and other USB modules connected to the “head” are combined with the altmenu, but become inactive.
After the MMS 2190 firmware is completed on a Lada Granta car, its display displays a new type of desktop, namely “Wince”. The 4 files previously mentioned and copied into the depths of the root directory of the map are “responsible” for the presence of the interface on the desktop.
The subsequent manipulation is associated with the need to configure new software in the standard multimedia device of the Lada Granta car. For these purposes, click the “Start” button, after which we follow the following route: “Start\Setting\Control Panel”. Sometimes owners complain about the slowness of the “Control Panel” opening process, but this phenomenon disappears after rebooting the MMC in forced mode.
When the control panel is open, in its interface click on the “Stylus/Calibration” symbol. With this action, the user of the new software gets the opportunity to calibrate the touch screen for response accuracy.
Upon completion of the simple calibration procedure, a timer appears; you should not wait for the completion of the counting process. Feel free to click on the screen.
Now the long-awaited time has come for the forced reboot process. Long and holding pressure on the volume key (10 seconds or more) allows you to implement this process in MMC. At this moment, the removable media, which contains the new software, continues to reside in the connector of the head unit of the Lada Granta car.
Having completed the reboot action, the device will first display the standard menu, and then, similar to the preparation procedure, the altmenu. If you need to return to the “native” menu, you should hold down the “Native” key.
The process of rebooting the device, after the dashboard firmware has been flashed, requires its connection via a USB splitter of the specified model with the Globalsat BU-353S4 GPS wave receiver. If there is none, then upon completion of the process itself the “head” will display the normal menu mode on the display.
Such common settings as sound, as well as audio or video, are present in any multimedia device in the domestic Lada Granta car.
“NewMenu V7.391Nitro” needs a manual way to install the indicated options, which will require:
- log in to the “soft/radio” folder;
- resort to activating the “start.exe” file.
The procedure will agree to associate present files with the extensions “exe” and “ahk”. This manipulation is quite important and allows you to achieve stable functionality of the MMC, which is used to flash the dashboard firmware.
kalina2sport.ru
Description:
Alternative menu (shell) for MMC cars Lada Granta, Kalina, Priora. In NewMenu 9, all functionality is divided into separate applications. The main applications - radio, video player, audio player, BT player, AUX, phone and navigation - are located on the main menu screen. The remaining additional functions of MMC are divided into corresponding applications. For example, application options: Trip computer, Car (displaying a car with doors, indicators, etc.), Climate (for displaying climate status), Motor (for reading and decoding errors, controlling fans), an application for measuring dynamics, an application for street racers (red flash), etc.. You can come up with many applications. Applications can be uninstalled and installed through the Application Manager. Those. You can create your own MMS functionality. Installed applications are displayed and launched in the Applications window. Some applications can be launched as a screensaver (Trip Computer application). Applications can be launched either by a hot button (the Trip Computer is launched by clicking on the Fuel icon in the Kan-panel) or by an event (for example, when check the Motor application is launched).
Possibilities:
- Listening to radio, audio files; watching videos.
- Connection with phone via Bluetooth protocol; Speakerphone; the ability to receive and make calls; phone book with quick contact search; listening to music from your phone via Bluetooth (via BTPlayer).
- Launch a navigation program, simultaneous use with all audio applications.
- Playing navigation prompts when listening to the radio, AUX, music from the phone, during a telephone conversation on the front or rear speakers (mixing).
- AUX input support (hardware modification required).
- Sound settings (balance, equalizer, advanced hardware equalizer settings); screen settings, automatic day/night mode switching; turning on the parking camera.
- Setting up sound alerts, mixing direction and volume, and the ability to immediately do a mixing test.
- Kan-panel with vehicle data readings, voice prompts about the vehicle’s condition.
- Automatic volume adjustment depending on the current speed (auto volume).
- Support for navigation programs, support for USB GPS receivers, support for standard GPS receiver.
- Trip computer application: display of trip data (speed, revolutions, gear, mileage, time, consumption, cost, remaining range, etc.), recording trip data in the log, log viewer with data grouping, adjusting the accuracy of mileage and fuel level in the tank, and etc.
- Motor application: reading, displaying, decoding engine errors, resetting ABS automatic transmission SRS errors, manual and automatic control of engine fans, idle speed control when the car is stationary.
- Other applications: file manager, text viewers, calculator, browser and many others.
- Switch between all running applications using the Mode (Menu) button.
- Ability to change the design style, preview the changes made.
- All main menu settings in one window with tabs.
- Saving all user settings (including design) when switching to a new version.
- Steering column switch support.
Features of the ECU for Lada Granta
The controller in this car has one feature. Thanks to it, there are enormous opportunities to make changes to algorithms and data.
A special feature is the CAN bus. The technologies used to transmit digital data are a highly complex system. However, it makes driving easier and improves reliability. This is achieved due to the higher speed of calculations based on information from sensors. A complex system in an ECM is a clear logical diagram. This makes it possible to eliminate failures in the electronic unit.
The bus uses broadcast technology to transfer data more efficiently. When additional sensors or other equipment appear, there is no need to make modifications to the firmware. This scheme allows you to increase the reliability of the control of vehicle components and saves wiring.
The bus allows you to combine a huge number of different sensors, control units and all sorts of systems without being tied to a specific control system in the engine. An immobilizer that runs on this bus can easily work with all devices.
What modes are optimized when chip tuning a Granta power plant?
The plant periodically makes some warranty adjustments at service stations, but not everyone uses this service, and those who undergo warranty maintenance do not always receive it. As a result, owners continue to operate obviously faulty cars, not suspecting that it is enough to correct the electronic algorithm. The point of changing the ECM software is to optimize the operation of the engine and transmission.
Lada Granta modes that require improvement:
- ignition timing;
- injection time value;
- exhaust emission control systems;
- algorithm for determining the octane number of fuel;
- automatic transmission operation.
Video instructions for flashing firmware for Lada head unit
If, after flashing the firmware, the radio does not boot, but freezes on the “LADA” logo:
- Make sure nothing is inserted into the USB port.
- Create an empty Explorer.txt file in the USB root. After rebooting, the WinCE desktop should load.
- Try turning off the power to the MMC (remove the battery terminal) for 5 minutes.
- Try formatting the SD card to a different file system (FAT32/exFAT/FAT) and reflash the radio again.
- Use another SD card to flash the radio firmware.
Let us remind you that we solve other problems of MMS related to its operation in this article.
The MMS Grant firmware makes it possible not only to expand the functionality of the system itself, but also the ability to connect a rear view camera to the standard multimedia.
It is worth noting that the presence of a standard or normative standard multimedia system pre-installed by the manufacturer is not suitable for performing a number of actions that will be described below. The exclusively multimedia system in the luxury configuration is suitable for firmware.
The process of flashing the multimedia system requires the presence of a GPS receiver, namely the Globalsat BU-353S4 model, as well as a Huawei E1750 3G modem from Megafon. These devices, paired with new software, will allow you to use the navigation that VAZ engineers promised, and will also delight you with the presence of the Internet in the car. All these products can be bought on eBay, and cheaper than in other stores.
Navigation and the Internet are not yet compatible things for a domestic car, so for their full and simultaneous operation it is necessary to use a hub (USB splitter DNS ATH-08).
Exterior
Initially, Lada Kalina was considered exclusively as a “workhorse”. Consequently, the attitude towards design was largely characterized by the residual principle. They say that this is not the main thing for such a machine. But after the restyling, the model began to look much more lively and aggressive.
Initially, the Lada Kalina was a simple car. Rather, even too simple.
The front bumper is decorated with a huge air intake supporting a small radiator grille. And under the spectacular headlights there are small foglights located in massive seats.
The new Kalina looks much more interesting from the front!
However, there are an order of magnitude fewer changes in the profile. The same modest and proportional doors, a round tank flap with a recess for opening, front fenders and so on. Perhaps the changes affected only the rims and rear fenders.
On the side, other than the different rear wings and rims, no changes are observed.
The situation is similar with regard to the stern. There are no fundamental changes observed, with the exception of the rear bumper, which has become more massive and powerful, and has also acquired new reflectors and a trim at the bottom.
At the rear, the changes are more noticeable, but they are not fundamental.
The image of Lada Vesta is fundamentally different. She was not a nondescript machine, to which they later tried to instill pseudo-aggressive features. Initially, Lada Vesta was created as a landmark and expressive car - the first representative of AvtoVAZ’s new corporate style. That’s why it looks more harmonious – the headlights, chrome, air intake, foglights, “X” lines and other elements of the front end combine perfectly.
Vesta's front end is much more harmonious.
From the side the impression is the same. A solid, complete product, with logical lines and transitions, stylish rims and considerable ground clearance.
The ground clearance of the Lada Vesta can be the envy of some crossovers.
And the food didn’t disappoint. The chopped lines of the stops are impressive, especially against the background of a modest bumper and a proportional trunk lid, decorated with large letters of the brand name.
Vesta looks great from behind!
How to update the radio firmware to ver.38 (23.0.2.38)
Archive password: club-lada.rf
- The build is based on version 23.02.38.
- Has built-in Russian localization.
- Launching the altmenu without rebooting from the standard menu (by long pressing “Settings”).
- Built-in driver for GPS receiver BU-353s4.
- Initialize sound and time without the participation of the MMC.exe process.
- Display of engine temperature and remaining fuel (provided the CAN bus is entered into the MMC).
- Screen and sound settings.
- There is a radio.
- Support for radio buttons.
Firmware
Check compatibility before updating!
Before updating the MMS firmware, check the software version, do not rush to kill your device!
To read errors you need to flash CAN with a modified version 1.7
Attention: in any case, before the first firmware, take a dump, no matter what kind of software you have, it may be non-standard! Do not under any circumstances format the internal MMC drive using any methods or means!
Types and features of software changes
Based on their types, operating systems that control the computer brain of any device can be divided into two groups:
- Standard (stock) software made for a specific type of device by a company that develops computer programs. And installed at the factory by the car radio manufacturer under a license agreement.
- Custom or, more simply put, homemade. Made by a programmer independent of large companies/
Based on the opinion of people involved in the development and implementation of computer innovations, any program contains at least one error. It is precisely for this reason that during the operation of electronic equipment the need for its improvement arises. Which entails the emergence of new versions - firmware, standard operating system.
Before continuing on the topic - firmware for the standard radio of the Lada Kalina 2, I would like to warn owners of any brand of car about the consequences of the decision to reinstall the standard software.
Independent changes in the technical device and OS of the car radio automatically deprive you of the right to warranty service provided by the manufacturer when purchasing their equipment!
Theory
Like its predecessor roadster, Crimea-2 is built on VAZ units. The engine is a 1.6-liter VAZ-21127, the gearbox is mechanical, five-speed (“cable” VAZ-2181). Some of the suspension elements were also borrowed from Kalina. The rest was developed from scratch by students and graduates of the Baumanka formula team. The layout is mid-engine, rear-wheel drive. Crimea is based on a spatial frame on which plastic panels are hung; almost all of them remained unchanged, with the exception of bumpers, optics and, of course, the roof.
Vesta’s behavior on the track quickly makes it clear where the young, albeit untalented, developers are inferior to the experienced engineers of the automobile plant.
Vesta’s behavior on the track quickly makes it clear where the young, albeit untalented, developers are inferior to the experienced engineers of the automobile plant.
The interior of Vesta Sport is easy to distinguish by its original carbon fiber inserts and a steering wheel upholstered in pleasant leather.
The interior of Vesta Sport is easy to distinguish by its original carbon fiber inserts and a steering wheel upholstered in pleasant leather.
The front seats with developed lateral support and a different cushion are better than the standard West seats. But they are still inferior to the heavy-duty seats of Crimea.
The front seats with developed lateral support and a different cushion are better than the standard West seats. But they are still inferior to the heavy-duty seats of Crimea.
The architecture of the dashboard is the same as that of a regular Vesta, only the scales are painted scarlet.
The architecture of the dashboard is the same as that of a regular Vesta, only the scales are painted scarlet.
We struggled with the headlights - the seals and housing of the LED optics could not be done accurately. We found an elegant and effective solution - we tinted the headlights to hide the nuances of custom manufacturing. They look interesting: the high and low beam lenses are shrouded in LED strips, the turn signals are in the creeping line style in the manner of current Audi and Lexus models. Like the first car, the hood (remember, it is at the back) opens against movement along a complex trajectory so as not to touch the bumper. They struggled with the implementation of the sophisticated mechanism for several weeks. But most of the time was spent on setting up the suspension. After all, the kinematics were calculated from scratch (although Kalinov elements were used - steering knuckles and levers). Shock absorber calibrations and spring stiffness were also calculated taking into account mass. Everything is like adults!
A nice bonus of Vesta is that you can enjoy driving with a large group - it is still a family sedan.
A nice bonus of Vesta is that you can enjoy driving with a large group - it is still a family sedan.
Against the backdrop of the Crimea trunk, the cargo compartment of the Lada seems bottomless.
Against the backdrop of the Crimea trunk, the cargo compartment of the Lada seems bottomless.
Vesta Sport is also far from just a body kit and beautiful wheels. The main differences from the standard sedan are in technology. Reworked suspension, original brakes, increased track, which is why the front fenders had to be widened. Well, boosted to 145 hp. engine. In theory, a larger, heavier front-engined sedan doesn't stand a chance on a track against a lightweight mid-engined coupe. But in practice?
Video instructions for flashing firmware for Lada head unit
If, after flashing the firmware, the radio does not boot, but freezes on the “LADA” logo:
- Make sure nothing is inserted into the USB port.
- Create an empty Explorer.txt file in the USB root. After rebooting, the WinCE desktop should load.
- Try turning off the power to the MMC (remove the battery terminal) for 5 minutes.
- Try formatting the SD card to a different file system (FAT32/exFAT/FAT) and reflash the radio again.
- Use another SD card to flash the radio firmware.
If you can’t flash MMS yourself
, contact specialists, they will help you update your multimedia system (link to service)
Let us remind you that we solve other problems of MMS related to its operation in this article.
Source
TV standard
How to flash a car radio
Frequent requests from a Russian driver who wants to reflash his Japanese or Korean car radio are also related to a TV monitor. It cannot be used for its intended purpose, since it does not support the standard of our Secam television.
Due to some features of television broadcasting, it may also be impossible to watch high-quality television programs while driving. To ensure traffic safety, some cars use a lock that turns off the image on the monitor while driving.
How to reflash a car radio
To improve the TV systems of car radios from Japan (reflash the software, change the standard, remove locks), it is customary to use special adapters. They can be installed in any car.
Flashing car radios
Conclusion
The latest version of the firmware we reviewed turned out to be quite convenient. It is impossible not to note from a positive perspective its developers - participants in the Grant Club. Having a convenient interface in MMS, you can comfortably spend time behind the wheel of LADA Granta.
The multimedia system (MMS) of Lada Granta, Kalina 2 and Priora has a 7″ display with TouchScreen, FM, USB, Bluetooth SD card slot and Handsfree. The standard firmware of the radio has a number of disadvantages, for example, there is no way to configure a 3G modem, GPS, and the interface is not functional enough. MMC firmware will help get rid of these shortcomings.
You will need: SD card up to 4 GB formatted in the FAT file system (in the future you can use the exFAT file system), select the firmware for the radio (list of firmwares).
Attention! Perform all operations on MMS firmware only at your own peril and risk! Which leads to the loss of the manufacturer's warranty on the MMC. Before flashing the firmware, it is recommended to make a dump (backup)