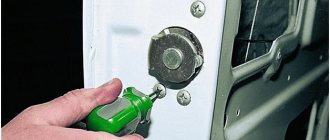
now the time has come to adjust the door locks, since the seals have already pressed down and have taken the working position, so to speak))) I have always adjusted the locks for myself and not only for myself, so I have little experience, but I have it)) and so let’s get started: 1. where to start to start, this is adjusting the mating part of the lock which is located on the body, it is screwed on three bolts, loosen these same bolts so that the lock latch can move, then: - move the latch outward if the door closes tightly - move the latch inward if the door does not close tightly ( that is, if it closes easily, but when closed it does not go straight along the body, but kind of sticks out as if it’s not closed) - move the lock down if the door rises when closing.
I noted everything in the photo below))
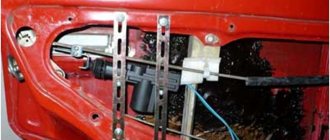
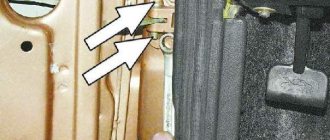
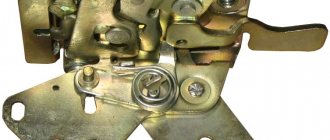
I also did a little magic with the locks)) they came from the factory silent, but they still clicked quite loudly, and because of this I decided to do a little magic on them, namely, I took them apart and, using a screwdriver, took out two springs from the lock, throwing out the one smaller one, and the larger one I put in place, plus in the place where the metal pawl, so to speak, hits the lock body during the click, I glued a small piece of the seal to muffle the sound from the impact (the photo is more clear)
well, something like this)) I hope this post is useful to someone)) thanks for your attention))
Quite often, drivers wonder how door locks are adjusted on Priora, 2107, 2110 and 2112. This is a fairly common job. The bodies of domestic cars have never been of particular quality. The problem arises due to misalignment of parts; wear of the elements of the lock itself can also affect it; this is usually observed on fairly old cars. In any case, adjustments will need to be made. Otherwise, the door will either open while moving or not close at all. This will, at a minimum, cause you inconvenience, and at a maximum, it may turn out to be unsafe.
Adjusting door locks on Priora, 2107, 2110 and 2112 does not require special skills. Even a beginner can handle this job. Such repairs do not require a large number of tools. Everything you need can be found in any garage.
Communities › Lada Priora Club › Blog › Doors are hard to open
The doors are very difficult to open, especially when you pull the handle before opening the lock, so that the door opens you have to rest your thumb on the door. Can you tell me how this handle or lock can be configured or adjusted?
Comments 16
Install extended euro handles and forget about this problem
adjust the counter part of the lock - it’s on the counter, everything is simple there. The lock itself is not adjustable. Try adjusting the Priora lock while driving, there's a lot of stuff there.
The lock tongue is to blame, use a file to file the upper part a little and everything will be ok
The doors need to be lubricated periodically. And the loops too - there will be no problems. I also advise you to push small pieces of foam rubber under the lock tongues and lubricate them with engine oil - the doors will close more quietly, easier, and the lubricant in the foam will last longer.
Well at least they open ;))
Is the lock still in factory condition?
I removed the casing and lubricated the inside mechanisms with oil and grease, now everything opens very easily) I also lubricated the lock with grease.
Litol is better than solid oil. Solid oil has a short service life and dries quickly over time.
Same crap, my wife can’t open the back doors))))
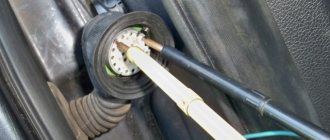
lubricate everything, the disease has been going on since 2108. You can try without removing it - from the outside where the handle is in the gap, spray it with a bucket, unscrew the cap on the rod in the cabin and spray it in the gap towards the lock. Spray the reciprocal larva from the outside. If you don't lubricate it and don't use the door, the lock will jam.
My rear right door is like this... sometimes it’s ok, sometimes it’s bad - it depends on the force vector
It was very difficult for me to open the passenger door. I lubricated the lock with WD40 and then applied lithol and everything began to work perfectly) try to do this first.
Take a look in my journal, maybe this method will work...
I had this happen too, I removed the door cards, generously lubricated the entire mechanism with lithol, and also adjusted the rod going from the lock to the handle, namely, I tightened the plastic tip on the rod with a cam, twisted it, reducing the length of the rod, figuratively speaking, so the handle is, as it were, in the charged position, pulled a little - the door opened, the main thing is not to overdo it, otherwise the door will open from any rustle))
Source
Lada Priora door adjustment
ADJUSTING DOORS ON PRIOR.
The doors on the Priora are the same as on the VAZ 2110-12. The new Prioras have a fairly hard door seal (not crushed), so in most cases the doors on the Priora close tightly, poorly and not the first time. For example, on a two or three year old Priora, the doors close much easier due to a dented seal, since the seal, with frequent opening and closing of the door, becomes dented over time and the door closes much easier than on a new car. Try this option, you bought a new Priora, close all the doors and windows in the car and try to close, slam, for example, the right rear door or the left one, it doesn’t matter if the door closes with difficulty or does not close the first time, and now open any door or lower the glass any door, slam, the door will close or slam easier, since the air that captures the door when closing enters the interior of the car, with the doors tightly closed, the flow of forced air has nowhere to go (plus the new seal), and the door seems to be thrown back, as if it had nothing to do with it it prevents it from closing. The Priora, like imported cars, has a system for the exhaust of air forced when the door is slammed, these holes - “curtains” are located in the area of the rear bumper on the left and right sides. Often with strong bass, if the subwoofer is playing, you can hear the sound of slaps under the boom these “curtains”.
Priora's seal is single-chamber,
There is nothing inside the seal, an empty tube. The seal on the Priora looks like a ring; the two ends are soldered to each other, and the front seals on the Priora are longer than the rear seals. The Priora's seal has a wide internal overlap on the sills and plastic parts in the car interior. The set includes four o-rings, two of which are long and two are shorter. Seal on a Priora, a set of single-chamber seals consisting of four rings/seals costs 1,500 rubles.
Only after using the car, and more specifically the doors, do the front doors begin to whistle unpleasantly at high speeds and this undoubtedly infuriates. We have in stock two-chamber seals for Priora at a price of 350 rubles; one seal, it is not ring-shaped, but tape-shaped; the cross-section clearly shows the presence of two chambers/tubes, which guarantee silence in the cabin after replacing the seal. For example, nines have a three-chamber seal.
If the doors move tightly, it means the hinges are rusty, spray generously with WD-40, swing the door back and forth, spray again, and do this until the door starts to move normally, then pour any motor oil on the hinges and, after such work, the door moves like new again.
Doors and locks on Priora often have difficulty opening doors from the outside, handles or Euro handles are very difficult to open the door from the outside, the handle does not open the door well, the handle does not open the door - this is a common problem with new Prioras. This is due to the quality of today's factory locks and adjustments. Come to us, we will fix all problems in half an hour. Eliminated by grinding off burrs on the locking hooks of the door lock. This operation is carried out when installing silent locks; after such work, the doors are very easy and effortless to open. It is especially dangerous for Euro handles, since if the door is not opened properly, the factory Euro handle will break. If you have trouble opening the door locks on your Lada Priora, come and don’t put it off until another day. It will take 20 minutes to complete the locks. 1 year labor warranty.
Silent closing for four doors price 500 rubles, trunk adjustment as a gift. 89372817000 call right now.
New Priors often have doors installed incorrectly from the factory. When closing the front door, its upper part (corner) touches the upper corner of the rear door. The door sags and due to a sharp bend of the door in the opposite direction from the lock, for example from a strong wind or when backing up with the door open, the lower part of the door hits a snowdrift; in such an unpleasant accident, the door usually lifts up. Due to incorrect installation after an impact, and due to too much soundproofing, after which the door becomes much heavier.
The outer ones are plastic (silent), the working surfaces are covered with a layer of white plastic 1mm thick. The internal mechanisms of the Priora are similar to the VAZ 2114, only from the factory an additional plate is welded to the mechanism to which the alarm drive motor is attached. After such modifications, the mechanism began to cost three times more.
A separate topic is about the alarm drive motor, unlike the usual “SATURN” or worse “StarLine”, which have in their design a small electric motor, a worm gear, which contributes to the powerful operation of the electric drive. The Priorovsky drive does not contain an electric motor; it operates on an electric pulse. When closing and opening it makes an unpleasant squeal.
For information about the window lifter, see the “ESP REPAIR” section on the main page.
Silent closing on Priora price 600 rubles. + door adjustment as a gift.
Elimination of sagging price from 200 rub.
Door adjustment price from 100 rub. door.
Repair of locks, replacement of mechanisms price from 300 rubles.
Adjusting the door position
- Thank you
- I do not like
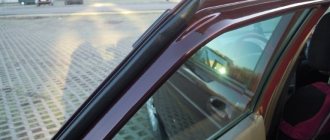
me. July 17, 2011 Today I noticed this problem: at the top, near the roof, at the junction of the front and rear doors, the paint from the rear door has peeled off a little, the very corner looks like a scratch about 5 mm long. When closing the front door, it catches the rear door with its upper corner. If you close the front door as if lifting it up, then nothing catches. I compared the gaps between the rear edge of the back door and the small window. On the side (left) where the paint peeled off, this gap is larger than on the other side. On the other hand, there is no such peeling of paint.
The questions are: how can you adjust the position of the doors, and what to do with an existing scratch?
- Thank you
- I do not like
maks52 July 17, 2011 The questions are: how can you adjust the position of the doors, and what to do with an existing scratch?
If the car is new, then it looks like the hardware is crooked, you need to apply under warranty.
But if it’s not new, then most likely you’ll have to work with a sledgehammer to pull the door up. And the scratch should definitely be painted over.
- Thank you
- I do not like
111 17 Jul 2011
- Thank you
- I do not like
Macher Jul 17, 2011
- Thank you
- I do not like
me. July 18, 2011 The car is 3 years old, there has been no accident, there are no other problems with the body (except for a protruding bumper, but judging by the topic https://www.priorovod.hread.php?t=345, this is a common problem).
What is the procedure for working with loops? How to bend and place washers?
- Thank you
- I do not like
me. 18 Jul 2011
- Thank you
- I do not like
profy July 20, 2011 In general, it is recommended to place a washer between the hinges and determine the thickness experimentally.
So do it. It’s better not to bend or knock anything. And it’s easy to paint over a scratch with a toothpick, dipping it into the paint first.
- Thank you
- I do not like
nimble July 26, 2011 The car is 3 years old, there have been no accidents, there are no other problems with the body (except for a protruding bumper, but judging by the topic https://www.priorovod.hread.php?t=345 - a common problem).
What is the procedure for working with loops? How to bend and place washers?
Yes, this is a disease of the Prior. In pursuit of global gaps, VAZ has reached the point where the gaps have been reduced so much that the front door (or rear) in the upper part of the door touches the adjacent door and this can no longer be corrected. If you put a washer under the rear, the rear door will touch the opening, if you move the front door, it will stand at an angle. The only solution is to move the frame of the front door a little. You can do this like this: take a board (40-50 mm thick, about 1 m long, about 200-250 mm wide), wrap it with a rag (so as not to rip off the paint), close the door and insert your tool into the gap between the glass frame and the middle pillar of the body (in the area where the door clings), close the door until it stops. Now one holds the door from opening, the other presses forward. Watch, don’t overdo it! Press a little, take it out, look, if you press too little, press again. And so on several times. During this procedure, lower the glass all the way. Good luck!
Usually problems with doors occur either from the old age of the car or after an accident, somewhere the body misaligned. If there are no problems with the body other than the door, then you can work with the hinges, adjust either with washers or by bending the hinges
Complete stupidity! Only surgically! Cut everything to hell! A hinge costs 120 rubles, cutting it costs 250 rubles. And who needs this saving? With a new hinge, life seems better and it will last for a long time, because this is not a door in the house!
VAZ 2109: adjusting the doors yourself
VAZ 2109 door adjustment - this procedure is sometimes very important and the motorist must be able to handle this matter independently. On a VAZ 2109, door adjustment is often necessary after the car gets into an accident, as a result of which the factory settings are shifted. It also happens that the owner decides to replace a door damaged during an accident, but the new one will not fit into place without gaps and distortions. In this case, proper door adjustment will help fix everything.
Adjusting and replacing the lock on 2107
First, you need to identify the reason for the poor functioning of the lock. In some cases, the problem is sagging hinges. Because of this, the door sag and, accordingly, the lock does not coincide with the latch. You can check this by measuring the gaps between the door and the body. This figure can range from 3 to 7 millimeters
It is important that it is completely uniform. If the indicator is different, then you need to adjust the position of the loop
In some cases, this may save you from further manipulations with the lock.
The lock is adjusted in the following order:
- The position of the latch is outlined directly on the car. To do this, you can use a marker;
If the door closes with just 1 click or just closes tightly. You need to unscrew the lock and move it to the sides of the outer part of the body; The door closes, but the gap remains, you need to loosen the latch, and then move it inside the body.
Adjustment on Kalina
Typically, it is necessary to adjust the operation of the lock on this model if there is excessive noise that occurs when closing the doors. It rarely gets to the point where the locking device works poorly. To work, you need a Phillips screwdriver, a wrench and a screwdriver with an asterisk. The work is carried out in the following order:
- Using a screwdriver, loosen the screws securing the clamp. It is secured with two Phillips screws and one sprocket;
- We make adjustments. The shift here is made up or down;
- Tighten the screws in the selected position.
To reduce noise, you can put a silicone cap on the clamp. If this procedure does not help, then it makes sense to tighten the screws securing the door hinges.
Removing the lock on Kalina
Sometimes adjustments don't help. This indicates wear of this mechanism; this often happens when the machine is used intensively. To continue normal operation of the car, it is necessary to change the lock. This is done in the following order:
- The door trim is dismantled;
- Using a Phillips screwdriver, remove the screw securing the base of the handle (inside). After this, carefully remove it from the guide pin;
- The insulating material located in the door is removed;
- The rod is disconnected from the cylinder mechanisms. To do this, press it out using a slotted screwdriver;
- The rod coming from the external handle is disconnected in the same way;
- Using the “8” head, the outer handle is detached;
- The outer handle is removed from the car;
- The lock itself is secured with 3 screws. Older machines use Phillips screws. On newer ones you can find stars;
- The locking drive block retainer moves upward. After that, disconnect the block with wires;
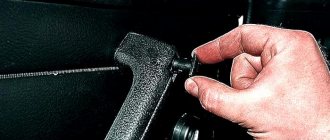
- Using a screwdriver, we disconnect the rod clamp; at the same time, it must be carefully rotated around its own axis. This way you can remove the handle rod (internal);
- The locking mechanism is removed from the door.
Assembly is carried out in reverse order. Before installing the new lock, be sure to lubricate it. This will extend the life of the mechanism.
Conclusion
. As a rule, car doors sag somewhat over time. This leads to some problems in operating the machine. To eliminate the problem, the door locks on Priora, 2107, 2110 and 2112 are adjusted. This work is not difficult, even a beginner should not have any problems. But sometimes this doesn't help. In this case, you will have to replace the entire lock. For each model, this work is slightly different, but usually, difficulties arise to a minimum.
Removing and replacing front doors on a Priora according to instructions
To remove the front door on a Priora and replace it, you must perform the following steps:
- Using an 8/10 socket wrench (depending on the car modification), unscrew the bolts securing the opening limiter. To avoid damaging the paintwork on the bolt heads, you should first cover them with masking tape.
- Next, you need to release the rubber protective cover from engagement with the car body, inside of which there is a wiring harness to the power window console and rear-view mirrors. To do this, pry off the cover using a flat-head screwdriver.
- Unscrew the two screws securing the plastic threshold. The photo below shows their locations on the threshold. You need to remove the plastic threshold in order to get to the place where the connection for the power supply wires is located.
- Under the soundproofing mat there is a chip that needs to be disconnected.
- Disconnect the chip from the terminal block by prying off the tab with a flat screwdriver and pulling the chip up.
- Now the disconnected bundle of wires must be inserted through the opening in the car body, having first removed the rubber plug.
- After this, you can begin to unscrew the two bolts that hold the hinges on the Priora.
- When unscrewing the bolts, you need to call an assistant who will hold the door. After all, it is quite heavy, and in order to eliminate the possibility of damage during dismantling, it is better not to risk it and turn to a neighbor for help.
This completes the process of removing the front door on the Priora. All that remains is to perform the necessary manipulations with it, and then install it back. If a door is replaced on a Priora, the installation process is performed in the reverse order of removal. You must first rearrange all the parts (glass, door lock, map, side mirror, etc.). You can clearly see how to remove the front door on a Priora in the video below.
Adjusting and installing a short-stroke rocker on a Priora
Tuning does not always mean installing a new body kit or shortening the Priora springs. Sometimes modernization helps improve driving comfort. An excellent example would be a short-throw rocker. VAZ owners know the “features” of the gear shift lever (GSL), which is not so easy to direct to the desired gear. The short-throw rocker on the Priora solves this problem, but we will tell you how to install it on the Priora and adjust it correctly.
The instructions in our material are also relevant for motorists who want to know how to repair and replace a conventional rocker. The instructions describe in detail the process of dismantling and adjustment, which is carried out for a factory part according to exactly the same principle.
Principle of operation
Study the diagram below to understand how the short throw rocker works. The lever is installed in the neutral position, here it is indicated by the points “O” and “F”. To start the transmission, you need to move the rod - it will connect to the control gear at point “B” - at point “A”. After this, the handle will move to point “E”. Repairs and subsequent replacements are carried out in order to reduce the distance.
This can be done if the lever extends to point “H”. This move will increase the distance. On the diagram, "A" and "B" will become points "C" and "D". Replacing the standard rocker with a short-stroke one allows you to reduce the movement of the handle. We've sorted out the theory, now we can start the repairs.
Replacing the gearbox slide
First, you should decide whether you will buy a ready-made short-stroke part or make it yourself. For Lada Priora drivers who have not upgraded components, we recommend choosing the first option. The instruction will be carried out taking into account modifications.
For work we will need:
- Two metal plates.
- Kardanchik from Kalina.
- Welding machine.
- A set of keys, including spanners.
- A grinder with a cutting wheel; alternatively, you can use a hacksaw.
Step-by-step instruction
- Repair and replacement begins with removing the decorative cover from the gearshift lever. The knob may not give in, but it is not secured by anything, so just pull firmly towards you;
A pattern that is the norm
The figure-of-eight design of locks is the norm in domestic car manufacturers. Priora was no exception to this rule and received figure-eight locks from the assembly line. What exactly is the pattern?
The pattern appears at the time of purchase of the above-mentioned silent locks, which also have a figure-eight design. The only difference is the smaller thread diameter of the bolts in the mating part of the mechanism.
All Ptimash bolts have a silicone seal, the color range of which cannot be predicted
It is worth paying attention to the fact that their color can be either transparent, which is the most popular, or any other. Thus, it is not realistic to match the color of your fingers to the color of the car, but the final high-quality result more than covers this shortcoming
Lada Priora trunk malfunctions
After a well-spent weekend, the happy owner of the Priora finally returns home. Behind are kilometers of kilometers wound on wheels. Wonderful nature and leisure. True, on the way back I was somewhat irritated by a strange noise in the trunk area. But when it started to rain, it became less audible. The trip was a success. Now just take the equipment out of the trunk and into the house. But what is it? Everything that was lying there was very wet! How could this happen? And there’s something wrong with the lid itself. Where is the problem? We need to figure it out.
Major breakdowns and inconsistencies in the Priora trunk
Technically, these faults only appear due to three main reasons:
- Mechanical damage to the trunk lid (door).
- Body corrosion.
- Wear of the Priora trunk lid seal.
We need to make a reservation right away. The first two reasons are not worth considering closely in this topic. These jobs are the responsibility of bodywork specialists and require not only special skills, but also many special tools and equipment, not to mention materials. Therefore, you should only contact them if corrosion or damage is detected.
Important! Repairing a faulty Priora body is a very specific and difficult job! You should not try to fix the problem yourself without the necessary experience. A separate issue is the problematic opening of the trunk.
There are two possible problems here:
A separate issue is the problematic opening of the trunk. There are two possibilities here:
- Poor adjustment or worn hinges.
- The lock is broken or the trunk lock is misaligned.
This malfunction (loops) can already be eliminated independently. Therefore, the issue will be briefly considered.
Priora trunk arrangement
The compartment at the back of the car is called the trunk. in the Priora with a sedan body, it is isolated from the passenger compartment. at the same time, on station wagon and hatchback bodies, the trunk is combined with the interior space.
however, this part, in the mentioned body models, is called not a lid, but a “door”. this is due to the fact that both the station wagon and the hatchback have a glazed window in this “door”. otherwise, all these cars have a similar device. this system includes:
- directly “door” (trunk lid).
- locking device.
- fastening loops.
- reclining springs (shock absorbers for station wagon and hatchback)
- wiring.
- electric lock activator.
- seal.
on a new car, all the parts fit perfectly, and therefore there are no questions about them. but over time, those same suspicious noises appear, and there is moisture on things left in the trunk.
Important! The trunk opening system is controlled electrically. there is a lot of wiring
therefore, the appearance of moisture in this place threatens the appearance of short circuits.
wear or misadjustment of hinges
This malfunction causes precisely the appearance of unpleasant sounds. the trunk rattles. It is the tight connection of the trunk surface to the Priora body that makes it possible to avoid rattling while driving. because at this moment, willy-nilly, the vibration intensifies. and accordingly, if the loops are weak, “beating” begins.
Determining the malfunction: open the lid and simply shake it on its hinges. the play will be immediately noticeable.
elimination: as a rule, in this case, faulty “prior” loops are simply replaced. the cover (door) is removed with hinges, and new ones are installed.
trunk lock and drive
With this malfunction, the luggage compartment usually does not close. but in the case of an electric activator it does not open. that is, if the mechanical part of the device is faulty, then when you try to close the compartment, the lid does not lock. and if the fault is in the electrical component, then when you press the activation button, automatic opening does not occur.
Well, there’s only one piece of advice. The easiest way is to go to the service center. or read a separate article - Priora trunk lock.
water in the trunk of a Priora
And here is the main question of the article. So, all the objects in the compartment are wet. What to do? First of all, carefully inspect the seal along the cut of the body. Its flaws will be noticeable upon simple inspection. These are breakthroughs or critical abrasions. You can also pour water on the closed compartment. And check to see if there are any fresh stains at the damage site.
How to adjust doors on LADA cars
Some owners, after purchasing a LADA car, notice malfunctions in the operation of the doors. For example, the back door doesn't open well. You can cope with the problem yourself by adjusting the locks and door geometry. The defect can also be corrected under warranty from an authorized dealer.
Malfunctions that owners of LADA cars (and other car brands) encounter when the door locks are not adjusted:
- the door does not open or close;
- the door closes/opens poorly (tight);
- large gaps between the door and the body (water gets into the cabin, rattling and whistling appear at speed).
Door adjustment on all LADA cars (XRAY, Vesta, Largus, Granta, Priora, Kalina Niva 4x4) is performed in the same way. There are no fundamental differences.
Prior door handle does not work
Currently, many car enthusiasts are asking the question: why doesn’t the driver’s door open (despite efforts) on a new or not so Priora?
It is worth noting in this regard that all problems mainly arise from the fault of the central locking. The situation is aggravated by the fact that the owners simply do not find the necessary information. The main signs of a malfunction in the locking system installed by the manufacturer on Priora are as follows:
- the door does not close;
- does not open;
- unlocks on its own.
Moreover, car enthusiasts often complain that it is impossible to open the lock with a key, from a key fob or from the inside.
In reality, in about 90 cases out of a hundred, the culprit of the malfunction is the lock installed directly inside the driver's door.
Device
The weakest point of the Priora locking system is the microswitch. The electrical package itself, used on the model in question, is a rather complex device. It is his responsibility to receive the owner’s command to unlock or lock the door. Having received a certain signal, it activates certain electrical networks that supply the drive. In this case, the electrical package can perceive orders in two ways at once:
In the first case, having sensed the order to close, the immobilizer turns off the alarm and energizes the electric drive of the lock, closing or, conversely, opening the contact groups of the microswitch.
Then the latter, all the time the lock is locked, monitors whether an order has been received to open the doors.
Why is everything arranged this way? Everything is simple, because the command in this situation can be received not only from the key fob, but also from the switch if the car owner used the key. This allows the immobilizer, when the security alarm is activated, after detecting a raised blocker, to immediately begin to act according to the alarm protocol.
So, the biggest problem of the Priora is water getting inside the door. As a result, the contact groups of the microswitch quickly oxidize and become overgrown with verdigris, similar to moss. The volume of the working surface increases significantly and the contacts stick together. In addition, the oxides have fairly good conductivity. As a result, the passing tension is perceived as an order to unlock or lock the doors.
Door lock adjustment
Another reason for poor door opening is unadjusted locks.
: Phillips screwdriver (if the screws do not come off, you will need an impact screwdriver) or Torx T40 wrench
- Mark the position of the lock shackle for possible return to its original state.
- Loosen the two/three bolts securing the lock bracket.
- We move the bracket (forward/backward, up/down), achieving easy and tight closure of the door.
- Upon completion of the adjustment, tighten the screws securing the lock retainer with a torque of 22 Nm.
Everything said in the article is shown in the video:
Have you ever had to adjust the door locks yourself? Let us remind you that in order to extend the life of locks and seals, they should be lubricated regularly. Do you want to improve the design? Install additional door seals (instructions for XRAY, Vesta, Granta/Kalina/Priora, Largus and Lada 4x4).
Adjustment on Kalina
Typically, it is necessary to adjust the operation of the lock on this model if there is excessive noise that occurs when closing the doors. It rarely gets to the point where the locking device works poorly. To work, you need a Phillips screwdriver, a wrench and a screwdriver with an asterisk. The work is carried out in the following order:
- Using a screwdriver, loosen the screws securing the clamp. It is secured with two Phillips screws and one sprocket;
- We make adjustments. The shift here is made up or down;
- Tighten the screws in the selected position.
To reduce noise, you can put a silicone cap on the clamp. If this procedure does not help, then it makes sense to tighten the screws securing the door hinges.
Removing the lock on Kalina
Sometimes adjustments don't help. This indicates wear of this mechanism; this often happens when the machine is used intensively. To continue normal operation of the car, it is necessary to change the lock. This is done in the following order:
- The door trim is dismantled;
- Using a Phillips screwdriver, remove the screw securing the base of the handle (inside). After this, carefully remove it from the guide pin;
- The insulating material located in the door is removed;
- The rod is disconnected from the cylinder mechanisms. To do this, press it out using a slotted screwdriver;
- The rod coming from the external handle is disconnected in the same way;
- Using the “8” head, the outer handle is detached;
- The outer handle is removed from the car;
- The lock itself is secured with 3 screws. Older machines use Phillips screws. On newer ones you can find stars;
- The locking drive block retainer moves upward. After that, disconnect the block with wires;
- Using a screwdriver, we disconnect the rod clamp; at the same time, it must be carefully rotated around its own axis. This way you can remove the handle rod (internal);
- The locking mechanism is removed from the door.
Assembly is carried out in reverse order. Before installing the new lock, be sure to lubricate it. This will extend the life of the mechanism.
Conclusion
. As a rule, car doors sag somewhat over time. This leads to some problems in operating the machine. To eliminate the problem, the door locks on Priora, 2107, 2110 and 2112 are adjusted. This work is not difficult, even a beginner should not have any problems. But sometimes this doesn't help. In this case, you will have to replace the entire lock. For each model, this work is slightly different, but usually, difficulties arise to a minimum.
If the door does not close tightly or tightly, adjust the lock.
You will need: impact screwdriver with TORX T40 bit, hammer.
1. Loosen the three screws securing the retainer.
2. Move the latch outward if the door closes tightly, or inward if the Lada Priora door does not close tightly.
- 3. Move the lock down if the Lada Priora door lifts when closing.
- 4. Tighten the screws to the torque specified in Appendix 1.
Adjust the doors on the Prior so they open easily
- Registration
- Entrance
- To the beginning of the forum
- Forum Rules
- Old design
- FAQ
- Search
- Users
Good afternoon, ladies and gentlemen. I ran into a problem. When I bought the car off the showroom floor, the front passenger door didn’t close well, that is, I had to slam it hard, and I adjusted the lock, and put a rubber band under the lock, but nothing helped. But then I noticed that the door somehow didn’t hang evenly, and that the upper corner of the back door scratched the upper corner when closing, so I started adjusting it, and it seemed like I unscrewed the bolts and moved them, but there was no point, the gaps did not change. Help me what to do?
I won’t go to maintenance 2, even though the mileage is already 13 thousand, I will change everything myself.
Lyokha-124i
In theory the car is fresh. everything should be ok - Look at the gaps - maybe the rear one is sitting askew? If you still sin on the front, open it and move the top/bottom to see if there is a knock in the hinges. maybe there's a loop there. then change the pin/axis
Then you can remove the counter part of the lock so that it does not interfere with the door closing smoothly. check how it will be... if it’s smooth, you need to adjust the closure of the mating part. if it’s not level, you need to sort of bend the top hinge 1 forward. - hit the hinge with a sledgehammer through the spacer - the hinge will bend - check. 2. — place a 2 mm washer, for example, under the bottom hinge — check the catch 3. — take a stick — like half a hammer handle — and place it between the front pillar and the plane of the door in the area of the bottom hinge. and close the door with force. those. in the place of the lower loop the metal will stretch. it looks like you need to put a washer in. check the catch. Then you place the counter part on the counter and, closing the door, fix it in a position so that the lock slightly pushes against it. sort of like that.
Source
VAZ 2170 | Removing, installing and adjusting doors
Removing, installing and adjusting doors
Door fit gaps
Removal and installation
| |
| |
practical guide
The right and left front doors of the car are similar in design. The work is shown on the front left door. All right front door equipment is removed and installed in the same way. When removing the upholstery, there is a high probability of damage to the holders. Therefore, we recommend purchasing spare holders (8 pcs.) in advance.
We remove the limiter to replace it, as well as when repairing the door (straightening, painting).
To avoid damaging the door, do not swing it open after removing the door stop.
1. Remove the door trim and remove the plastic film.
2. Using light hammer blows through a drift, knock out the axial pin of the limiter rod upwards.
3. Using a 10 mm socket wrench, unscrew the two bolts securing the door opening limiter.
4. Remove the stopper from the door.
Installation
We install the door opening limiter in the reverse order and lubricate it with grease.
We remove the glass when repairing the door (straightening, painting).
1. Disconnect the door glass bracket from the window regulator. We lower the glass all the way.
2. Remove the lower edge of the upper glass seal from the door frame.
To remove the glass, the top seal does not need to be removed.
3. Through the hole in the door panel, use a slotted screwdriver to move the lower edge of the inner glass seal (disengaging it)
and remove the inner seal from the door.
4. Similarly, remove the lower outer glass seal.
5. Remove the glass from the door from the outside of the frame.
To remove the upper glass seal from the door, use a socket wrench to unscrew the bolt securing the glass guide.
We remove the seal from the door along with the guide.
Install the glass in the reverse order.
We remove the window regulator to replace it, as well as when repairing the door (straightening, painting).
1. Remove the door trim and remove the plastic film.
2. Remove the switch from the upholstery and connect it to the wiring harness block. Turning on the ignition, lower the door glass to a level that allows you to unscrew the two bolts securing the glass bracket to the window lifter guide.
3. Disconnect the power window motor gear block from the door wiring harness block.
4. Using a 10 mm socket wrench, unscrew the two bolts securing the glass bracket to the window lifter guide.
5. Move the glass all the way up by hand and fix it in the upper position with masking tape or wooden wedges inserted between the seal and the glass.
6. Using a 10 mm deep socket wrench, unscrew the three nuts securing the window lift drive.
7. Lower the glass along the guides and remove the upper pin of the window lifter guide from the hole in the door panel. Raise the glass and remove the window regulator from the door.
Install the window regulator in reverse order.
We remove the lock to replace it, as well as when repairing the door (straightening, painting).
The door lock consists of an internal and external part. If the outer part is faulty, it can be replaced without removing the door trim.
1. Remove the door trim and remove the plastic film.
2. Disconnect the wiring block of the lock gear motor from the wiring harness block
3. Remove the gear motor wires from the clamp.
4. Using a slotted screwdriver, disconnect the plastic ends of the switch rods (cylinders) of lock 1 and the outer handle of lock 2 from the lock levers.
5. Using a TORX T40 key, unscrew the two screws securing the lock.
6. Remove the outer part of the lock.
Do-it-yourself modification of the VAZ 2110 door lock
The basic VAZ door lock, in principle, is a fairly reliable system, but there may be prerequisites for its replacement. In this case, it is better to replace it with a silent door lock.
At the same time, for most drivers, updating the silent locks of the VAZ 2110 is a matter of principle, because they strive to make the lock not just quiet, but almost inaudible. But first things first.
Door lock mechanism
When to change the lock
So, the need to replace the standard factory lock with a modified one arises in the following cases:
- If you suspect that someone tried to steal your car. As a rule, inexperienced car thieves can only damage the lock, as evidenced by the following signs: • The front door lock began to dangle, which was not the case before; • The key turns with difficulty, naturally, the doors are not easy to open; • There is visually noticeable damage in the lock area and/or near it; • You cannot open the front door at all with your own key;
Door and trunk cylinders
Lock mechanism design
The door lock on the VAZ 2110 has the following device:
- The outer part that everyone sees from the outside of the door;
- Internal part (larva);
- Lever arm;
- Locking rods, as well as their tips;
- Retaining bracket;
- A latch with which the lock is adjusted;
- Handles - external and internal;
- Fastening screws.
Lock mechanism design
Removal
Replacing, adjusting or repairing a lock involves removing it, for which you should perform the following actions:
- Remove the upholstery from the front door where the lock is located;
- Disconnect from the lock lever: • External handle rod; • Lock cylinder rod;
- Disconnect the rod, remove the inner handle;
- Remove the outer lock by unscrewing the two screws securing it;
- Remove the internal lock along with two rods - the internal handle and the lock;
- After removing the plastic holder from the locking rod, it must be disconnected from the lever;
- After removing the locking bracket, disconnect the outer handle rod from the lever;
- If your repair involves replacing the rod end, then when unscrewing it, be sure to count, remember or write down the number of revolutions you made. You need to tighten the new ones by the same number of turns, since these tips are used to adjust the length of the rods;
- When installing a new lock, all work should be done in reverse order.
Installation details
Very often, even the so-called silent locks (which are usually installed instead of old, noisy ones) are further modified.
There are several methods, but it is important to install a gasket between the body and the mechanism, since there remains a gap that affects the penetration of air, dust, and also the volume of sound.
If it suddenly turns out that after installation the door does not latch, you can solve the problem in several ways:
- Strengthening the lower springs (better suited for an old, noisy mechanism);
- Installing a cube of foam rubber in place of the bullet spring;
- By installing one large spring from below.
How to remove the rear door on a Priora
The sequence for dismantling the rear door is the same as in the case of the front door. Notes:
- if the car does not have rear power windows, the step of disconnecting the wiring can be skipped;
- The presence of a central lock requires the supply of electricity to the electric lock mechanism. After removing the upholstery, the block with connections should be disconnected and pulled out from the door through the hole.
After this, unscrewing the fasteners and removing the door itself can continue.
The tools are similar: for the travel stop - a 10 mm head (in some, 8 mm), for hinges - 13 mm.
How to Adjust Doors on Priora
How to set up a door to previous video
How do Russian cars differ from many foreign cars? In order for our car to be properly repaired in the future, it should be improved as soon as it is purchased. AvtoVAZ still managed to create an ordinary comfortable car. Priority and this model could not avoid this fate. For now, the conversation will focus on the doors, namely their settings and minor improvements. Otherwise, you have to watch how the gap between the door and the body itself begins to increase, how big the roar is when it is closed, etc.
Let's start with the door lock. The fact is that their design was very poorly executed; all metal elements rattle. To completely get rid of these sounds, we now need to completely remove the door lock, and put the standard rubber tubes on the hands.
At first glance, it seems that there is nothing to do here, but the effect is amazing, almost all sounds disappear immediately. Now, when you close yourself, you only hear a pleasant, muffled pop. You need to take a look at the exterior door handles that are too bad in appearance. They should be exchanged for nicer pens. At the next stage, it is necessary to replace the inner casing, and also place a special soundproofing material in the internal cavity, as well as a second sealant.
READ How to Remove the Door Trim of a VAZ 2107 Video
Priority door does not open well
a priority
grant, etc. bad door
.
You can also install additional speakers. Go back to the locks again, they need to be adjusted, otherwise they will close very poorly and then start completely loose and squeaking. It is necessary to slightly loosen the tension on all locking lock screws.
It needs to be moved if the door is closed very tightly. If we are talking about poor tightness, the latch should be moved inward. If you feel the effect of the car door lifting when closing, then this is the case. You can safely slide the lock down. If the car is a hatchback or station wagon, you will also need to adjust the tailgate. To do this, find a bracket that will match the lock tab.
Lubricate the lock thoroughly with special silicone grease. If the locking bolts are tightened properly and the lock still does not work properly, you will need to tighten the rubber stops, but do not tighten them tightly as the doors will hang and always rattle when you drive. There is an anti-slip pad under the door. We have to check its condition, if it is very thin or damaged, it needs to be replaced. As a result, excess noise in the cabin will completely disappear. If you are replacing a door then you will need to accurately measure the distances on your body as simply purchasing a door from Priora may not be for you.
READ Car Doors Creak What to Lubricate