Articles
Radio tape recorder and its connection to the subwoofer
It’s hard to imagine a modern car without a high-quality audio system. Anyone who enjoys the delightful sound of musical compositions while driving needs a good sound system that meets all the requirements. Moreover, it is important not only the correct distribution of sound throughout the cabin, but also the presence of high-quality sound frequency. For powerful and clear sound of low frequencies, as is known, a subwoofer is used. Connecting an active subwoofer to a radio is not the easiest task, so you need to be prepared for some difficulties. In our article we will learn how to connect an active subwoofer to a radio on our own and what you need to know for this. Before you begin installation, you need to select the desired option for acoustic equipment, especially since the choice is quite extensive these days.
Car subwoofer: types and design features
A subwoofer (SBV) is an acoustic system that converts low-frequency sound waves.
You don't need it to listen to most music tracks. A sub is needed for high-quality sound of low frequencies (bass).
Subwoofers come in two types:
- Active - they already have a built-in power amplifier;
- Passive - there is no amplifier and requires additional connection so that the output sound is clear without distortion or interference.
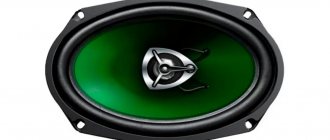
A passive subwoofer may look like a regular large speaker or a box in which the speaker is placed.
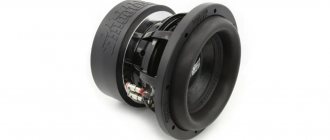
Structurally, an active sub consists of the following elements:
- body - wooden or plastic;
- woofer;
- signal regulator;
- amplifier;
- signal frequency regulator.
This is interesting: How to connect your phone to the radio in your car in all ways
For high-quality sound, the active sub must be correctly connected to the radio.
Types of subwoofers by design:
- Horn - the type has a folded horn-speaker, used at concerts;
- Closed - is a speaker installed inside and tightly adjacent to the walls of a closed box;
- Bass inverter - a type using a ventilation pipe, from which, under the force of sound waves, air comes out along with low-frequency sound;
- Quarter-wave resonator - acoustics with a tunnel design, a tunnel-pipe, of a given length and cross-sectional size through which sound comes out;
- Bendpass is a box with a bass inverter, divided in the middle by a wall into two chambers, different in volume, the speaker is placed in the partition between them.
Installation nuances in cars of different brands
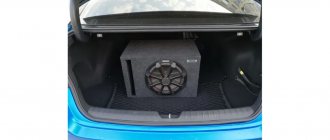
The subwoofer and amplifier are placed in the luggage compartment in 99% of cases. But the trunk does not always have sufficient volume. For example, in a VAZ 2114 it is problematic to place a passive subwoofer and amplifier and leave room for transporting something. Therefore, for 2114 it is better to choose an active subwoofer with a suitable housing. Fortunately, car audio stores offer a wide selection of models of different power and configurations.
Take the installation of the power cable seriously. Look for a way to route the power wire through the factory holes. Use rubber or plastic couplings to move from the engine compartment to the luggage compartment. The wire should not come into contact with metal. This will help protect it from chafing and possible short circuits.
For the power cable, it is recommended to use plastic or rubber couplings for transition from the engine compartment to the passenger compartment and from the passenger compartment to the luggage compartment
Self-installation and connection of the subwoofer will take from 1.5 to 3 hours. The procedure is simple, but requires care and precision. If you have doubts about your abilities, contact specialists installing speaker systems. They will select the speaker components and connect them. And after 2-3 hours you will be able to enjoy high-quality surround sound in your car.
- Author: Dmitry Kuznetsov
Let's get acquainted, my name is Dmitry Kuznetsov. Rate this article:
- 5
- 4
- 3
- 2
- 1
(18 votes, average: 3.7 out of 5)
Share with your friends!
Connecting a subwoofer to a radio via an amplifier
To connect the SBV to the car radio you will need a set of tools and materials:
- knife;
- set of screwdrivers and keys;
- pliers and wire cutters;
- insulating tape;
- circuit breakers;
- capacitor;
- consumable fasteners (nuts/bolts);
- O-rings;
- wiring (“tulips”, speaker cable, power supply).
Important: before connecting, be sure to disconnect the terminals from the battery to avoid short circuits.
Connection process
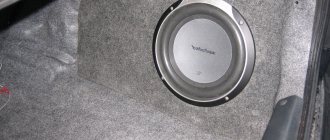
Select a location in the car to mount the device. Depending on the model and size, this will be the trunk or the cavity under the rear seat of the car.
Now you need to lay the power cable from the battery from under the hood to the place where the amplifier and subwoofer will be installed in the luggage compartment. The connecting wires from the radio to the amplifier are laid in the same way.
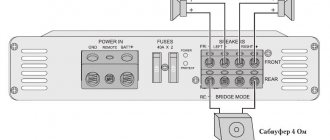
Next, connect the “black” and “red” wires to the “-” and “+” contacts of the amplifier, respectively.
When the amplifier is powered, it is connected to the car radio; ordinary RCA wires - “tulips” and a power wire (usually “blue”) are suitable for these purposes.
Now you need to carefully remove the radio using a screwdriver and knife.
Then “tulips” are connected to the radio according to the colors of the connecting wires. In order for the sub to turn on simultaneously with the car radio, you can immediately connect the “+” power wire.
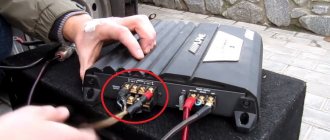
RCA connecting wires are connected to the amplifier ports according to polarity. The power cable is also connected.
An additional fuse is inserted into the resulting connection diagram to protect against voltage surges and short circuits. It is better if it is installed next to the battery so that it can be easily changed.
Next, the wires are connected to the radio into the linear output connectors (LO), and their opposite end into the LINE-IN connector of the amplifier.
Recommendation: To avoid voltage surges in the car’s electrical network, experts advise additionally installing a capacitor on the circuit. This is not necessary if the subwoofer power is below 350 W.
Advice: in order for the sound to be of high quality and reproduced without interference in the connections, it is recommended to use speaker wires with a cross-sectional thickness of 4 mm or more.
Security measures
When installing a subwoofer and amplifier yourself, you must follow certain rules:
- you cannot start work without removing the terminals from the battery;
- do not forget about de-energizing all circuits to which the connection will be made;
- use electrical insulating tape, corrugated tube, clamps to reliably protect all wire connections;
- you must have only high-quality wiring;
- do not allow sharp bends in the wires;
- choose a fuse that matches the rating data of the connected devices;
- securely fix the acoustic equipment in the car; nothing should move during operation.
By following the above safety precautions, you will not damage your vehicle and avoid the risk of fire.
Examples of circuits for connecting active and passive subwoofers
Please note that not all car radios have LV. As a rule, factory models do not have this connector.
In such cases, it is recommended to additionally purchase a special adapter to connect a passive subwoofer, which connects to a radio that does not have a LP. In turn, the subwoofer will be connected to this adapter. How to do this correctly is shown in the diagram below.
Active connection diagram. subwoofer to a car radio without a LV channel via an adapter.
Passive connection diagram. SBV through an amplifier.
Video “Instructions for making a subwoofer yourself”
How to properly build a subwoofer with your own hands at home - visual design instructions with drawings and dimensions are given in the video below (author - Denis Legostaev).
How to install a subwoofer: pitfalls and connection diagrams
True music lovers prefer to enjoy high-quality sound both at home and while driving a car. To listen to your favorite music in excellent quality, the acoustics (speakers) are upgraded. A pumped-up speaker consists of: a standard radio, an amplifier, a subwoofer and speakers. A subwoofer helps you get surround sound. In this article we will look at the selection and installation of a subwoofer (LF).
How to connect a subwoofer without an amplifier
Step-by-step instruction:
- On the rear panel of the car radio there are two inputs through which the subwoofer and the radio are connected using a linear cable.
- Then the power is connected: the power cable is laid under the interior trim and connected to the “+” terminal of the battery with one edge, and the other is connected to the subwoofer.
- The negative contact is connected to the battery “-” terminal and is grounded to the housing with a bolt connection. For these purposes, the edge of the wire must be stripped in advance. Cleaning is done with a knife and wire cutters.
- Since the power supply to the battery is 12V, the connection is only permissible through a fuse, which is installed on the power cable near the battery.
- Next, the connecting RCA wires are laid from the subwoofer through the interior and connected through the LOW-Input connectors, having previously cleaned the edges. If the connectors in the radio do not have RCA connectors, then you can connect them via the HI-Input connector.
Important! When connecting a device, do not confuse the active with the passive; remember that the active already has a built-in amplifier, while the passive does not, so the connection diagrams are different in both cases.
Flaws
- You won't be able to play video files on MMC XRAY.
- It’s a matter of habit – the radio does not have the round volume controls familiar to all generations of domestic car owners. Only the buttons can increase/decrease the sound.
- The volume of the radio can be controlled using the multifunction steering wheel, but you won’t find buttons for switching tracks here; you still have to reach out to the screen.
- USB devices are read quickly, but the flash drive must be in FAT 32 format, and the maximum memory capacity cannot be increased beyond 32Gb.
- The standard IGO navigation program may begin to slow down when driving. Stutters may occur when entering an address. There is no way to change the map scale with your fingers: control only with buttons.
- Navigation map updates are quite expensive, especially since maps in Russia are not of the best quality. Free map updates are performed only once after purchase within three months from the date of device activation.
- The lack of line outputs means that connecting an amplifier and subwoofer in one minute will not be possible. You will have to solder the line outputs or connect the amplifier and subwoofer to the rear speakers.
Of the biggest drawbacks - the inability to play video, there is a decent solution. Firmware will help solve all these problems.
In general, it is clear that the XRAY MMC leaves only pleasant impressions with its functionality; there are shortcomings, but they are not particularly significant. The price of a multimedia system for a domestic car is quite unexpected, but if you compare it with the cost of multimedia in some other foreign cars, it begins to look in a different light.
Check out our group.
Problems you may encounter when connecting
The following difficulties may occur when connecting the device:
- A factory car radio usually does not have a special audio connector for an amplifier - this can be solved by purchasing a special adapter;
- Setting and correlation of low and high frequencies with the main acoustics of the car.
Please note: to properly connect the subwoofer to the car radio, you must have basic knowledge of electrical engineering. Otherwise, it is better to contact a car service center for specialist help.
MMS revision process
We remove the radio and unscrew the cover, turning the screws out into view. Next, we take out the audio system board and find on it the amplifier chip (circled in red) and the amplifier power capacitor (circled in yellow), which is located nearby.
1. Solder the microcircuit by first removing the metal casing and bending the lower ears. It is more convenient to do this using a hair dryer (25 legs in total, which are soldered with lead-free, refractory solder). Next, we clean the holes in the board and solder the purchased microcircuit and install the metal casing. Apply thermal paste.
2. Solder the capacitor (don’t forget that it is polar). We install the new one in a lying position, because its dimensions are much larger than the standard one. We solder a film capacitor on the back of the board.
Additionally: We change preamplifiers in a similar way.
As a result, the radio/MMC has a huge power reserve. Now you can listen to music at higher volume levels with virtually no distortion. In addition, the sound became cleaner.
Let us remind you that there is an easier way to improve the sound quality of music, for example, install an amplifier or flash MMC with a different version of the menu and equalizer.
The standard radio for the Lada Granta model is an improved device, the design basis of which is the “Sirf Atlas” processor, supplied by the well-known. In addition to the presence of a radio receiver, the device is equipped with a large touch screen and has the ability to connect an external source via a video input by replacing the software and performing firmware. However, in the basic configuration of a domestic car there is only a push-button radio. Many owners are not happy with this fact and want to connect a more modern radio. This article will tell you how to install a radio.