Articles
How to connect a subwoofer to a 4 channel amplifier
How to connect a subwoofer to a 4-channel amplifier without losing power? What needs to be done so that the connection diagram of a subwoofer to a 4-channel amplifier is fully and correctly implemented? All these questions require answers, which we will try to provide in the article.
Installation
First of all, you need to understand how to properly install a four-channel amplifier without thereby spoiling the interior of the car and the amplifier itself. The amplifier should be easy to access to adjust the sound of the speakers. Let's look at the sedan body model and where the amplifier can be installed.
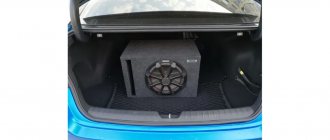
· Trunk
Rear seat back
· Space under the rear, front seat
Trunk lid
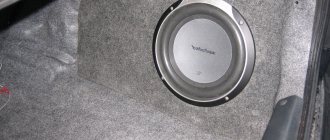
· Subwoofer housing
The trunk is one of the most convenient places, since the amplifier needs cooling for normal operation, it does not like confined spaces! You can install it on the right, on the left, to the bottom of the trunk through the podium, making sure that nothing damages our amplifier. We securely fasten the amplifier inside, the consequences can be sad, so do not neglect this important fact.
The rear seat back is also not a bad option. Well ventilated place, easy access, does not affect the interior. The downside is that if the back is frequently bent, the wires become broken and damaged over time.
The space under the front seat is not the best option. Cooling is poor, not aesthetically pleasing from an interior perspective and poor protection from external threats. There is little space under the rear seat, which will cause the amplifier to overheat.
The trunk lid is a bad option; you can quickly break the wires.
There is strong vibration on the subwoofer housing, the contacts will constantly weaken. Vibration also has a detrimental effect on the amplifier itself.
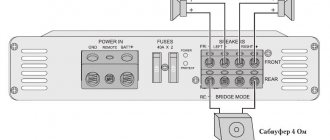
Connection diagram for a passive subwoofer to a 4-channel amplifier
To connect this type of speaker to a 4-channel amplifier, you will have to use a standard circuit.
Connection diagram for 4 channel amplifier and subwoofer
So:
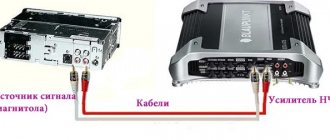
- First, the subwoofer and other speakers are connected to the amplifier.
- Then the amplifier is connected to the car radio.
- Having received the signal directly from the car radio, the amplifier distributes it. Part of the signal is sent to the sub, and part to the tweeters.
Amplifier 4 channel connect subwoofer
Note. Often the subwoofer is placed in the trunk of a car. In view of this, it is necessary to stretch cables there through the entire cabin. In this case, the path from the battery to the trunk is implied, and so much cable needs to be calculated.
Connection diagram for subwoofer and 4 channel amplifier
- When wiring cables, you need to make sure that the positive wire is protected with something, for example, corrugation. Basically, this means protecting the part that is located in the engine compartment, as close as possible to the battery.
Connecting speakers
Now the question is how to connect speakers to a four-channel amplifier in order to enjoy the sound from the speakers.
There are several options here: we can connect several loudspeakers both in parallel and in series. You need to know the power and impedance of both the amplifier and speakers. The amplifier is afraid of resistance lower than stated! That is, the greater the resistance, the better for him.
If the amplifier has an output resistance of 4 ohms, then we connect the speakers so that their total value is at least 4 ohms. Otherwise, our amplifier will heat up. The operating temperature of the output transistor is 85 degrees. Anything higher can break our amplifier.
That is, when connected in series to one channel, our speakers in total must be at least 4 ohms. You can connect two or three speakers, 2 ohms each, which in total will be equal to or more than 4 ohms - this is the correct connection, which will have a positive effect on the sound quality. We do the same for the other three channels.
With a parallel connection (bridge), we connect one speaker or several to two output channels of the amplifier (we take plus from one, minus from the other).
Here you need to sum the two channels on the amplifier, in our case it is 4+4 ohms = 8 ohms. That is, the speaker, or speakers, should not have a resistance of less than 8 ohms. If more is good. But again, everything should be in moderation. There is no point in hooking up a bunch of speakers, thereby increasing the resistance; this will not increase the power, and the amplifier will work with overload.
Based on the above, we now know how many speakers can be connected to a four-channel amplifier, and how to do it correctly.
Instructions for setting up a 4-channel amplifier
Generally, there are three types of amplifier settings you need to know. All of them are given below.
Amplifier setup for four speakers but no subwoofer
So:
- The amplifier's filter/crossover is turned off, and only the speakers reproduce the entire frequency range.
- We put the Crossover Selector switch in the Flat position.
- Level is set to position 8V.
- Bass Boost is set to 0dB.
- Now you will need to increase the volume on the car radio, but not more than 90%.
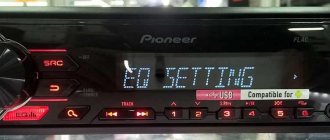
- The equalizer, if it is not configured, is set to position 0 according to music styles.
- Connect the amplifier and slowly turn the Level clockwise until the end.
Setting up an amplifier for a subwoofer and speakers
So:
- Crossover Selector Front on the amplifier is set to the HP position.
- Phi Pass is set to 60Hz-80Hz.
- Crossover Selector Rear is installed on LP.
- Love Pass is adjustable in the frequency range 65Hz-85Hz.
- Level is set to 0.
- Bass Boost is also at 0dB.
- As with the above-described Level setting, rotate it all the way, but adjust the sensitivity.
Tuning for local gain
So:
- Crossover The selector is set to Flat.
- Turn on HP for tweeters.
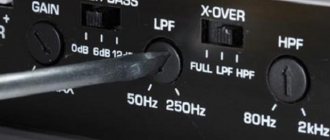
- Turn the Hi PASS control to the 250Hz position.
- We adjust the amplifier using the Level rotator.
Note. If the car radio in the car is a new version, adjusting the amplifier may not be necessary. These radios already have automatic Bass Boost settings. If this is the case, then you will just need to adjust the Level rotator.
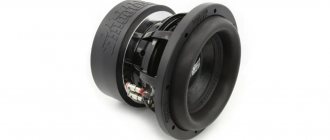
Dual coil woofer
The low-frequency speaker is a subwoofer, it comes with one coil and two. The one with two coils is no different in appearance from the one with one. But there is still one difference - a pair of additional terminals to which the wires from the amplifier fit. A speaker with one coil has 2 terminals, and a speaker with two coils has 4. Well, two coils have two independent windings. This was done for the flexibility of connecting such a speaker. So how do we connect a dual coil subwoofer?
According to the same principle as was considered with conventional speakers - in series, in parallel. Another connection option is independent.
Independent is when each independent speaker coil is connected to a separate amplifier channel (right, left). This type of connection is intended for amplifiers that do not have bridging capabilities.
It is better to connect such a speaker in series or in parallel, since a different signal for each channel can ruin our speaker. This type of connection must necessarily have the same signal for each speaker coil. And the signal for the right and left channels is provided to us by the recording studio, and we cannot know how each audio recording was recorded.
How to setup
Correctly setting up the subwoofer allows you to make the most of all the capabilities of the speaker system in your car. Some music lovers still use factory settings, but this can greatly affect the sound quality. This feature is explained by the fact that the manufacturer cannot take into account the preferences of each listener. In addition, the quality of the reproduced sounds is greatly influenced by the type of car body and the installation features of the subwoofer.
Inaccuracies when connecting the subwoofer to the standard radio and setting up the system cause resonance in the car and rattling of individual elements of the plastic trim. To correct the sound, experts suggest using a specialized disc. It can be found in auto stores. This disc contains musical compositions with which you can fine-tune the settings.
Active subwoofer
To properly set up an active subwoofer in a car, you need to go through several stages of work. The stages of work are similar for any type of connection (to a monoblock or through amplifiers).
First of all, turn on the low-pass filter. It can be located on the radio itself or on the amplifier. The filter can be called as follows: Low Pass Filter (abbreviated LPF), as well as LF or low-pass filter. This action is necessary to minimize the sound of mid and high frequencies. When the filter is turned on, only bass will be heard.
Initial volume and frequency settings. Before you properly configure the sub, you need to find the filter frequency control - it is located on the amplifier and marked Frequency. Its indicator should be at around 80 Hz. The sensitivity control can be recognized by the inscription Gain or Level. Its level must correspond to that of other regulators.
Switching polarity. Only the fact in which direction the speaker cone will begin to move depends on the specific connection. In order to adjust the parameter, you need music in which the bass is reproduced clearly and clearly. After this, you need to find a sound option in which the subwoofer will produce sounds that are indistinguishable from the sounds from other elements of the speaker system.
The next task is to adjust the subsonic. This name refers to a subtonal filter that cleans musical compositions from excessively low sounds. In most cases, a level of 20 Hz will be sufficient. Those who prefer the loudest bass possible may need a level of 40 Hz.
It is equally important to configure the subwoofer taking into account mid-bass performance. This again requires volume control and a low-pass filter.
If you need soft bass, set the volume higher and the filter lower.
We connect two amplifiers
Now let's figure out how to connect two four-channel amplifiers in parallel to each other.
If you are a fan of loud and high-quality music, you may need two amplifiers for a more powerful sound output.
Both amplifiers can be powered from one power cable using a splitter (tee). The main thing is not to forget about the load on the wire: the more power you need, the larger the cross-section of the positive cable should be. The minus should be taken from one place so that there is no interference. Remote - wire for turning on the amplifier, we also make one for two, branch and connect. Well, we connect a four-channel interconnect RCA cable on one side to the linear output, on the other to the linear input.
Connecting interconnect wires and control (REM)
To lay the cable, you need to find the linear output on the radio. The linear output can be recognized by the characteristic “bells” that are located on the rear panel of the radio. The number of linear outputs differs in different radio models. Usually there are from one to three pairs. Basically they are distributed as follows: 1 pair - you can connect a subwoofer or 2 speakers (labeled as SW\F) If there are 2 pairs of them, you can connect 4 speakers or a subwoofer and 2 speakers (outputs are labeled F and SW), and when there are 3 pairs of linear ones on the radio wires you can connect 4 speakers and a subwoofer (F, R, SW) F This is Front i.e. front speakers, R Read rear speakers, and SW Sabwoorer I think, and so everyone understands what.
The connection will require an interconnect wire, which should never be skimped on. It is prohibited to lay the interconnect cable near the power wires, as various types of noise will be heard when the engine is running. You can run the wires both under the floor mats and under the ceiling. The latter option is especially relevant for modern cars, in the interior of which there are electronic accessories that create interference.
You also need to connect the control wire (REM). As a rule, it comes with interblock wires, but it happens that it is not there, purchase it separately; it does not need to be of a large cross-section - 1 mm2 is quite enough. This wire serves as a control for turning on the amplifier, i.e. when you turn off the radio, it automatically turns on your amplifier or subwoofer. As a rule, this wire on the radio is blue with a white stripe; if it is not there, use a blue wire. It is connected to the amplifier to a terminal called REM.
Step-by-step instructions for serial connection
In this embodiment, the resistance is summed up and calculated using the formula:
R1 - first speaker,
R2 - second speaker.
In this case, R1 must be equal to R2, otherwise the speaker system will quickly wear out and the expected sound effects will not live up to expectations. Using this scheme, you can connect as many speakers as you like, but their R value should not exceed the maximum permissible R of the amplifier. It is also worth considering that the more speakers are connected in series, the less sound power will be output.
- Negative 1 is connected to the positive channel of column 2.
- Positive 1 is connected to the negative terminal of the device.
- Negative 2 is connected to the positive output.
The serial connection of three or more speakers is carried out according to the same scheme, where each subsequent one is polarly connected to the previous one, and their outermost contacts are polarly connected to the terminal of the device.
Video on how to properly connect a four-channel and single-channel amplifier
We hope that this article helped you understand how to properly connect a car amplifier. Rate the article on a 5-point scale; if you have any comments, suggestions or you know something that is not indicated in this article, please let us know! Leave your comment below. This will help make the information on the site even more useful.
Many car owners are not satisfied with the power and sound quality of their radio. In order to solve these problems, an external amplifier is installed. The external audio amplifier operates on a voltage of 12 V; thanks to the built-in voltage converter, it increases it from 12 to 100 V.
Read also: It is prohibited to overtake a vehicle with marked
How to connect?
After installing an external amplifier, the radio's power, maximum volume and sound quality increase.
Sound settings
You can connect the amplifier to the car radio yourself. After installing all the elements, you need to configure the system as follows:
- The crossover is installed in the HP position.
- The Phi Pass indicator is 60-80 Hz.
- The “Rear” selector is set to LP.
- “Love Pass” is adjustable in the range of 65-85 Hz.
- The level is set to 0.
- “Bass Boost” is also adjusted to 0 dB.
The above settings allow you to achieve the best sound of the created system. If the amplifier is part of the radio, then the setup is carried out through the built-in functions of the device.
When installing a speaker system, laying the cable, you should choose the shortest path; it is not recommended to create a large number of connections, since they significantly reduce the reliability of the system.
Messages 17
1 Topic by ivan 2014-03-13 15:43:17
- ivan
- New member
- Inactive
- Registration: 2014-03-07
- Messages: 21 Thanks : 0
- Auto: 2110
Topic: Connection diagram for 4-channel amplifier (4 speakers + sub)
connection diagram for a 4-channel amplifier. 4 speakers + sub
2 Reply from kapelkaK 2014-03-13 16:21:51 (2014-03-13 16:42:33 edited by kapelkaK)
- kapelkaK
- Experienced
- Inactive
- From: Ramenskoye, Moscow.
- Registration: 2013-12-16
- Messages: 313 Thanks : 94
- Car: VAZ 2111, 2001, 1.5; 8V; January 5.1; BK ShtatKh4m.
Re: Connection diagram for 4-channel amplifier (4 speakers + sub)
connection diagram for a 4-channel amplifier. 4 speakers + sub
Minus the sub . As you want (4 speakers + sub), you need a 5-channel or 4 + 2 in a bridge circuit.
Standard connection diagram for 4-channel wuxia:
3 Reply from ivan 2014-03-13 16:54:05
- ivan
- New member
- Inactive
- Registration: 2014-03-07
- Messages: 21 Thanks : 0
- Auto: 2110
Re: Connection diagram for 4-channel amplifier (4 speakers + sub)
I know such a scheme! So I’m wondering if the sub should be put on the rear speakers or on the front ones
4 Reply from kapelkaK 2014-03-13 17:02:47
- kapelkaK
- Experienced
- Inactive
- From: Ramenskoye, Moscow.
- Registration: 2013-12-16
- Messages: 313 Thanks : 94
- Car: VAZ 2111, 2001, 1.5; 8V; January 5.1; BK ShtatKh4m.
Re: Connection diagram for 4-channel amplifier (4 speakers + sub)
if you put the sub on the rear speakers or on the front ones
And it will work as a simple speaker (if it doesn’t grunt)
5 Reply from ivan 2014-03-13 20:11:27
- ivan
- New member
- Inactive
- Registration: 2014-03-07
- Messages: 21 Thanks : 0
- Auto: 2110
Re: Connection diagram for 4-channel amplifier (4 speakers + sub)
I don’t like it when the front 2 and bass are playing
although right now I’m hooked
Added: 2014-03-13 21:11:27
Can I connect it through a filter?
6 Reply from kapelkaK 2014-03-13 21:05:04
- kapelkaK
- Experienced
- Inactive
- From: Ramenskoye, Moscow.
- Registration: 2013-12-16
- Messages: 313 Thanks : 94
- Car: VAZ 2111, 2001, 1.5; 8V; January 5.1; BK ShtatKh4m.
Re: Connection diagram for 4-channel amplifier (4 speakers + sub)
What kind of head do you have?
7 Reply from ivan 2014-03-14 08:06:08
- ivan
- New member
- Inactive
- Registration: 2014-03-07
- Messages: 21 Thanks : 0
- Auto: 2110
Re: Connection diagram for 4-channel amplifier (4 speakers + sub)
Added: 2014-03-14 09:06:08
How do you connect the front ones from the head and the sub to the front from the amplifier?
8 Reply from kapelkaK 2014-03-14 08:24:24
- kapelkaK
- Experienced
- Inactive
- From: Ramenskoye, Moscow.
- Registration: 2013-12-16
- Messages: 313 Thanks : 94
- Car: VAZ 2111, 2001, 1.5; 8V; January 5.1; BK ShtatKh4m.
Re: Connection diagram for 4-channel amplifier (4 speakers + sub)
There are many Kenwoods, what model? On the back of the head there are linear output connectors. Depending on the model, you can connect: 1. nothing; 2. rear + sub; 3. front + rear + sub; 4. front + rear.
Near the antenna socket.
9 Reply from ivan 2014-03-14 09:52:46
- ivan
- New member
- Inactive
- Registration: 2014-03-07
- Messages: 21 Thanks : 0
- Auto: 2110
Re: Connection diagram for 4-channel amplifier (4 speakers + sub)
I have a 4-channel output, what are tweeters needed for? When I put music in the field, I connected tweeters from them, so an idea appeared
10 Reply from kapelkaK 2014-03-14 11:41:07
- kapelkaK
- Experienced
- Inactive
- From: Ramenskoye, Moscow.
- Registration: 2013-12-16
- Messages: 313 Thanks : 94
- Car: VAZ 2111, 2001, 1.5; 8V; January 5.1; BK ShtatKh4m.
Re: Connection diagram for 4-channel amplifier (4 speakers + sub)
11 Reply from kapelkaK 2014-03-14 12:02:39
- kapelkaK
- Experienced
- Inactive
- From: Ramenskoye, Moscow.
- Registration: 2013-12-16
- Messages: 313 Thanks : 94
- Car: VAZ 2111, 2001, 1.5; 8V; January 5.1; BK ShtatKh4m.
Re: Connection diagram for 4-channel amplifier (4 speakers + sub)
12 Reply from iliaBkmz 2014-03-14 13:52:05
- iliaBkmz
- Forum legend
- Inactive
- Registration: 2012-11-12
- Posts: 2,036 Thanks : 583
- Car: outlander and 2104
Re: Connection diagram for 4-channel amplifier (4 speakers + sub)
It seems to me - from the very beginning of the topic - there is a wrong idea. Why install a 4-channel VUS + VUS for the subwoofer if the radio does not have a sufficient number of linear channels for this? Maybe start with a selection of radios? A sub connected to the same channel as the front will “kill” the entire front and the whole point of the procedure described above will be lost.
If you only have 4 outputs (although strangely, usually either 1 or 3), put two two-channel channels, one for the speakers, two speakers from the radio directly and one two-channel bridge to the sub - IMHO - the best choice
13 Reply from kapelkaK 2014-03-14 14:19:49
- kapelkaK
- Experienced
- Inactive
- From: Ramenskoye, Moscow.
- Registration: 2013-12-16
- Messages: 313 Thanks : 94
- Car: VAZ 2111, 2001, 1.5; 8V; January 5.1; BK ShtatKh4m.
Re: Connection diagram for 4-channel amplifier (4 speakers + sub)
So I’m trying to get a model of the head from the TS to tell him what can be done. And there are 5 linears.
14 Reply from Daniil.Smit 2015-04-23 16:06:19
- Daniel Smith
- New member
- Inactive
- From: Donskoy
- Registration: 2014-12-03
- Messages: 108 Thanks : 6
- Car: VAZ 2111
Re: Connection diagram for 4-channel amplifier (4 speakers + sub)
And why am I looking now and many people install a 4-channel amplifier, front midbass and tweeters, and a sub in the back. So it’s really better than let’s say the front is the same, and the coaxial ones in the back are also through an amplifier? I just thought about something and it turned out wrong it’s expensive, considering that I have an excellent GU-X3600UI. Right now there are only 250W coaxial pioneers in the front, there used to be a fusion in the back, but they died, and the pioneer plays great.
Added: 2015-04-23 17:06:19
I also read a lot here, watched enough of the sound sound and came to the conclusion that I also have bad wires to the speakers and GU. Both are 0.75. I think 2 is enough for the speakers, and 4 from the battery for the GU
15 Reply from Daniil.Smit 2015-04-23 22:31:44
- Daniel Smith
- New member
- Inactive
- From: Donskoy
- Registration: 2014-12-03
- Messages: 108 Thanks : 6
- Car: VAZ 2111
Re: Connection diagram for 4-channel amplifier (4 speakers + sub)
It’s just strange to me that there’s only one sub in the back. And my friends have this kind of garbage, but only they have a coaxial front and a sub in the back, but damn, either they’re hands-offs, or it actually reproduces sound distortion instead of music.
16 Reply from maximilyn64 2015-08-28 19:40:15
- maximilyn64
- New member
- Inactive
- Registration: 2015-08-28
- Messages: 1 Thanks : 0
- Auto: 2114
Good nutrition is the key to success
The amplifier connection procedure begins with the power wires. Wiring is the most important element of a car audio system; the volume and sound quality depend on it. Amplifiers need a stable power supply, otherwise the power will not be enough and the sound will become distorted.
To understand why you need to pay attention to the quality of wiring and how it affects the sound reproduced by a loudspeaker, you need to know what a music signal is.
Some suggest that it represents a sine wave, however, the musical sinhala is characterized by a large difference between the normal and peak value. If sharp signal bursts are not important for car speakers, then in the case of an amplifier the situation is completely different. If the signal exceeds the permissible power for even a second (or even a millisecond), then these “anomalies” will be audible even to those who cannot boast of a good ear for music.
If the car amplifier is connected properly, the signal will flow through the wires undistorted. Carelessly done work or incorrectly selected wire cross-section will result in the sound being more compressed, rough and sluggish. In some cases, wheezing may also be clearly audible.
How to choose a wire cross-section?
Wire is the most common metal with a certain level of resistance. The thicker the wire, the lower the resistance of the wire. To avoid sound distortion during large voltage fluctuations (for example, when playing powerful bass), you must install the correct gauge wire.
An amplifier is considered to be a rather electrically intensive device. For its effective operation, high-quality grounding is necessary so that it is possible to receive the necessary energy from the battery. In order to choose the correct cross-section of wires, it is necessary to make some calculations. First, look at the instructions for the amplifier (or directly at the box from the manufacturer, if there is no documentation, use the Internet) and find the rated power value (RMS) there. Rated power is the signal power an amplifier can deliver over an extended period of time to one channel of 4 ohms.
If we consider four-channel amplifiers, they usually have a power of 40 to 150 watts per channel. Let's say that the amplifier you purchased produces 80 watts of power. As a result of simple mathematical operations, we find out that the total power of the amplifier is 320 W. Those. How did we calculate this? It’s very simple to multiply the rated power by the number of channels. If we have a two-channel amplifier with a rated power (RMS) of 60 W, then the total will be 120 W.
After you calculate the power, it is advisable to also determine the length of the wire from the battery to your amplifier and you can safely use the table to select the required wire cross-section. How to use the table? On the left side the power of your amplifier is indicated, on the right you select the length of the wire, go up and find out what cross-section you need.
The table shows the cross-sections of copper wires, remember that a large number of sold wires are made of aluminum coated with copper, these wires are not durable and have more resistance, we recommend using current copper wires.
Fuse selection
In order to secure the connection of the car amplifier, it is necessary to protect the power supply from the battery to the amplifier using a fuse. Fuses should be placed as close to the battery as possible
It is important to distinguish between a fuse that protects the device itself (whether it is an amplifier or a radio) and a fuse installed on the power wire
The latter is needed in order to protect the cable itself, since a considerable current flows through it. Make sure that the fuse ratings match, since if the rating of the wiring fuse is very large, the wire may burn out as a result of a short circuit. If the rating, on the contrary, is less, then the fuse can easily burn out at the time of peak loads and then there will be no other choice but to buy a new one. The table below shows the wire cross-section and the required fuse rating.
What you will need
To carry out the work yourself, you need a small set of tools and various consumables.
Bridge connection has become widespread because it allows the use of 1 channel amplifier.
Before you begin the actual work, you need to prepare:
- Amplifier, speakers and subwoofer. You can find ready-made kits on sale, so there is no need for knowledge in selecting such devices. The service life of the entire system largely depends on the quality of the installed equipment.
- Thick cable to power the device. At the same time, experts recommend not saving on the purchase of this consumable, since too small a cross-section can cause overheating and melting of the outer insulation.
- B+ amplifier terminal, which is used to connect the power cable to the battery bus. The connection cannot be made, because there is a possibility of oxide and other problems.
- Fuse to be used with a 4-channel amplifier. The device is installed closer to the energy source. Missing a fuse may cause damage to the fuse.
- GND - ground connection terminal. It is recommended that this wire be led from the battery itself, and not from the vehicle body. This is due to the fact that the metal is susceptible to corrosion, which significantly reduces conductivity. There is no need to skimp on the quality of the wire used.
- R.E.M. A blue wire often comes out of the radio; when the device is turned on, a voltage of 12 V is supplied.
- Electrical tape for insulating connections. It eliminates the possibility of a short circuit.
- A special corrugation, which is used for laying the cable, so that in the future problems will not arise during the operation of the system. It protects the insulation from mechanical damage and exposure to high humidity.
You can work with the cable using wire cutters, a soldering iron and other common tools. A tester is used to check the condition of the system; it can indicate resistance or an open circuit.
A modern amplifier has a complex design that has a large number of connectors. This allows you to connect multiple devices at once. All outputs can be divided into several groups:
- Outputs and connectors for power cable.
- 12 V output, which is supplied with power from the battery. When using it, it is recommended to additionally use a safety element.
- The REM output is required to connect the head unit. The amplifier works in tandem with a radio, for which a high-quality cable is used.
- GND is ground. It is required to connect to the machine.
- There are separate inputs for the speakers and subwoofer.
- Outputs for RCA.
On the reverse side you can find the corresponding symbols, so during operation there are no problems with connecting various elements of the system. All amplifier models are conventionally divided into 2 categories:
- AB - connects to the head unit, is analog, increases sound quality with low efficiency and low power. Amplifier models from this group are inexpensive, but they drain the battery a lot.
- D - is a digital device that is characterized by increased efficiency and high power. However, such an amplifier produces low quality sound.
The highest quality offers include equipment produced under the Alpin and Magnit brands.