Hi all! Have you ever heard about how air suspension is installed on a VAZ? The topic is quite interesting and, as it turns out, relevant. Therefore, I decided to study this issue a little and also share my observations with you.
It’s not difficult to find VAZs with air suspension in Russia and Ukraine. Moscow alone or the glorious city of Yekaterinburg is filled with owners of classics from AvtoVAZ and something newer like the Lada Priora, whose cars have pneumatics.
To begin with, it is worth understanding not how this is done, but why. Some will say that air suspension has only disadvantages. Let me disagree. Installing such a solution has impressive advantages. Let's talk about everything in more detail.
Key Benefits
At first I was surprised why so many owners of domestic cars that fall into the classic category are looking for an air suspension kit.
But when I began to delve into this issue, I discovered serious arguments in favor of such a change in the suspension design. If I had an old VAZ, maybe I would decide to install pneumatics on it myself.
Historically, the authors of this idea when organizing suspension were the French. And to be even more precise, representatives of the car company Citroen. They were the first to use air suspension on cars. And for good reason, because it provides a number of advantages.
- Comfort. Pneumatics can significantly affect the level of comfort in a car, and in a good way. Such solutions help achieve an optimal balance between rigidity and comfort. Classic shock absorbers are not capable of this;
- Ground clearance. Exhibition cars only compete to go lower and go higher. But let's talk about real operating conditions. Pneumatics allow you to change the current vehicle clearance at your discretion. This way you can relate the clearance to the degree of load of the machine. The more cargo, the higher the car rises. But it is also useful to lower the car when entering the highway. This lowers the center of gravity, allowing the car to stay on the road better;
- Overload resistance. By adjusting the suspension, the driver, if necessary, can load the car as much as possible, but without fear of possible damage to the chassis, or any significant changes in the behavior of the car on the road.
This is just a small part of the benefits. There are many more of them that can be identified. But we won’t focus too much attention on this.
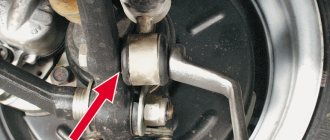
Replacing front pads
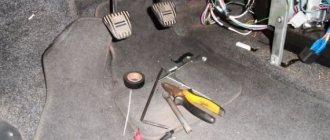
It is logical that for replacement it is better to select original parts or those that have received official approval from the manufacturer. For the further process, you should hang the wheel and secure the car properly. Replacement procedure: Remove the wheel.
- Remove the cotter pin of the lower axle clamping element.
- Partially knock out the axle and then remove it with pliers while holding the lever.
- Remove the lever.
- Remove both springs so they don't get lost in the process.
- Remove the brake caliper using a screwdriver.
- Remove the pads from the guide.
Before installing new parts, press the pistons into the cylinders as much as possible. This is done with an installation spatula, pliers or an adjustable wrench. Afterwards the assembly is assembled in the reverse order. To simply install the clamping lever axis, it is recommended to slightly sharpen it into the shape of a nail and lubricate it with graphite lubricant.
How much and where
If you are thinking about buying a set of equipment and upgrading the suspension by making it pneumatic yourself, it is worth thinking about the components of the kit.
Ready-made kits are now available for sale. Their price ranges from 20 thousand rubles and above. If you want to install pneumatics on both axles, giving the car to specialists, you will have to pay at least 40 thousand rubles. This applies to AvtoVAZ products, such as:
- VAZ 2101;
- 2106;
- 2107;
- VAZ 2109;
- 2110;
- 2114;
- VAZ 2115;
- Priora;
- Kalina, etc.
Both domestic classics and more modern models of the Russian automobile industry are suitable for creating a miracle on wheels with air suspension.
Do you think it is possible to install such a system with your own hands? I'm sure it is possible. It’s not for nothing that even ordinary car enthusiasts everywhere offer their services for installing a pneumatic kit. They do not work at a service station, but simply install equipment in their garage. And if they could do it, then you will succeed too.
There are even special videos where drivers show how and in what sequence the pneumatic kit is mounted. The question is different. Do you need this?! This is worth thinking about carefully.
Safety first
During operation of the structure we have assembled, it is necessary to pay special attention to its technical condition. To do this, first of all, it is necessary to observe the places where the parts are connected (fittings, valves, adapters). Air leaks may develop in these areas over time. If the air comes out with great force, you will hear it. Another check can be done using a soap solution.
Constantly monitor the readings of the pressure gauges and the rate of decrease in pressure in the air bags. Once a month it is advisable to check the compressor for operability.
Pneumatic pressure measurement
Immediately after completing the suspension installation work, it is necessary to make a test drive, during which you listen to the movement of the car and make sure that there are no extraneous noises and vibrations.
Do not forget about the air supply hoses: regularly inspect them for integrity.
The pressure level in the cylinders deserves special attention. For the front part, normal pressure should be within 7-8 atm, and for the rear part - no more than 6 atm. Changing the pressure level, either up or down, is extremely undesirable.
Necessary equipment
Well, you got the idea to install a pneumatic suspension on your VAZ. I can understand you, because the solution is really not bad.
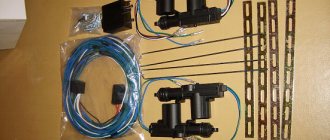
Therefore, I propose to understand the components of the standard kit. I won't tell you that you need a jack or a set of tools. Kit components only. It consists of:
- compressor;
- pneumatic cushions;
- air cylinder;
- solenoid valves;
- connecting tubes;
- pressure gauge;
- control unit;
- wires, terminals, hoses, etc.
I don’t think I mentioned anything complicated or unusual here. A standard set for equipping any car, including a VAZ, with air suspension.
It's all about the components themselves. It is necessary to clarify some points that relate to the quality, quantity and manufacturers of certain items.
I’ll say right away that using the mentioned components, the total cost of the set will be from 30 thousand rubles. But we’ll probably have to get closer to 40 thousand.
Now briefly about each of the voiced components.
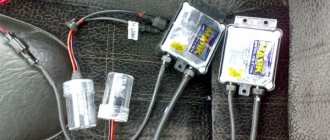
- Compressors. One unit per vehicle is used. You should choose durable and productive systems. Compressors from Falcon and Berkut are considered worthy options, especially for VAZs;
- Air bags. Since the suspension is placed on 2 or all 4 wheels, an appropriate number of cushions is required. Focus on pillows for a specific model. There will be no problems finding them;
- Cylinders. They contain compressed air. Choose a volume that is sufficient to meet your needs in terms of pneumatic efficiency. I don’t recommend saving here;
- Valves. And more specifically electromagnetic. You will need 4 pieces. These will be locking and access elements. For high-quality suspension operation, you should take valves that can operate at pressures up to 25 atm;
- Connecting tubes. Here you can get by with tubes that are used in the brake systems of trucks. Made of PVC;
- Pressure gauges. A total of 2 pressure gauges are installed in the cabin;
- Control block. Whether you assemble it yourself or buy it to order is up to you. Additionally, you will need a toggle switch that will control the operation of the compressor.
All this can be found by purchasing each component separately. But it is much more profitable and easier to purchase a ready-made kit. These are actively sold online. You just need to indicate your requirements and budget.
About the origin of the term
The term means, translated from French, movement along a load-bearing structural element. It is the power unit of modern vehicles. In the 20s of the last century, Auburn created a spar frame with an X-variant cross member. Such spar frames included two spars located in parallel, as well as several cross members. Outwardly, they were similar to stairs, which is why they were often called staircases. Currently, domestic Gazelles have a ladder frame.
Air suspension on the VAZ 2114 is an effective option for your car
In recent years, owners of various VAZ models have begun to install air suspension on their cars more often. This tuning option has a number of advantages and allows you to feel more comfortable behind the wheel of a domestic car.
1 What is air suspension and why is it needed on the VAZ 2114?
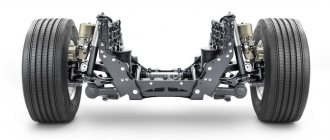
Air suspension is a set of parts that are installed to reduce the load on the car's factory suspension. The air suspension on the VAZ 2114 allows you to adapt the car’s settings to the owner’s needs and allows you to increase or decrease the vehicle’s ground clearance when necessary. The main components of air suspension are air springs, which are attached between the frame and axles of the car, with the help of which adaptive adjustment of ground clearance and suspension settings is carried out. Installing air suspension gives the driver a number of undeniable advantages.
We recommend that you read
- Tuareg air suspension compressor relay
- Air suspension
- Air suspension on Priora - low-profile look, high comfort
- Auto scanner for self-diagnosis of any car
2 The main advantages of air suspension
Firstly, these are adaptive settings. Using pneuma, you can adjust the stiffness and set maximum axle loads, which is not possible when installing simple lowered springs.
Secondly, thanks to the installation of updated sports shock absorbers and new anti-roll bars, road handling is improved.
Thirdly, you can adjust various suspension parameters directly from inside the car and while driving. You can reduce the ground clearance to a minimum by making the car lower, or, conversely, increase the vehicle's cross-country ability by increasing the ground clearance. All this gives the car greater sportiness and originality.
It is recommended to install air suspension in specialized auto repair shops, since do-it-yourself installation is associated with a number of difficulties. Not everyone will be able to correctly install air suspension parts on a VAZ 2114 or configure all the necessary parameters.
But if you believe in your abilities, you can try to install the pneumatic system and its components on the VAZ 2114 yourself.
3 Installing air suspension on a VAZ 2114 with your own hands
Every motorist should have a universal device for diagnosing his car.
You can read, reset, analyze all sensors and configure the car’s on-board computer yourself using a special scanner.
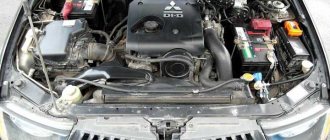
To begin installation, you will need to purchase all the necessary parts and equipment. Typically, budget air suspension starts with installing a high-quality compressor. Some experts recommend purchasing inexpensive versions of compressors like Falcon 820 or Berkut R20. As practice shows, these compressor models show the optimal price-quality ratio.
Before starting installation, it is necessary to remove the lower platform under the compressor and the special portable handle, since it will be installed on a stationary unit. In addition, it is recommended to install a plastic fitting pipe into the compressor housing, which will be responsible for supplying the air mixture.
Once the compressor is ready for installation, it is necessary to begin installing new front air struts. To do this, you need to dismantle the old struts with springs, remove from them the upper travel limiter and the bearing with the traction support. To remove the standard struts, you need to lift the car on a special lift, then hang the wheel, unscrew the steering wheel end nut. Then, using a wrench, unscrew the two fastening nuts and the three nuts from the fastening to the upper support. In this case, for convenience, it is also necessary to dismantle the brake system hose. After this, you need to use zip ties to tighten the spring and, using a special key for removing struts (can be found on any chassis), remove the strut from the spring.
Afterwards, you need to put a new air strut for the VAZ 2114 on the removed rod, connect it to the upper stroke limiter and tighten the nut. Installing the air strut on the car occurs in the reverse order to what is described in the previous paragraph. Don't forget to return the tip and brake hose to their original places. Next, you need to adjust the new struts; for this it is better to contact a service center, since incorrect camber can have serious consequences for the new air suspension system.
The same applies to the installation and connection of the compressor; the slightest error and you can lose not only your time, but also your finances. By the way, a budget option for installing air suspension on a VAZ 2114 with your own hands will cost at least 30,000 rubles. The price of installation in a specialized workshop can be safely multiplied by two. However, the air suspension fully justifies all the investments, and this will become noticeable already in the first days of using the car.
Do you still think that diagnosing a car is difficult?
If you are reading these lines, it means you are interested in doing something in the car yourself and really saving money, because you already know that:
- Service stations charge a lot of money for simple computer diagnostics
- To find out the error you need to go to specialists
- The services use simple impact wrenches, but you can’t find a good specialist
And of course you are tired of throwing money down the drain, and driving around the service station all the time is out of the question, then you need a simple CAR SCANNER ELM327, which connects to any car and through a regular smartphone you will always find the problem, turn off CHECK and save a lot of money.
We ourselves tested this scanner on different machines and it showed excellent results, now we recommend it to EVERYONE! To prevent you from falling for a Chinese counterfeit, we publish here a link to the official website of Autoscanner.
Handbrake diagram (photo of handbrake)
Handbrake diagram
Hand brake device:
- Drive lever.
- Lever pawl pull.
- Traction spring.
- Lever button.
- Front cable axle.
- Bolt M6x14.
- Spring washer 6.
- Drive traction.
- Lock washer 6.
- Protective cover.
- Cable equalizer.
- Washer 8.
- Nut M8.
- M8 nut is low.
- Lever axis.
- Washer 10.
- Cotter pin 2x20.
- Lever right.
- Left lever.
- Right expansion bar.
- Left expansion bar.
- Nut M6.
- Lock washer 6.
- Cable clamp.
If the handbrake does not hold, then it needs to be tightened. The process of adjusting the handbrake is not very complicated, but it does require some equipment and suitable conditions.
So, before you learn how to adjust the handbrake, you should know the following: the working stroke of the parking brake should be 2-4 clicks, but the handbrake stroke of 8 clicks is not excluded - here you already need to adjust the parking brake stroke.
Be careful!
Working with the cardan shaft mount (including the box seal) leads to displacement of the rocker, so difficulties arise with switching some speeds. The reason for them is in the fastening and adjusting screw at “13”, connecting the cardan and the gear shift lever. Therefore, after the new oil seal is installed, you need to check the position of the lever and adjust it if necessary.
After everything is assembled, it is worth checking the oil level and, if necessary, adding it. Then check the work to make sure there are no leaks.
How to replace the oil seal
If you detect an oil leak from the gearbox, carefully inspect the crankcase.
The leak will reveal itself. Lubricant usually leaks out through the CV joint seals and rocker panels. In the latter case, to replace you will need to perform a number of actions:
- Purchase a new VAZ-2109 gearbox seal. Its price is about 100 rubles.
- Drain the oil completely from the gearbox by unscrewing the plug from the bottom using the key “17”. If necessary, you can replace the lubricant later. It is recommended to pull out the upper dipstick to facilitate oil drainage.
- Disconnect the cardan from the rocker arm.
- Remove the boot, use a 10mm wrench to unscrew the bolt securing it to the gearbox rod.
- Using an awl or a thin screwdriver, remove the old oil seal. Inspect it for damage.
- Install the new oil seal using a pipe or large washer to press in.
After replacement, install the boot. Assess the condition of the cardan: if it has too much play, it will need replacement. After carrying out all the work, be sure to check that the speeds are turned on correctly.
Standard Lada Granta wheel sizes
Depending on the vehicle's configuration, it may use tires and wheels of different diameters and widths. The year of manufacture of the car also plays an important role.
The first generation of Lada Granta was equipped with wheels with the following parameters:
| Equipment | Tire size | Disc offset |
| Standard | 175/70R13 or 175/65R14 | 35 |
| Norm | 185/60R14 | 35 |
| Lux | 185/55R15 | 35 |
| Sport | 195/50R16 | 35 |
Many people mistakenly perceive the letter R as a “radius”, but in fact, it only means the structure of the tire – radial. The numbers after the letter R are the diameter of the disc in inches.
Since 2022, the configurations have changed slightly. Now tires and wheels are installed in the following sizes:
| Equipment | Tire sizes | Disc offset |
| Standard | 175/65R14 | 35 |
| Norm | 185/60R14 | 35 |
| Lux | 185/55R15 | 35 |
| Cross | 195/55R15 | 33 |
These are all the standard sizes of tires and wheels that are installed on the Lada Granta from the factory.
Repair parts
Replacing the rear wing of a VAZ 2114 in 70% of cases is associated with straightening out a dent from an impact. When there is no metal rupture there is no need for replacement. They straighten, putty and install back. The rear wing can be repaired without dismantling it from the car if there are small dents. Repair methods:
- reverse hammer;
- PDR method;
- vacuum suction cups.
If there are small pockets of corrosion in the area of the wheel arch, then use the method of welding metal patches and sealing through holes with epoxy glue.
Regardless of which repair method is chosen or whether a full replacement of the part is carried out, it is recommended to simultaneously check the condition of the sills and the general geometry of the body along with the fenders.