13.11.2014
Installing a fog light
We said earlier that fog lights on the VAZ-2114 and other Samaras are installed from the factory only in “luxury” versions. And without PTF, driving is very uncomfortable, because the head light on the Samara is very weak - worse than on the Nine. This is why many car owners are wondering how to install fog lights themselves? In fact, the whole process is very simple, but it takes time. You can even get by with an old bumper without holes for the PTF - cut it out with a jigsaw and install “glasses”.
Second installation option
It will be much easier for car owners whose bumper already has space for mounting fog lights. Then you don't need to buy any fuses. All that is required is a pair of new fog lights and up to 100 centimeters of wire (in reserve).
This algorithm for installing PTFs is suitable not only for foreign cars, but also for all domestic cars on which the manufacturer has provided a mounting location for the optics. For example, on VAZ 2110 and 2114 cars, connecting foglights in this way takes no more than 20-40 minutes (and this despite the fact that the car owner has no experience installing such equipment on a vehicle).
Installation
The PTF installation process can be divided into three main stages:
- Installation of headlights;
- Network connection;
- Functionality check.
So now we will talk about each stage separately.
Installing headlights
We will consider the option of installing PTF on a standard bumper. Therefore, it does not have holes for new optics. You will have to do them yourself.
To work you will need a certain set of tools and materials:
- File;
- Drill and drill bits;
- Electric jigsaw;
- Roulette;
- Marker.
Connection elements
Now directly about work.
- First of all, remove the bumper. Work is performed only if it is disconnected from the seat.
- Remove all dirt from the bumper.
- Make markings for the installation of future fog optics.
- It is best to mount the headlights slightly to the side of the lower air intake. Try to place the PTF strictly under the main optics of your car.
- For decorative glasses that have outer and inner halves, make markings. The outer half is decorative, and the inner half is designed to fix the outer part and headlights.
- The outer part of the glasses has a protrusion on the inside. With this mounting protrusion, the element should fit into the hole made in the bumper.
- To determine the optimal dimensions, you should measure the landing protrusion. This way you can make the appropriate markings on your bumper.
- Using an electric jigsaw, holes of the required size and location are cut.
- Use a file to file the cut areas.
- The outer part of the glasses should eventually fit tightly into the hole.
- Fog lights are mounted in the resulting holes. For this purpose, the kit includes special mounting bolts.
- Attach decorative glasses to the top of the headlights. The bumper can then be returned to its place.
Connection
Together with the PTF, a diagram for connecting the devices must be attached. It is not complicated, so even a beginner will be able to understand all the nuances of connecting the components to each other.
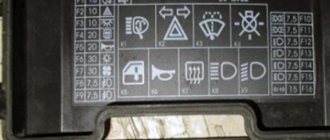
You will need to embed the wiring from the foglights into the mounting block, which is located in the engine compartment to the right of the windshield. To do this, just unscrew the bolts from the block, lift it and find the pads marked Ш7 and Ш8.
These blocks are used to connect fog lights, although these lighting devices are not installed standard at the factory. Wiring from the headlights and from the fog lamp relay, which is provided in the purchased PTF kit, is connected to these blocks.
Your job is to make the correct connection. This is done according to the following scheme:
- The output wire from pin 87 is ground, so you need to connect it to the car body;
- Pin number 85 goes to the block marked Ш7 and is connected to connector number 17;
- Pins numbered 30 and 86 go to block Ш8. In this case, connect pin 30 to connector 8, and lead 86 to connector number 1;
- Having installed the headlights, stretch the positive wire through the engine compartment, as they are connected to the Ш8 block. But these wires need to be inserted into connectors numbered 2 and 3;
- Now connect the block to the mounting block, and return the block to its place;
- Select an area near the block where the fog light relay will be installed.
Connection result
Button
Now all you have to do is connect the control system for your PTFs. Included with the fog lights is a corresponding button, which will stand on the panel in the seat provided by the manufacturer.
PTF button
The manufacturer, that is, AvtoVAZ, provided for this. Therefore, under the panel you will find a control block. The panel is removed, the corresponding block is located and the button is connected to it. That's it, the controls are ready.
Examination
The last stage is to check the functionality of your PTFs.
To check the efficiency of the lighting devices, turn on the headlights on your VAZ 2114, then press the button to turn on the fog lights. When the lights are turned off, even if the fog lights button is pressed, they should still go out.
The importance of PTF is difficult to overestimate. They help you see the road better during fog, rain, and snow. Moreover, fog lights are designed to improve the visibility of your car to oncoming and behind vehicles. Therefore, we strongly recommend installing PTF not only in front, but also in the rear.
Headlight installation
Since the standard bumper does not have seats, they will have to be done independently. For this you may find it useful:
- Drill with drill;
- Jigsaw;
- Ratfil;
- Measuring tools (tape measure, ruler, etc.);
- Marker;
Hello everyone, subscribe and like the group on VK Instagram.
The installation of fog lights is carried out with the bumper removed. Markings are first made on a bumper that has been cleaned of dirt. The optimal installation location is at the level of the lower air intake, but at a certain distance to the side of it. It is advisable that PTFs be placed strictly under the headlights.
First, we determine the distance at which the fog lights will be removed from the air intake. Then we figure out what size holes need to be cut. Decorative “glasses” will help with this. They consist of two halves - the outer (which is decorative) and the inner (which secures the outer part and the headlights themselves).
The outer half of the glasses has a fitting ridge that should fit into the hole in the bumper. To determine the size of the hole, the dimensions of this mounting protrusion are measured. Then we apply markings with the appropriate dimensions on the bumper.
Having completed the markings, we proceed to cutting out the holes with a jigsaw. After this, it is advisable to correct the edges of the hole with a file.
It is important to ensure that the outer part of the glasses fits tightly into the hole
We fix the fog lights in these holes using bolted connections. All that remains is to attach the “glasses” over the headlights.
After installing the fog lights, we install the bumper on the car. This completes the first stage.
How to install xenon in fog lights on a VAZ-2114 photo and video
Many motorists want to have fog lights in their arsenal, and even more want them to be xenon. So, you can replace the lamps with halogen ones or those marked H1, but we are talking about xenon and its advantages. So, you can install xenon PTFs yourself, without resorting to the services of a car service. We will tell you how to do this in this article.
Video about installing xenon and fog lights
https://youtube.com/watch?v=X6G0ROEQxUE
The video will tell you about installing xenon fog lights, and will also tell you all the nuances and subtleties of the process.
The process of installing xenon in PTF
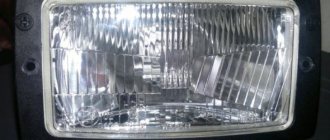
Xenon fog lights in working order
If we don’t take the tuning option, where xenon-type fog lights are an integral attribute, then consider installing PTF on a standard standard bumper, as most motorists do.
Options
Fog lamp housings
There are several options for installing fog lights, among which the motorist must choose the one that best suits him.
- Buying a bumper with installed fog lights.
- Purchase of individual PTF elements and their installation.
Algorithm and necessary tool
So, to complete the process you will need the following tools: a xenon kit (the selection of this product is described below), a drill, drill bits, a jigsaw. Is everything collected? Then we proceed directly to the consideration of the sequential process of installing xenon fog lights on the VAZ-2114:
- First you need to remove the front bumper.
For the convenience of the work, remove the front bumper - Now, we clean it from dirt, dust and other objects. The best thing to do is wash it and clean it.
- We carry out markings for future fog lights.
- Using a drill and jigsaw, we cut out holes for installing fog lights.
We cut and grind holes for future fog lights - Using a file, emery and other grinding devices, we process the edges.
- We fasten the fog lights into the holes using the bolts.
We install headlights on seats - The headlights themselves are installed, now you need to secure the xenon ignition units.
- We do this in the engine compartment, away from water.
- Wires with light bulbs extend from the blocks, which need to be installed as fog lights.
We fix the xenon ignition blocks on the metal mudguards on the right and left - Now, we connect the PTF and xenon to the electrical circuit.
Connection diagram of PTF to the general on-board network - At the last stage, performance testing is carried out.
As most motorists and experts recommend, xenon installation should be trusted to a professional. Thus, if a motorist is not sure that he is able to do everything himself and correctly, the best option is to contact a car service center or an auto electrician.
Selection of xenon lamps for VAZ-2114
With the installation process covered, it's worth considering what's included in the xenon fog light kit and where it can be purchased. To begin with, let’s look at what the entire xenon kit in the PTF consists of:
- Headlights;
- Light bulbs;
- Switching relay;
- Set of wires;
- Connection diagram;
- Button to turn on/off PTF.
Xenon kit for fog lights
Where to buy
Now that it’s clear what elements the kit consists of, it’s worth talking about purchasing options:
Chinese xenon, or?
Cheap Chinese xenon shines anywhere, but not on the road
You should not take the Chinese version of xenon, it is better to add a little and buy, albeit cheap, but high-quality branded goods.
As a rule, it has a guarantee, and the quality is certified by certificates. But, as practice shows, China is different from China and you can come across some pretty good and high-quality parts even made in China.
Installing xenon fog lights on the VAZ-2114 is quite easy and simple. A more difficult task remains the choice of product, since the market for automobile spare parts is saturated with them, and therefore it is possible to find the most suitable option for any motorist.
Which fog lights to choose
When choosing fog lights for your car, do not forget that their power, together with the power of other electrical equipment, should not exceed the capabilities of the generator. Otherwise, it is possible not only for the battery to discharge very quickly while driving, but also for problems, and possibly even failure of devices connected to the network.
The most popular and has earned numerous approvals from car enthusiasts is a set of fog lights produced by the Kirzhach company. It provides moderate energy consumption in combination with high-quality light and uniform illumination of the road.
Fog lights VAZ 2114
Speaking about xenon PTFs (which, by the way, many drivers think about), it is worth noting that they consume much more energy, and therefore they are undesirable for the VAZ 2114 with its original generator.
In addition, xenon lamps have a different focusing principle from standard lamps, as a result of which, when they are installed on conventional headlights, the rays are incorrectly refracted, reflected from the road surface and, as a result, blinding drivers of oncoming vehicles.
If you really want, you can try to focus fog lights with xenon headlights (or use yellow headlights), but if this does not give results, then it is better to abandon their use in favor of conventional light bulbs.
How to replace a lamp
Before replacing the light bulb, you need to buy a new one with the same parameters. It is better to choose reliable brands from well-known manufacturers. Before replacing, it is better to lift the car on a lift or jack, or place it over a hole.
Sequencing:
- Remove the negative terminal from the battery.
- We find the fog lamp power supply.
- Slide the rubber protection along the headlight.
- Disconnect the connector and block.
- We move the spring clips away from the headlight reflector (we remove the loops of the clips from the hooks).
- We take out a light bulb with a wire.
- We connect and install a new lamp.
- We assemble the headlight.
- Checking the operation of the new light bulb.
Replacing lamps in PTF VAZ 2114
The old light bulb is removed along with the wire. The new bulb should have exactly the same wire as the old one.
How to choose foglights VAZ 2115 and PTF VAZ 2114
Let's start with the fact that there are several types of fog lights. More precisely, there are two types: standard and universal PTFs
It is important to understand that their effectiveness greatly depends on the quality of the fogs themselves.
Let's move on. Standard PTFs can be original or analogues. In any case, they are produced for a specific car model, have similar mounts, housing, etc. Such PTFs are the easiest to install, especially if the bumper already has places for installation, covered with plugs.
Universal PTFs have a mount that allows them to be installed on different car models; such fog lights can be installed in the area of plugs on the bumper, on the radiator grille, hung on the bumper, etc.
The disadvantages are the insufficiently bright and strong glow of such lamps, as well as a short service life. At the same time, it is not always possible to replace the blades quickly and easily, taking into account possible difficulties with access (especially if the fogs are installed in standard places).
PTFs with a xenon lamp shine brighter than halogen lamps, the service life is also 50-60 or even 80-100% longer (provided that high-quality lamps are used). However, the cost of the equipment is much higher; for such lamps it is also necessary to install separate ignition units, correctly connect xenon, etc.
Also, brighter xenon light, which is better than halogen lights on a dry road, often provides worse visibility in fog and rain, since the color temperature is slightly different from halogen headlights, even for xenon analogues that are as close in characteristics as possible.
It is also worth noting that the brighter xenon glow can cause blinding oncoming drivers. Taking into account this feature, PTFs with xenon need to be lowered lower, constantly monitor their adjustment, keep the headlights clean and do not turn on the fog lights under normal conditions (when there is no fog, snow or rain).
LED PTFs are more economical in terms of energy consumption and place less load on the battery and wiring. The service life of good quality LED PTFs is usually longer than halogen or xenon ones.
Such fogs shine well (if the product is of high quality), in some cases you can change the temperature of the glow (from white to yellow, etc.). In practice, such PTFs may well perform the function of DRLs during daylight hours.
The downside is the high cost of high quality products. Additional requirements should be taken into account during installation, since in case of installation errors or poor ventilation, the LED headlights can become very hot, which renders them inoperable.
Replacing halogen lamps with analogues
When traveling long distances, the quality of light from halogen lamps may not suit the driver for various reasons. Usually they are replaced with LED or gas-discharge bulbs in the PTF VAZ 2114. However, there are no strict restrictions on the installation of LED bulbs. Conditions and restrictions must be taken into account when installing xenon.
Before upgrading a halogen lamp, it is removed and the base size and brightness are determined. An LED lamp is purchased with a similar base and a brightness of at least 1000 lm. Otherwise, the effect of the replacement will tend to zero.
How to connect fog lights with your own hands
Before directly installing the headlights, their location is determined. In the case of the VAZ 2115 car, the bumper already has standard holes for installing additional lighting fixtures. Similar ones can be cut in the bumpers of VAZ 2113 and VAZ 2114.
There is no need to spoil the appearance of the bumper - fog lights are easily installed on special brackets. Many PTF kits contain special decorative plugs that add attractiveness and neatness to the installed headlights and facilitate the installation process.
Installation and connection algorithm
- Installation of a power button in the car interior. In the case of the VAZ-2114, the place for the button is on the left side of the driver on the front panel. However, its placement can be arbitrary - the main thing is that it is convenient for the driver to drive the car. Often, PTF power buttons are installed instead of plugs on the control panel.
- The grille with the speaker is removed from the standard front panel. Behind it there are two connectors - one is for turning on the headlights, the second is for indicating the operation of lighting fixtures and illuminating the key itself.
- The button is placed in a convenient place, and chips are connected to it. The speaker grill can be returned to its place.
- Under the hood there should be a mounting block that combines fuses and relays. The PTF relay will be mounted in the same place, so the block must be removed: to do this, unscrew the nuts that secure it and lift it.
- On the bottom panel of the mounting block there are two blocks - 7 and 8. Each of the blocks is signed during production at the factory, so it is impossible to make mistakes at this stage.
- The PTF set contains a wiring harness with four contacts. The mentioned wires are pulled to the fuse block from the fog light relay.
- The relay is mounted in the engine compartment of the car.
- The wires coming from the PTF relay are connected to connectors 7 and 8 of the mounting block: in connector 7, terminal 8 is connected to terminal 30 from the relay, terminal 87 is connected to connector 1, terminal 85 is connected to connector 17 on terminal 7, terminal 86 is connected to ground . From block 8, terminals 2 and 3 are directed to the left and right fog lights, respectively.
- The ground wires are connected to the fog lights: they are usually attached to the nuts of the headlights.
Wiring diagram for connectors and terminals of fog lights
The functionality of the entire connection can be checked by turning on the side lights - only then will the fog lights work.
Fog lights only function when the side lights are on
After completing the installation of the PTFs on the car, they only need to be adjusted correctly. The flow of light should not blind drivers in the oncoming lane.
Video: instructions for installing and connecting fog lights
Fog lights are essential lighting equipment on any car, making it easier to travel in conditions of minimal visibility. If there is no PTF on a certain car model, you can install them yourself. The installation procedure does not require special knowledge and can be carried out by the driver without the involvement of third parties.
Installation and connection of front and rear PTFs on VAZ 2113, 2114, 2115
Before you begin installing fog lights, you will need to select a certain list of tools and additional elements. You can purchase a ready-made connection kit or select the necessary spare parts separately. When everything is prepared, you can mark on the front bumper a place for installing future headlights. The VAZ 2115 comes with standard holes from the factory, but in the case of the VAZ 2113 and VAZ 2114 you will need to work with a tool (a jigsaw or a drill). If you don’t want to damage the bumper, you can install the lighting fixtures on special brackets.
To install foglights in the front bumper, you need to make holes using a jigsaw or drill with drill bits, having previously completed the markings
You will need:
- file;
- drill and drill bits;
- electric jigsaw;
- roulette;
- marker.
Installation materials
As a rule, the kit for installing PTF on VAZ 2113, 2114, 2115 includes the following elements:
- headlights with bulbs;
- set of wires;
- electromagnetic relay;
- PTF power button;
- ties and clips for fixing wires;
- PTF connection diagram VAZ 2113, 2114, 2115.
The kit for connecting fog lights should include wires with terminals and connectors, a relay, a button
The installation of the lighting sources in question must be carried out using a button and an electromagnetic relay. The fact is that fog lights consume quite a lot of current and connecting directly to the ignition switch will lead to burning and subsequently burnout of the contacts. All this can contribute to damage to the wire insulation and the occurrence of a short circuit, which may result in failure of the electrical wiring.
Step-by-step installation and connection of PTF
To install fog lights, the following procedure must be followed:
- Installation of the headlight switch button in the cabin. You can choose any location for the element, as long as the driver can easily operate the key. Quite often, the part is installed instead of plugs on the dashboard.
- The grille with the dynamic head is removed from the front panel. Behind it there are two blocks designed to turn on the headlights, indicate the operation of the PTF and illuminate the button.
- Having placed the button in a convenient place, connectors are connected to it. After this, the grate can be put back in place.
- The relay is installed under the hood on the partition of the engine compartment near the mounting block. To remove it, you need to unscrew 2 nuts, lift it and find 2 pads (numbers 7 and 8).
- A block with a harness of four wires with contacts included in the kit is laid to the relay block.
- The connection of the wires that come from the PTF relay is carried out according to the diagram in the following order: the wire from the 30th contact of the relay is connected to block No. 8 of the mounting block at the 8th terminal, the 87th contact of the relay goes to the 1st terminal of the connector, 86 is “ground”, and 85 is connected with the 17th terminal of block No. 7.
- The positive wires are pulled to the PTF, the mass is mainly secured to the nut of the headlights. The “+” voltage is supplied to the fog lights from the 2nd and 3rd contacts of block No. 8.
- After all connections, the connectors are installed in the mounting block and secured.
As for the rear PTFs on VAZ 2113, 2114, 2115, on these modifications of the car such a light source is installed from the factory, i.e. another light bulb is used in the rear light. Control is also carried out from the passenger compartment using a button, but without fixing, since a slightly different relay design (electronic) is used. It’s worth knowing about this and not trying to install a latching key.
Video: installing PTF on a VAZ 2114
Checking the performance of PTF on VAZ 2113, 2114, 2115
After the lighting devices are installed and connected, you need to check how correctly everything works. To do this, just turn on the headlights and press the key that supplies voltage to the PTF relay, after which the headlamp lamps should light up. When the headlights are turned off, the PTF lamps should also go out, regardless of the position of the fog light button. After checking the functionality of the light source, you will need to adjust the light output so that oncoming drivers are not dazzled.
After installation and connection, we check the operation of the PTF: when the lights are turned on and the fog lights are pressed, the lights should light up, when the lights are turned off, the lights should go out
Fog optics are essential lighting equipment for any car. Such devices greatly facilitate travel in poor visibility conditions. If a certain car model does not have PTF installed from the factory, you can carry out the installation yourself. This does not require special tools or special skills and knowledge.
PTF connection diagram
Voltage is supplied to the electrical circuit by contact B+ from the generator. The mass is taken from the car body, not far from the location where the PTFs are installed. They begin to work when the switch key is pressed, provided that the low or high beam is working. To reduce the load on the contacts, a relay is connected to the circuit, which is installed from the factory in the engine compartment on the left mudguard; in addition, three fuses F8, F9, F10 are installed in the mounting block, which protect the fog light circuit.
Installation and connection of front and rear PTFs on VAZ 2113, 2114, 2115
Before you begin installing fog lights, you will need to select a certain list of tools and additional elements. You can purchase a ready-made connection kit or select the necessary spare parts separately. When everything is prepared, you can mark on the front bumper a place for installing future headlights. The VAZ 2115 comes with standard holes from the factory, but in the case of the VAZ 2113 and VAZ 2114 you will need to work with a tool (a jigsaw or a drill). If you don’t want to damage the bumper, you can install the lighting fixtures on special brackets.
To install foglights in the front bumper, you need to make holes using a jigsaw or drill with drill bits, having previously completed the markings
Installation materials
As a rule, the kit for installing PTF on VAZ 2113, 2114, 2115 includes the following elements:
The kit for connecting fog lights should include wires with terminals and connectors, a relay, a button
The installation of the lighting sources in question must be carried out using a button and an electromagnetic relay. The fact is that fog lights consume quite a lot of current and connecting directly to the ignition switch will lead to burning and subsequently burnout of the contacts. All this can contribute to damage to the wire insulation and the occurrence of a short circuit, which may result in failure of the electrical wiring.
Step-by-step installation and connection of PTF
To install fog lights, the following procedure must be followed:
The PTF activation key is usually located instead of one of the plugs located on the dashboard
The relay is fixed near the mounting block, for which it is necessary to unscrew the two fastening nuts
A wiring harness with four contacts, which is included in the kit, is laid to the mounting block
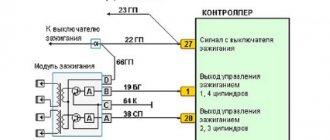
Diagram for switching on fog lights: 1 - fog lights; 2 — relay for turning on fog lights; 3 — mounting block; 4 — fog lamp switch with a control lamp (on the left) and a backlight lamp (on the right); 5 — external lighting switch (fragment); A - to power supplies; B - to the instrument lighting regulator
The ground is attached to the headlights, the positive wires are connected to pins 2 and 3 of block No. 8
As for the rear PTFs on VAZ 2113, 2114, 2115, on these modifications of the car such a light source is installed from the factory, i.e. another light bulb is used in the rear light. Control is also carried out from the passenger compartment using a button, but without fixing, since a slightly different relay design (electronic) is used. It’s worth knowing about this and not trying to install a latching key.
Video: installing PTF on a VAZ 2114
Checking the performance of PTF on VAZ 2113, 2114, 2115
After the lighting devices are installed and connected, you need to check how correctly everything works. To do this, just turn on the headlights and press the key that supplies voltage to the PTF relay, after which the headlamp lamps should light up. When the headlights are turned off, the PTF lamps should also go out, regardless of the position of the fog light button. After checking the functionality of the light source, you will need to adjust the light output so that oncoming drivers are not dazzled.
After installation and connection, we check the operation of the PTF: when the lights are turned on and the fog lights are pressed, the lights should light up, when the lights are turned off, the lights should go out
Fog optics are essential lighting equipment for any car. Such devices greatly facilitate travel in poor visibility conditions. If a certain car model does not have PTF installed from the factory, you can carry out the installation yourself. This does not require special tools or special skills and knowledge.
Source