After purchasing a car or a new audio system, you need to configure the head unit. The sound will depend on the quality of the actions performed. For the Pioneer Mosfet 50Wx4 radio, the instructions describe in detail the procedure for making the necessary adjustments. Thanks to the fact that the device is equipped with a touch screen, this is easy to do. A few taps on the screen are enough.
Appearance and Features
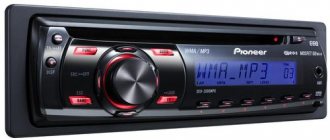
For example, let's take the Pioneer DEH-5000UB car radio. On the front panel there is a large display with alphanumeric indication and control buttons. It consists of 16 characters. You can change the display backlight using color combinations of 10 colors. The main part of the display displays information:
- in “tuner” mode – the range and frequency are displayed;
- in RDS mode - program name, PTY information and text information are displayed;
- built-in CD player and USB audio player - text information and elapsed time are displayed.
The rear panel contains USB and auxiliary (AUX) inputs. External audio sources are connected to them.
To control the device there is a control dial that works like a joystick. The joystick itself - the MULTI-CONTROL lever - can be rotated, moved to the right, left, up or down. By pressing the SRC button several times, select one of the signals: TUNER, COMPACT DISC, USB, AUX. The tuner has three fixed bands, each of which is tuned to 6 radio stations and provides stable reception of the FM and AM bands.
When switching playback mode from one source to another, there may be changes in sound volume.
To equalize the volume, a continuous sampling function is provided. There are many options for controlling the built-in CD player: folder selection, track selection, fast forward, etc.
An additional line output via an RCA connector allows you to connect the radio to an external amplifier or active subwoofer for better bass sound.
Review
An overview of the Pioneer car radio is presented below. Let's start with the display, which is well-informed and high-resolution.
Display
The display has special buttons that perform various functions:
- Audio button. It must be pressed if you want to exit the radio. This will turn on music from the device.
Note: When an SMS arrives on the connected cell phone, a receipt notification will appear on the display.
- Func. The function menu is activated.
- A movable button that can be rotated left/right is necessary to adjust the volume.
- Repeat allows you to play the song repeatedly.
- Using buttons 1,2,3,4,5,6 you can select one or another frequency when the radio is on.
Note. By the way, the radio supports FM and AM frequencies. Each frequency can record 6 radio stations. These buttons are what switch radio stations.
- There are also connectors for a USB cable, headphones, and a flash card. There is a place to connect a disk.
Speakerphone
Pioneer car radio malfunctions
Before you can use the speakerphone feature, you must set up your device to work with your cell phone. For this:
- Use the Bluetooth connection menu on your phone.
- Configure functions in the application menu.
Note: If your mobile phone is set to private mode, the hands-free function may not work.
The display will show the duration of the call.
Tuner
You can select the range in the tuner yourself. In addition, you can use the “Search” function, which is carried out automatically. The tuner is configured to work in most countries of the world. However, it is not designed for American frequencies, so the signal quality here may not be at the best level. In addition, you can use the RDS function only where you can receive FM.
Other devices
Any portable devices that can be connected to the connector on the front of the device can be connected to the pioneer car radio. Usually they connect audio players, USB devices, MP3 players.
How to remove a pioneer car radio
In addition, it can control the operation of the iPod. That is, using a car radio you can easily control the player located in a portable device. In addition, you can easily play any songs that are on it. However, the car radio only supports iPods with certain cables.
Note: The USB device may lose some data after connecting it to the radio. Such failures occur if the car radio turns off due to low battery.
Operating rules
Pioneer car radios pinout
Having a pioneer mosfet 50 w4 car radio in your hands, you should fulfill the following important requirements:
- Under no circumstances should the device be exposed to liquid of any kind. If it gets into the device, it can lead to its failure, overheating and smoke.
- You should always keep the volume low.
- Do not allow moisture to enter the product.
Note: Therefore, you should not use the car radio in conditions of high humidity.
- It is important to know that if you turn off the device due to low battery, the preset memory will be erased. Therefore, it should not be allowed to turn off due to undercharging.
Audio
Front speakers
Having configured the radio receiver, as well as connecting sound sources, you can focus on sound quality.
- After adjusting the volume, press the knob to get to the settings menu.
- Here they look for the “Audio” item.
- By pressing the handle, you enter this menu.
- After looking through it, they find the Fader instruction.
- Click on the knob to get to this submenu.
- As usual, select the Fader menu (it should blink).
- Turn the knob and set the value to 15 units.
- Swing the knob to the left once to return to the “Audio” menu.
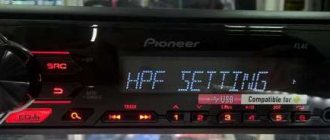
- Now you need to find a high-pass filter - HIGH PASS FILTER (HPF).
- Included in the menu.
- On the screen, most likely, the HPF is also zero.
- Twist the handle and set it to 50.
- Swing the handle to the left to exit the menu.
Rear speakers
The front speakers work cleanly, now it’s time to switch the rear speakers on the shelf into subwoofer mode - fortunately Pioneer can do this too.
- Turn off the radio.
- Press and hold the power button (as if you were going to set up the “demo” mode).
- Once in the menu, look for the inscription in the form of SW Kontrol.
- By pushing down the handle, you enter this menu.
- By rotating it, the parameter is set to SW.
- Confirm by pressing the handle again.
- Press the power button to save parameters and exit the menu.
- Then they return to the “Audio” menu (press the volume knob and rotate to select).
- By pressing the handle, you enter the menu.
- Here they look for the inscription SW SETTING1. Click on the handle to enter.
- Of the three options presented in the menu, you need to choose one of two - Normal or Rev.
- Having chosen, swing the knob to the left - return to “Audio”.
- Turning the knob clockwise will highlight the SW SETTING2 menu.
- They enter it by pressing the handle. The factory setting will show 80 HZ 0. Rotate the knob to decrease the first value.
- Having chosen what you want, swing the knob to the right to change the second parameter. This is the power level. The range here is from minus six to plus six. It will not be possible to give optimal parameters - it all depends on the quality of the speakers used.
- Press Band to exit the menu.
Before moving on to the next settings, check at different volumes how the selected settings work. If you don’t like something, repeat the steps described, trying other values.
Loudness compensation
This option is hidden in the same “Audio” menu.
- Enter the menu, find the Loudness parameter.
- Select by pressing the knob.
- There are three values available here - High, Middle, Low (respectively high, medium, low).
- This parameter is responsible for adjusting frequencies at low volume levels. It is also impossible to give optimal settings here - they are set experimentally.
- Swing the knob to the left to go to “Audio” or from settings by pressing Band.
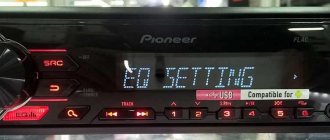
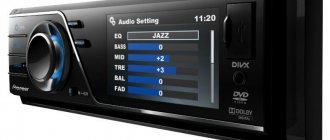
Equalizer settings
For advanced music lovers, here are a few more equalizer settings. They are hidden in the same “Audio” menu.
- Once in the menu, rotate the knob to select the EQ SETTING parameter.
- Enter this menu (depending on the model, you may need to enter another menu here). The three parameters offered in this menu are responsible separately for the settings of the low, mid, and high frequencies.
- Set according to your preferences. On some models, you can select several preset settings here. Depending on the speakers and your own preferences, adjust these parameters.
The settings here are no different from others - select by pressing, change by rotating, going to a higher level by swinging the knob to the left.
general characteristics
In terms of functionality, the new Pioneer is also not inferior to its competitors. With its help, you can listen to all radio stations available in the region where the car is located, music from various external media, from classic CDs/DVDs to SD and flash cards, and watch videos. Thanks to the large diagonal size and fairly high resolution of the display, the user can enjoy the startup screen and colorful menu design instead of the small monochrome backlight typical of most car radios.
Popular models of the manufacturer
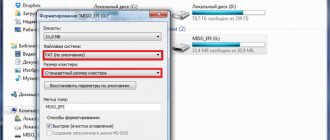
When choosing a Pioneer car radio, the buyer should pay attention to the model range and technical characteristics of each device. First of all, you have to choose a standard
The size, set of functions and cost of the device depend on this indicator. There are 2 options:
- 1 din (single-block) - such models have smaller dimensions and a limited set of functions, but their cost is lower:
- 2 din (two-block) - you can recognize such tape recorders in cars by their wide screen and advanced capabilities.
The second option is in great demand, as it provides the car enthusiast with a high level of comfort.
In addition, there are standard and non-standard radios. A standard product should be understood as a model intended strictly for a particular brand of car. Such devices have an original housing and plug. This feature does not allow the installation of standard radios in cars of other brands.
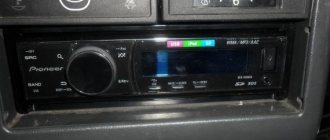
Characteristics and connection of the Pioneer Mosfet 50wx4 radio
The radio tape recorder meets all modern technological standards, both visually and in terms of technical equipment. It is equipped with a touchscreen, thanks to which all operations on it have become even faster and easier - with just a few taps on the touch screen. At the same time, the design of the radio is not devoid of classic “decoration” in the form of buttons responsible for accessing the main functions. It must be said that externally Mosfet 50wx4 is in no way inferior to factory devices even from the most famous automakers, and therefore is suitable as an alternative for any car, even for some representatives of the business class.
Connection diagram
What can be improved
Speaking of settings, it is worth clarifying that Pioneer regards the concept of a radio tape recorder not just as a device for listening to radio or recordings. In this device you can see the date, time and much more if they are configured. Information can be presented in several languages - either Japanese (since the brand is Japanese in origin), or, more often, English.
Whether there will be Russian on the menu depends on many factors, but even the English menu is easier to understand than the Japanese one. Some additional features, such as USB ports, will also need to be enabled through the menu. Not to mention the above problem of connecting specific speakers.
How to complete the demo
When supplied by the Pioneer manufacturer, the device is set to DEMO ON. Immediately after purchasing and connecting the car radio, it is important to understand and disable the demonstration, designed to advertise the device when selling. It is possible to use the Pioneer car radio in this state, but it does not seem comfortable, since when the device is turned off, the backlight does not go out and the creeping line does not disappear from the display.
Disabling Demo on the Pioneer radio is very simple:
- If long pressing on mute does not help, then you need to turn off the Pioneer radio, go to the engineering menu and long press the SRC (Source) key.
- In the settings, turn the wheel to reach the DEMO line.
- Switch from ON to OFF indication.
- Close the settings by pressing BAND.
Pioneer car radio engineering menu
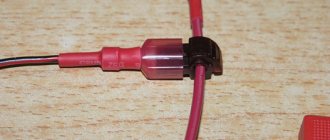
Important: if the red wire (ACC) of the Pioneer radio is not connected to the contact that turns the ignition on/off, the car’s battery will be discharged.
Thus, after purchasing a modern Pioneer car radio, setting up the device is quite accessible for independent actions.
Demo mode disabled
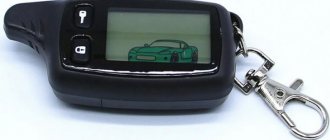
Joystick positions
First, let's characterize all possible movements of the joystick. The positions of its handle can be as follows:
So, let's begin. We set the volume to about 30 units, not paying attention to possible wheezing during playback. After that, press down the joystick and go to the list of settings.
You'll see a lot of options here, but don't let that scare you: for now you'll only need one setting. Start turning the joystick to the left or right until you find the “Audio” item. Found it? Now you need to press the joystick again and enter “Audio”, and there you will look for the item where the balance and fader are indicated. It looks like this: FADER / BALANCE.
Press the joystick again so that the words FAD 0, BAL 0 are displayed. If instead of zeros there are other numbers, it’s okay. It just means that adjustments have already been made here before.
If you tilt the joystick to the right, you will go from the fader settings to the balance settings. Rotating the joystick will allow you to adjust these settings. At such moments, the current menu will flash.
Set the fader to position + 15. In this case, the sound must be passed only to the front speakers so that the rear speakers do not interfere with the setup of the front speakers.
Specifications
The sound of an audio device is determined primarily by the power amplifier. Our car radio is equipped with a built-in 4-channel amplifier MOSFET 50Wx4. This ensures: matching with 2 Ohm acoustics, Hi-Fi class in terms of signal-to-noise ratio, low output noise. This ensures clear and rich sound when playing music of different genres.
- Are common. Power Supply: 14.4 VDC: (allowable range 10.8 V to 15.1 V);
- maximum current consumption: 10.0 A;
- dimensions (W × H × D): chassis - 178 mm × 50 mm × 162 mm, front panel - 188 mm × 58 mm × 22 mm;
- weight: 1.3 kg.
- Maximum output power: 50 W × 4, 50 W × 2/4 ohm + 70 W × 1/2 ohm (for subwoofer);
- frequency range: 87.5 MHz to 108.0 MHz;
Tuner adjustment
To make adjustments to the FM path, it is necessary to connect measuring instruments according to Fig. 4.
Table 4
| Adjustable knot | Signal generator frequency, MHz | Signal level, µV | Displayed frequency, MHz | Adjustment element | The device and its indications |
| Tuning voltage (PLL circuit) | — | — | 108,0 (107,9) | L5 | DC Voltmeter - 6V |
| FM detector circuit | 91.8 M* | 1000 | 98,1 | T51 | Zero detector - 0 |
| Input circuit | 98.1 M* | 1,7 | 98,1 | L2 | Millivoltmeter - maximum readings |
| URCH circuit | 98.1 M* | 1,7 | 98,1 | L4 | Millivoltmeter - maximum readings |
| IF circuit | 98.1 M* | 1,7 | 98,1 | T31 | Millivoltmeter - maximum readings |
| Stereo decoder | 98.1 S* | 100 | 98,1 | VR154 | Millivoltmeter - 5 dB separation (stereo) |
| * Modulation: M - mono, modulation frequency - 400 Hz, deviation - 22.5 kHz; S - stereo, modulation frequency - 1 kHz, deviation - 20.25 (±7.5) kHz |
In table 4 shows the main tuner adjustments for models with the ES index.
Note. For radios with the UC index, the PLL is adjusted at a frequency of 107.9 MHz.
Malfunctions and their elimination
Installing a pioneer car radio
The car radio may have the following basic faults:
- The display returns to its original mode, although the car owner did nothing about it. The reason for this may be that no operations were performed for half a minute. Therefore, you will have to repeat the whole process all over again.
- The range of playable files is changed by the device independently. The range of playable files may change if you select a different folder or track. To resolve the error, you must select the range again so that it is played again.
- The folder from the connected device cannot be played. We need to try to reproduce it again.
Note: The folder may not be playing because the Folder range is selected. You can also resolve the problem by changing this range.
- When the display function is changed, NO XXXX appears on the display screen. That is, any text information is missing. You need to try switching the display. If this fails, you need to turn on another track.
- The display is backlit even after the device is turned off. The reason for this may be that demo mode is enabled. You should just turn it off.
- During operation of the device, some errors are observed. There may also be interference.
Note: most likely the interference appears due to the influence of some additional device on the car radio. It should be removed as far as possible so that it does not affect her.
Recommendations for caring for the device
During operation of the device, you must adhere to the following basic recommendations:
- Use only discs with a specific logo.
Note: the discs must be exclusively round. You should not select discs with an unusual shape.
- Connection via a USB hub is not supported.
- Do not connect devices to your Pioneer car radio that it does not support, as this may cause system failure.
- Only USB storage devices can be connected.
Note: If the vehicle is moving, the USB device must be securely secured. After all, it can fall and get stuck under the pedal, which will lead to serious consequences.
You can find out about problems in the system yourself. Moreover, they can be easily removed with your own hands. Our instructions should help with this difficult issue. It is also advisable to familiarize yourself with photos and videos on this topic available on the Internet. This way you will be able to save a lot of money, since the price of this procedure from a specialist is much higher. The operating instructions for Pioneer car radios should also be studied.
How to set up your device
Before you start listening to your favorite artists in the car or catching up on the news on the radio, learn how Pioneer works. First, understand all the functions. Follow simple rules and you will quickly solve all difficulties.
Setting up your Pioneer radio will not take much time. Follow our simple recommendations:
- Connect the speakers and insert batteries into the remote control.
- Use the joystick located on the control panel. Set options.
- Select and adjust individual functions one by one in the “Menu” section.
Features and differences depending on the manufacturer
Correct setting of the car radio is necessary so that a clear and loud melody is heard from the speakers, the speakers do not distort the sound and no additional noise is heard.
All Pioneer DEH and other 3100 and above models are configurable by changing the position of the joystick. The handle of this part of the device can rotate in all directions and go deeper into the body. This device helps you set up car radios from most companies, use the menu and find the necessary parameters in it.
Setting up the standard radio can be done in other ways. For example, in the Japanese device Clarion CP435L1 there is a hidden menu, which is called up by simultaneously pressing button 6 and turning Tune 10 clicks with the ignition on.
Setting the parameters of each model is prescribed in the instructions, which also describe the device of the radio and the functions of the various buttons.
Subtleties of setting up the Pioneer radio in your car
When asked about the leader in the production of audio equipment, most readers will answer without hesitation - of course, Pioneer. The name of this brand has long become a household name to designate good, high-quality equipment, and not only in the audio segment. But on auto forums the name of this company is often heard in the form of how to set up a Pioneer radio in a car. Despite the variety of brands, all such devices are configured almost the same. Here are some configuration examples.
Loudness compensation
I would like to end here, but we forgot about something - loudness compensation. This is such a regime. It is easy to find it in the audio settings menu by rotating the joystick. Find the inscription LOUDNESS. Press down the joystick, and the same LOUDNESS will light up on the left, and three levels will be displayed on the right: low, medium and high. This setting adjusts the high and low frequencies at low volume. That is, the quieter the sound, the more clearly the effect of this setting is felt. However, if you turn the sound up to full power, this mode will not be felt at all. Therefore, you can fix the high level, which is indicated by the inscription HIGH. Now go to the audio settings in the EQ SETTING1 menu. Press down the joystick until the display shows EQ SETTING1 and three options in columns, adjusting bass, mid and treble. You can move through the columns by tilting the joystick to the right, and the adjustment itself is done by rotating the joystick handle. Using these options, adjust the frequencies to your liking. However, we do not recommend exceeding the low frequency parameter by more than one. From 0 to 1 will be quite enough - take pity on your acoustics. Although, if your speakers are powerful enough, then you can experiment. Now, that’s probably all. This time your “Pioneer” will sound at a professional level. I must say that there are still a few settings left in this radio, but only real music lovers with an ear for music will need them - and that’s a completely different story. We wish you a fun and safe journey! Video about setting up radio stations on Pioneer radios:
TagsTips for motoristsAn article on how to properly set up a Pioneer car radio. Features of setup, step-by-step algorithm. At the end of the article there is an interesting video about setting up radio stations on Pioneer radios.3 -> Sources used:
- https://autotuning.expert/magnitola/pioner-mosfet-50wx4-instruktsiya.html
- https://1avtozvuk.ru/sovety/magnitola-pioneer-mosfet-50wx4
- https://fastmb.ru/soveti_auto/1621-nastraivaem-avtomobilnuyu-magnitolu-pioneer.html
Installation of 2 din radio
The situation is somewhat different in the case when a 2 din standard radio tape recorder claims to replace the old radio. The installation procedure for such a radio will be painless if the old analogue meets the same standard. Otherwise, a number of problems may arise.
Firstly, if you replace the standard 1 din standard configuration with 2 din, you will have to replace a number of elements: the center console, frame, etc.
In addition, during these events you will definitely encounter various undesirable phenomena that will not have the best effect on the aesthetic component of the interior of your car.
Based on all of the above, it is quite reasonable to draw one single conclusion: select an audio system that meets the standards provided by the manufacturer of your car.
Video instructions for connection and setup
To learn more about the intricacies of connecting a Pioneer car radio, follow the link below. The presented video review highlights the main stages, features and recommendations on the topic under consideration.
Video: “deep” settings menu + disabling DEMO mode + disabling time
Turn off the demo
To disable the demo mode, turn off the car radio, and then turn it on again by long pressing the SRC button (maybe the SOURCE button), after which we get to the start settings menu, where using the joystick or the right-left buttons we find the DEMO ON sub-item, and then change it parameter to OFF.
How to adjust the bass
To adjust the bass level, you need to switch the rear speakers to subwoofer mode, which is described in detail in subparagraph 1. Also, to obtain richer bass, correct adjustment of low frequencies through the equalizer, as well as activation of the BASS BOOST function, which is disabled by default, can help. To do this, turn off and then turn on the radio using the SRC (SOURCE) button, and go to the preset menu, where we look for the BASS BOOST sub-item, after which we activate it.
Depending on the Pioneer audio recorder used in the car, there may be other parameters, which you can familiarize yourself with by carefully reading the instructions for the device, which is included in the kit or can be downloaded via the Internet.
High pass filter
Next we find the HPF (High-passFilter) item. This is a high-pass filter that cuts the frequency of the sound supplied to the speakers below their specified limit value. This is done because it is very difficult for standard speakers (13–16 cm) to reproduce low frequencies due to their small diaphragm diameter and low power. As a result, the sound is reproduced with distortion even at low volumes. By cutting the low frequencies, you can get clear sound over a larger volume range.
You can then exit the menu using the return button and check the result. It is better to do this at a volume of 30.
If the sound quality is not satisfactory, or if you are outdoors and want to have a loud disco, you can raise the lower limit from 80–120 Hz or more. It is recommended to use the same level of boundary cut if you have a subwoofer. These measures will allow you to increase the purity and volume of the reproduced sound.
There is also an adjustment for the frequency attenuation rate. On Pioneer it comes in two positions - 12 and 24 dB per octave. We advise you to set this indicator to 24 dB.
Subwoofer doesn't work
In standard installed stereo systems with a Pioneer head unit, the sound from the subwoofer sometimes disappears. The problem is an unsuccessful output to the low-frequency speaker. The problem is treated in 2 ways. If the radio is new and under warranty, you can try to exchange it. But this does not always happen; more often it is repaired and returned.
Another option is to re-solder the output yourself. Perhaps the second option is the most optimal. Self-made repairs are much more reliable than warranty repairs. Moreover, no difficulties should arise there.
Conclusion
. Acoustics in a car often require quite a lot of attention. It needs to be configured correctly, this will allow you to make the most of its technical characteristics. How to turn off a Pioneer radio is a question often asked by owners of such equipment. In fact, this is done so simply that the manufacturers didn’t even mention it in the instructions.
Some radio models have an inscription on the front panel - MOSFET 50Wx4. This means that the model’s amplifier is assembled using transistors using MOSFET technology, and this guarantees sound quality. This inscription is also used on Pioneer car radios. Let's look at the Pioneer MOSFET 50Wx4 radio and setup instructions.
Speaker wheezing
Some drivers encountered a situation where the speakers began to wheeze. At the same time, this does not happen all the time, but only from time to time. Of course, the problem could be a faulty speaker. But, often the reason turns out to be unsuccessful configuration of the system itself. Therefore, troubleshooting should begin by viewing the settings. You are interested in the balance menu. Here you can evaluate how the sound is distributed between the speakers. Pay attention to the uniformity of its distribution. Most often, unbalanced low frequencies cause wheezing.
If everything is correct in the settings, then it makes sense to pay attention to the wire connections. There may be a bad connection somewhere. That is why the speaker wheezes. This may be indirectly indicated by the irregularity of wheezing. Especially if the speakers are in the doors. When you open the door, you move the wire, one time the contact may be normal, another time, not so much. The cause of wheezing may be a broken capacitor.
. In this case, you need to check it.
Shutdown
This is done in the following order:
- Press button 2 and enter MENU. Then select SISTEM, at the next stage press PW SAVE
, all that remains is to turn off the radio with the OFF button. This is how we switch to energy saving mode; - Turn off the radio with button 1. At the same time, a clock indication should appear;
- We press button 4, eventually the display goes out.
Having completed this procedure once, you can subsequently turn off and turn off the radio with the standard button 1. Sometimes, resetting the settings can occur after disconnecting the speaker system from the power supply. In this case, you should repeat the steps described above.
Removing an old car radio
So, the treasured radio is waiting in the wings. It's time to get rid of your old audio system. At first glance, it may seem that this procedure is not complicated. By and large, this is true. However, there are a number of nuances that it is advisable to take into account during dismantling.
At the initial stage, in order to avoid damage to the panel elements, it is necessary to find out how the radio is secured in the niche.
Depending on the type of car audio system, there are several mounting methods:
As a rule, if we are talking about a standard radio, there is a last method of fixation. Often, the manufacturer, pursuing an aesthetic goal, masks the heads of screws or screws with plastic caps. Dismantling such a radio should not cause serious difficulties. To do this, it will be enough to unscrew the screws and gently pull it out.
The situation is somewhat different when the radio is located inside a metal casing. In this case, special keys will be required to remove the radio. Hardly anyone remembers their existence when this kind of need arises. However, all radios of the presented type are equipped with them.
The principle of fixing such a radio is not very complicated. Flexible metal tongues with a protruding part are attached to its side walls. On the casing, in a strictly verified place, there are special recesses. The aforementioned tabs go into them, rigidly fixing the radio in the casing.
If you don’t have a key, you can use two thin metal plates to remove it. To do this, you need to insert each of them between the frame and the radio, thereby squeezing out the metal tabs.
After this, you should pull the radio towards you, turning it slightly in different planes. It should be noted that this kind of tricks of manufacturers is nothing more than measures of protection against lovers of easy money.
In addition, the radios can be installed in the panel using plastic clips
With this method of fastening, it is important to prevent distortion of the plastic frame. To avoid damage, the clips should be released gradually and evenly, avoiding distortions
With any method of fixing the radio, its dismantling must be done carefully so as not to damage the integrity of the connecting wires and contacts.
Setting up the subwoofer mode
To configure the mode, we will have to work with the preliminary settings, which Pioneer, fortunately, has available. Finding yourself in the menu for these settings is easy. To do this, you need to turn off the radio and then press the power button (top left) and hold it in that position until the display lights up. Fired up? That's it, you are now in the preset menu.
As a digression, let’s say that almost all the options discussed below have always been on such radios, with the difference that these settings were entered in different ways. This is either holding the joystick in a recessed position, or holding the “function” button. But at the same time, the radio must be turned off - otherwise you cannot enter the preliminary menu.
Let's go further. So, here is a list of preliminary settings. Turn the knob to find out what options are available. There you can see the language settings, search for radio stations, enable additional inputs, etc. But you need to find the name SW Control.
To find this name, turn the handle. Found it? Very good. Next, press the joystick and look at the screen. The message REAR SP FUL should pop up on it, which will tell you that all the sound is going to the rear speakers, and we need the system to enter subwoofer mode.
Turn the knob further until FUL changes to SW. Leave it like that. The preliminary settings are all done. Now turn on the radio by pressing the power button
As soon as sound appears, you will immediately notice that the rear speakers are not audible at all
Don't be alarmed because this is completely normal. After all, using the preliminary settings, you just entered the rear speakers into the desired mode, and now you still have to configure them.
Go to “Audio” again, fortunately now you already know how to do this. In this menu, rotate the joystick to find SW SETTING1. After this, press the joystick briefly, and as a result you will see the SW item on the left side of the display, and as many as three items may appear on the right side: NORMAL, REV and OFF. Well, with OFF everything is clear - this is turning off the mode. You will not need this function for settings.
But the NORMAL command means that the speakers operate in normal mode with the diffuser working upward. The inscription REV means that the speakers operate in reverse mode with the diffuser working downward. Rotate the handle to stop at any of these modes. By the way, experienced car enthusiasts know that the reverse mode is best suited for sedan-type cars.
Press down the joystick and light up SW 80 HZ 0 on the display. We give the explanation: 80 – frequency filter. That is, this is the frequency that goes to the speakers. If you have them in an oval shape, then the frequency range can be limited to 50 hertz.
With this cut, you get a nice rich bass in sub mode. But if something doesn’t suit you, then here you can experiment with different options. By turning the knob to the right, you will find the mode power level indicators from -6 to +6. Using the verification method, select the indicator at which there will be no distortion on the speakers. That's all. The subwoofer mode setting is complete.
Exit the menu using the same BAND button. After this, monitor the rear at different volume levels and adjust the sound power if necessary.
Video: finding radio stations on Pioneer tape recorders
Setting up the equalizer
To configure the equalizer, go to the EQ SETTING1 menu item, where you can set the signal amplitude level for mid, high and low frequencies. In the EQ SETTING2 item, which is also located in the main settings menu, the user can select the center frequency of the signal correction, as well as the width of the adjusted range. All this is available for HF, MF and LF.
To configure the equalizer, go to the corresponding menu
It is necessary to select settings based on the capabilities of the speakers and the personal preferences of the listener.
How to enable AUX
To activate the AUX mode, which is not active by default, you need to turn off the radio, and then turn it on by long pressing the FUNC button, after which we look for the inscription AUX: OFF and use the up/down buttons to select the AUX: ON item.
Wire marking
How to connect aux to pioneer radio
To correctly connect the wires in the Pioneer radio, first understand the marking features. The equipment kit includes connectors for connection, consisting of two contacts. Each has 8 wires. The power circuit is connected using one connector. The second one is needed for acoustics.
Pioneer connects in two ways. You need to purchase a special connecting adapter. Some do this: they disconnect the connectors from the wiring and connect them by twisting.
To connect the Pioneer car radio, a standard circuit is used. It is also suitable for other equipment models. The design has multi-colored wires
Connecting the Pioneer radio by color is very important. Since they are not just colored, but each color means something
And, it is important to exclude any mistake in this matter.