I want to tell you how I managed to solve a common problem associated with an error on a Pioneer radio. First, a little background.
For a long time I was looking for a new radio for my car, so there was no talk of any other company other than Pioneer - I really liked the tone in which these radios sound. In the end, I settled on the MVH-190UI, which I connected without any problems.
At first everything was fine, but then I decided to download several albums of my favorite band in *.flac format, after which I was annoyed because the radio told me that “error-23” had happened inside it and it would not play my music.
Looking ahead, I will say that I found information on the Internet that such an error is not uncommon on devices from Pioneer.
Radio with flash drive: features
Modern Pioneer radios can read not only discs, but also flash drives. This is very convenient, as it allows the driver to record musical compositions independently. If necessary, they can be easily replaced with new ones. The playback quality is quite high and does not depend on what media is used.
Today, most people prefer such devices. Because they have more opportunities. In addition, they are convenient to use and economical. There is no need to spend extra money on purchasing new disks.
Error on Pioneer radio: what does it mean?
But as practice shows, any device can fail. The radio was no exception. There are breakdowns that are clearly expressed. In such cases, the device does not turn on and does not work at all. To fix this problem, you will definitely need the help of a specialist. But there is another type of breakdown.
They are reproduced on the device display in the form of some letters and symbols. To understand their meaning, you will need to use the instruction manual. It is included with all radio manufacturers and contains useful information. It is important to familiarize yourself with it before using the radio.
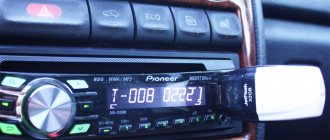
pioneer DEH-X7650SD 64 Gb flash drive cannot be read (error 23 appears on the screen)
Hi all. The problem seems to be well known. Formatted in both fat 32 and ntfs. BUT in my case: 1. Tried a new flash drive for 64 gb 2.0 - it worked for several months and error 23 came out. New one for 64 gb 3.0 - immediately error 23 came out. Old one for 16 gb 2.0 - works flawlessly.
The manual for the car radio states that the maximum number of playable files is 15,000. That is, as I understand it, THEORETICALLY it should read a 126 gig flash drive and it’s not a matter of volume. The instructions do not indicate which USB. most likely 2.0 of course. So the question arises. will it play a usb 3.0 flash drive? Maybe someone has encountered a similar problem. There is no opportunity or desire to buy an endless number of flash drives in the hope of stumbling upon a compatible one, so I ask for your help. It can take 32 gb, but I don’t know yet whether to take 2.0 or 3.0. Thanks in advance to everyone who responded!
Error 23 on the radio
Errors in the operation of the radio can occur at any time. And it doesn’t matter at all who its manufacturer is Pioneer and another company. One of the most common is error 23; it is typical for a radio with a flash drive. Anyone can encounter it. The problem is that the radio does not read the flash drive. As a result, the musical compositions that are on it are not reproduced.
There are many reasons for this problem. But before you start identifying them, you should check the flash drive for viruses. They can also interfere with its work. This is quite easy to do. To do this, you will need a computer and a special anti-virus program. If the test is passed and its result is positive, then the reason is different.
Re: pioneer DEH-X7650SD 64 Gb flash drive cannot be read (error 23 appears on the screen)
Hi all. The problem seems to be well known. Formatted in both fat 32 and ntfs. BUT in my case: 1. Tried a new flash drive for 64 gb 2.0 - it worked for several months and error 23 came out. New one for 64 gb 3.0 - immediately error 23 came out. Old one for 16 gb 2.0 - works flawlessly.
The manual for the car radio states that the maximum number of playable files is 15,000. That is, as I understand it, THEORETICALLY it should read a 126 gig flash drive and it’s not a matter of volume. The instructions do not indicate which USB. most likely 2.0 of course. So the question arises. will it play a usb 3.0 flash drive? Maybe someone has encountered a similar problem. There is no opportunity or desire to buy an endless number of flash drives in the hope of stumbling upon a compatible one, so I ask for your help. It can take 32 gb, but I don’t know yet whether to take 2.0 or 3.0. Thanks in advance to everyone who responded!
Error 23 on the Pioneer radio with a flash drive: reasons
This problem may occur for reasons such as:
- Music file format mismatch. This item must be strictly monitored. Since the device will not be able to read songs recorded in a different format. For example, if the Pioneer radio is designed for MP-3 expansion, then only such files need to be downloaded;
- Incorrect file names. It is easy to determine this reason. Basically, some files play and others don't. This suggests that some are written in the Cyrillic language that is typical for the radio, while others are not. Perhaps, in general, it works in the Latin alphabet. Then all files will need to be renamed so that their names contain only letters of the Latin alphabet;
- Flash drive failure. It is necessary to check the drive for serviceability. Perhaps this is the first thing that follows in a situation of error. The flash drive may have failed. To determine its status, you need to connect it to another device. For example, a computer. If it is not readable on it either, then the reason is a faulty drive. This can happen either due to mechanical damage or for another reason. In some cases, the operation of the drive is quite possible;
- The connector into which the flash drive is connected to the radio is faulty. This may happen if the device is used frequently or incorrectly. Its contacts become loose during operation, which disrupts their function. It is possible to correct the situation, but it is not easy. It is better to contact the service center specialists;
- The discrepancy between the volume of the flash drive and the car radio. This mainly concerns a large amount of information. Basically, radio tape recorders are designed for flash drives of no more than 4 GB. And if this value is exceeded, the device is unlikely to work. But this does not mean that the flash drive should only be of this size. There are some tricks that are great for solving this problem. So, the drive can be divided into segments that will contain the necessary amount of information;
- The file system of the flash drive does not match. Almost all radios are individual and can only work with a certain format. You can find out which one is typical for your radio from the device’s operating instructions. And you just need to format the flash drive.
List of the most famous Pioneer radio errors and how to fix them
Most often problems arise with USB drives. Let's start with them.
CHECK USB error
The message CHECK USB appears on the display of the radio when it refuses to read a flash drive or some other storage device (for example, a portable hard drive). This message indicates a power failure in the USB device. A failure may occur either due to the incompatibility of this drive with the radio, or due to a short circuit in the connector itself.
Solution:
- First you should carefully inspect the USB port on the radio. Perhaps dirt or some foreign object got into it, which caused a short circuit;
- if there is no short circuit, you should pay attention to the amount of current consumed by the USB drive (this figure can be found in the instructions for the device). The fact is that some flash drives require a current slightly higher than 500 mA for normal operation, while the radio is designed for exactly 500 mA, which leads to the CHECK USB error. There is only one way out: replace the flash drive, having previously specified the amount of current consumed;
ERROR 23 with flash drive
When error 23 occurs, the user sees the message ERROR-23 on the radio display. This happens immediately after installing the flash drive into the USB port of the radio. The error means that the file system in which the flash drive is formatted is incompatible with this radio. That is, if the drive was formatted in the outdated FAT32 (or even FAT16) system, the error is guaranteed to appear.
Solution: format the flash drive in the NTFS system, supported by all Pioneer radios.
- The flash drive is removed from the radio and inserted into the home computer. When it appears in the list of connected devices, you should right-click on it. A context menu will appear in which you should select “Format”;
In the context menu, select the option to format the drive - A new window will open with a drop-down menu in which you will be offered 4 formatting systems to choose from: FAT, FAT32, exFAT and NTFS. The NTFS system is selected, and just below, in another drop-down menu, “Standard cluster size” is set. After this, click the “Start” button;
Select the NTFS file system from the drop-down menu - After the procedure is completed, the flash drive is removed from the computer. Now both it and all files recorded on it will be fully compatible with Pioneer radios;
What does this mean
Error 23 on the Pioneer radio reports that the contents of the flash drive or disk cannot be read by the main device. Sometimes this happens due to mechanical damage to the radio or media.
In this case, you won’t be able to fix the problem yourself; only replacing the flash drive or repairing the player will help.
When reading a disc
In this situation, the cause of the problem may be computer viruses, scratches on the surface of the media, or an incorrect track name.
Some radios do not work with Latin or Cyrillic alphabet.
To find out what the player responds to, you need to conduct an “experiment”: rename several files and check which of them will be read.
In addition, tracks on the disc may not play because the format is incorrect. You can check this information in the technical data sheet of the device.
When connecting a flash drive
The Pioneer radio does not read the flash drive for the same reasons that arise when connecting an optical drive:
- incorrect name;
- mechanical damage;
- viral infection.
Sometimes an error occurs when reading flash drives larger than 4 GB. This is due to the fact that most radios are still tailored to outdated standards, but this problem can be solved by dividing the memory of a USB flash drive into sectors. In addition, the problem may occur if the storage device is not formatted correctly.
Also, sometimes the problem is with USB; the connector does not turn on due to the radio being connected incorrectly and the corresponding lack of power for the player to work correctly.
In this case, only contacting a car service or reinstalling the GU yourself will help.
About notOshibka.Ru
Consent to the processing of personal data
I hereby confirm and give my voluntary consent to the website neoshibka.ru (Internet address https://neoshibka.ru/) in accordance with Article 9 of the Federal Law of July 27, 2006 N 152-FZ “On Personal Data” for processing and the use of my personal data specified during the registration process, commenting, or when filling out any other contact form on this site, with or without the use of automation tools, including collection, recording, systematization, accumulation, storage, clarification (updating, changing ), extraction, use, transfer (distribution, provision, access), depersonalization, blocking, deletion, destruction of personal data in order to collect statistics and improve the services provided by the site. The processing of personal data is also carried out for the purposes of my information notification (distribution of information, if desired, there is an unsubscribe function) and for conducting analytics and statistics.
I am aware that:
- This consent to the processing of my personal data specified during registration on the Site, sent (filled out) using the Site, is valid for 20 (twenty) years from the date of registration on the Site;
- Consent can be withdrawn by me based on a written statement in any form;
- Providing personal data of third parties without their consent entails liability in accordance with the current legislation of the Russian Federation.
Any technology, even the best, can fail its owner at some point. The Pioneer radio is no exception in this sense. Even in this device from a well-known manufacturer, annoying errors periodically occur that can confuse even an experienced car enthusiast. What are these errors and why do they occur? Is it possible to eliminate them yourself? We’ll talk further about eliminating typical errors with flash drives of type 23 and 19 on Pioneer.
How to fix
You can fix the problem in different ways, depending on the cause of its occurrence. For example, in the event of a virus infection, the removable drive needs to be connected to the laptop and run an antivirus program scan. At the same time, it is important to have updated malicious code databases, since they are periodically modified and outdated detection algorithms may not recognize the threat. In some cases, the infection is so extensive that it is impossible to recover information.
There are other causes of failure, and, accordingly, methods for solving them.
Formatting
Modern media have the NTFS file system, which is not always recognized by car radios. To fix the problem, you need to reformat the device to FAT16 or FAT32. To do this, you need to connect the drive to your PC, wait for it to appear in the task manager under the “Computer” tab and right-click on it to select “Format”.
In the window that opens, you need to change the “File system” parameter to the desired one and, if necessary, change the cluster size. It is better to choose a standard size, after which the system will start the process, warning you about the loss of files. Because of this formatting feature, all tracks must be transferred to the computer and moved back at the end of the procedure.
Wrong name
The specificity of some radio tape recorders has already been mentioned above.
After testing, during which it becomes clear which alphabet the equipment works correctly with, it will be enough to rename all the files.
Wrong format
In this case, everything is extremely simple: you need to convert the files into a suitable format. For this, there are various programs (FSS Audio Converter, etc.) and online services that do not require installation on a computer.
They have intuitive controls and work with many files, so there is no need to provide detailed explanations for their operation.
How to enable/disable printing via phone
Having dealt with the possible options for connecting a printer to an Android phone, we will gradually move on to detailed instructions for each method. Please note that the procedure may differ depending on the model of the printing device. But the general principle will remain the same.
Via Google Cloud Print
The virtual printer is automatically linked to the Google Cloud service, the setup of which was described just above. Now let's move on to installing a smartphone application that allows you to send documents for printing. You can download it through the official Play Market store.
Developer:
Price: Free
For clarity, we suggest you read the step-by-step instructions:
- Open Google Play and enter the name of the application in the search.
- Go to the page with the program and click “Install”.
- We are waiting for the installation procedure to complete.
But you may encounter one unexpected error - the application simply cannot be installed on modern phones. This is not surprising, because the last update of the utility was in 2022. For more than two years, the developers have not made any changes or optimized the program in any way. Therefore, it cannot be installed on smartphones with Android 9 and 10.
On older phones the application may run. Then to print, open the document or photo, and then click on the three dots icon in the corner of the screen. Select “Share” or “Send”, then o. A settings window will appear where you can specify DPI, sheet orientation, number of copies and text color.
Via USB, Bluetooth, Wi-Fi
As mentioned earlier, you can connect to the printer via a smartphone using various methods. Some people find it more convenient to simply connect their phone via a USB cable, while others prefer to pair wirelessly. Let's assume that you decide to send a document for printing via Wi-Fi. How to do this? And it’s very easy, using step-by-step instructions:
- Turn on the printing device.
- Open settings on your smartphone.
- Go to the “Wi-Fi” section.
- Near the corresponding item, move the slider to the right.
- We connect to the same local network along with the printer.
After pairing is completed, go into the program and send the document or photo for printing. The highest quality applications will be discussed below. Decided to connect to the printer via Bluetooth? Follow these steps:
- Turn on the printing device.
- On your phone, open the desired document, photo, or just a page in the browser.
- Click on the “Share” button or click on a similar icon.
- Among the available options, select “Bluetooth”.
- We connect to the printer and print.
Some printers support operation without additional applications, but in almost any case you will need to install a special program on your smartphone. The Play Market contains both official utilities and software from third-party developers.
Via Dropbox, cloud
Cloud storages are special services that allow you to store added files on servers. You can access them at any time by connecting to the Internet and logging into your own account. Similar technology can be used to print documents by sending the necessary files from your phone to your computer. The most popular services are: Dropbox, Google Drive and Yandex Disk. For clarity, let's look at the principle of working with the latest cloud.
The most convenient way is to install the Yandex Disk mobile application on your smartphone, but all actions can also be performed through the web version of the service. So, here are the step-by-step instructions:
By the way, you can read more about working with cloud storage here.
Now you need to use a computer. We connect a printer to it and perform authorization in the Yandex Disk cloud storage. Select the required document or photo, then at the top of the screen click on the “Download” button.
In the computer explorer, find the file and right-click on it. A window will open where you need to select “Print”. Among the connected devices, we find a printer and send the document or photo for processing.
Note! If you use cloud storage as a PC program, then you can send files there for printing even without downloading them first.
Complex car radio malfunctions
In this article we will try to answer the questions:
What is a complex fault?
How can error codes help when repairing car radios?
In the practice of repairing car radios, there are often cases when, in order to restore the operation of the car radio, it is necessary to find and eliminate not one specific malfunction, but several. It’s good if the breakdowns are not related to each other or relate to different electronic components of the car radio (for example: no sound - the amplifier chip is faulty; no disk reading - the laser reader lens is dirty).
What if both faults are in the CD drive? With such malfunctions, the process of diagnosis and repair becomes difficult, since, having eliminated one malfunction, we are immediately faced with the manifestation of another. Such a malfunction with several causes can be called complex .
Let's look at troubleshooting a complex problem using the example of repairing a Pioneer DEH-P3500MP car CD receiver. This is a case from real repair practice and its consideration will be useful for those who are interested in the topic of repairing car radios with their own hands.
The Pioneer car radio came to the repair table due to the lack of reading from the CD.
Upon external inspection, it was noticed that when the disk eject button is pressed, the process of ejecting the disk occurs slowly. The car radio was also heavily soiled with dust.
It is no secret that when heavily soiled, the optics are the first to suffer - the surface of the laser reader lens becomes covered with fine dust and this prevents the laser beam from focusing on the surface of the CD. In this case, there may be failures during playback (the sound “hiccups”), failures during the initial loading of the disc (“NO DISK”, “Error”), a long search for a recording when switching to another song. Do not forget that the cause of such a malfunction can be not only contamination of the optics, but also degradation of the laser diode in the optical unit.
For car radios, if any malfunctions occur, an error code appears on the display. Knowing the decoding of the error code, you can more quickly find the faulty unit and not waste time on diagnostics. So, for example, on the Pioneer DEH-P3500MP car radio in question, when turning on and loading a disc, the message “ERROR-11” appeared on the display. At the same time, spinning of the disk was observed - which means the spindle motor is in order.
Fault code for sound-reproducing automotive equipment
Starting with models of car radios in which CDs were used as a storage medium for music recordings, and now also USB devices of the latest generations, manufacturing companies have equipped car radios with an additional option - “self-diagnosis”.
The result of the operation of the device without human intervention is to determine the correct actions to put the gadget into operation, as well as to identify possible malfunctions in the operation of both the car player itself and the media installed in it, as well as additional equipment, such as an amplifier, subwoofer, and the like. All possible malfunctions have their own numerical numbering and, when detected, are displayed on the device display in the form of the inscription “error” (with the corresponding number). Despite the fact that manufacturers classify faults at their own discretion, the error codes for many of them are the same. The main fault codes are compatibility errors between the media and the device reading them. Let’s talk about some of them using the example of a car player from the Pioneer brand in a little more detail.