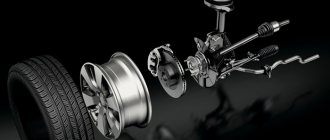
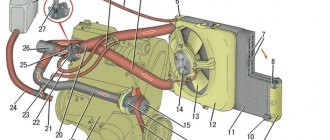
The braking system in cars of the VAZ family is one of the most important components, due to the fact that we are talking about the safety of not only the driver, but also other road users. A typical diagram of the VAZ 2109, 2110-2114 car system is shown in the figure:
Reasons for a drop in brake fluid level:
- Reducing the thickness of the friction linings of the brake pads.
- Worn end seal of the master cylinder.
- Wear of the cuffs of the working cylinders of the front or rear wheels.
- Liquid leakage through torn hoses.
- Leak through leaks at joints.
It is quite easy to detect the location of the leak due to the fact that the brake fluid leaves characteristic stains when it flows out. For example, if there is a leak through the working cylinders, traces of fluid can be found on the front wheel calipers or on the rear wheel brake drums. Moreover, to diagnose the location of the leak, you often don’t even need to remove the wheels.
There may be several reasons leading to fluid leakage around the front or rear wheels, the main ones being:
- Leaky connection of hydraulic tubes to the mechanism;
- Wear (scratches, risks) of the “mirror” of the brake cylinders;
- Wear of rubber sealing cuffs.
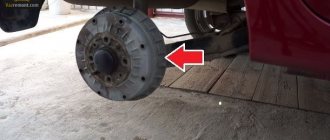
To identify and eliminate these faults, you need to lift the rear of the car and remove the wheel. Then you need to remove the brake drum, after unscrewing the two guide pins for the wheel.
TIP: As a rule, due to wear on the inner surfaces of the drums, it becomes difficult to remove them. There are two ways to solve the problem
The first method is to knock down the drum by striking its diametrically opposite internal parts, and it is recommended to use a RUBBER hammer; a metal hammer cannot be used, since there is a high probability of damage to the brake drums.
The second method is based on the principle of “squeezing” the drum from the hub. For this purpose, the drums have two threaded holes. You need to select two bolts of sufficient length and screw them into the holes until they stop and then continue to screw them in one at a time until the brake drum is removed.
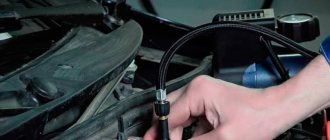
After this, you need to unscrew the hydraulic tube from the brake mechanism. To do this, you need to use a special wrench (see photo): To avoid unnecessary loss of liquid, it is advisable to plug the free end of the tube using a wooden plug of a suitable diameter, or a piece of plastic film wrapped around the tube and tied with any elastic band.
TIP: The most optimal solution to the problem would be to replace the complete brake cylinder of a VAZ car. If this is not possible, then it is necessary to replace the worn parts of the old cylinder.
First, you need to remove the anthers on both sides. Then carefully use pliers with narrow jaws to pull out the pistons along with the rubber seals, each in its own direction. After this, it is necessary to inspect all parts for wear.
IMPORTANT! Before installing the drum, you must thoroughly clean all friction surfaces of brake fluid residues. To do this, you can use a rag soaked in white spirit.
Finally, it is necessary to remove air from the system. The method of “bleeding” the brake circuit of VAZ cars is described in detail in the literature and is not particularly difficult.
Fluid leakage from the front wheels is eliminated by analogy with the rear mechanisms. There is a difference in the design of the front brakes depending on the brand of car. So, for example, in the “classic” 2107, the caliper is a device consisting of two halves, each with its own pistons installed.
This design is quite complex due to the fact that the number of possible faults doubles. Therefore, unlike the VAZ 2107, more modern Ladas (2109, 2112, 2114, etc.) are equipped with self-centering calipers, which have only one piston. In this regard, when repairing a VAZ 2107 (and similar ones), it is also necessary to disassemble the caliper into two halves and replace the worn parts on each half, and then assemble the caliper.
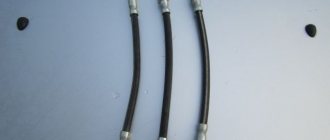
Very often, fluid escapes through cracks in brake hoses, which become unusable due to difficult operating conditions, as well as due to the natural aging of the materials from which they are made. Front brake hoses that are damaged, even on the outer layer, must be replaced. Dismantling the hoses begins by unscrewing the end that is screwed to the system tube. To do this you will need two wrenches. Holding the brake hose with one wrench and thus preventing it from turning with a second wrench, unscrew the sliding nut located on the tube.
After disconnection, it is necessary to plug the free end of the tube using any method described above. The second end of the hose is unscrewed from the front wheel brake mechanism. The new hose is installed in the reverse order of removal, after which it is necessary to remove air from the system.
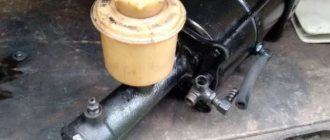
A drop in the brake fluid level due to a malfunction of the master cylinder cuffs.
To resolve this problem you must
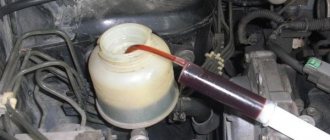
- Use a syringe to pump out as much liquid as possible from the tank; this can be done using a syringe without a needle by unscrewing the tank cap.
- Disconnect the exhaust pipes from the brake master cylinder
- Unscrew the brake master cylinder from the brake master cylinder body
After this, using pliers to remove the thrust rings, remove the ring from the inside of the cylinder, carefully remove the pistons of the first and second brake circuits and the springs. After inspecting the inner surface of the cylinder for damage and traces of corrosion (if any, replace it) and replacing the sealing collars, thoroughly cleaning all parts of dirt and using fresh brake fluid, assemble the master brake cylinder. In this case, you must be very careful not to confuse the sequence of installation of components.
The structure of the car brake system
The hydraulic brake system consists of a brake master cylinder (MBC), wheel cylinders, brake booster, master cylinder reservoir, circuit lines, hoses and brake pads and discs.
Depressing the brake pedal transfers the load to the brake booster, which moves the master cylinder piston. Excess pressure is created in the system, the fluid moves along the lines, actuates the wheel cylinders, which press the pads against the discs or drums, and the car slows down.
FakeHeader
Comments 11
The piston under the front contour is correct, this is good. How does it work after repair?
I used to like the brakes better))) now they are as sharp as diarrhea
))))) They are as they should be. The same thing happened to me before replacing the front pads and brake discs. As soon as I replaced it, it started to slow down like a stone, you didn’t have time to press the pedal. Previously, we were a little thoughtful, you press the brake and the car slows down. Now you can fly your nose into the steering wheel.
My discs are almost worn out... Well, yes, the brakes are the same for me... It’s so bad... If you press harder, it slows down faster)) plus it squeaks on the UAZ, and it’s in the front... The pads are half worn out
Sources of brake fluid leaks
Brake fluid may leak from one (or several) elements of the brake system. May leak:
- brake hose;
- brake pipe;
- tank;
- cylinders;
- places of fastening and connection of the components of the assembly.
Crack in the tank
The fluid level may drop due to mechanical damage to the reservoir. This malfunction is easily identified by a simple inspection: oil leaks are visible. The tank will have to be replaced with a new one, do not be greedy and do not try to solder it.
Depressurization of the brake line
One of the most dangerous breakdowns. It manifests itself simply: when pressed, the pedal goes to the floor almost without resistance, and the car does not noticeably slow down. If this happens to your car, stop immediately. Use the handbrake or use the engine brake. You cannot drive with such a malfunction; you risk your life.
Damage to the brake hose
Hoses are made of rubber, so sooner or later they will crack. This can be determined by carefully feeling the hose. It must be dry (without leaks of fuel fluid), without damage or tears, and be easy to bend. If something is wrong, the hose is changed.
The hose may fly off the fitting - this is another reason for brake failure. To repair, either put it in place, tightening the clamp tightly, or replace it with a hose of smaller diameter.
Clogged hoses and pipelines
Using low-quality brake fluid, neglecting daily car care and violating maintenance schedules can lead to blockages in the main pipeline. Eliminating this malfunction will take a lot of effort and time, so don’t skimp on the TZ and don’t forget about prevention.
Loosening the fastening
All transitions and seals between components in the braking system must be as tight as possible, otherwise leakage of fuel fluid and air leaks cannot be avoided.
The main brake cylinder is faulty
Most often, seals fail. It's easy to change them even yourself. A malfunction will be indicated by leaks of technical fluid.
Violation of the integrity of the brake cylinder
The absence of traces of fuel fluid on the master cylinder does not necessarily indicate its serviceability. The fluid does not always flow outward; it can go inward, into the brake booster. It is more difficult to identify this failure; you will have to remove the cylinder. In this case, the unit must be replaced, we are not talking about repairs.
The wheel brake cylinder is faulty
If you see traces of fuel oil on the asphalt near one of the wheels, most likely the reason is the wear of the wheel cylinder seal. To replace a defective seal, you will have to jack up the car, remove the wheel and caliper, and only then begin repairs. If you do not consider yourself a car repair specialist, it is better to turn to professional car mechanics.
REPLACEMENT PROCESS
Before starting work, you need to stock up on the following tools:
- Hose 10-15 centimeters long and 6 mm in diameter;
- Wrenches for 8 and 10;
- Plastic bottle;
- Gloves (work clothes and safety glasses are also a good idea);
- Hydraulic fluid (there are a lot of manufacturers, each with its own characteristics).
Having collected all the tools, you can start working. The procedure is not complicated and does not require any professional skills. Most motorists do the replacement themselves.
It is extremely difficult to do this kind of work alone, so I recommend taking a friend with you who will undoubtedly help in the process. This will not only save time, but will also greatly simplify the procedure.
We are changing bunker - 4 in the VAZ 2114 in stages:
- We park the car on a pit or overpass;
- Remove the cap from the brake reservoir;
- We go into the pit. Here we need a fitting located on the rear right wheel;
- It is closed with a cap, which we remove;
- Take a bottle and pour some DOT-4 into it;
- We put the hose on the fitting and lower the other end into the bottle (do not forget to lower it to the bottom);
- Now you need someone to press the brake pedal. Smoothly 7-8 times in a row, and the last press all the way and hold;
- Unscrew the fitting a couple of turns;
- We observe how the waste product comes out;
- When 1-1.5 centimeters remain in the tank (it is important not to be late, otherwise air will enter the system), tighten the fitting and release the pedal;
- Add the missing DOT-4 to the tank (up to the Maximum mark);
- Then we repeat the procedures with the fitting and pressing the pedal until clean pillbox flows into the bottle;
- We tighten the fitting and move on to the next wheel.
There is a specific order in which the replacement must be performed. After the left rear wheel, we need the right front, then the left rear and finally the right front. If you started doing everything according to the instructions, then this is the sequence in which the bunker runs.
Checking the brake fluid level
An experienced driver always checks the level of technical fluids in his car (motor oil, antifreeze and brake fluid) before leaving. We strongly advise all motorists to have such a useful habit. It is not difficult to check the condition of the fuel tank; the tank for it is located immediately under the hood, and there are control marks on the tank. It is believed that it is optimal to fill the liquid to the middle between MAX and MIN.
If this is your first time refilling the fuel tank yourself, be sure to read the instructions for your vehicle. Why is this needed: in some cars, the ABS (anti-lock) system requires bleeding the brakes.
If, when adding fuel oil, you notice a sharp and rapid decrease in the level, this is a reason to look for a leak. Traveling with such a malfunction is strictly prohibited.
In addition to checking the level, it is recommended to check the quality of the liquid. You need to buy a tester and measure the percentage of water in the fuel fluid every six months. An increased indicator indicates that the boiling point of the liquid has decreased (or even reached a critical point, after which the fuel fluid will “boil” and damage the brakes).
When checking the level daily, also monitor the condition of the fuel fluid: there should be no foreign matter, dirt, or deposits on the inner surface of the tank. There should also be no water drops.
Brake fluid can be added, but it is better to change it entirely. Remember that mixing different TJs is not recommended; do not skimp on your safety. The frequency of replacement is indicated in the operating instructions for the technical device. You can do this yourself or at a car service center. Use the fluid recommended by the manufacturer.
Dismantling
To carry out dismantling work that entails replacing the master brake cylinder, it is necessary to prepare a certain set of tools and materials. It includes:
- Brake fluid;
- Tool for unscrewing fittings;
- Pliers;
- Dry rags;
- Metal brush for cleaning contacts;
- Key for 17, 13 and 10 millimeters;
- Spring tensioner;
- New brake cylinder.
Before starting work, prepare yourself a site where you can place all the elements to be removed. Write down or photograph, or otherwise record where this or that unit was removed from. This will greatly simplify the reassembly procedure.
After all the preparatory activities, you can start working.
- Be sure to remove the negative terminal from the battery of your VAZ 2114. Without this, almost no repair or maintenance work on the car can begin.
- Raise the hood and lock it securely.
- Use a syringe to remove any remaining brake fluid from the container.
- Unscrew the brake fluid supply pipes using an open-end wrench. Unscrew it carefully so that the brake fluid does not get on other units in the engine compartment.
- In some cases, the thread becomes stuck, making it very difficult to remove. In such a situation, we recommend treating the threads with brake fluid and letting it sit for a while. Then the hoses are removed using a 10 mm wrench.
- If these measures do not help, you will need a special wrench with a clamping bolt and a cap slot. It is attached to a nut, clamped with a bolt and rotates the part.
- After dismantling the brake fluid pipes, be sure to mark them with a marker or corrector so that you know which pipe is connected where during reassembly.
- Now you need to remove the brake master cylinder. To do this, first remove the two main nuts that hold the GTZ to the amplifier.
- That's it, the damaged element can be removed from its seat.
- Clean the installation sites so that there are no problems with the new cylinder in the very first months of operation.
- Follow the reverse assembly sequence so as not to confuse the location of certain elements.
- Do not clamp the brake fluid hoses too tightly, otherwise there is a risk of stripping the threads. Restoring connections is a hassle.
- It is recommended to replace the brake fluid used before repair, and then be sure to bleed the brakes.
- To level up, you will need help, so make an agreement with a friend in advance. One will gently press the brake from inside the car, and the other will wait for brake fluid to start coming out of the holes. At this very moment it will be necessary to return the front tubes to their places.
How to get to a service station if brake fluid leaks on the road?
The correct answer is to call a tow truck. But force majeure can happen, no one is immune from this. Then there are two ways. You can drive at low speed (no higher than 20 km/h), hugging the side of the road as much as possible and turning on the emergency lights. You will have to brake with the handbrake and with the help of the engine.
The second way is to try to temporarily revive the braking system using improvised means. If you don’t have TJ at hand, you need to pour something else into the system (even water, but alcohol-containing solutions are preferable). Try to find the problem. Try to seal leaks at the junction points using improvised means (any plastic or rubber will do).
Let’s make a reservation that these methods are suitable if you are not far from a car repair shop.
The tank is cracked - what to do first?
Some motorists mistakenly begin to dismantle the entire brake assembly. Calmness and a visual inspection are the first step towards a successful repair. Wet marks and smudges indicate a decrease in the level of the substance. If a crack is detected, experienced car owners advise replacing the tank immediately - sealing it will not help. What to do if an incident happens on the route?
Clutch hose repair method
Experts say one of the common reasons why clutch brake fluid has leaked is a damaged hose through which fluid circulates from the reservoir to the clutch.
Effective replacement tips:
- You need to remove the tank itself by removing the clamp from below.
- You should purchase a new hose, preferably red.
- You need to pull out the damaged hose carefully so as not to accidentally break off the plastic fitting.
It is important not to allow fluid to leak onto the fender or paint. After removing the tank, you should rinse it with water; it is also recommended to replace the clamps. We install the hose and tighten it without much effort. Don't forget to tighten the nuts as well.
Experts say that the hose often wears out. It must be checked periodically and, if damage is detected, replaced with a new one.
Vacuum booster - symptoms of malfunction
Almost all cars have a vacuum booster. It reduces the force applied by the driver to the pedal, while at the same time increasing the force transmitted by the fluid. It only works after the engine is started. Poor performance is often caused by wear or damage to the vacuum seal diaphragm. In this case, no vacuum is created in the chamber. We need to look at the fuel fluid level: if it is normal, we check the operation of the amplifier. If the vacuum tank is not topped up in a timely manner, it first malfunctions, then the diaphragm is damaged.
First, we check with the engine not running: depress the pedal and hold it pressed. If it begins to gradually fail, the reason is in the gas turbine engine: the cuffs are leaking or the working surface of the cylinder is worn out. Without releasing the pedal, we start the engine. It should fall smoothly and slightly and stop. If everything is exactly like this, then the vacuum seal is in order. If the pedal falls while the engine is running, the reason is in the amplifier, the GTZ is to blame. When driving with a damaged diaphragm, the speed during braking practically does not decrease. You need to immediately replace the diaphragm with a new one.
When the vacuum seal dies, when braking, the car, especially in cold weather, tends to stall, and the noise of escaping air is clearly audible.