The VAZ 21124 engine with 16 valves appeared in 2004, by reconstructing and improving the 2112 engine and was mounted on cars produced by the AVTOVAZ concern, models 2111, 2112, 2111.
The updated internal combustion engine received an increased displacement - 1.6 liters. The increased engine volume of the VAZ 21124 was achieved by increasing the distance between the axes of the main and connecting rod journals of the crankshaft by 7.3 mm (it was 30.5 mm, now it is 37.8 mm). Moreover, the increase in volume occurred without changing the diameter of the cylinders; it remained the same - 82 mm.
Thus, the designers' intention was achieved - bringing the environmental characteristics to the European level. Let's consider its description in more detail.
A simple procedure for replacing the timing belt VAZ 2110, (2112) 16 valves
Former flagship of the Russian automobile industry VAZ 2110 with a 1.5 16 valve engine, replacement of the timing belt, rollers and pumps. The recommended replacement interval is from 40 to 60 thousand kilometers. The mileage on this strap is 80 thousand and, as the autopsy showed, if they hadn’t changed it today, then tomorrow it would have been more work for our mechanic. In general, we recommend that all customers check the condition of the belt at least once every 5 thousand kilometers, or once a year. But knowing the quality of our spare parts, more often is better.
Attention! On this engine, when the timing belt drive breaks, almost all the valves bend.
Consequence of exceeding the replacement interval. We look, remember and don’t let it get to that point. A little more and the meeting of the valves with the pistons would have been ensured.
The patient became five millimeters narrower and generally looked very bad. We send him to the honor board.
In what cases is replacement required?
To understand that the timing belt needs to be replaced, you need to visually inspect the element.
It is necessary to stop using it if the following damage is detected:
- cracks, cuts have appeared on top of the timing belt, or its base is delaminating;
- if the notches located on the inside of the belt are damaged.
The most common reasons why a belt breaks:
- the car enthusiast simply does not know how to tighten it properly;
- improper operation or use of the belt for longer than the specified period;
- contact with the belt surface of coolant, fuel, lubricant;
- incorrect operation of the water pump;
- play in the belt rollers: tension and support.
If you do not ensure the correct adjustment of the belt, do not inspect and replace the rollers on the VAZ 2112, this can lead to other breakdowns. We will find out which timing belt rollers for the VAZ 2110-2112 16v are better from the author of the video, MegaMeyhem.
If the timing belt breaks, it will disrupt the operation of the entire engine. Then everything descends into chaos: valves and pistons touch each other because their movements are not controlled. As a result of the impact, the valves bend and, touching the pistons, damage their outer walls, scratch the cylinders and important parts of the gas distribution mechanism.
Preparatory operations
We remove the absorber and power steering reservoir so that they do not interfere in the future.
We loosen the bolt by seventeen, the tension roller of the drive belt of mounted units, also known as the generator belt, and remove the latter. It will not be possible to remove it completely because the engine mount is in the way. If the drive belt requires replacement, you will have to unscrew the engine mount. We don’t touch the generator, it doesn’t bother us.
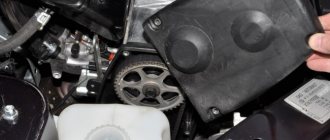
Remove the tension roller. We unscrew the bolts securing the upper protective cover; they are hexagonal.
Remove the right wheel, plastic mudguard and drain the antifreeze.
Setting Top Dead Center
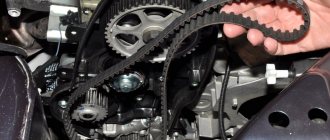
We see the crankshaft pulley. Using its bolt, clockwise, rotate the crankshaft until the marks on the camshaft pulleys and the timing belt protective cover match.
Markings on the left exhaust camshaft. The mark on the protective cover is highlighted in red.
Likewise for the intake camshaft. He's on the right. Its pulley has an inner ring for the phase sensor, so it is very difficult to mix up the pulleys.
Remove the crankshaft pulley. Let's lock the crankshaft with the help of a friend. We put him in the car and force him to turn on fifth gear and press the brake all the way. And at this time, with a slight movement of your hand, unscrew the crankshaft pulley bolt. Remove it and the lower protective cover.
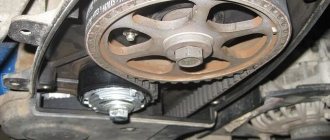
We see that the mark on the pulley and the slot on the oil pump ebb coincide. The repair manuals also advise putting marks on the flywheel, but I think this is unnecessary, because if the flywheel was changed, it could simply be put on the wrong mark.
Loosen the seventeen bolts of the tension and idler pulleys and remove the timing belt. Then the videos themselves. We change them anyway.
Replacing the pump
We lock and unscrew the camshaft pulleys and remove them. Remember that the right camshaft has a pulley with an inner ring for the phase sensor. The picture should look like this.
We unscrew everything that holds the protective plastic cover and remove the latter. Unscrew the three bolts holding the pump. They are hexagonal.
The pump for a sixteen valve engine is slightly different from the usual for an eight valve engine. It has a small threaded ear for attaching the protective casing.
Lubricate the gasket with a thin layer of sealant and put the pump in place. Tighten the fastening bolts. We put the protective cover in place. We make sure that he sits in his place, otherwise he will rub the belt. If everything is in order, tighten everything that holds it and install the camshaft pulleys and new rollers.
Video “Removing the timing case”
From the author of the video Winter Jack we will learn how to remove the timing belt cover on a VAZ 2112 with a 16-valve engine, and we will also see how to change this belt.
Replacing the timing belt VAZ 2112 1.6 16 cl.
1. Remove the timing belt protection. The timing belt guard is secured with six bolts. Remove the chip from the crankshaft sensor, unscrew one bolt and remove the sensor.
2. One tooth is missing on the pulley, this is not without reason, this allows the crankshaft sensor to determine the top dead center, and also allows you to block the crankshaft in order to unscrew and tighten the pulley mounting bolt.
3. This is done like this: the pulley is aligned with the hole for the crankshaft sensor and through the hole for the sensor, a suitable size tube or other suitable object is inserted, in my case it is a hexagon, the pulley is blocked, and then unscrewed and removed.
4. Loosen the tension roller nut and remove the old timing belt.
5. Install a new belt, the belt can be installed by turning the right camshaft with a wrench, or you can remove the tension roller, whichever is more convenient for you.
6. Tighten the pulley mounting bolt back and align the timing belt drive gear according to the marks. If there are no marks on the oil pump housing, put marks on the flywheel and, using a chisel, make a mark on the oil pump, this will be more convenient.
Installing a new timing belt
We check that the marks on the camshafts and crankshaft match. We install a new timing belt. If there are no directional arrows, put it so that the inscription is read from left to right.
The right, or descending, branch of the belt should be tight. You can turn the right camshaft clockwise a few degrees, put on the belt and turn it back. In this way we will stretch the descending branch. The tension roller has two holes for a special key. You can find it in any auto store. The issue price is 60 rubles. To tighten the timing belt, insert a special key and counterclockwise . Since there is a lot of controversy about tensioning the timing belt, let's write it this way: a tensioned belt should not have a sag between the camshafts of more than 5 mm when pressed and 7 mm on the longest branch (specially experimented).
Remember: an overtightened belt reduces the service life of the pump, and an undertightened belt can lead to cylinder head repair. (photo below)
We check all the marks. We turn the crankshaft two turns and check the marks again. If the pistons and valves do not meet and the marks coincide, then accept my congratulations. Then we put everything back in place in the reverse order of removal. Don't forget to tighten the bolts. We tighten the service belt roller with the same wrench as the timing belt tension roller. Fill with antifreeze and start the car. We wish the belt many years of service, but don’t forget to check it periodically; after all, it was made in Russia.
Consequences of a broken timing belt
Now you can easily change the timing belt on a VAZ 2110 with a sixteen-valve engine, even in an ordinary garage.
Graphs of 16 valve engines - power and torque
All engines of the “tenth hatchbacks” are ordered by power as follows: 21120, 21124, 21114 and 2111. They develop 93, 90, 81 and 77 “forces”. The graph shows how power varies with rpm.
The first two engines, 20 and 124, are 16-valve. Both belong to the Euro-3 class.
Engines 21124 of later years of production meet Euro-4 standards. They have an improved catalyst installed. The ECU unit was also installed differently, updated.
124 engine under the hood of the “two-wheeler”
The pistons of the 124 series engines have grooves for the valves. Simply put, the internal combustion engine of the VAZ-21120 is plug-in (valve bending as a result of a broken timing belt, the valves will need to be replaced, and then it depends), and 21124 is not plug-in (does not bend the valve). Let's estimate the torque.
The most interesting thing here is the VAZ-21120 engine. In terms of “low-end traction” it is not much inferior to 8-valve engines.
Formal characteristics
Here are the characteristics of two different motors:
- ICE model: 21120/21124;
- Working volume: 1,488/1,596 l;
- Compression ratio: 10.5/10.3;
- Power: 93/90 hp;
- Rated power speed: 5600/5000 rpm;
- Maximum torque: 140/131 N*m;
- Recommended fuel: AI-95/AI-95;
- Ecology: Euro-3/Euro-4 or Euro-3.
The lower the compression ratio, the more “omnivorous” the engine will be in relation to fuel.
Replacing the timing belt VAZ 2110 16 valves
Replacing the timing belt VAZ 2110 16 valves in VAZ 2110, VAZ 2112 cars. Requires regular performance. Of course, an injector with sixteen valves adds agility to our Lada and this is pleasantly pleasing. There is a fly in the ointment. The timing belt must not be allowed to break due to wear. This leads to damage to the cylinder head.
Gas distribution mechanism
Serves for timely opening (intake of the combustible mixture) and closing (exhaust gases) of the engine cylinders.
The belt drive is compact and has low noise levels during operation. The timing belt of the VAZ 2112 16 valves can simultaneously drive, in addition to the camshaft, other units: the oil pump, the ignition distributor and even the fuel pump.
How to avoid valve failure
The camshafts are stationary and at the moment when the piston approaches top dead center, the valves remain open, resulting in the piston hitting the open valves, which leads to the valves bending and in some cases destroying the seats and guides. Repairs are of course expensive.
This can be avoided by installing pistons in the engine with recesses for the valves, such as in the photo. It is not advisable to replace this on purpose, since engines have a significant service life, and there is no point in disassembling a serviceable engine. Therefore, it is easier and cheaper to simply change the timing belt in a timely manner, especially since it does not require extensive experience in locksmith work and deep knowledge in the field of car repair, but just attentiveness and knowledge of some of the nuances when installing the belt itself.
Some conclusions
The steel receiver looks powerful and beautiful
All VAZ-2112 hatchback engines differ in characteristics, and the differences are significant. It seems that the best option would be a 16-valve 1.5-liter engine. But the 21124 (1.6) engine has its advantages:
- Rated power is achieved at 5000 rpm rather than 5600;
- A broken timing belt does not lead to bending of the valves and their replacement;
- It is acceptable to use 92nd gasoline.
Any 21124 engine can be converted to Euro-4 or meets these standards immediately.
The appearance of the 1.5 liter engine inspires respect. But if you remember about bending the valves, the choice becomes difficult to make. A steel receiver and a beautiful schedule are not everything.
Various nuances
Motor 21124 is more modern than its brother. It has spark plugs with individual coils installed on it. Experienced craftsmen also know about the tuning possibilities specific to the 21120 engine (for example, installing a turbine). In defense of the latter, we can say the following: the service life of the two engines under consideration is approximately the same. After the first 120 thousand, the 20th engine deserves a rating of “4.5 out of 5”.
On the secondary market, VAZ-21120 and 21126 (Priora) engines are valued almost equally. But the VAZ-21124 unit is in short supply. Draw conclusions.
Installing timing marks VAZ 2110
The crankshaft is installed so that the piston of the first cylinder is at top dead center, this position must correspond to the mark on the crankshaft timing pulley, it must align with the rib on the oil pump housing
In addition, there is a mark on the flywheel; it should be located in the center of the ignition timing scale; it is clearly visible through the inspection window located on the flywheel housing.
Having installed the crankshaft, install the camshafts in this way. So that the valves have a position corresponding to the moment of compression of the fuel in the cylinders. When the piston is at top dead center.
For this purpose, there is a mark on the camshaft timing pulley.
must align with the slot on the body of the protective casing
this is typical for both pulleys
Belt tension
Having installed the tension rollers, install the belt as shown in the photo
The hole for fastening the left tension roller is offset from the center. Due to this, the timing belt is tensioned. Using holes into which a special key is inserted (a screwdriver is also suitable)
After tensioning the belt, turn the crankshaft two turns and align the marks again. This is necessary for self-testing. If this time the marks coincided clearly. Then after installing the generator drive pulley and protective covers, the engine can be started. replacing the timing belt VAZ 2110 16 valves must be done every 80,000 km
Source
Replacing the timing belt for a VAZ with a 16 valve engine
We put the car on a flat surface, raise the handbrake and put it in first gear. Remove the decorative engine cover and the protective cover of the timing belt. Using a 19 mm spanner or a wrench, turn the generator pulley until the mark on the camshaft pulley aligns with the “tendril” of the protective casing mounting bracket on its left side. We move to the right and remove the rubber plug in the clutch housing to make sure that the marks on the flywheel match the triangular cutout on the scale, which is located there.
After all the marks match, loosen the tension on the generator drive belt and unscrew the bolt securing the pulley to the crankshaft gear.
We remove the gear and check the alignment of the marks on the oil pump cover and the crankshaft gear. The generator pulley mounting bolt must be installed back in order to subsequently rotate the crankshaft to check the correct valve timing. Next, you need to loosen the bolt securing the tensioner (tension roller) and use a special wrench to turn it clockwise until the timing belt tension is released. Now you can remove the old belt.
We put a new belt on the crankshaft gear, then on the camshaft gear, tension roller and pump. Once again we make sure that the marks match. Let's move on to belt tension.
Attention! Due to inexperience, you may encounter the following problem: when trying to tension, the mark may “run away” from the crankshaft pulley and flywheel. This happens due to the fact that you do not tension the drive belt branch (the one that “enters” the camshaft gear) loosely.
Tension it as much as possible and, while turning the tension roller, guide the belt teeth with your fingers into the teeth of the camshaft pulley so that torque is transmitted to the crankshaft. There is another option - make an allowance of half a tooth - a tooth on the camshaft pulley. After putting on the belt, turn it until the mark coincides with the “tendril” on the bracket, and carefully tighten the loose branch of the belt (from the side of the tension roller and pump) by turning the roller counterclockwise
This happens due to the fact that you do not tension the drive belt branch (the one that “enters” the camshaft gear) loosely. Tension it as much as possible and, while turning the tension roller, guide the belt teeth with your fingers into the teeth of the camshaft pulley so that torque is transmitted to the crankshaft. There is another option - make an allowance of half a tooth - a tooth on the camshaft pulley. After putting the belt on, turn it until the mark coincides with the “tendril” on the bracket, and carefully tighten the loose branch of the belt (from the side of the tension roller and pump) by turning the roller counterclockwise.
How to change it yourself?
Before changing the timing belt yourself, you need to study the diagram of the gas distribution mechanism, stock up on the necessary tools, and also imagine the order of work in the form of a sequence of actions.
Before replacing, study the timing diagram
There are differences between modifications of the VAZ 2112, but the basic algorithm is approximately the same for all modifications. This algorithm can also be used on VAZ cars of other modifications, for example, 2110. It is necessary to have a good manual that explains the progress of work step by step. And if you have at least a little experience in car maintenance and minor repairs, we can calmly carry out timing belt maintenance ourselves and change the necessary parts.
Tools and materials
The set of basic tools is small:
- socket heads for 10, 15 and 17;
- spanner or open-end wrench 17;
- large flat screwdriver;
- key for the tensioner pulley (if power steering is installed on the car).
The materials required are a new timing belt.
Step-by-step instruction
- The work begins by removing the negative terminal of the battery.
- Using a 10mm socket, unscrew the six bolts and remove the gas distribution mechanism cover.
- The crankshaft sensor chip is disconnected.
- The crankshaft sensor mount is unscrewed. Then you need to remove the sensor.
- The sensor hole must be aligned with the part of the pulley where there are no teeth. This is done so that the crankshaft sensor can detect TDC (top dead center). In addition, the area without teeth is used to block the pulley. After alignment, you need to put a 12mm hexagon in the hole of the sensor and fix the pulley.
- When the pulley is blocked, the generator nut is unscrewed.
- The belt tension roller bolt is loosened. After this, the belt is removed. Often during this operation the tension and support rollers and the pump are also changed.
- Installing a new timing belt. There are two ways to correctly install this part. First: put on the belt with the tension roller removed. The tension is adjusted after installing the roller. Second: install the belt by turning the exhaust camshaft pulley using a 17mm wrench.
- Next, you need to tighten the timing belt using the adjusting bolt. It rotates using a 10 key. Rotation clockwise increases the tension, counter-clockwise weakens it.
Replacing the timing belt of a VAZ 2112 with a hanging wheel
If you are changing a belt with a wheel hanging out, then while tensioning the belt, install the wheel and lower the car to the ground. Engage first gear. This will also prevent the crankshaft mark from running away. Having ensured that the tension is correct, the car will still have to be raised so that it is possible to rotate the timing drive to check the marks. But there is a way out! Ask a neighbor or assistant to simply depress the clutch pedal.
Checking the timing belt tension
A well-tensioned belt should bend 90 degrees from the force of your fingers. If you overtighten, there will be problems with the tensioner and pump bearings. If you don’t tighten it enough, the belt will either jump (which will disrupt the valve timing) or fall off altogether.
So, the belt is tight. We turn the crankshaft twice to make sure that the marks match. If the marks match, then return the generator pulley to its place, tighten its drive belt and install the protective and decorative elements of the engine back. After 2 - 3 thousand kilometers of the car, check the belt tension and its condition again. The optimal service life of the timing belt before it is replaced again is 40 - 60 thousand kilometers. The frequency of checking its tension is 15 thousand kilometers.
Dear friends, today we will tell you the basics of setting timing marks using the example of a VAZ 16 valve engine. It's no secret that correctly set timing marks are the key to proper engine operation. If the marks are set incorrectly, then normal engine operation is impossible.
It is also important to tension the belt correctly, this greatly affects its durability. So, when do we have to deal with the procedure for setting timing marks? When, according to the regulations, we need to replace the timing belt at the next maintenance, by the way, the rollers are also necessarily changed along with the belt in this case
Also, if our pump is “covered,” the timing belt will have to be removed, since it is this that drives our “water pump.” Well, if (the worst case scenario) – our belt broke. Here, if the engine is “plug-in”, then this is a huge nuisance, the pistons meet the valves, and at a minimum, we are guaranteed to remove the cylinder head and replace the valves. So, what are timing marks and where are they applied? The first is the marks on the camshaft pulleys, both intake and exhaust:
Step-by-step replacement instructions
We will learn how to properly tension the belt and how to set the marks from the video from the channel In Sandro’s Garage.
Tools and materials
To replace a belt on a 16-valve, you will need the following tools:
- fifth key with six sides;
- 10, 15 and 17 mm socket heads;
- ring wrenches or 13 mm open-end wrench;
- extension tube;
- large flat-head screwdriver;
- key for tensioning the belt roller;
- torque wrench.
Replacing the timing belt on a VAZ twelfth model
Algorithm of actions
Installing and tensioning the timing belt on a VAZ 2112 occurs as follows:
- We put the car on a horizontal surface and open the hood.
- We remove the ground terminal from the battery to de-energize the on-board circuit.
- We unscrew the 6 fastening bolts of the belt drive casing to the left of the cylinder head.
- We disconnect the contacts on the crankshaft sensor and check the synchronization of the marks on the camshaft gears with the marks located on the rear surface of the casing.
- There should also be similarities in the marks on the flywheel crown. To check whether it is there, use a screwdriver to unscrew the plug on the crankcase under the thermostat. Above the plug there is a flywheel gear, and on it there is a mark. If the mark aligns with the cut on the crankcase on the left, then everything is in order.
- We adjust the belt tension so as to loosen it and check the crankshaft pulley mark. We remove the belt from the pulley and secure the current position of the flywheel by holding a screwdriver between the crown and the crankcase.
- Use the seventeenth key to remove the generator pulley bolt and check whether there is any similarity between the crankshaft gear with the mark and the mark on the surface of the oil pump.
- We remove the tension roller with the fifteenth key and the support roller; Next we remove the timing belt. We replace the removed rollers and install a new belt.
- Installation begins with the crankshaft pulley. When tensioning the belt, turn the tension roller clockwise, using a special key prepared in advance. You can use pliers with curved ends instead of a wrench. We adjust the tension until it is the best. The best belt tension is when, when grasped with your fingers, it rotates 90 degrees - no more.
- Collecting parts occurs in reverse order. At the last stage, remove the screwdriver clamped in the crankcase. After watching the video from the VAZ 2112 Repair channel, we will learn how to change the belt.
Replacing the timing belt Priora 16 valves
Replacing the timing belt on a 16-valve Priora is a little more difficult than on 8-valve engines, however, this procedure is accessible to almost every car enthusiast.
A belt in a car engine is one of the main parts for transmitting torque from one mechanism to another. But it is worth remembering that everything has an expiration date. We will outline the nuances of working and replacing the belt in the article below.
Tools and spare parts
Let's start with the fact that to replace the timing belt on a Priora 16 valves you will have to stock up on a very specific set of tools.
This is definitely a set of hexagons, a set of torx bits, and a set with a small 1/4-inch ratchet will not work, we’ll tell you why later.
In addition, you will need a device for tensioning the roller, but the usual one from 2114 will not work, you need a slightly wider one. If you have enough strength, you can tighten the roller simply by leaning against it with a mounting tool; many people do this.
The fact is that initially the 16-valve 21127 was designed without air conditioning. Everything was simple. The pump is driven by the timing belt, the alternator belt is no longer responsible for anything. In general, it couldn’t be simpler.
Crankshaft and generator with tensioner, without rollers.
The designers were faced with an almost unimaginable task - to install an air conditioning compressor, which they accomplished. Yes, not perfect, but we did it. And therefore, two additional pulleys appeared here - a compressor and a tension roller.
By the way, many car owners later began installing these same brackets with a tensioner in order to dismantle this circuit.
Replacing the timing belt on a Priora 16 valves
Let's get to work. First, unscrew the oil filler neck, then pull off the plastic casing. Then there are two development options. We will look at a more complex one, with air conditioning. Its difference is in the additional video, this has already been said. The whole point is that it also needs to be unscrewed, because it simply interferes with removing the protective cover.
Here you need a 15mm head. Unscrew the roller and remove the alternator belt. On the way, we listen to the video so that it doesn’t buzz, otherwise we need to replace it. Next, the timing belt casing opens before us. Remove the front upper and lower parts of the casing. To do this, unscrew the 8 Torx bolts.
There is also a surprise here if you use a ratchet. One of the bolts, the one closest to the passenger compartment, will have to be unscrewed using a simple Torx wrench, because the head with a tip and a ratchet will not fit between the engine and the spar.
So, we removed the casing, in front of us is the timing belt and all the rollers.
It is best to rotate by the camshaft - it is easier than by the crankshaft. It is not advisable to rotate the camshafts separately from the crankshaft. A maximum of 10 degrees to correct the marks if they misalign by a tooth or two.
Then we turn the wheel all the way to the right, someone removes it, which is not necessary. We unscrew the 4 bolts securing the mudguard using a Torx and one using a Phillips screwdriver to gain access to the crankshaft pulley.
Here we need a long extension and a wrench, as well as a 24mm socket. We put the assistant in the cabin, he engages fifth gear and presses the brake pedal all the way. After this, unscrew the crankshaft pulley bolt.
Now we take the key 15, unscrew the tension roller, while it is advisable to stop the camshafts from turning. We removed the video, looked at its condition, if it is buzzing, be sure to replace it, it may jam.
After the marks match, remove the roller, remove the old belt. It is advisable to remove the deflection roller to check its condition. Now we put the rollers in place and put on a new belt. First we put it on the crankshaft, then on the pump, then on the camshafts.
Now all that remains is to charge the roller. In order to hold it, you can use either a standard wrench, which is quite difficult to find on sale, or circlip pliers. We tighten the rollers, and then assemble them in the reverse order. Before assembly, turn the crankshaft two turns by hand. If it rotates, then everything is fine.
Video on how to replace the timing belt on a Priora 16 valves:
Causes of belt breakage
One of the common problems with the model is the failure of the timing belt. The reasons for this may be different:
- Simple wear and tear caused by a long period of use of the vehicle;
- Regular increased loads under which the engine has to work intensively;
- Mechanical damage as a result of improper operation or received during the repair of other components;
- Manufacturing defect.
Regardless of the causes of the problem, it must be eliminated.
Over time, it stretches so much that the gear teeth jump by 1-2 links. This disrupts the valve timing and causes interruptions in engine operation. But this is the best-case scenario for such a situation. The worst is when the strap breaks and the valves bend.
Tuning
Simple firmware or chip tuning for 124 engines not the technical characteristics . To significantly increase power, it is necessary to modify the engine.
- The simplest and most common tuning of the 21124 engine is the installation of sports camshafts, a direct-flow resonator, an increased throttle - in this way you can increase the power to 120 hp. Installing a lighter piston engine can add some power to this. This, at the same time, will reduce the fuel consumption of the VAZ 21124.
- About 150 hp can be ensured by modification of the cylinder head and installation of camshafts with increased valve opening phases.
- Installing a compressor has approximately the same effect; it is installed on eight-valve and sixteen-valve engines.
- Stable engine operation at any speed is ensured by installing four chokes, one for each cylinder. According to popular experience, the most suitable option is to install an injection system from ToyotaLevin. To do this, a set is assembled from the chokes themselves, an adapter manifold, a zero-resistance filter, injectors, an absolute pressure sensor and a fuel pressure regulator. Due to the fact that the speed exceeds the limit, it is necessary to install lightweight piston and wide-phase camshafts. With this modification, engine power can reach 200 hp. But such modernization sharply reduces the service life of the engine, is fraught with frequent breakdowns and the need to carry out serious repairs of the VAZ 124, due to the fact that the engine easily and often spins up to 9,000 rpm.
What can cause a timing belt to break?
In a VAZ-2112 car with 16 valves, rupture of a belt part can occur due to:
- Strong or, on the contrary, weak tension. To make sure it is tensioned correctly, it is recommended to use a special device called a frequency meter. Measurements should only be taken from a cold engine, the indicator should not exceed 155 Hz +/- 3 Hz.
- A rupture will be inevitable if the part has been in use for a long time and the replacement was not made in a timely manner. Since there is a constant temperature difference during the working position, the belt element gradually collapses, cracks appear on it, which leads to rupture.
- Due to improper placement of the bearing, which can jam and tear the timing belt.
- Due to leakage of the oil seal, which coats the part with oil.
- Due to a low-quality timing belt, which was installed in the 16-valve VAZ-2112 engine by the manufacturer.
Malfunctions and repairs
The most common malfunction that VAZ 2110 owners encounter is when the 21124 engine fails. This is expressed in unstable engine operation, interruptions in operation, increased vibration, noise and gasoline consumption. What could be the reasons for this unpleasant phenomenon and what repairs will be required on the VAZ 21124 engine.
If the engine in any VAZ 2110 car is malfunctioning, then, firstly, you need to find out the reason, diagnose the ignition, fuel supply system, gas distribution mechanism, electronics and mechanical parts (pistons and crankshaft) and repair the VAZ 124, even if you do it yourself .
- Ignition - the wires are removed from the spark plugs one by one. If the friction increases when the wire is disconnected, then the cylinder is working. If it still troits, that means the problem lies there. In this case, the spark plug and high-voltage wire are checked. The easiest way is to install new ones, and if the problem is not solved, then the diagnosis must be continued by checking the ignition module. You can also try to replace it with a working one, or test its circuit with a multimeter.
- The cause of interruptions may be poor quality fuel. In this case, you need to change it and also wash the injectors.
- The piston and valve groups are tested together. First, you can disconnect the breather hose. If white smoke comes from the breather, then the problem is hidden in the pistons, or rather in their rings. If there is no smoke, then it is necessary to measure the compression. Reduced compression usually indicates a valve failure. If compression is normal, you can try adjusting the valves. Engine malfunctions can occur due to clamped or, conversely, too loose valves. These cases threaten to carry out the most complex and expensive repairs of the VAZ 21124.
- Interruptions can also occur due to a faulty crankshaft position sensor. It is removed, marking its position, and the resistance of the sensor coil is checked. Normally, it should show a resistance of 550-750 Ohms.
The 124 engine does not cause any other special problems. Previously, there was a problem with the impact of the valves on the piston and bending of the valves and the subsequent need to repair VAZ of previous modifications. But the 124th engine is freed from this problem due to recesses in the piston bottoms.
The Lada of the tenth family in the hatchback body is the VAZ-2112 model. All cars of this family were produced until 2009. The range of engines included four options. Among them, by the way, were two 8-valve engines. Below we present the characteristics of 16-valve engines, but engines with 8 valves do not deserve attention. The torque graph proves these words true. So, let's look at the characteristics of VAZ-2112 engines with four valves per cylinder.
Two different 16-valve valves accelerate the car differently. Here is a video of the test drive.
Belt replacement
Replacing the timing belt must be described separately, depending on how many valves your VAZ 2110 has - 8 or 16. Self-repair of the unit on an 8-valve engine is considered easier, although you should not have any serious problems with a 16-valve engine.
8 valve
The sequence of work will be as follows:
Disconnect the battery by removing the negative cable; Unscrew the bolts from the belt protective cover; Remove this protective cover; Remove the front wheel on the passenger side, while simultaneously removing the mudguards and engine compartment protection; Turn the generator pulley clockwise so that the marks on the cover and the pulley match; Remove the protective plug from the gearbox and check in the resulting hole to see how much the control marks match; Using a metal screwdriver or other object, you need to block the flywheel; After this, you can unscrew and remove the generator pulley; Make a few turns to loosen the nut that holds your belt tensioner pulley in place; Remove the old belt. You won’t need it anymore, so feel free to send it to the landfill; The space needs to be cleaned and degreased. White spirit is perfect for this; After rinsing, dry everything using a dry and clean cloth; Install a new roller, following the direction arrows
If they are missing, then take the inscription into account. It should be located from left to right, that is, you could read it without any problems; To tighten the belt, move the roller counterclockwise; Check that all marks and the degree of belt tension match correctly; The compression ratio should be checked on a cold engine and at an air temperature within 15-30 degrees Celsius; Turn on the motor and with the unit running, check whether you have installed everything correctly; If the sound is normal, then the installation was completed correctly; Reassemble the removed elements in reverse order.
16-valve
The VAZ 2110 is equipped with two types of engines - with 8 and 16 valves. At the same time, replacing a 16-valve valve is considered more difficult. Experienced craftsmen assure that for a high-quality timing belt change it is enough to put in a little more effort and attention.
Therefore, in this case, the work must be done as follows.
- Remove the six nuts that hold the protective cover in place. Remove the protection cover.
- Release the crankshaft sensor.
- Find an area on the pulley that is missing a tooth. It will act as a guide to find top dead center.
- Install the piston from the first cylinder so that it is at top dead center.
- Align the pulley and crankshaft sensor, lock the pulley, unscrew and remove it.
- Next, loosen the nut located on the tensioner pulley.
- Remove the old belt and also remove the tensioner pulley.
- Clean the freed space from dirt, oil, and clean it with a dry cloth.
- Install a new belt and secure the pulley with bolts. It is recommended to replace the roller itself at the same time.
- Make sure that the belt and drive marks match, as well as the timing gear marks.
- Tension the belt using the tensioner roller.
- Check the elasticity after stretching.
- Make two full revolutions of the crankshaft to check the quality of the assembly.
- Make sure that the marks match, after which the pulley can be installed in place.
- Turn on the engine, check for correct installation, and then reinstall the protection casing.
How to check the condition of the VAZ 2110 timing belt
To check the condition of the timing belt you need to:
- remove the front timing belt protective cover plug,
- remove the alternator belt so that it does not interfere,
- unscrew 6 bolts and remove the front protective cover,
- Having gained access to the timing belt, we inspect it.
If during your next inspection you notice:
- cuts on the timing belt, bulges,
- delamination, appearance of broken threads,
- numerous cracks, folds, severe abrasions,
- oil leaks on the belt,
it must be replaced immediately.
As a rule, young drivers perform such repairs in specialized auto repair shops or car repair centers. But, if you decide to replace the old belt with a new one yourself, prepare the tools and materials: heads “10”, “17”, a special wrench used to tension the belt, a screwdriver, a new timing belt, detergent, clean rags.