If your car's headlight breaks, don't rush to get a new one, especially if the headlight housing and its reflector are in good condition. This tip is about how to replace your headlight glass at home in no time. It is worth remembering that the less time has passed since the depressurization period, the greater the chances of this device remaining repairable.
Initially, disconnect the wiring, remove the bulbs and carefully remove the headlight from the vehicle. Next, wrap the body with a worn rag or a good-quality bag. Now, carefully, to avoid cuts, break the remaining glass using a hammer.
Now use a screwdriver to clean the edge of the body element from all kinds of glass and sealant residues
. It is better to choose new glass and silicone sealant in white or something that is transparent. This is the case if you do not want the headlight to have a colored edging of the “cat’s eye” standard.
We wipe the entire edge of the prepared body with gasoline or alcohol and dry it. We perform the same actions with glass. Later, we apply a thin layer of sealant to the edge of the glass, and press the entire structure against the body.
After this, we leave the craft to dry overnight, and in the morning we return it to its original place and collect the elements. It is worth checking the condition of the components in the evening; it may be worth adjusting the headlight beam.
Good health!
As you already understood from the title, this is a post about glass replacement!
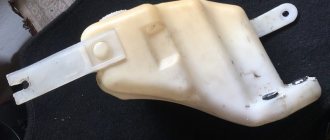
I think this post will be useful for a beginner who will be removing headlights from his car for the first time! I found a reason for this work ((((as I wrote in some on-board report that a stone broke the glass, making a small hole that I covered with tape for a while)! Now the time has come to do everything as it should and so that there are no unpleasant cracks! The removal process is very simple; you will need an 8-10 wrench, a screwdriver, accuracy and patience)))! Well, we can start, everything will be as it should be in the pictures:
The hole, as if out of thin air, the stones deftly break through the glass!
Place the screws and bolts so that they don’t get lost))) We need to put everything back together later)!
It is advisable to remove the grill so that no one breaks it, anything can happen)!
The nearby bolts also need to be unscrewed to remove the black plates!
Next, unscrew the two bolts under the grille to loosen the movement of the lower cilia!
Replacing glass in a VAZ 2110 headlight
When your car has problems with the headlights, you shouldn’t get upset right away, because you can do all the work yourself. One of the most common and not at all difficult car repairs is replacing the glass in the headlight of a VAZ 2110. Even novice drivers can handle this job. This article will tell you how to quickly and without much difficulty carry out a process called replacing glass in a VAZ 2110 headlight.
Reasons for replacement
Replacing glass on a VAZ 2110 headlight
Why do you need to change the glass on your headlights? Here are just a few reasons:
- A separate glass will cost much less than a whole headlight , and the reason why you have to change the glass is a small stone that gets into and breaks the glass of the headlight. A crack in the glass causes the headlight to shine dimly and the road illumination becomes poor at night.
- Over time, the glass of your car's headlights can become significantly dull, which also leads to poor road illumination at night. Polishing the glass is unlikely to help in this situation; it is much easier to buy new glass and replace it on the headlights.
- The easiest way is to find glass for a headlight on the private market and buy it second-hand. It will be much cheaper than in a store, and it’s not profitable to buy the headlight itself in auto stores; it will cost at least five thousand rubles for each headlight.
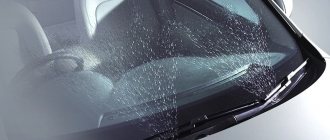
- The headlights fog up and do not have time to dry on short trips. A regular flashlight may sweat, but it dries completely after a short trip. If this does not happen, it means moisture is somehow getting into the headlight. This can happen either through a damaged case or through a crack in the glass.
Note. Some seal the damage with sealants, but it would be better to replace the headlight or the glass in it.
- Another reason why headlights fog up is condensation deposits inside the headlight itself.
Work order
Unscrew the two screws securing the turn signal and remove it.
There are two plastic washers under the turn signal mount; it is advisable to put them in place during reassembly.
Often there is a desire to wipe the shiny headlight reflector from dust; remember that this layer is very fragile and can be easily erased with strong pressure. Wet both the rag and the reflector thoroughly, or better yet, just blow through the reflector.
Pour silicone sealant into the recess around the perimeter of the headlight and place a new headlight glass on top.
If you have a headlight with clip-on brackets, then snap them on and put everything back together. It is more convenient to install the bracket by first hooking it onto the headlight housing and pressing it from above, snapping it onto the glass.
If the glass was held in place only by sealant, then we make 3-4 turns of electrical tape on both sides, after 2 days it will be possible to cut it off.
When replacing the headlight glass, try not to twist the wing screws for adjusting the direction of the headlight beams.
The adjusting screws rotate the optical element in the vertical (outer screw) and horizontal (inner screw) planes.
If you change the settings, you will have to go to a service center to adjust the headlights!
Main signs of a faulty or dim headlight
Replacing glass on a headlight on a VAZ 2110
The problem associated with road lighting overtakes every motorist, but what to do in this situation is an individual matter. If, for example, the flashlight starts to work poorly, you can replace it completely; for this you need to buy sealant and new spare parts, and then, after dismantling the old flashlight and applying a new sealant, insert the headlamp into the place where the old one was. It is very important to prevent dirt from getting into the connections. The first signs that the car light is not working properly:
- Shaking headlights;
- Darkening and deterioration of lighting;
- Poor adjustment of the light beam;
- Malfunction of the hydraulic corrector.
Dismantling
Replacement
To solve the replacement issue, you will first need to dismantle the headlight unit. By following fairly simple instructions, you will quickly understand the device and be able to remove it.
- Disconnect the negative terminal from your battery. This way you will de-energize the car, thereby protecting yourself from electricity.
- Remove the radiator trim.
- Disconnect the connectors with wires from the flashlight. Don't forget to disable the second one too.
- Now press the latch on the hydraulic corrector cylinder, turn it clockwise 90 degrees, which will allow you to remove the element from its seat. You will also see hoses there. There is no need to turn them off. They won't bother you.
- The headlight unit is held on by three bolts, which can be unscrewed with a regular wrench.
- Slide the light back and then to the side, moving towards the center of the car. Move until the hook disengages from the wing.
- The top bolts on the bumper will have to be loosened. There is no need to completely dismantle them.
- Press the trim from below until the flange disengages from the buffer. This will allow you to remove the cover.
- There is a nut at the bottom that holds it in place. It needs to be unscrewed.
- Now pull the headlight unit towards you, disconnect the block from the turn signals. That's it, the device is dismantled.
Types and types of lanterns
The search for high-quality headlights should be undertaken with all responsibility, although it is not easy. The main problem is that domestic cars are mainly sold on products that come from China or Taiwan. For example, a significant part of xenon flashlights are from there. This kind of product often comes with low quality indicators and lasts much less than their factory counterparts. And high-quality products always cost much more. Headlights for a VAZ 2110 car come in two popular varieties. Both types of lanterns are of fairly high quality, but differ in their shape and appearance, as well as functionality.
- Headlights from Bosch. Bosch flashlights have reflectors, but do not have lenses in their design;
- Kirzhach headlights have both a reflector and lenses.
VESKO-TRANS.RU
AutoNews / Reviews / Tests
How to Remove Glass from a VAZ 2110 Headlight
VAZ tuning and repair 2110
The information presented in this article will relate to the analysis of the phases of the VAZ 2110 . Why disassemble the headlights? In my case, I did this to insert a diode strip into the headlights. Also useful for those who have headlight sweating. The reasons may be different.
How to remove a headlight I will not describe the VAZ 2110 in this article, since you can find detailed information about it HERE.
Well, let's get down to the process. In order to disassemble the headlights of a VAZ 2110 , you need to be patient. Because the parsing process is simple, but it can be delayed.
First, let's see how to disassemble the headlight of a VAZ 2110 (Kirzhach)
- So, firstly, you need to fly up the glass with the headlights. I consider this stage to be the longest and most dangerous. This is dangerous because you may break the glass with carelessness.
Replacing headlight glass
Replacement of headlight glass for VAZ 2110 Kirzhach
In order to correctly replace the headlight glass, you need to know the design of the entire lamp. Therefore, every motorist who encounters breakdowns in his car related to electronics is obliged to know the components of his vehicle.
What does the headlight consist of?
Replacing headlight glass on a VAZ 2110
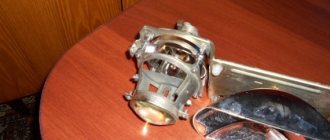
The main component of any headlight is the reflector or flashlight reflector. Externally, it looks like a concave mirror surface that shapes the light from the headlight into the desired shape. Three types of special automobile lamps are used as a light source:
- Conventional incandescent lamps are an ordinary sealed flask with inert gases, inside of which there is a tungsten filament. Under the influence of electricity, the spiral heats up to 3000K and emits thermal and light energy;
- Halogen lamps are similar in components to an incandescent lamp, as well as in the principles of operation of the lamp. The only difference in such a part is the presence of bromine and chlorine inside it, and in addition various kinds of halogens. Lamps of this type allow the headlights to last much longer;
- Xenon lamps are classified as HID lamps. It is a gas-charging lamp, inside of which there is xenon. A xenon lamp is made of quartz glass inside two bulbs. One such light bulb consumes very little energy - only 35 W.
Checking technical fault
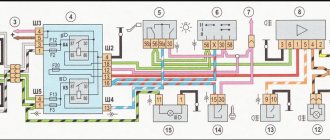
This procedure is carried out every 2-3 months, regardless of the technical condition of the VAZ turn signal. First of all, attention is drawn to power wire No. 3, which is red. It comes from the positive terminal of the battery. The VAZ turn signals receive the electrical energy required for operation only when the ignition system is turned on. The procedure for performing a check is as follows:
If any of the above actions could not be completed, this indicates a technical malfunction. It is recommended not to delay in resolving the problem. Continued operation of the 2110 with a malfunctioning turning system increases the likelihood of an accident.
A loose connection or broken light bulb is a common cause of the dashboard light blinking too frequently. You can verify this visually. If the VAZ turn signal works in normal mode, then the problem is hidden precisely in the broken contact of the 2 elements. In second place in terms of frequency of occurrence is a faulty relay.
Differences in disassembling Kirzhach and Bosch headlights
Note: headlights, as mentioned above, come in two varieties. One of them is called “Kirzhach”, this type is explained on how to take it apart. Disassembling the lanterns of these two varieties is different and each in its own way. In order to disassemble the second type of headlights, called “Bosch”, you need to carry out even less complex operations.
- The glass should be removed from the headlights; it will come out by itself when the latches on the headlight are unfastened.
- Now you need to unscrew the adjusting bolt of the reflective surface until the end.
- Pull out the cap, which is located inside the reflector itself; it covers the near-view bulb. To do this, you can also use a screwdriver to pry up the reflector on the other side of the lamp.
- We are changing the parts in the headlight that were planned.
- Reassemble the car headlight in reverse order.
Note: when the headlight is reassembled, no matter after replacing which part, you must always use a special sealant. If it is not there, take note that you can also use a rubber seal for these purposes.
As you can see, everything can be done with your own hands, at no cost, very quickly and without harming the car. We remember that replacing only the glass is much easier than replacing the entire headlight. The instructions will tell you how to do this easily. This way you can save a lot of money, because the price of glass is much lower than for a new headlight.
Disassembly
After removing the device, it can be replaced with a new one, the old one can be repaired, or the optics can be tuned. Here the decision depends entirely on your needs and wishes.
Foggy
Disassembling the headlight unit is not a tricky task. But there are some peculiarities:
- Unscrew the two screws that are responsible for fastening;
- Disengage the two hooks located on the turn signals from the headlights;
- Thus, the optics is disassembled into two components.
Modernization of headlights on VAZ 2110
Headlights of the "Kirzhach" type can be modified to improve lighting properties. How to improve the light:
- Remove the glass using a knife (it is secured with sealant).
- Remove the reflective pad.
- Move the lens 0.15 cm towards the reflector.
Upgrade option: slightly reduce the modular ring on a lathe. This tuning will allow the optics to shine brighter.
In addition, the following modifications to the headlights are possible:
- Changing the shape of the reflector. To increase the width of the light beam, it is necessary to compress the reflector vertically. In addition to the reflector, it is necessary to change the shape of the fastening, make it oval, for example, resting the part on the floor, and bend it to the required shape.
- Improving lighting by replacing and installing a new curtain. Make a curtain from tin and attach it to the module reflector. The border of the curtain should be located in the middle. After installing the curtain, the unit needs to be adjusted.
When making certain changes and modifications to the headlights, it is important to remember not only the quality and brightness of the light, but also safety. If you are not good at repairs, it is better to entrust it to professionals.