The stability of the engine is directly related to the condition of the air filter. It is entrusted with the function of preventing abrasive particles from entering the combustion chamber.
During operation, dust and dirt gradually accumulate, causing the filter to become clogged. This leads to a decrease in the dynamic performance of the VAZ 2109, and also causes an increase in gasoline consumption. If the pollution is severe, the speed starts to fluctuate and the engine “chokes.”
Air filter for cars with a carburetor
The air filter for the VAZ 2109 differs depending on the engine and year of manufacture of the vehicle. If a carburetor is installed on the car, then the original consumable has article number 21010110910002. The price for it is 120-235 rubles.
On later VAZ 2109 cars, an injector is used. The air filter on such machines is completely different in design. Consumables are not interchangeable. The original air filter for the injection VAZ 2109 comes with catalog number 2112-1109080. Its cost ranges from 220 to 300 rubles.
Original air filter for injection VAZ 2109
Third-party manufacturers also produce filters for the VAZ 2109. Many analogues have a very attractive price-quality ratio. The tables below show recommended consumables that perform well on cars.
Table - Analogues of the original air filter 21010110910002
| Brands of analogues of the original air filter | Catalog number | Cost, ruble |
| Starline | SFVF2189 | 120-150 |
| Mfilter | A101 | 60-90 |
| WIX | WA6395 | 140-160 |
| Starline | SFVF2189 | 150-180 |
| Bosch | 1457432108 | 440-500 |
Table - Alternatives to branded air filter 2112-1109080
| Manufacturer | Article number | Price, ruble |
| VAG | 021129620D | 500-620 |
| Starline | SFVF2246 | 140-200 |
| Febi | 1510 | 300-350 |
| Japan Cars | B2W004PR | 100-160 |
| Filtron | AP006 | 220-250 |
Replacement frequency
Replacing the air filter is necessary every 15-20 thousand km. It is recommended to periodically blow out the filter element with compressed air. However, sometimes it may be necessary to unscheduledly replace the filter. Symptoms of the need to install a new consumable are:
- noticeable loss of power from the power unit;
- the car had to cover a long stretch of dusty dirt road;
- fuel consumption has increased;
- the previous replacement period is unknown, for example, when purchasing a used car;
- There is a lot of oil getting into the air filter;
- The filter element has noticeable mechanical damage, which does not allow quality air purification.
Preparing for work
How to choose the right air filter for VAZ 21099?
The VF must have the necessary cleaning efficiency and the required dirt holding capacity. It is also worth paying special attention to its folded structure. A high-quality WF should be dense, and the corrugated paper should not be damaged. Each fold must fit tightly to the base and have no defects to prevent water from entering the internal combustion engine. Also, the VF material must be susceptible to the effects of vapors, fuel, and motor oils that accumulate on the surface of the part.
In WFs made of paper, dust particles are retained on the surface. In filters made of non-woven materials, they are captured along the perimeter of the entire thickness.
Plastic VFs are several times superior to paper filters in many respects. However, the cost of such parts will be too high.
Required Tools
In order to replace the VF in a VAZ 21099 car you will need:
- Screwdriver;
- Set of wrenches;
- New air filter.
Replacement process
Step-by-step instructions for replacing the air filter on a VAZ 21099 injector:
- Initially, you need to turn off the engine and open the hood;
- Next, unfasten the clamps of the protective casing;
- Remove the cover that covers the air cleaner (air filter housing);
- An air vent is connected to the filter cover. In order to disconnect it, you need to loosen the clamps;
- Remove the cover and carefully remove the old VF;
- It is also necessary to remove contaminants in the air purifier using acetone and a clean rag;
- The new filter element is installed in the reverse order.
The process of replacing the air filter on a VAZ 2109 with a carburetor
Replacing the air filter on a carburetor VAZ 2109 is shown below.
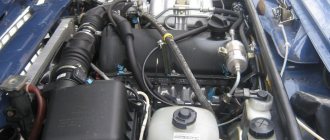
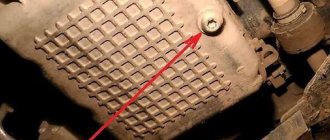
- Open the hood lid.
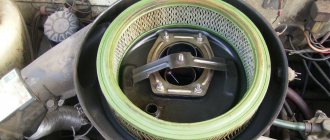
Location of the air filter in the engine compartment of the VAZ 2109
- Unscrew the nut securing the filter cover.
Unscrewing the nut
- Unclip 4 latches.
Unsnapping the latches
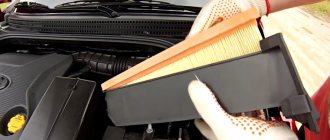
- Remove the air filter cover.
Removing the cover
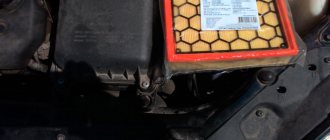
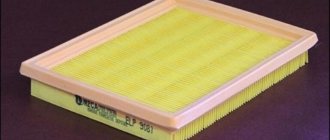
Air filter view
- Install a new filter. For better sealing, many car owners recommend lubricating the rubber ends of the filter element with oil.
Filter installation
Filter element during installation
- Match the marks on the cover and the air filter housing.
Label matching
- Reassemble everything in reverse order.
VAZ 2109 owners are often faced with the situation of oil in the air filter. The reason for this is the design of the crankcase gas exhaust. The tube connects the power unit crankcase and the filter housing. This design reduces air pollution and increases engine efficiency.
Oil can flow through the crankcase ventilation tube into the filter. To solve this problem, car owners recommend closing the hole in the filter housing with a champagne cork. The crankcase outlet can be extended with a hose of suitable diameter.
Troubleshooting oil getting into the air filter
We remove the air filter housing from the carburetor engine of VAZ 2108, 2109, 21099 cars
The need to remove the engine air filter on VAZ 2108, 2109, 21099 vehicles arises when carrying out various work on the carburetor or the engine itself.
For most car owners, this procedure is not particularly difficult, but for those who are faced with repairs for the first time, this information may be useful.
Required Tools
— Open-end or socket wrench (or head) at “10”.
— Open-end wrench, socket wrench or “8” socket.
- Crosshead screwdriver.
The procedure for removing the air filter housing on carburetor engines of VAZ 2108, 2109, 21099 cars
— Remove the cover of the air filter housing
Using a “10” wrench, unscrew the cover securing nut. Unfasten the four latches on the sides of the filter housing. Remove the cover of the air filter housing. We take out the filter element. See photo above.
— Remove the crankcase ventilation hose
Use a Phillips screwdriver to loosen the fastening clamp and remove the hose from the pipe on the engine filter housing.
— Remove the corrugation of the warm air intake
If a clamp is installed on the corrugation, use a screwdriver to loosen it and move the corrugation down from the pipe on the thermostat. If there is no clamp, simply remove the corrugation.
— Remove the air filter housing
Using an “8” wrench, unscrew the four nuts securing the body to the carburetor studs. Remove the pressure plate. Remove the air filter housing along the studs upwards.
We remove the air filter housing of the VAZ 2108, 2109, 21099 engine
The air filter housing is installed on the engine in the reverse order of removal.
Notes and additions
— The dismantled engine air filter housing should be cleaned of dirt (outside and inside), and the movement of the thermostat damper should be checked (position “winter”, “summer”). In case of severe contamination or oiling, replace the filter element.
— Based on the condition of the inner surface of the air filter housing, you can assess how correctly the engine operates and whether it has certain malfunctions. For example, the presence of oil in the housing or an oily filter element indicate either clogging of the engine ventilation system or wear of the piston group (rings, pistons, cylinders).
— Design of the air filter housing for the VAZ 2109 car and its modifications.
Air filter device for VAZ 2108, 2109, 21099 engine
Twokarburators VK - More information on the topic in our VKontakte group, on Facebook Twokarburators FS and on Odnoklassniki - Twokarburators OK
More articles on engines of VAZ 2108, 2109, 21099 cars
— Removing a Solex carburetor from a car engine
— Measurement of compression in the cylinders of a carburetor engine
— Adjustment of thermal valve clearances on engines of VAZ 2108, 2109, 21099 cars
— How does dirty engine air filter affect its performance?
Self-replacement of the air filter on the injection VAZ 2109
Instructions for replacing the air filter on the injection VAZ 2109 are presented below.
- Open the hood.
- Disconnect the sensor located near the air filter.
Disconnecting the sensor
- Unscrew the four filter fasteners. To do this, use a screwdriver.
Unscrewing the filter cover
- Open the lid.
Opening the lid
- Remove the filter element.
Removing the filter
- Clean the seat.
- Install a new filter element.
Installation
- Reassemble everything in the reverse order, avoiding distortions of the air filter cover.
Replacing the air filter on a GAZ 52 injector
In order for the gas 52 injection fuel system in a car to work efficiently, the incoming air must be clean. Atmospheric O2 is purified using a WF. Periodically, this part becomes dirty (during the operation of the car), so it must be replaced frequently. The driver can handle this kind of work on his own. To do this, you just need to know the location of the air filter in the VAZ 21099 car.
The VF is located under the hood, to the right of the engine. In order for the part to be better preserved, the vehicle manufacturer placed the VF in a special plastic casing. To replace, you will need to disconnect the box fastenings, as well as the air outlet pipe. After this, you can easily get to the detail itself.
Air filter 2109. Pan. Dimensions. Correspondence.
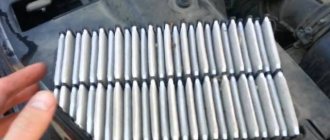
I made a pyramid out of plasticine, placed it in the air purifier body, buried the lid, and snapped the latches.
Pyramid (approximately).
He pulled out the crumpled pyramid and measured it. Measurements were taken three times.
Measuring a crumpled pyramid 1.
Measurement of crumpled pyramid 2
As they wrote in the magazine Behind the Wheel No. 6 for 2002, “ONE THIRD FILTER” is the nominal height of the air cleaner housing (60 mm). But checking the height of real bodies on different cars showed that “off-scale” heights of up to 63 mm also occur.
Additional measurements:
- The height of my case closed only with “latches” (the nut is not tightened) is 64.5 mm.
- The height of my case, closed with latches and a screwed nut, is 63.65 mm.
- In my case, a tightened nut (I have a wing nut) gives a maximum pressure of 1 mm.
- Not every normal filter will work properly on any car. The fact is that the current OST 37.001.491–90 prescribes a height for filters (59–63) ± 1.5 mm. In other words, everything that falls within the range of 57.5–64.5 (scatter is more than 10% of the filter height) is considered normal.
- In general, it became clear that we either need to take filters from 65 mm. height, either change the pan, or make a rubber gasket under the filter.
- In the same “Behind the Wheel” test, domestic filters did not shine with quality, so I looked at what I could choose with a height of 65 mm. from import.
I didn’t dig particularly deep, but it turned out that there weren’t many options.
Height of different filters
As a result, I bought a MANN C2443/1. Honest 65 mm. with a slight plus. I took it from ISNEXT (formerly EXIST).
As for the FRAM CA660PL filter, despite the manufacturer’s stated height of 61 mm, my copy has a height of 57-58 mm. The currently installed “Behind the Wheel” filter is 63 mm.
I bought the filter at EMEX. So it’s hard to say whether it’s a defect or a fake.
Store labels
Well, here's a comparison photo between MANN and FRAM. Feel the difference!
FRAM CA660PL MANN-C2443-line
FRAM CA660PL- MANN-C2443
Summary: Before you buy a filter, measure the height of the pan!
pot