How to replace a steering rack with your own hands 3.33/5 (66.67%) 72 votes
The steering mechanism of a car is a rather complex system with a complex design, due to which the car is controlled. The main component of this system is the steering rack . Unfortunately, this node is not durable. When driving on a road with poor surfaces, a knocking noise may occur, which can be heard in the steering wheel. This manifests itself both while standing still and while turning the steering wheel. A signal that there is a fault with the steering rack.
Car services in Moscow for replacing the steering rack:
Loading car services...
+7 Metro station: Altufyevo
"MIKA", Moscow, st. Lobnenskaya, house 17
Enroll now
In this article you will learn how to replace the steering rack with your own hands , because this is not such a difficult task.
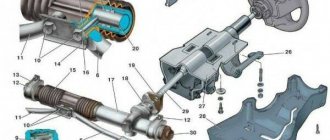
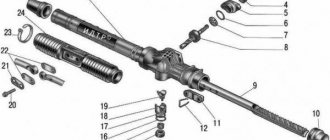
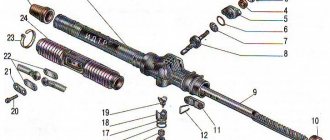
Steering rack design
The main integral elements of the slats are:
- crankcase;
- gear shaft;
- support sleeve;
- spool mechanism.
In order to repair a steering rack, you need not only special equipment, but also sufficient experience, since the repair process is quite complex. Directly repairing the rack involves the following steps:
- disassembling the rack, washing and troubleshooting parts;
- parts that cannot be restored are replaced;
- the rack toothed shaft is cleaned and checked;
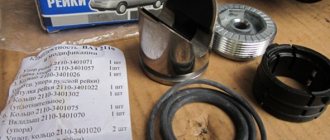
- Oil seals, anthers, rings and other parts are replaced.
How to determine if the rack is faulty
The control unit of a German car is extremely reliable, but sometimes its elements break. The following signs indicate malfunctions and the need for repair of the Audi A4 steering rack:
- the reaction of the wheels to the driver's steering commands is slow;
- the steering wheel is loose;
- On rough roads, knocks in the steering wheel are clearly felt.
Having discovered signs indicating incorrect steering operation, you need to go to a service center as quickly as possible. Only repairs can correct the situation.
↑ How to remove steering rods on a VAZ without a puller, video
Keywords
car repair tips from experienced
Similar news
VAZ 2106 (21061) / Steering VAZ 2106
Steering device VAZ 2106
VAZ 2110 - operating and repair instructions / VAZ 2110 steering
Steering mechanism VAZ-2110, 2111, 2112
VAZ 2107 - repair and operating instructions / VAZ 2107 steering
Removal and installation of rod and ball joints of the VAZ 2107 steering drive
VAZ 2107 - repair and operating instructions / VAZ 2107 steering
Removal and installation of the VAZ 2107 steering mechanism
VAZ 2107 - repair and operating instructions / VAZ 2107 steering
General information about the steering of the VAZ 2107 car
VAZ 2107 - repair and operating instructions / VAZ 2107 chassis
Determining the condition of the front suspension parts of the VAZ 2107
We diagnose the condition of the steering rack ourselves
The function of the steering rack is to transmit rotation of the steering wheel to the wheels. The steering rack is the main tool for driving a car. If a malfunction occurs, the car’s obedience decreases under shock loads and driving on uneven roads. With severe operation of the equipment, the mileage of 210-240 is the maximum wear of the steering rack, which now requires replacement and repair.
How to identify a malfunction
To determine whether the steering rack is faulty, we look at the following aspects:
- bumps and turns are accompanied by a characteristic knocking sound in the area of the steering mechanism;
- deterioration in handling when driving at high speed, when the car bounces a little from side to side;
- increased steering play;
- heavy or jerky steering wheel rotation;
- to return the steering wheel to its original position, tighten it yourself;
- characteristic noise of the power steering pump when we turn the steering wheel;
- We note the drop in oil in the power steering reservoir;
- Oil is leaking near the rack.
If the car is equipped with an electric booster, check whether the electric motor has failed. The circuit is probably closed or the contacts in the connectors have oxidized. The fuses also blow, resulting in the steering wheel.
How to replace a steering rack - removal and installation
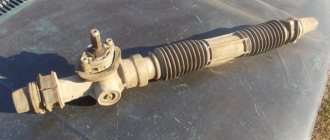
Steering rack mechanism
Experienced car enthusiasts know that twitching of the steering wheel in a car when driving on an uneven road surface indicates that the steering rack needs to be replaced. Often this effect is accompanied by characteristic knocking sounds. There are two ways to deal with the malfunction: delegate related concerns to service station specialists or take care of everything personally.
Note! The steering device is the most important mechanism in a car, which not only allows you to correct the movement of the vehicle in the horizontal direction, but also ensures safety when driving.
And if you do not trust domestic craftsmen, and there is no way to contact a specialized service center, it is advisable to repair the steering rack yourself. There is nothing complicated about this if you approach the issue consistently and with a certain theoretical basis. Below we will look at how to do this most effectively.
Characteristic signs of a faulty steering rack
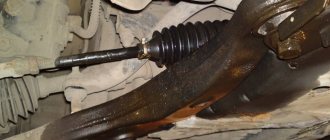
The most characteristic sign of a faulty steering rack is a knocking sound . A characteristic, and not entirely pleasant, knocking noise comes from under the front axle of the car. At first, this knocking is almost unnoticeable, but over time the intensity increases significantly.
After some time, these knocks begin to be heard in the steering wheel. After this, driving on uneven roads and making sharp turns is very dangerous. At such moments, the twitching of the steering wheel is very noticeable.
What to do to avoid being deceived at a car service center? How to avoid it, click on any of the messengers below to find out 5 simple ways to avoid being scammed
The important point is that characteristic signs of a faulty steering rack are observed only in small holes. But the car goes through deep holes without any obvious knocking. In this case, there is a high probability that the unit has become unusable, and you will need to replace the steering rack yourself.
Another signal about a faulty steering rack is the tight operation of the unit itself . This usually manifests itself in the fact that it becomes difficult to turn the steering wheel only in one direction. Also, under the car, after parking, there may be an oil leak, which is observed on the unit itself and on the asphalt, and a hum in the power steering. These symptoms should not be neglected, because... indicates that the car will soon be unacceptable to use. It can lead to bad consequences, including an accident. This malfunction is typical for hydraulic mechanisms. In most cases, failure of the steering rack is associated with a malfunction of the seals and rod .
Wheel play is another characteristic feature of a faulty steering rack. This is easy to determine. It is enough to grab the wheel with your hands and pull it in different directions. The play should be pronounced and well felt by the hands. In this case, the steering wheel can rotate freely left and right at low speed. The sharpness and response disappear when the driver turns the steering wheel. The best way out of this situation is to replace the steering wheel with your own hands.
Frequent failure of the steering rack is associated with damage to the joint .
The main reason that this unit failed is due to the fact that the driver likes to drive fast on bad roads.
Hitting an obstacle at speed, sudden braking, worn out boots - this can cause a problem with the steering rack. Through cracks in the anthers, dirt and sand get inside, where they mix with oil. Thereby speeding up the slats and supports.
You need to know and remember that you should not leave a car with the wheels turned to one side for a long time in cold weather. Hydraulics can break down quickly.
It is important to remember that operating a car with a faulty steering rack is unsafe . Leads to loss of vehicle control. If a breakdown is detected, it is necessary to immediately begin repairing it.
We recommend: How to repair a driveshaft on a European truck?
Replacement procedure
Frame replacement may vary slightly depending on brand. However, this only concerns a few small details; the general sequence is similar in most cases.
Preparatory stage
First, the car must be properly immobilized. To do this, you need to manually brake the car and support the rear wheels.
The further procedure is as follows:
- Set the steering wheel to zero position.
- Slightly loosen the wheel nuts.
- Lift one side of the car and lift it slightly.
- Remove the wheel and place a support beam or similar object under the chassis.
- Repeat the same (without step 1) on the other side of the machine.
After completing all the preparatory work, the car should be on supports with the front wheels unscrewed. This item will make your future work easier.
How to remove
The first step is to find out what type of rack and pinion fits your vehicle.
It could be:
- hydraulic;
- electrical support;
- Mechanics.
The type of device your car is equipped with will affect how you drive. If your vehicle is equipped with a mechanical guide, remove any debris from the bolts before removing the ends. A wire brush and WD-40 cleaner will help. Before removing the ear, remove the clips from the alarm clock (if equipped) and gas spring, then carefully move the devices aside.
Then the sequence of actions is as follows:
- Slightly loosen the mounting screws on the crossbar. This device is located inside the car, under the brake pedal. Remove the mat and lift the barbell. The cross member is attached to a splined flange, which is screwed with a nut. Unscrew it.
- Open the engine hood and unscrew the nuts securing the tie rod clamps.
- That's it, the stand doesn't hold anything, it's removable. Grasp the cover and gently pull it towards you. It may turn out that this action will not bring the desired result. Sometimes this happens, most often due to jamming of the gap. Hit the part with a hammer, but not too hard. This should help.
- After freeing the device from the mounting hardware, reach through the hole in the wheel.
Often specialists and craftsmen suggest welding this part on site. But it is better to introduce a rule that welding, alteration, alteration of the steering mechanism and brake system are strictly prohibited. Moreover, replacing the bracket is quite simple. For example, on domestic cars such as VAZ 2108-2109 of all modifications, the bracket is welded to the body by spot welding. Sometimes such fastening fails and the frame stops sticking to the body, the bracket dangles almost freely.
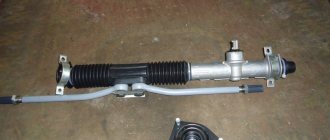
Installing a new rack
Repair is carried out as follows:
Remove the wheel from the side where you want to replace the bracket.
- In the bracket (it’s better to buy a new one, but an old one in good condition will do) drill 10 holes in the places where there were welds with the car body.
- 10 nuts are welded to the mounting holes on the side facing the wheels, one for each hole.
- Replace the bracket and screw 10 screws of the appropriate diameter with washers of the appropriate diameter from the inside of the cab.
- To avoid repairs to the steering mechanism, try to promptly replace all parts of this mechanism that require repair. Balance your wheels periodically, check tire pressure and avoid driving on deformed rims. If you follow these simple tips, you can completely forget about steering problems.
- Follow our social media channels on Facebook, VKontakte, Instagram, Pinterest, Yandex Zen, Twitter and Telegram: all the most interesting automotive events in one place.
When is replacement required?
The main signs that an Audi steering rack requires repair or replacement are:
- An unnatural knocking noise that intensifies while driving on uneven road surfaces;
- The need to exert force while turning the steering wheel;
- Spontaneous rotation of the steering wheel;
- The steering wheel does not return well to the center position after the car exits a turn;
- Excessive sensitivity of the car to the driver’s actions;
- The angle of rotation of the wheels does not correspond to the angle of rotation of the steering wheel;
- Significant drop in fluid level in the power steering reservoir.
A timely response to these problems and contacting qualified specialists to eliminate them will prevent even more complex and costly breakdowns of the unit.
Basically, the Audi steering rack “suffers” due to an aggressive driving style, external aggressive influences, the use of low-quality fuels and lubricants, and a number of other reasons. Due to the intense load on the contact points of the gears and gear base, these elements are most often subject to mechanical wear, abrasion and destruction. Problems can be resolved in the following ways - adjusting the optimal distance between the rack and gears, replacing damaged components, or replacing the entire assembly.
Recommendations for car owners
To check the serviceability of the tip, you need to ask an assistant to turn the steering wheel in different directions. At this time, you need to listen to the outgoing knocks. You can use a pry bar to check for play. If during the test you hear a knock and there is play, you must immediately take measures to eliminate the malfunction.
Experienced car owners who have encountered this situation more than once advise:
- store the car in a dry room, because with constant humidity, parts are subject to destruction;
- avoid driving off-road and on roads with poor surfaces;
- upon completion of the repair, especially if it was carried out by another person, check the tightness of the wheel bolts and the parts being replaced;
- buy original and high-quality spare parts from reliable suppliers;
- After all work related to the chassis of the car, adjust the wheel alignment.
Operating a vehicle with a faulty steering system can be dangerous for the driver, passengers and other road users. Therefore, you need to repair your vehicle in a timely manner and listen to the advice of experienced motorists.
Removing the steering rack
To successfully remove the steering rack, follow the step-by-step instructions.
- Raise the car on stands from the front and remove the wheels.
- We press out the steering tips, which are located in the steering knuckle axles, using a special puller.
- We remove the rack heat shield.
- If a hydraulic booster is installed, unscrew the hoses in which the oil is supplied and processed. Place a container in advance to carefully drain the liquid.
- We unscrew the bolts that secure the steering rack from the subframe or engine shield, which is determined by the make of the car.
- Slightly loosen the pinch bolt that holds the universal joint and the steering shaft together.
- To release the spline connector, pull the rack in the direction of the steering shaft. The rail does not always move easily, so we use a hammer and knock it out of place with a small blow.
- We pull out the rack through the wheel arch (left or right - determined by the layout of the space under the hood).
Each car has its own engine compartment. If the subframe is in the way, unscrew the rear bolts with the engine mount. Next, move the subframe lower and pull out the steering rack. We do not completely remove the subframe - this is a rather labor-intensive process.
Removing the steering rack from the power steering
Newer models of domestic and imported cars are equipped with hydraulic power steering. In this case, the appropriate type of steering racks is installed. The peculiarity of the assembly of such a system is that the steering racks are connected to the amplifier using tubes containing working fluid under high pressure.
To understand how to remove a power steering rack, you should familiarize yourself in detail with the main steps of this procedure:
- before removal, it is necessary to disconnect the racks from the high-pressure pipes that are part of the hydraulic power steering system;
- for optimal repair and replacement of steering racks, it is also necessary to first drain the fluid filling the power steering tank into a separate tank until the repair is completed;
- Next, you should loosen all the fasteners and then remove the rack from under the car body.
Without performing the required preliminary work before removing the rack from the power steering, there is a risk of ineffective repair, as well as breakdown of other steering parts and damage to the amplifier itself.
Repairing such a steering system requires high qualifications, so we strongly recommend that you contact a branded automotive service center. Removing and repairing steering racks with electro-hydraulic power steering is not only technically difficult, but also unsafe without special skills.
High-quality, prompt and effective removal of steering racks of any type in various cars is carried out only in a car service center, where there are specially prepared conditions for this, as well as experienced craftsmen with the appropriate knowledge and special tools.
Repair or replacement?
Replacing a faulty steering rack is easier than repairing, but is more expensive. If we consider a new original rack for a Ford Focus II 2009, the cost is 800 euros. A copy will cost 350 euros.
A kit to repair the steering rack for this car is estimated at 40-50 euros. All that remains is to buy clamps and anthers, which will cost approximately 10 euros. To remove and repair the steering rack, we prepare a set of wrenches. To assemble and disassemble the slats, you cannot do without a special tool, which must be purchased separately.
Removing the steering rack with your own hands, using a garage and available tools, is profitable, but not reliable. Therefore, it is better to remove the rack in a specialized car service center, in conditions where there is a suitable kit for removing, repairing and restoring the functionality of problematic steering rack elements. The savings are obvious, but nevertheless, we evaluate our strengths in order to justify the upcoming expenditure of effort, emotions and time.
Is it possible to inexpensively repair the steering rack?
Technicians in Moscow can perform high-quality repairs at an affordable price. The service station has spare parts for all Audi models.
Arrangement of rods and tips
The middle solid element of the trapezoid has the simplest design - an iron rod with two hinges at the ends. The rod fingers are inserted into the second holes of the bipod (counting from the end of the lever), screwed with 22 mm castle nuts and secured with cotter pins.
Please note: the mid-link rod is bent forward slightly to bypass the gearbox. If you insert the part the other way around, problems are inevitable - the bend will begin to rub against the gearbox housing, making it very difficult to control the car.
The middle lever is slightly bent forward so that when the trapezoid moves, the rod does not touch the gearbox
Not all service station mechanics know about the correct installation of the middle trapezoid rod. My friend, who came to the service to change a set of steering rods on a VAZ 2107, was convinced of this. The inexperienced master placed the middle section in a backward bend, so it was not possible to go far - exactly until the first turn.
Side rods consist of the following parts:
- short (outer) tip with ball pin;
- long (inner) tip with hinge;
- connecting clamp with 2 bolts and nuts M8 for a 13 mm spanner.
The element is made detachable to adjust the toe angle of the front wheels. The length of the lever can be changed by rotating the threaded clamp and thus adjusting the position of the wheel for straight-line movement. The threads of the tips and inside the clamp are different - right and left, so when rotated, the rod lengthens or shortens.
The hinge pins of the Zhiguli side rods are attached to the outer holes of the bipod
The design of all hinge ends is the same and includes the following parts (the numbering coincides with the diagram):
- Ball pin with M14 x 1.5 thread for a 22 mm castle nut. The radius of the sphere is 11 mm; a hole is made in the threaded part for a cotter pin.
- A rubber (or silicone) dirt-proof cover, also known as a boot;
- Metal body welded to a rod with M16 x 1 thread.
- The support liner is made of a composite material, otherwise - a cracker.
- Spring.
- A cover pressed into the body.
The thrust joint works on the principle of a plain bearing - a metal sphere rotates inside a plastic sleeve
Some lever manufacturers cut into the cover a small fitting for periodic lubrication - a grease fitting.
The short outer ends of the side rods are the same, but the long ones are different. You can tell which part belongs to it by its bend—a lever curved to the right is installed on the right side. The ball pins of the side rods are attached to the first holes of the bipod of the pendulum and gearbox.
The identity of long tips is determined by the bend of the rod
A car mechanic I know suggests distinguishing between long tips like this: take the part in your right hand by the hinge, pointing the ball pin downward, as if you were holding a gun. If the “barrel” is curved to the left, you have a left-hand rod tip in front of you.
Video: design of the rod end for VAZ 2101—2107
How to replace the steering rack with your own hands?
If there is serious damage to the surface of the steering rack or gear mechanism, then the steering rack needs to be replaced.
Before you begin work, you should read the instructions for replacing the rack for your car. In addition, a day before starting work, we recommend spraying WD-40 on all bolts and nuts to make it easier to unscrew them later.
- With the car on a level surface, apply the parking brake. We recommend placing something under the rear wheels, for example, bricks.
- The steering wheel is set to neutral. And the wheel nuts are loosened one by one. The car is raised on a jack and the front wheels are removed.
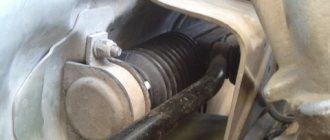
- The next step is to remove the absorber, thereby opening access to the steering rack.
- Then we move on to unscrewing the tips. You can then knock out the tips with a hammer. However, it is worth doing this if you are going to change the tips along with the steering. Otherwise, it is better to use a puller.
- The fastening nuts on the clamp holding the steering rack are unscrewed. And the clamp is removed.
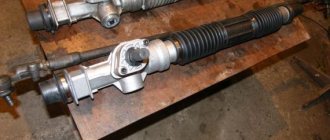
- The steering rack is free, all that remains is to pull it out. It is most convenient to do this from the passenger side.
- Then you need to install a new one in its place, performing the steps in reverse order.
We recommend: Electric additional pump for the heater of VAZ and other cars: selection and installation
It is worth remembering that after replacing the steering rack with your own hands, you need to adjust the wheel alignment yourself or at a service station.
Preparing to remove the steering rack
You must first secure the vehicle and set the parking brake. For greater reliability, it is better to place chocks under the rear wheels. After the machine is securely fixed, you need to:
- set the steering wheel to neutral position;
- loosen the wheel nuts;
- take a jack and lift one side of the vehicle;
- remove the wheel by placing supports under the car.
We perform the same procedure on the other side. As a result of these steps, you will be able to completely open access to the tips, which will make removing the mechanism much easier.
What tools will be needed for the work?
Required Tools
In order to replace a failed or poorly functioning mechanism, it is necessary to prepare a certain set of tools in advance:
- wooden supports;
- liquid key;
- thin screwdriver;
- medium hammer;
- a set of socket wrenches and a set of sockets with a ratchet;
- puller for tips.
Preparatory activities
Before changing anything, we strongly recommend that you read the service manual, which consistently describes the entire process and tips for its implementation. Generally, there are 3 steps to complete first:
- The machine should be placed on as level ground as possible, and then the parking brake should be locked. To secure the vehicle, it is necessary to place bricks under the wheels.
- The steering wheel is set to neutral position.
- Then you need to loosen the wheel nuts, and this must be done one at a time.
Loosening Wheel Nuts
Having completed the preliminary work, the car is placed on a jack and the wheel is removed from one side. After which the car is lowered again, but on wooden supports. The wheels on the other side should be removed in the same way. The described steps are aimed primarily at gaining access to the steering tips, which will greatly simplify the removal of the steering rack.
Advice! Before unscrewing the bolts, they are cleaned with a metal brush and treated with a WD-shkoy.
Unscrew the absorber
While the liquid consistency destroys rust, it makes sense to look under the hood and clear the area for access to the problematic mechanism. In order to remove the steering rack, it is necessary to remove the alarm siren and gas adsorber, having previously unscrewed the corresponding terminals. The extracted solutions are removed so as not to interfere.
Removing the tips
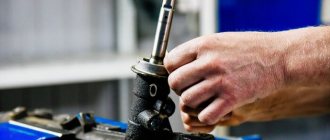
Experts emphasize that very often the steering rack is replaced along with the tips. They are dismantled using a conventional puller or knocked out with a hammer. Using pliers, the key is removed from the fastening nut, after which it is unscrewed.
Removing the steering tips
A fork-shaped mount should be inserted under the rubber seal, and the upper part of the pin should be placed on the base of the tip bolt. The puller nut is tightened to the maximum, and then a hammer is used to strike the rack mount, so that the tip can be removed without any problems. Removal and installation of all elements must be carried out extremely carefully.
Elimination of parts deformation
When bending any element, there are two ways:
- It is trivial to take and cut it in half and thus create freedom of action for yourself. A radical method, of course, but you should understand that parts with defects should be replaced in any case, because this greatly affects your safety.
- Heating a part to deform it to its original position. With this method, you still need to understand that you need to do everything carefully, because you don’t want to damage parts that are in good condition or remove the paint from the car under the influence of high temperatures. After this, it is also still worth replacing the part, since it will no longer perform all its functions and may behave extremely unpredictably.
Removing the rack: step-by-step instructions
Steering Cardan Lock Bolt
How to remove the steering rack, regardless of the car model? The work is carried out in 4 stages.
- The mounting crosspieces are loosened (to access them, you should look under the brake pedal inside the car). To release it, it is enough to unscrew just 1 nut, since the fastening mechanism is implemented on the principle of a clamp.
- When restoring or repairing the steering wheel, you need to return to the area under the hood and use the steering wheel to release the clamp clamps.
- After performing simple manipulations, the rail is finally released; simply remove it: grab the base of the body with both hands and begin to gently and slowly loosen it, simultaneously pulling it towards you.
We remove the rack
4.After disconnecting all the clamps and fastenings, you need to pull out the steering rack using the hole in the arched wheel space: turn it first to the left and then to the right (as it turns out) so that the splined shaft gets into the structural recess.
Removing the rack
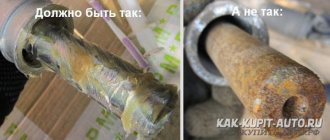
Craftsmen recommend carrying out work as carefully as possible. Replacing the steering rack should not damage the electrical wiring or fuel hose. You can't do this without an assistant. Installation of a new rail begins only after the old one has been cured.
The process of installing a new mechanism is carried out in reverse order. Using graphite lubricant or ordinary grease, the landing areas of the studs are treated, and they are also cleaned with a brush. To prevent traction in the car from falling, all the plugs in the new rack are opened and they are filled with lithol.
New steering rack
The rack is rotated around its axis, but smoothly, in order to eliminate the possibility of damage to the wiring.
Note! You cannot do without the additional hands of an assistant when attaching the steering “worm” to the spitz part. One person should be in the cabin and directly connect the mechanism to the clamp, and the second should guide it from the outside.
We strongly recommend watching the thematic video about removing the steering rack yourself, presented below.
Removing the rack with a simple mechanism
If you are the owner of a car with a fairly simple configuration that includes a rack and pinion mechanism, then to remove the steering racks you will need:
- determine the location and loosen the fastening of the rack and pinion mechanisms;
- completely disconnect the steering racks from the tips;
- unscrew the connecting bolts of the rails from the car body;
- find the output of the cardan clutch with the racks;
- release the steering racks from the cardan mechanism;
- pull out the parts from the side where there are no fasteners or obstacles.
It should be noted that most standard instructions contain only the main points, without familiarization with the nuances and details of this procedure. For this reason, drivers without appropriate experience are strongly discouraged from proceeding with independent inspection and removal of racks, relying on their own strength and the information they have read. In the absence of special tools and equipment, as well as practical skills, you can simultaneously damage other parts, thereby further aggravating the situation and increasing the total repair costs.
Complete Guide on How to Remove Steering Wheel
The right guide will help you remove the steering wheel from your car and save money that would have been spent on professional service. This easy-to-follow guide will ensure that you do everything right and there will be no chance of failure after that.
Required Tools
Although the steering wheels look different from one to another, the process for removing the steering wheel is more or less the same. Before going through the steering wheel removal procedures, gather these tools:
- Protective gloves
- Set of tools including screwdrivers
- Protective glasses
Step by step procedures
Before you continue, remember that safety comes first. There is no need to take risks if you don't have the necessary skills. Entrust this task to a professional. However, if you do decide to remove the steering wheel, park the vehicle on a level surface with the wheels pointed straight ahead to ensure it remains in a straight position. Apply the emergency brake and stop the engine. Your car is ready. Here are the necessary steps you need to follow to remove the steering wheel:
We recommend: There is now an opportunity to obtain the services of a car lawyer remotely
Remove the negative battery cable.
This is the first step. This will prevent any short circuit when replacing the steering wheel. Disconnect the airbag located in the middle of the steering wheel.
Remove the mounting bolts.
After carefully removing the airbag, locate the steering wheel mounting bolt or nut. If the steering wheel is held in place by a mounting bolt, a wheel puller is not required. Turn the steering wheel 90 degrees and unscrew the bolt counterclockwise. Most cars have a steering lock that needs to be unlocked to make the unlocking process smooth. Using an air gun will make this process easier. However, if you don't have one, use a socket or wheel clamp to loosen the bolt.
Pull out the steering wheel.
After removing the bolt, carefully inspect the threads to make sure you did not damage them when removing the steering wheel. Now grab the handlebars firmly and pull outward with equal force with both hands. If the steering wheel resists, change your hand position and try pulling again by twisting and turning it a little. The steering wheel will come out of the shaft. Here's how to remove the steering wheel.
Check wiring etc.
Keep an eye on the alignment indicator, which you will need when reinstalling the wheel. Indicator mark at the top. If you don't notice the mark, please create one for your reference. (Note: Some shaft splines contain a flat spot that serves as a marking.) Once the wheel is free, route the wiring, connectors, and terminals through the access hole located in the center of the steering wheel.
Inspect the steering wheel.
Inspect the steering wheel for damage. When planning to replace, check the similarity with the new unit. The clock spring assembly consists of a bundle of wires that remains attached to the steering wheel when you turn it in any direction. You must be careful when handling this device. Do not turn it when the steering wheel is not attached.
Be careful when removing and reinstalling the steering wheel.
Reinstall the wheel.
Once that wheel is ready after repair or you have a new steering wheel ready to install, connect it to the wiring and connector that comes out through the access hole on the steering wheel. While maintaining alignment with the indicator mark, install the steering wheel onto the steering wheel shaft and press gently. Alignment will help you avoid future driving accidents. Take the mounting bolt and apply a thin coat of Loctite Blue to it. This will help the mounting bolt stay firmly in place. Insert the mounting bolt by hand. This will prevent cross cutting. Tighten the bolt according to the manufacturers recommendations. This is the last step in installing the steering wheel.
Do one last check.
Here's how to remove your steering wheel, inspect it, and reinstall it. Before the trip, check the routing of the wires and the tightening of the bolts again. Completion
Steering wheel removal information will save you a lot of money. All you have to do is follow the instructions in this guide and act accordingly. Also be careful when handling components because even minor damage can lead to costly repairs.
How to unscrew the steering wheel nut
If there is a broken thread that cannot be unscrewed, there are three ways:
- You shouldn’t immediately take a radical approach to this matter; perhaps not everything is as bad as you think and just simple manipulations are enough. First, let's clean the entire surface on which we will work with a wire brush and drop a little penetrating lubricant. If you do everything described above, then there is a chance that a regular spanner will help you to unscrew a bolt or nut with torn edges. If not, there are other ways. You can try to simply tap the ill-fated object (but not too hard!).
Lubricating a soured nut with WD-40
- How to unscrew a bolt or nut with broken edges? Of course, a gas wrench will help you a lot in this case. This is truly a magical tool. This tool, of course, requires a lot of space since it is very large, but at the same time it is able to hold even the most even objects, which helps a lot in this problem.
Gas key
- In those equally frequent cases when a gas wrench will not help, but the nut (or bolt) is large enough, an angle grinder will come to the rescue. You can simply take and carefully cut the edges, which will be smaller than those that have been erased. Four of these newly cut edges will be enough; there is no need to try to cut out all six. After this, the nut (or bolt) can be easily unscrewed with a socket or socket wrench, or using a gas wrench for greater confidence in a positive outcome (it is not recommended to touch the open-end wrench). You can also restore the edges using a file, although this, of course, takes more time.
Cutting the nut thread with a grinder
Manufacturers of steering racks
I would also like to dwell a little on the manufacturers of steering racks for Audi cars. Audi racks were installed from ZF, Koyo and SMI. Steering racks from ZF, although generally reliable, are susceptible to corrosion due to condensation. As a result, the seals become unusable. The racks from Koyo and SMI are less susceptible to corrosion, but the crankcase of this unit is characterized by increased wear. The malfunction manifests itself in the form of the steering wheel biting when turning in one direction, and possibly both. The problem can be resolved by repairing or replacing the crankcase.
If we talk about the possibility of restoring racks, ZF, unlike Koyo and SMI, offers components for its products, which makes it possible to order the necessary part. When faced with steering rack repair, it is better to give preference to refurbished ones rather than used ones purchased, for example, at a disassembly site. In the first case, you will be given at least some kind of guarantee. Now, if the above malfunctions occur, you will know that the steering rack needs to be repaired and, as with any other part, you should not delay it too much.
Preparing to remove the steering racks
The preliminary step before removing the steering rack is to diagnose the vehicle's steering system. The initial technical inspection necessarily includes a consultation with an experienced auto mechanic who will determine the type and configuration of the steering rack installed on your car. You can independently prepare for the repair of steering mechanisms using the factory service documentation.
So, before removing the steering rack, you must:
- Determine exactly what type of steering system is installed on your car. It can be based on a hydraulic or electro-hydraulic booster, as well as in older car versions, a simple rack and pinion mechanism;
- study the vehicle configuration based on the type of steering racks installed, and strictly follow the sequence of actions outlined in the instructions for a specific type of steering system.