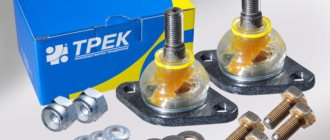
Support bearings are designed to reduce body loads transmitted from the vehicle wheels through the shock absorber struts.
They are components of the upper supports of the front shock absorbers. The support bearings are located in the upper inner surface of the “cups” located in the engine compartment above each of the wheels.
The design of the standard support bearing of the VAZ 2110 consists of the bearing itself (a thick rubber separator with steel balls built into it) and two protective rubber gaskets.
What is needed for repairs
First, you need to determine which support on the VAZ 2110 engine should be changed (if you do not want to change all the damper mounts at once). To do this, you need to do an independent inspection of these parts. Sometimes, the power plant seems to be tilted horizontally on one side or tilted along the central axis of the car. This is the first sign to replace the damper mounts.
| Locksmith kit | Rolling jack |
| A couple of short boards | Angle grinder (grinder) |
Two cushions (side) secure the engine to the left and right side members in the engine compartment. And one (rear) fixes the motor to the bottom. Therefore, it is necessary to lift the machine on a lift or install it on a viewing hole. The wear is immediately visible. The rubber has tears and core failure. Depending on the result of visual diagnostics, you should purchase the required number of parts for installation.
You will need a tool. In most cases, a standard locksmith set consisting of open-end and box-end wrenches with heads will be sufficient. In addition, to replace engine mounts on a VAZ 2110 you will need a rolling jack and a pair of short boards. It is advisable to have electricity and a cutting machine with a disc, since you may have to cut off the mounting bolts.
Helpful information! A couple of hours before repairs, it is strongly recommended to apply universal lubricant “Liquid Key” to the threaded connections. Damper supports are changed very rarely, therefore, unscrewing them without prior preparation is quite difficult.
How to find out that the support bearing is broken
In the vast majority of cases, the support bearing fails due to severe contamination. Therefore, if you often drive in bad weather or travel on almost complete off-road conditions, this part will break down much more often than when using the car in the city.
What symptoms indicate bearing failure? There are several of them:
- knocking of the front suspension when driving even on small uneven sections of the road;
- an unpleasant grinding or crunching sound when turning the steering wheel in any direction;
- clicks that can occur even while driving on a flat road.
Replacement of the VAZ-2110 support bearing should be carried out immediately after detecting any of these symptoms. Otherwise, the safety of car operation is significantly reduced, the risk of rapid tire wear increases, the support struts fail, the restoration of which will cost much more.
Design features
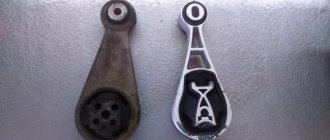
If you have a “ten” with an 8-valve engine, then the design provides two side and one rear support;
On a 16 valve engine there are two side mounts, one lower and one upper.
It is important to note that 8 valve engines on the 10 have a rear engine mount, while on the 16 valve there is none. But such motors can boast of having additional supports.
Regardless of the design, the replacement procedure is performed using a similar method.
Malfunctions
In fact, it is quite easy to detect failed airbags, since engine vibrations will immediately increase.
If the power unit is working normally, but the body is shaking, vibration is felt on the steering rack, pedals, and dashboard, then there is no doubt that the engine mounts are worn out.
The vibration peak occurs when the engine starts and when it is turned off. If the rubber elements are completely worn out, then a knocking noise will begin to appear. It is caused by contact of engine elements with the supports.
To make sure the cushions are worn, turn on the engine, lift the hood, and visually inspect the supports and cushions. By placing your hand on the engine, you will tactilely feel an increase in vibrations compared to the normal behavior of the car.
There may be several reasons for problems.
| Causes | Peculiarities |
| Deformations | Deformation of elements can occur during the life of the pillows, under mechanical or temperature influences |
| Loss of elasticity | Rubber does not have a large margin of strength, so it ages over time. This effect increases when exposed to temperature changes. |
| Delamination and cracking | The pillow can literally fall apart and creep apart when exposed to chemically aggressive substances. |
Is replacement required?
If you find that the rear airbag or any other airbag has begun to wear out, you should under no circumstances delay repairs.
In addition to the discomfort of the driver and passengers when the car is moving, you risk delaying the breakdown until the moment when destructive processes begin in the operation of the gearbox and power unit.
When starting to repair engine mounts, you should think about whether it is worth changing the cushions separately, or replacing the mounts as a whole.
If the support is not damaged, it is not necessary to replace it. That is, in such situations it is enough to simply replace the pillow. A set of new pillows for a VAZ 2110 today costs about 1.3 thousand rubles. A set of supports will cost you 2.5 thousand rubles.
Doing the work yourself or contacting a service station is your choice. But you should know that you will be charged at least 300 rubles for replacing one pillow.
Stories from our readers
“Fucking basin. "
Hi all! My name is Mikhail, now I’ll tell you a story about how I managed to exchange my two-wheeler for a 2010 Camry. It all started with the fact that I began to be wildly irritated by the breakdowns of the two-wheeler, it seemed like nothing serious was broken, but damn it, there were so many little things that really started to irritate me. This is where the idea arose that it was time to change the car to a foreign car. The choice fell on the melting Camry of the tenth years.
Yes, I had matured morally, but financially I just couldn’t handle it. I’ll say right away that I am against loans and taking a car, especially not a new one, on credit is unreasonable. My salary is 24k a month, so collecting 600-700 thousand is almost impossible for me. I started looking for different ways to make money on the Internet. You can’t imagine how many scams there are, what I haven’t tried: sports betting, network marketing, and even the volcano casino, where I successfully lost about 10 thousand ((The only direction in which it seemed to me that I could make money was currency trading on the stock exchange, they call it Forex. But when I started delving into it, I realized that it was very difficult for me. I continued to dig further and came across binary options. The essence is the same as in Forex, but it’s much easier to understand. I started reading forums, studying trading strategies. I tried it on a demo account, then opened a real account. To be honest, I didn’t manage to start earning money right away, until I understood all the mechanics of options, I lost about 3,000 rubles, but as it turned out, it was a precious experience. Now I earn 5-7 thousand rubles a day. I managed to get the car buy after half a year, but in my opinion this is a good result, and it’s not about the car, my life has changed, I naturally quit my job, I have more free time for myself and my family. You’ll laugh, but I work directly on the phone)) If If you want to change your life like me, then here’s what I advise you to do right now: 1. Register on the site 2. Practice on a Demo account (it’s free). 3. As soon as you get something on the Demo account, top up your REAL ACCOUNT and go to REAL MONEY! I also advise you to download the application to your phone, it’s much more convenient to work from your phone. Download here.
In order to install the additional engine rod, you will need to disassemble it into parts. Then remove the ignition module and install part No. 1. After this, install part No. 2 and secure the structure with bolt No. 3.
If the installation is carried out on an 8kL engine, then you will need to move the ignition module using a special bracket (code 3705.0100.04). On a 16kL engine such a bracket will not be needed, but installing the support is somewhat more difficult due to the smaller space under the hood. It is better to carry out the work on a lift, and at the same time it is recommended to install a standard support from 8kl on the gearbox.
If the engine is 1.6 l, then a bracket will be required (code 3705.0300.04).
Conclusion
I installed an additional engine mount on a VAZ 2110 and..
Source
Replacing the left engine mount of a VAZ 2110
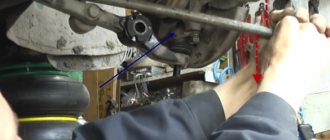
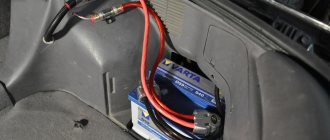
Place the car on a level and solid surface. Disconnect the negative terminal from the battery. Remove the crankcase protection. We place a jack under the engine, and use a piece of board (as a spacer) to lift the engine. The power plant is suspended in this way and the supports do not experience any load.
Next, we perform the following steps:
- Unscrew the nut of the central stud (15 mm wrench);
- unscrew the two fixing bolts of the protective cover (13mm wrench);
- under the bracket, unscrew the 3 bolts that connect it to the spar (17 mm wrench);
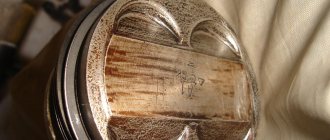
- then, we take out the worn-out pillow;
- We replace the damper part with a new one and assemble the structure in the reverse order.
On a note! Spare parts from imported suspension manufacturers, such as: Lemferder, SWAG, RUVILLE, SKF, can provide high-quality and long-lasting performance. If they are not in the store, they can be delivered to order.
What to do if the caliper creaks or jams
If the brake caliper creaks or jams, and the part is in good condition, you can try to fix the problems yourself. To do this, it is recommended to perform the following set of actions:
- The first step is to unscrew the brake caliper; to do this, you need to put the car on a jack and remove the wheel. It is worth noting that in some car models the caliper can be unscrewed counterclockwise;
- Having removed the caliper, unscrew the piston using a wrench, then it must be pulled out of the cylinder;
- The removed parts must be carefully inspected for chips, rust, corrosion and various damages. If rust is found, it needs to be cleaned well. When the calipers are heavily worn, problems may arise with cleaning the rust with improvised means; in such a situation, the part will need to be sanded;
Important: When reassembling the caliper, pay special attention to the boot so as not to accidentally damage it. If there are cracks on the boot, be sure to replace it.
Replacement
For eight-valve engines
- Prepare the car for repair: place it on a flat surface, place stops under the rear wheels, remove the engine protection.
- Unscrew the generator belt tensioner bolt and remove the belt (key 13).
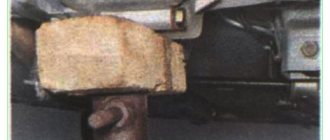
- Place the jack under the engine, place a thick wooden beam or board under its upper part. Raise the engine to remove the load on its mounts.
- Unscrew the nut of the central fastening of the right pillow (15 wrench).
- Unscrew the bolts securing the pillow to the bracket (key 13).
- From the bottom side of the right arch, unscrew the 3 bolts securing the bracket to the spar (17 key).
- Remove the bracket and replace the old cushion with a new one.
- Carry out installation in reverse order.
- Move the jack under the gearbox and lift it up.
- Unscrew the nut of the central fastening of the left pillow (15 wrench).
- Unscrew the two bolts securing the support and remove it (key 13).
- Replace it and reassemble the structure in reverse order.
- Unscrew the two 17 nuts securing the cushion to the body, and then two more nuts securing it to the gearbox (removal and replacement of the rear support is carried out from the bottom of the car).
- Remove the rear support.
- Unscrew the nut securing the pillow to the bracket (19mm wrench). Remove the old pillow and install a new one.
- Install the rear support in reverse order.
Caliper repair methods
Caliper malfunctions can be different. However, we can highlight the most common cases, as well as recommendations for eliminating them.
Brake pads jam in caliper
This is noticeable when, with the caliper removed, the pads do not move freely. Usually the reason is rust on the stationary caliper pads, which prevents the pads from moving.
To eliminate the problem, you should arm yourself with sandpaper, a metal brush and a file (but only a small one). Then you need to clean off the corrosion from the metal, and then lubricate the surface with a high-temperature type lubricant. However, there should be no wear on the caliper - pits from corrosion. If they are present, cleaning will not help - the pad will not be pressed tightly enough or will not move away from the surface of the brake disc quickly enough.
Sometimes such a defect can be eliminated with a file (subject to insignificant wear), but usually you have to buy a new part of the caliper (fixed).
Something else useful for you:
Video: Passat front caliper rebuild
Corrosion on the caliper piston
It can be triggered either by a defective boot or a long downtime of the machine.
To eliminate the problem, it is recommended to remove and disassemble the caliper. Remove the rust-damaged piston from it and polish it with a special paste or fine rust. After this, thoroughly wash the piston seat with WD-40 and reassemble the caliper. Installing new cuffs won't hurt either. But the best option would be to buy a new piston or caliper assembly.
Replacing the right engine mount of a VAZ 2110
Place the jack under the box. We hang the engine and remove the load from the cushion. Completely disconnect the battery and remove it (this will be more convenient).
Next, we move in the following sequence:
- Unscrew the nut of the central stud (15 mm wrench);
- Unscrew two bolts (13 mm wrench);
- We take out the central pin (you will have to loosen the jack a little);
- We take out the support bracket and replace the pillow with a new one;
- We insert the new support into place and raise the engine;
- We tighten the damper assembly with the bolts in the reverse order.
On a note! The support mounting areas on the side members may be in poor condition (rust). In order to extend their “life,” you should cover the damaged area with Movil immediately before installing the bracket.
Functionality check
Before you start replacing the pillows, it is recommended to check whether they have really lost their functionality. It is likely that vibrations can occur for other reasons.
To check you need to do the following operations:
- Place the car on stands;
- Place a jack under the oil pan, placing a block or board at the same time;
- Raise the engine until the mounts relieve the weight of the engine;
- Check the pillows;
- Inspect them for cracks;
- Check if they come off easily from the metal backing;
- Has the original hardness of the material been preserved, or has it become too elastic;
- If no visual defects are found, check the play between the plates and the frame;
- Treat the cushions with protective compounds, return the engine to its place;
- Sometimes, to return the supports with cushions to normal operation, it is enough to tighten the fastening nuts.
If the check shows that the pillows have already served their purpose, then the only correct solution is to replace them. These elements are not subject to restoration.
Checking serviceability: do-it-yourself diagnostics
A more detailed check can be done using the assistant:
- Open the hood and have a helper turn the steering wheel (if you have power steering, start the engine). When you place your hand on the support, you will feel impacts and clicks. The fault can be more accurately determined using a car stethoscope.
If you don’t have a car stethoscope, a regular medical stethoscope will do.
Replacing the rear engine mount of a VAZ 2110
If, when dismantling/installing the left and right supports, the work was carried out in the engine compartment, then to remove the rear damper you will have to crawl under the car. It’s good if there is an inspection hole in the garage, since the ground clearance of the “ten” is quite low and it’s very difficult to crawl up on your belly.
The replacement process looks like this:
- We install a jack under the box and hang the rear part of the engine;
- Unscrew the two support nuts from the body (17 mm wrench);
- Using 2 19 mm keys, unscrew the support mount from the gearbox;
- We remove the support from the seats and take it out from under the car;
- We take out the bolt and replace the damper with a new element (a vice may be needed);
- We return the knot to its place and tighten it;
- We lower the engine with a jack and install the crankcase protection.
After you have managed to change all the engine mounts on the VAZ 2110, the engine should take a level position. You should start the engine and carefully observe the vibration. It should be minimal. This means that the repair was carried out correctly.
Manufacturers and prices
Now you know how to change engine mounts, and you need to talk about the cost of the products. The most popular producers in Russia are Balakovo and Tolyatti. Which manufacturer of the part to choose is up to you to decide. They differ little in quality; the choice depends only on individual preferences. Their prices are approximately the same:
- Engine side mount (popularly called “guitar” for its resemblance) - cost 480-600 rubles, depending on the seller.
- Rear airbag attached to the gearbox (without bracket) – 350 rubles.
- For 16-valve engines, supports cost about 450-500 rubles.
A complete set will cost you approximately 1500-1800 rubles.
But this will significantly improve driving comfort, and the level of extraneous noise will decrease, since the new rubber installed in the supports is much more elastic. Usually there is little choice in stores. Therefore, before removing the engine, make sure that all the cushions are in good condition. If not, replace it. Source
Characteristics
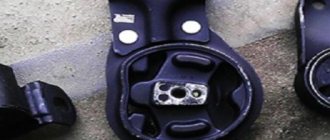
Additional engine support for 8 cells. VAZ 2110 engine is attached to the engine bracket. Designed to limit the movement of the power unit, especially when braking the engine, when hitting road irregularities, you can install an additional (fourth) support for the power unit, as well as when the car suddenly starts moving. An additional support for the VAZ 2110 connects the clutch housing to the cross member of the front suspension. The part ensures uninterrupted operation of the system. The support is made of high-strength material, the distinctive feature of which is reliability and wear resistance. Additionally, a plate for transferring the ignition module is purchased.
The manufacturer reserves the right to change the characteristics of the product, its appearance and completeness without prior notice to the seller.
| Packed length | 0.25 m |
| Packed width | 0.11 m |
| Packed height | 0.11 m |
| Package weight | 1.6 kg |
| Automobile model | VAZ 2110, VAZ 2111, VAZ 2112, VAZ 2170 Priora, VAZ 2171 Priora, VAZ 2172 Priora |
Working principle of brake caliper
The brake caliper performs its main task - it provides the necessary braking force required to slow down or stop the car.
Pressing the brake pedal causes pressure to build up in the brake line. It is transmitted to the caliper pistons, which at this time strictly parallel fixes the pads relative to the disc. When braking, the calipers compress the pads on both sides of the disc, causing it to slow down. But there is another effect. It involves heating, as friction energy is transformed into heat. This significantly heats up both the disc and the pads and calipers. The temperature of the brake fluid also increases.
This effect places certain demands on manufacturers. So the front brake caliper must have the following characteristics:
- high heat transfer rates;
- strength;
- high resistance to heat (so that increased temperature does not deform the caliper components).
Video: General principle of operation of the rear caliper
Useful tips
Please note that when engine vibrations occur, you should not always immediately change all the supports “in a circle”. It happens that even on a relatively “fresh” car, only one element fails, while others are quite suitable for further use. This occurs as a result of technical fluids getting into contact with the rubber part of the cushion, etc.
However, as for basic recommendations, if the car has a mileage of about 80-100 thousand km. and more, and all engine mounts have the same service life and have begun to fail, it is better to immediately replace all such mounts.
The reason is obvious - if the rubber begins to deteriorate from old age, after replacing one clearly faulty element, after a while the next cushion will also no longer cope with its task.
It is also important to select only original products or high-quality analogues for replacement, as well as purchase parts from trusted sellers. The fact is that there are a large number of spare parts on the market for VAZ cars, but not all of them are of high quality. Moreover, you often come across cheap fakes of an original of unknown origin.
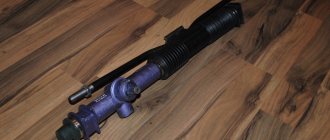
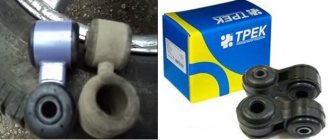
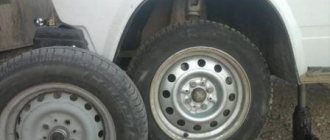
Replacing support bearings without removing struts on a Lada Granta
Hello. Chassis repair is perhaps the most common work that a car owner has to do, or more accurately, “our” car owner has to do. These constant knocks and squeaks seem impossible to completely “defeat”, and after one is put in order, another goes out of order. In general, this is not strange, given the state of the roads in Russia. Constant loads and driving on uneven roads have the most unfavorable effect on the chassis. In principle, it would probably be wrong to blame the roads alone; part of the problem certainly lies with the designers of AvtoVAZ, who, despite problems with the roads, continue to produce cars with flimsy suspension and chassis. Well, enough of the ranting, I think, we need to get to work.
Today, dear readers of VAZ Repair, you will learn how to replace the support bearings on a Lada Granta, and not just replace them, but replace them without removing the struts. I wonder how? Then continue reading.
I’ll say right away that before replacing the support bearings, you need to make sure that they are really faulty. Read about how to check support bearings here.
Those who have ever encountered the need to replace support bearings know that to perform this work it is necessary to remove the struts along with the springs, which certainly complicates the task. However, as you know, laziness sometimes works wonders; in addition to being the “engine of progress”, it also often allows you to make your life easier. This photo report will clearly demonstrate to you how to replace the support bearings without removing the strut and you will be able to see that sometimes laziness can work wonders :-). Joke!
To work you must have:
- Set of keys: “13, 14, 17, 22”;
- Hexagon (to fix the rod from twisting);
- Two jacks or supports for the car;
- Special spring ties;
- Actually, the support bearings themselves.
Features of replacing engine mounts with a 16-valve engine
The main difference in the mounting of the 16-valve engine is the absence of a rear lower support. The engine is attached with a rear support from above to the number plate of the body. Another additional damper bracket is located at the bottom front. It connects the motor and the lower beam of the radiator (TV) frame. These parts are called “guitar”. After hanging the engine with a jack, they change simply.
Sources
- https://FokSevmash.ru/dvigatel/podushka-dvigatelya-vaz-2110.html
- https://www.tuningsvs.ru/zapchasti/sportivnyje-zapchasti-vaz/podvjeska-rastjazhki-opory-stojki/usiljenija-podvjeski/usileniya-podveski-lada-priora/dopolnitelnaya_opora_dvigatelya_svs_dlya/
- https://medwegonok.ru/dopolnitelnaya-podushka-dvigatelya-vaz-2110-8-klapanov-svoimi-rukami/
[collapse]