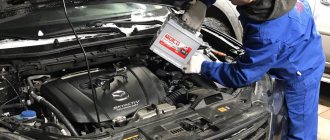
We make a backup wire from the generator to the battery with our own hands. NO to waste!
This article will be of interest not only to car audio enthusiasts, but also to ordinary amateur motorists. Many people are faced with this problem when, when they turn on the stove, headlights, air conditioning and other electrical consumers, the voltage in the network is loaded, the voltage decreases and there is a “drawdown”. The generator begins to wear out.
There is one very good way to help the generator - to power the backup wire from the generator to the battery. For some unknown reason, the original wires are thin, especially on domestic cars. When the load is high, these wires cannot supply a large amount of energy to the battery.
A wire with a cross-section of 25 squares is perfect.
KG markings (aka welding)
and PV3 (comes in different colors, usually yellow and blue)
Also, to the positive wire, as safety against short circuit (short circuit), you need to install an 80A fuse (with a cross section of 25 square meters)
If we duplicate the positive wire, then the negative wire requires similar duplication from the battery to the car body.
Sometimes such an installation increases the voltage by 0.7 volts
This will make the generator's work much easier.
Turned on the heater, headlights, heated rear window:
It would be nice to protect the wires with cable corrugation.
Source
To watch online, click on the video ⤵
How to duplicate a generator on a VAZ 2107? We crimp the wires incorrectly. We make drawdowns smaller. Read more
DUPLICATION FROM GENERATOR. WHAT DOES HE GIVE? IS IT WORTH DOING?More details
Duplicate generator for VAZ 2107 with measurementsRead more
COMPETENT DUPLICATIONS OF THE GENERATOR for the VAZ 2114! THE WAY TO THE SUB! / Vesta Gearbox and Handbrake! (Episode 28)Read more
INCREASING VOLTAGE ON VAZ / DUPLICATIONRead more
Negative wire on the car, correct connection.Read more
Duplication of wires from the VAZ generator. Will it help or not? Read more
#VAZ#CHARGING#DUPLICATIONVAZ 2107, current loss, weak charging, body weight duplicationRead more
Dubbings. A clear example of why they are neededRead more
Generator set design
The VAZ-2112 generator consists of covers - front and rear. They are made of aluminum alloy and have special sockets where bearings are installed. On the back cover there is a terminal that is used to connect the battery. It also has a connector. Through it, voltage is supplied to the excitation winding. There is a capacitor on the back cover - it serves to suppress electromagnetic interference. There are places on the device for installing and securing brushes.
The core cylinder in this generator is made of transformer iron. Inside it there are special grooves in which the winding is neatly laid. Also on the cylinder there are leads for connection to the rectifier unit. The covers are screwed to the stator using bolts. The shaft, which acts as a rotor, has an excitation winding. It is connected to copper rings. A special groove is made at the front end of the shaft, which serves to install the drive pulley. The brushes are made in one piece, which is combined with the generator relay. It is housed in a durable metal case and securely attached to the brush holder. The back cover inside holds the diode unit - it includes 6 main elements and three additional ones. They are mounted on aluminum semicircular plates, due to which the diodes are cooled more efficiently. In the car's operating manual there is a diagram with which you can figure out how the VAZ-2112 generator works.
It is also used for repair work.
How to install an eight generator instead of a five generator? see below.
The G222 generator is still produced as spare parts for cars that remain in service. Salespeople in stores sell it for cars of the 2105 series, without asking the year of manufacture. Generator G 222 does not work without altering the wiring on cars with generator 372.3701. It is correct to buy a generator 372. 3701 (eight), and not to redo the wiring for the G 222 generator.
Due to the high wear and tear of the fleet, the generators of most cars are in a very worn condition and require repair or replacement with new ones.
The generator has a conventional circuit - a stator winding, a rotor and a diode bridge. The built-in voltage regulator, together with the brush assembly, is inserted into the generator. The generator housing is grounded, that is, connected to ground with mounting bolts. In a single-wire circuit of a car, all elements are connected to ground with one wire. The minus of the battery is connected to the ground, so the common minus sits on the ground, and all the elements are powered by the plus.
The generator is similar to its predecessor G221 from the VAZ 2101 -06, except for the diode bridge and the front housing cover, the remaining parts from the G 221 are not suitable for the G 222, although you can assemble options that will be quite functional.
It will be useful: The VAZ-2112 cigarette lighter does not work: reasons, what fuse, repair
Operation of the G222 generator
When the ignition is turned on, from pin 151 through the 10th fuse, the positive from the battery reaches point B of the voltage regulator, the regulator opens from the positive of the battery, through the generator output point, to point B
regulator, excitation current flows, it enters the excitation winding through the brushes and then to ground. The excitation current is maximum - about 3 Amperes. The rotor is magnetized and, as it rotates, its pole pieces create a changing magnetic field, which generates an EMF in the stator winding. The variable EMF of the winding creates a current through the diode bridge and an almost constant voltage is obtained at the output.
Principle of operation
The rotor, whose main task is to create a magnetic field, is a shaft on which the excitation winding is located. Each half of it is placed in special pole parts. The slip rings supply current to the winding. The rotor rotates due to a belt drive from the drive. The stator consists of a core and a winding. Here, alternating current is generated, which is sent through the rings further along the electrical network. However, it must first be removed from the frame. In order to supply current to the rings, a brush assembly is used. Then comes the rectifier unit, which converts the alternating sinusoidal voltage generated by the generator. In different cases, different circuits for connecting the excitation windings are used. For example, another separate pair is applied. Current simply cannot flow through the battery if the engine is not running. When connecting the winding in a star configuration, you can increase the generator power by 15%. The generator relay maintains the voltage of the device within the specified limits. It changes the frequency and duration of electrical current pulses. A relay is a set of several sensors and actuators. Their task is to determine how long the field winding should be in the network. If the relay is faulty, then an unstabilized voltage will be supplied to the battery.
Differences in generator connection diagrams.
The VAZ 2107 charging scheme differs depending on the year of manufacture of the car, but not significantly. The difference lies in the presence or absence of a charge indicator lamp on the instrument panel, the method of connecting it, and the presence or absence of a voltmeter. But this only applies to carburetor cars. On cars with an injection engine, the circuit does not change and is exactly the same as on the first cars.
Charging diagram before 1986.
Let's consider the VAZ 2107 charging circuit with a control lamp that operates through a relay. It was used on cars produced until 1986. This circuit is characterized by the presence of a battery charge indicator lamp.
When the ignition is turned on, the plus from the lock through fuse No. 10 “Instrument panel, direction indicators” is supplied to the relay of the battery charge indicator lamp to the contact and output of the coil. The second terminal of the coil is connected to the central terminal of the stater, where all three windings are connected. The relay contacts are constantly closed, the control lamp lights up. When the engine is running, when the generator begins to produce current, an alternating voltage of about 7V appears on the windings. Current begins to flow through the relay coil and the armature is attracted, opening the contacts.
At the same time, current flows to the output of generator No. 15 through fuse No. 9. The excitation winding receives power through the brush voltage regulator.
Connection diagram after 1996 (carburetor engine).
The VAZ 2107 charging circuit differs from the previous one only in the absence of a warning lamp relay. Excitation in this case occurs in the same way as in the previous case. The presence and level of charge is determined by a voltmeter on the instrument panel.
Charging circuit for injection engines.
This scheme is the same as on other VAZ models. The difference from the previous ones is in the method of exciting and monitoring the health of the generator. Monitoring is carried out using a warning lamp and a voltmeter on the instrument panel. Through the charging lamp, the initial excitation of the generator is also carried out at the moment of operation. During operation, the generator operates autonomously, that is, excitation comes directly from output 30 of the generator.
When the ignition is turned on, power through fuse No. 10 is supplied to the charging lamp in the instrument panel. Then through the mounting block to output 61 of the generator. The voltage regulator receives power through three additional diodes, and through it the excitation winding of the generator. At the same time, the control lamp will light up. When the generator starts working, a voltage higher than the battery voltage will appear on the plates of the rectifier bridge. In this case, the control lamp will go out, since the voltage on the side of the lamp on the additional diodes will be lower than on the side of the stator winding and the diodes will close. If the control lamp lights up when the generator is running, then one or more additional diodes are broken.
The most basic function of the generator is to charge the battery and power the electrical equipment of the engine.
A generator is a mechanism that converts mechanical energy into electrical energy. The generator has a shaft on which a pulley is mounted, through which it receives rotation from the engine crankshaft.
Interactive image of the generator circuit. Works on mouseover
A car generator is used to power electrical consumers, such as the ignition system, on-board computer, car lighting, diagnostic system, and it is also possible to charge a car battery. The power of a passenger car generator is approximately 1 kW. Car generators are quite reliable in operation because they ensure uninterrupted operation of many devices in the car, and therefore the requirements for them are appropriate.
Generator
Home / Repair and operation manual VAZ 2110/2112/2111 / Generator
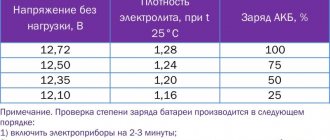
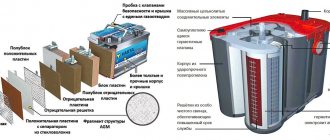
lite is below normal, then after selecting it from the cell, add high-density electrolyte (1.4 g/cm3).
After adjusting the electrolyte density, continue charging the battery for another 30 minutes to mix the electrolyte. Then disconnect the battery and after 30 minutes measure its level in all elements. If the electrolyte level is below normal, then add electrolyte with a density corresponding to the given climatic region (see Table 7-4). If the electrolyte level is higher than normal, remove the excess with a rubber bulb.
Maintaining a generator on a VAZ-2112 car
It is important to service this element on time - it has a large margin of reliability, but sometimes if the service is untimely, it is necessary to repair the car generator. The first step is to clean the outside surfaces of the device.
In addition, during service activities, they check whether the generator is securely fastened. The voltage regulator also needs checking. Experts recommend checking the drive belt. If it is loose, the system will not function correctly. It is recommended to check the VAZ-2112 alternator belt every 10 thousand km of the car - there should be no defects on its surface. Next, check the condition of the bearings. During this operation, it is necessary to remove the belt and rotate the rotor of the device by hand. If during rotation you feel play or jamming during movement, extraneous noise or any other sounds, the bearings are out of order and need to be replaced. For a VAZ-2112 generator, the price of which is about 4 thousand rubles, such parts can be found in any store or market.
Replacing the generator yourself
Typically, the VAZ 2106 generator must be replaced only in the most exceptional cases, and in case of most malfunctions it is simply repaired.
But if this device on your car has completely failed and cannot be repaired, then it is necessary to replace it.
To make this repair procedure as simple as possible, below is a list of necessary tools that will help make this operation easier:
- Keys for 17 and 19
- Heads for 10, 17 and 19
- Ratchet handles and knobs
- Extension with universal joint
The procedure for removing and installing the generator on a VAZ 2106
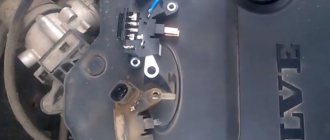
Before attempting this repair, disconnect the negative battery terminal. Then you need to disconnect all power wires from the generator itself. First you need to unscrew the terminal securing nut:
Now you can pull out all the other wires and plugs, just pull them to the side with a little effort:
Loosen and completely remove the alternator belt.
Then we tear off the upper mount of the generator with an ordinary open-end wrench 17, and after that we throw on the head with an extension and a cardan joint to unscrew this nut quickly and without unnecessary effort:
Next, you need to crawl under the car from below and tear off the nut with a spanner wrench and unscrew it completely using the ratchet handle:
After the nut is completely unscrewed, you need to knock the bolt out. To do this, you can use a wooden block, pointing it at the bolt and hitting it several times with a hammer. The photo shows it without a block, but keep in mind that the backing must be present so as not to damage the thread:
After which the bolt can be pulled out by hand. If it is difficult to move, you can resort to penetrating lubricant, spraying it a little in the right place.
Then you can remove the generator from below, as this is more convenient. If it doesn’t give in right away, you can turn it a little in the right direction so that nothing gets in the way when removing it. This is roughly what it looks like in practice, as shown in the photo below:
The price of a new generator for a VAZ 2106 varies from 2,500 rubles and above, it all depends on your wallet. The replacement process is not complicated and installation occurs in the reverse order of removal.
What is preferable: repair and modification of the generator or its complete replacement?
In case of minor damage to the device, from a financial point of view, it is advisable to carry out repairs, since it will cost several times less.
The only option for modifying the generator device would be to install an additional voltage relay or upgrade it. But the problem is not always the operation of the regulator.
Modification of the generator control device
Modernization of the regulatory device on the “tens” looks like this:
- To complete the modification, two regulatory elements will be required. One is standard, and the second can be used from a foreign car. The latter should have a power of 14.5 volts.
- The so-called tablet is disconnected from the standard device; as a result, the body of the brush assembly with the brushes themselves should be on hand. After this, a similar part is removed from the foreign-made relay and installed in the body of the standard device. The contact elements of the device are soldered to the relay body.
- Before any modifications can be made, the leads of the components must be bent. This will allow the contacts of the tablets to be adapted to the body of the regulatory element. The part is fixed using ordinary screws. Soldering is done using a soldering iron, and the solder must be done so that the element is completely covered with tin.
- Then the nuts on the parts must be sealed, otherwise during movement they may unscrew randomly when exposed to vibrations.
Technical characteristics of the VAZ 2105 generator
Starting in 1986, 37.3701 generators began to be installed on “fives”. Before this, the car was equipped with the G-222 device. The latter had different stator and rotor coil data, as well as a different brush assembly, voltage regulator and rectifier. The generator set is a three-phase mechanism with excitation from magnets and a built-in rectifier in the form of a diode bridge. In 1985, the relay responsible for indicating the warning light was removed from the generator. The on-board network voltage was monitored only using a voltmeter. Since 1996, the 37.3701 generator has received a modified design of the brush holder and voltage regulator.
Until 1986, G-222 generators were installed on VAZ 2105, and after that they began installing model 37.3701
Table: parameters of generator 37.3701 (G-222)
| Maximum output current (at a voltage of 13 V and a rotor speed of 5 thousand min-1), A | 55(45) |
| Operating voltage, V | 13,6–14,6 |
| Engine-generator gear ratio | 2,04 |
| Direction of rotation (drive side) | right |
| Generator weight without pulley, kg | 4,2 |
| Power, W | 700 (750) |
Possible faults
Like all other systems in a car, the alternator can also fail. Sometimes repairs can be made and the device will work again. But in case of some malfunctions, only replacing the VAZ-2112 generator will help.
Diagnostics of this unit is performed when increased noise occurs during operation. Often noise occurs due to severe wear of bearings. But often only the bearing located in the front cover fails. It is subject to increased radial loads, so it does not last long. If the drive belt is too tight, this will also affect the rate of bearing wear.
The best way to increase tension with your own hands
How to increase the voltage of the VAZ 2114 generator? There is one option that can be called the simplest. Its main disadvantage is its high cost. In particular, you will have to part with a large sum of money just to purchase a generator with increased power.
You will also have to purchase and replace the battery. It should be more capacitive. Otherwise, a voltage problem may occur. As a result, this will cause the complete destruction of the internal cells.
Electrical faults: diagnostic methods
Electrical problems in the operation of a generator can be identified based on several factors. So, among the popular symptoms are lack of charging, reduced charging voltage, or vice versa – increased. Without a multimeter, these breakdowns are determined by their main symptoms. So, the battery charge lamp on the instrument panel will light up or blink. Also, when the engine is running, the headlights shine very dimly, and the windshield wipers operate at a slow speed. Increased voltage will be indicated by boiling electrolyte in the battery and very bright headlights.
Superficial diagnostics can be performed without dismantling work. For testing you will need a multimeter. You need to measure the voltage at the battery terminals while the engine is running. If the device shows 12 V, the generator is not charging the battery. If the multimeter outputs below 14 V with all electrical equipment turned off, then the charge level is insufficient. Experts do not recommend testing the generator by removing the positive contact of the battery. This may damage the relay.
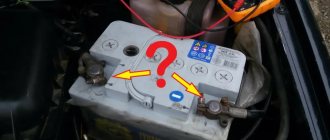
Possible battery malfunctions
Over time, any battery becomes unusable due to wear and tear. Its service life largely depends on operating and maintenance conditions. If there is a problem, the VAZ 2110 battery light comes on on the instrument panel.
Battery indicator is on
The warning light may come on if the following problems occur:
- low electrolyte level in banks;
- Excessive heat causes the battery case to swell;
- the appearance of the smell of rotten eggs (that’s what sulfur smells like) indicates a battery leak, which is also characterized by oxidation of the terminals;
- low tension of the generator belt due to damage or wear;
- overheated fuse or poor contact in the connections of the mounting block;
- malfunction of the diode bridge, relay regulator;
- a break in the electrical network;
- oxidized contacts on the battery terminals or generator output;
- the brushes on the generator device are worn out;
- Poor contact of the ground wire.
To detect the causes of the malfunction, you need to diagnose the battery and test the entire electrical circuit of the car.
Examination
It happens that the generator begins to act up ahead of schedule and the battery does not charge properly. Actually, it serves to ensure the operation of the source of electricity to power all cars - the battery.
We advise you to rely not only on our instructions, but also on video lessons that will allow you to carry out repairs and replacements with your own hands, even without much experience.
Troubleshooting
The first step is to determine whether your generator is actually the source of the problem. To check, you need to carry out a series of sequential activities.
- Start the engine and let it warm up to operating temperature.
- Increase the crankshaft speed to approximately 3 thousand rpm.
- Turn on all the headlights, activate the high beams, start the heater, emergency lights, heated glass, and wiper blades. That is, all electricity consumers should be turned on as much as possible.
- Measure the voltage on the battery.
- If the device shows less than 13V, then a short circuit or break has most likely occurred in the generator windings.
- Another option is a breakdown of the voltage regulator, oxidation of the contacts of the excitation winding ring.
Which generator is better to install on a VAZ 2106 - Lada master
The generator of any car, even a diesel one, is the gray eminence under the hood. Without it, the car won't even take a step. It can be annoying when the engine is tuned well and runs within decency, but for some reason the electrical equipment refuses to work properly. If we are talking about our VAZ 2106, then with a high degree of probability the whole problem lies in the G 221 generator, which was installed on the descendants of the Fiat 124.
Electrical diagram of VAZ 2106
As a matter of fact, if we look at the electrical circuit of the VAZ 2106, which we have given below just in case, it turns out that it differs from the 2101 circuit only in the presence of additional electrical appliances, which entailed some changes. And the generator in the base of the six is the same as in the 2101, its name is G 221.
There can be no complaints against it as long as it works. But the fact is that the design of an electric machine is not at all designed to use such a number of consumers. As a result, insufficient current is supplied to the relay regulator, which in turn leads to undercharging and slow death of the battery. Disorder.
How to connect a standard generator G221
This is expressed quite clearly. Especially if the owner installs additional, non-standard consumers in the car that work almost constantly. It can be:
- fog lights;
- powerful audio system;
- preheater;
- refrigerator, TV, additional heater.
In short, any step that leads to an increase in electrical energy consumption threatens premature battery discharge, even on the road, with the engine running and at high speeds. That’s why it’s worth understanding how the VAZ 2106 generator connection diagram works and what alternatives there are.
Replacing a VAZ 2106 generator with a G222
The easiest option is to replace the standard generator. On new. It makes no sense to talk about the generator design as an electric three-phase synchronous machine. Not about that now. We are faced with the problem of connecting the standard G 221 generator in order to avoid mistakes when installing another, more powerful and stable G 222 generator, which was already installed on the VAZ 2105.
How is it better than the standard six? Actually nothing. With the exception of a few nuances that can be decisive when the load on the on-board electrical circuit increases. It can be installed on a VAZ 2106 engine using one of two methods:
- Install a generator with a built-in relay instead of the standard one.
- Install the modernized G 222 generator.
Actually, it’s much easier not to complicate life by altering the wiring, albeit minor, but to take the simple path.
Modification of the G222 generator for the VAZ 2106
Relatively simple. Make some adjustments to the design of the 222nd generator. Externally, these two units are almost identical. They are distinguished only by a built-in battery charging relay. It is installed in the 222nd generator along with the brush block and it is clearly visible from the back, even if you don’t read the markings.
The difficulty of installing a 222 generator is that you need to thoroughly know the connection diagram. After studying all the nuances of the circuit, you can simply connect the standard remote battery charging relay to the new generator without making any changes to the circuit. This is the simplest and most rational way.
The difference in these two generators is not only the presence of an integrated charging relay. The fact is that the G221 operates with an output of 42 A, and the generator from the 2105 G222 produces 50 amperes. The increase in power was achieved by increasing the cross-section of the rotor winding, and structurally, this is the same generator that was installed on all Zhiguli classics.
Checking the functionality of the 2106 power system
In order for the G 222 generator to be installed without making changes to the connection diagram, it is enough to install the brush block from the six generator. It installs instead of the integrated one without any problems. At the same time, it is better to replace the remote charging relay.
After replacing the generator and connecting it according to one of the provided diagrams, it is enough to check the functionality of the system as a whole. To do this, it is necessary, with minimal current consumption by third-party electrical appliances, to check the voltage at the battery terminals at medium engine speeds. This is approximately 2.5 thousand revolutions per minute. The voltage at the battery terminals at these speeds should be 14 V.
Thus, you can solve the problem of insufficient power of the standard generator and replace it with a more powerful G222 from the VAZ 2105 engine. Good luck to everyone!
ladamaster.com
How to remove a generator on a VAZ-2112
For a more serious check, the device must be removed. The generator is held on a bracket on the engine block. To dismantle the installation, you will need keys 10 and 13, an open-end wrench 17, as well as a pry bar and socket 15.
The first step is to remove the terminals from the battery. Then loosen and remove the belt, and then dismantle the belt tensioner mechanism. Next, the wires are disconnected and the connectors are disconnected. The device is held in place by a long bolt and nut. It's not that easy to remove. Therefore, first unscrew the brackets on the motor block with a head. They are located at the back of the unit. Then the generator is deployed, which will help to easily unscrew the axle mount. It is pulled out together with the bushing, and then the axle is knocked out of the bracket.
Features of installing a diode in a battery
Advice. This method is best suited for solving the problem of insufficient voltage in the on-board network. In order for the problem to be resolved as soon as possible, all actions should be performed sequentially.
- First you need to remove the generator cover. This is extremely easy to do, so you don’t have to spend a lot of time on this operation;
This completes the first stage of work. It is necessary to check how accurately all procedures were performed. If any mistakes were made, they should be corrected immediately, otherwise any unpleasant consequences may occur.
When the verification is completed, you can move on to the second stage of work.
- Now you need to install a limiter for the female and male wires.
As a result, the voltage in a fully loaded network should be approximately 12.3 V. This will be quite enough for the normal operation of all devices installed in the car.
If a motorist needs increased voltage, which can reach 14 V, then you need to install a diode in circuit D. For this, any diode with a voltage of 20 V is suitable. The current strength of such a diode should reach 5 A.
Replacement
When dealing with any component related to electrical equipment, you need to start by de-energizing the VAZ 2110. So, we proceed according to the algorithm:
- Disconnecting the battery (remove the “-” terminal);
- Remove the pink wire that turns on the generator. To do this, you need to unscrew the nut from the positive bolt;
- Loosen the upper and lower nuts, and also unscrew the tension bolt, remove the belt;
- Turn the generator 90° and remove the lower mounting bolt;
- Clean all connections, as well as the rectifier housing itself;
- Clean the inside of the ring very thoroughly;
- Replace the generator diode bridge with a new one;
- Reassemble all parts;
- Check the functionality of the generator.
Brush unit malfunctions
To check the brush assembly, you will need a power source, as well as any 12 V lamp. The power source is connected to the voltage regulator, the lamp is connected to the brush - it should light up. When the input voltage rises to 15 volts, the light goes out. If the lamp burns at a higher voltage, then repair of the VAZ-2112 car generator is necessary. The relay needs to be replaced. As for the brushes themselves, their malfunctions are indicated by a lack of battery charge, too low voltage in the car network, or unstable charging voltages.
The length of the brush should be more than 5 mm. If it is smaller, they need to be replaced. You can also move them slightly in the grooves to check the brushes. Working brushes move freely. If they hang, it is recommended to lubricate them. It is also worth making sure that the slip rings are in good condition - they are checked for wear. If there are marks, the rings are sanded with fine sandpaper. After replacing the brushes, the generator will immediately begin to operate normally. It is important to monitor how the device works and regularly service the VAZ-2112 generator - the price of the unit is low, but with high-quality service, only the brushes will need to be changed.
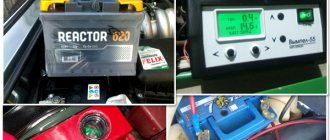
Ways to troubleshoot battery problems
First of all, you need to check the battery charging while the engine is running. During normal charging, the voltage will be in the range of 13.6 - 14.2 Volts. If the charge is weak, the value will be below 12 Volts (the author of the video is VAZ 2101-2107 repair and maintenance).
To troubleshoot problems, you need to prepare instructions with a diagram of the electrical equipment of the VAZ 2110 car and the necessary tools:
- pliers;
- flat and Phillips screwdrivers;
- multimeter;
- 12 V indicator light;
- knife;
- sandpaper.
Checking the battery on a car
There are the following troubleshooting methods, which can be determined by how the battery light lights up and goes out:
- If the charge indicator on the dashboard does not light up, this indicates that the battery is low. The reason why the battery is not charging may be due to oxidized contacts. The contacts on the battery should be cleaned. If this does not help, you need to measure the voltage at terminal “30” of the generator. To do this, one probe must be connected to ground, and the second to terminal “30”. If the flowing current greatly exceeds the charge on the battery, it is necessary to clean the terminal on the generator. It is possible that the wire connecting the generator to the device needs to be replaced.
- If the voltmeter on the dashboard and the warning light show that there is a charge, but the battery is discharged. In this case, the charge at the terminals is within normal limits, and when the equipment is turned on, the charge arrow occupies the extreme left position. This indicates insufficient tension on the generator drive belt or damage to it.
- The battery may not charge due to a breakdown in one of the diodes, as well as a break in the starter winding. In this case, with the ignition off, use a multimeter to check the diodes and, if necessary, replace them.
- The battery is not charging, but the indicator does not light up and the charge sensor does not work. The reason is a blown fuse F10.
- If the ignition is on, all devices are working, the charging indicator does not light up, and there is no charge, then you need to check the generator. To do this, remove the wire from terminal “61” on the generator and connect it to the car body, which will act as a “minus”. A lit battery indicator indicates a problem in the excitation winding of the generator device. The reason may be poor contact at the connection point. In this case, you need to clean the contacts. If this does not fix the problem, it is possible that the cause is a burnt-out lamp.
- When you turn the key in the ignition, the battery charging light comes on, but when the engine starts, it does not go out. In this case, there is no charging or it may periodically disappear, this indicates that the battery is discharging. The reason is insufficient contact in the place where the instrument panel is connected. It is possible that they have oxidized and need to be cleaned.
- The relay regulator should also be checked. To do this, you need to apply voltage to the contacts from the battery. If it is 12 volts at the brushes, then the relay is working properly. Otherwise it should be replaced.
- If the electrolyte level is insufficient, add the required amount of distilled water.
- If the battery case is damaged or the service life has expired, it should be replaced.
Normal voltage indicator in the VAZ-2110 generator
Content
In order for the car to work properly and not fail on the road, the car owner must constantly monitor the technical condition of his “four-wheeled friend,” while paying a lot of attention to the car generator. If the unit fails, the battery will not be able to receive electrical recharging, and as a result, the car will work only from recharging the battery, the reserve of which will be enough for a short period of time.
As soon as the battery supply is depleted, the engine will stop functioning and the car will simply stop, anywhere. In this case, the car owner will have to look for a lot of money to purchase a new generator, as well as to check and install it. But the process of monitoring technical serviceability, in which the most important thing is to monitor what voltage the VAZ-2110 generator should produce when driving, will help save money and know that the car will not let the owner down under any circumstances. If you notice that the generator is working intermittently, then you need to check the functionality of the unit, especially since it is quite simple to carry out such a process yourself, taking into account the advice and recommendations of professionals in their field. However, before work, the car owner must familiarize himself with some rules that will help check the serviceability of the unit without damage.
Source
Possible causes of malfunctions
There are several common reasons that require the driver to look under the hood of the “iron horse”:
- partial or complete combustion of the VAZ 2107 winding;
- cases of interturn short circuit;
- physical wear of parts;
- external physical influence;
- mechanical damage.
Inexperienced drivers of the VAZ 2108 or earlier modifications need to remember one nuance. When choosing lighting fixtures, you need to take into account their power. For example, if you decide to install fog lights, the power of which is 40-50 W each, you should look at the technical description of the VAZ 2106 or 07. Their installation is allowed only if the vehicle’s generator produces more than 55 A of current.
Failure to comply with this rule leads to dire consequences. The increased load of the VAZ generator leads to its rapid wear. The power of the unit gradually decreases, which is mistakenly perceived as a minor breakdown. That is why the total power of all voltage consumers should not exceed the maximum current level of VAZ 2107, 08 or 06.
The problem described above leads to another one - improper charging. The 2107 passenger car is designed in such a way that the generator is charged while driving. All electricity consumers are selected taking into account the power of the device. If individual elements are replaced without taking into account their power, the VAZ generator receives less energy than necessary.
Forced “starvation” leads to accelerated wear and failure. A great danger is posed by gadgets that significantly exceed the maximum level of current generated by the VAZ 2108. In this case, the “iron horse” risks stopping along the way. It will not be possible to revive a VAZ generator on site or even within the walls of a service station.