Designing and building your own subwoofer enclosure can be a rewarding endeavor. Not only will it save you money, but it will also provide better quality than store-bought products. You can also customize the enclosure to suit your needs.
Designing a box for a subwoofer with your own hands may seem like a difficult task, but in this instruction I will show you what and how to make a box for a subwoofer, as well as my visual calculations, drawings and design options. To make the body, you will need woodworking skills. Woodworking work will include assembling the frame, reinforcing the interior, and painting. Building a subwoofer can take anywhere from a few days to a week depending on your skills and desires.
Assembling a subwoofer box with your own hands
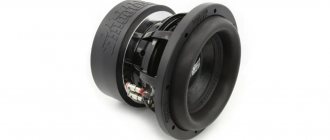
You can start assembling. We use a 12-inch Lanzar VW-124 speaker.
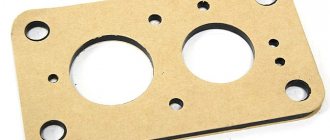
Its diameter is 30 cm, and the first thing you need to do is cut a hole for the speaker. The minimum distance from the center of the diffuser to the subwoofer wall is 20 cm. We measured 23 cm (20 cm + 3 cm plywood width) from the edge of the panel and cut a hole with a jigsaw. Next, we cut a hole for the bass reflex slot; in our example, it has a size of 35*5 cm.
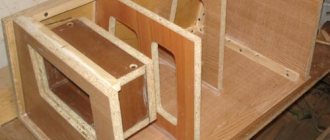
Instead of a slot, you can use a classic air duct - a tube. Now we assemble the bass reflex slot and attach it to the front panel of the subwoofer. We go along the joints with liquid nails and tighten them with self-tapping screws.
It is important to tighten the screws very tightly so as not to leave any voids. They will create resonant vibrations that will ruin the sound of the subwoofer.
Next, we assemble the side walls of the box, having previously lubricated them with liquid nails, and tighten them tightly with self-tapping screws.
On the back cover of the box you need to cut a small hole for the terminal block. We connect all parts of the body. We make sure that we cut and fastened all the parts correctly.
We insert the speaker. Let's look and admire.
Let's move on to the interior decoration of the box. The first thing you need to do is seal all the joints and cracks with epoxy glue or sealant. Next, using PVA glue, we glue soundproofing material onto the entire inner surface of the box.
Now we cover the entire outer plane of the box with carpet, including the bass reflex slot. You can attach it with epoxy glue or using a furniture stapler.
Next, insert and screw the speaker tightly. The subwoofer is almost ready, all that remains is to stretch the wires from the speaker to the terminal block and connect the amplifier.
We bought an additional amplifier, but you can also make it yourself. This is quite difficult, as it requires knowledge and practice in the field of radio engineering. You can also use ready-made kits and circuits for radio amateurs, like Master-KIT, and assemble the amplifier yourself. The only requirement for the amplifier is that its maximum power must be less than the maximum power of the speaker .
See also a video report on making a homemade subwoofer for 2 speakers
How to calculate a resonator for the Urals yourself?
First of all, we note that the main material for making this audio device is multi-layer moisture-resistant plywood. The speaker input is sized according to the selected model. The volume and design will depend on the technical tasks: interior features, required power and other features.
Designs depending on the direction of the port
The figure shows that the direction of the port and other parameters also influence the design. Sometimes drivers, after making calculations, are concerned that the dimensions are very large compared to the available space in the cabin, so they recommend a design that is suitable for this task.
Other housing options
The photo shows an example of the calculation of the HF box, but in total the cross-sectional area of the tunnel is taken into account (for example, 10″ or 12″), depending on the caliber of the subwoofer, for example, Machete m10d2.
Example
Use the Quarter Wave Box calculation program. You will only need to enter the speaker parameters and box volume. Otherwise you will have to make the drawings yourself.
To do this, use ready-made recommendations - a table with subwoofer sizes for 10, 12 inches and others. The cells show the volume that needs to be taken as a basis to achieve certain audio parameters. A “tuning” is also selected depending on the machine owner’s preferences and frequency. The box can be designed for two or more speakers, they can be different 10″ or 15″.
The proposed variations demonstrate some solutions for organizing a car interior media system that are available for self-production. With a little effort, you will get a high-quality sound system in your car for your new Machete m10d2 or Ural, taking into account the features of your interior and preferences.
Purpose, design and principle of operation of the CV box
The design of the HF box is aimed at modulating the sound flow. The effect of sound transmission and reflection is used. Thanks to the special housing design, sound harmonization is achieved. This is especially noticeable at low frequencies and when installing a subwoofer. With the appropriate dimensions, the HF box will make the bass sound quite loud, bright, but unusually deep.
Subwoofer box
Purpose and use
In a certain context, this device can be compared to an analog-type sound processor. Now that the purpose is clear, let’s now look at the design, operating principle and calculations. The proposed solution is especially in demand among motorists who want to install high-quality sound on used cars; with some effort, it will not be inferior to expensive audio systems.
So, in the technical understanding, the FM box, as implied by the name, is a resonator. We are talking about a hollow structure with the help of which sounds of a given frequency are reproduced. One of the functions of the resonator is to enhance audio sound. Such a device in the car will allow you to listen to loud music, provide musical accompaniment in nature, or use it for commercial purposes, for example, for scoring weddings and celebrations. The most popular solution is a box for a 12-inch speaker.
Operating principle
Motorists may be familiar with a resonator, another example of which is the CV box For example, it is used as a functional element of a muffler. In this case, the hollow structure has its own characteristics and another purpose.
From a technical point of view, a resonator is an oscillatory system that accumulates vibrations due to frequency resonance. Typically, the design involves “working” with a limited set of frequency characteristics. Depending on the design, resonators of cumulative and instantaneous action differ.
Homemade wooden box
The storage resonator accumulates external energy by reducing the frequency of internal oscillations. In a mathematical context, any resonator design whose oscillation frequency is greater than the oscillation frequency of the external influence is cumulative. This happens whether the diameter is 10 or 12 inches, but you need to choose a different volume.
Instantaneous action implies the correspondence of the internal oscillatory force in period to external oscillations. Such resonators increase the sound power due to thermal absorption of the surrounding space, shifting the frequency at the input power - changes due to an increase in the playback interval.
The common CV box has a rectangular shape with partitions resembling a caterpillar in arrangement. The appearance will depend on the speaker and its features, size – 10″ or 12 inches. At the moment, you can find drawing diagrams for any frequency device and make a resonator at no extra cost. It will differ slightly from the brand name.
You can make a resonator in a mini version. This solution is shown in the figure.
Drawing of a CV box for 12″
To obtain drawings of 10, 12 and 15″ HF boxes, you can use a search engine or our resonator database or calculation program. The easiest way is to search by type of speaker and required volume. For example, a 12″ CV box can be implemented in several versions, depending on the technical features described and demonstrated below.
What materials do we need to assemble the subwoofer?
The material for making the subwoofer box must be durable, dense and well insulating sound. Multilayer plywood or chipboard is perfect for this . The main advantages of these materials are their affordable price and ease of processing. They are quite durable and provide good sound insulation. We will make a subwoofer from 30 mm thick multilayer plywood.
To make a subwoofer box we will need:
- Wood screws (approximately 50-55 mm, 100 pieces)
- Soundproofing material (Shumka)
- Drill and screwdriver (or screwdriver)
- Jigsaw
- Liquid Nails
- Sealant
- PVA glue
- Carpet, approximately 3 meters
- Klemnik