We have already complained more than once that today it is becoming more and more difficult for drivers to diagnose their own cars, especially while driving. The toolkit is constantly shrinking. Let's say that voltmeters have disappeared from dashboards like mammoths, and the driver learns about all problems with charging after the fact from a message from a laconic warning light. But even with the lamp, not everything is so rosy, they don’t talk about it in driving schools, in the instructions for the car there is only the phrase “contact the service center.” Most drivers roughly imagine that it is responsible for charging, but how exactly and what exactly it shows is something that not everyone understands.
Operating principle of the warning lamp
We have already written more than once about how the generator works; we would not like to repeat it. The operating principle of the control lamp is tied to the generator, although it is still a separate element. It's quite simple. Two electrical circuits are connected to the control lamp, which in a simplified form look like this:
1. The first circuit from the lamp runs through the fuse block to the ignition switch, from it to the generator and then to the battery.
2. The second circuit directly connects the generator and the test lamp.
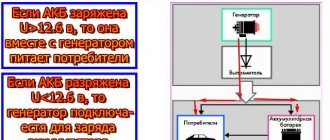
The question arises - why are there two circuits and why are they both connected to the generator? That's the point. The control lamp depends on the current at both inputs; when the voltage is the same, the lamp goes out, when it differs, it lights up .
Imagine we turn on the ignition. In the first network, voltage came from the battery to the control lamp, but in the second it was empty, the engine did not work, the generator did not produce current, so the lamp lights up. And it will burn as long as the ignition is turned on.
But then we start the engine, the generator starts working and voltage appears in the second circuit; moreover, the first circuit also starts working from the generator. The same voltage is applied to the terminals of the control lamp, and it goes out. Some drivers believe that the warning light coming on before starting the engine is a diagnostic of the system, but in fact the car does not ring or check anything, it simply determines whether charging has started or not.
Now let’s imagine that the generator breaks down on the road. In the second circuit, the voltage has disappeared, but in the first circuit, power still continues to flow, but from the battery, so the warning light lights up again.
If the light is on
Some repair articles categorically state that a burning lamp is necessarily a problem with the generator. As is not difficult to see from the principle of operation, a lamp can burn for other reasons.
2. Open circuit between the ignition switch and the lamp.
3. Open circuit between the generator and the lamp.
It is easy to diagnose these problems using the elimination method; in the first two cases, the lamp will not light up when the ignition is turned on, and in the third it will light up, although the multimeter will show that the battery is charging. The repair is tedious, but simple - we check the contacts, nick the wires, replace the burnt out parts, and restore the integrity of the circuit.
To be fair, we note that such situations are still not very frequent, and in most cases, problems with the generator actually lead to a lamp fire , although on various forums we have come across stories of drivers who checked a working generator many times, although the problem was precisely in the circuits control lamp. It's always worth keeping this possibility in mind.
In all the situations listed above, charging is still going on and you can continue driving, but it still makes sense to do repairs. If the battery light is constantly on, it will not indicate anything if the generator actually breaks down, and no one is immune from this.
Fortune telling by lamp
Sometimes the warning light may not just light up, but glow at full intensity, flash, or light up only when the speed increases or decreases. Sometimes it is suggested to carry out diagnostics based on this behavior. It is believed that a burning lamp only at high speeds is a problem with the belt, slip rings or brushes, only at low speeds is a malfunction of the voltage regulator, flickering at full heat is a breakdown of one of the diodes of the diode bridge. But this diagnostic method must be called very unreliable. All of the above reasons can lead to this behavior of the lamp, but the problem may be completely different. In any case, you need to check everything.
The main purpose of the battery warning light
The indicator in question is designed to let the driver know whether the battery is charging or whether the entire electrical network is powered directly from the battery while driving.
When the ignition is turned on, all warning lamps light up; when the engine starts, all indicators should go out. In this case, the battery charging system is working properly and there is nothing to worry about.
Otherwise, if the battery lamp still lights up, then you should look for a malfunction.
What to do if there is no charge, weak charge (battery is discharged)?
If the battery of your VAZ 2107 is discharged, then one of three elements may be “to blame”: the generator, the voltage regulator, the connections between them. Determining “who is to blame” can be very simple, even without additional equipment. How this article will help.
We carry out testing using standard equipment
To monitor the operation of the generator on the “seven” there are two instruments: a voltmeter and a control light on the instrument panel. With their help, you can track the cause of your troubles.
1) Turn on the ignition without turning on the starter
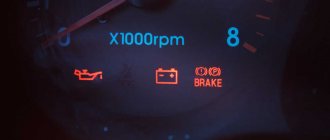
and look at the warning light. It should shine at full intensity, as in the photo. The voltmeter needle, normally, stands on the white part of the scale (photo). Let's say everything is OK - go to point 2 - start the engine.
The battery charge control lamp is on
Position of the voltmeter needle before starting the engine (ignition on)
The lamp does not light, the voltmeter needle remains at zero when the ignition is turned on.
Check fuse No. 10 in the mounting block. 99% of the time it will be burnt out. In this case, all other lamps on the instrument panel will also be de-energized. Replace it with the same one and test again. If the fuse burns out again, you need to look for the cause, that is, a short circuit. We check whether the wires from the generator are disconnected, whether the insulation is frayed somewhere, etc. Diagram 3 at this link will help you find the reason
The lamp does not light up, the voltmeter needle shows normal
We check the wires on the generator to see if the wire has come loose from terminal “61”. If everything is normal there, you need to check whether there is a “plus” on this wire using a test lamp, an indicator screwdriver or a multimeter.
Terminal “61” of the VAZ-2107 generator
If there is a “plus”, we check the “tablet” (aka “chocolate”) and the generator.
There is no “plus” - you will have to remove the instrument panel and check the lamp. Replace the burnt out one. How to remove the panel, watch the video
2) Start the engine
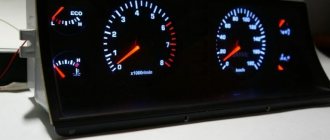
The control lamp should go out, the voltmeter needle goes into the green sector and is located from the middle to the right edge (photo). If everything is so, then most likely the generator is working normally.
The voltmeter shows normal voltage (charging is present)
The lamp remains on or dims slightly
If you give it gas, it goes out at high speeds and lights up again when they decrease. The voltmeter needle is in the white sector and goes to the edge of the green when the speed increases. The generator output is faulty. The same conclusion if the lamp continues to light at any speed, and the voltmeter needle is in the white sector and even goes to red.
Voltage too low (motor running). Weak charge
Read, it may come in handy: How to replace the mass air flow sensor on the “seven”
3) If the generator seems to be working, but the battery is gradually discharged
Let's do one more check. We start the engine, turn on the heater fan and low beam, take the key to “10” and, loosening the negative terminal of the battery, remove it. An idling engine (about 900 rpm) should not stall. If the engine stops, put the terminal back in place and start it again. While holding the speed at 1200-1500, remove the terminal again. Has the engine stalled again? Then turn off the headlights, leave the heater fan on and repeat the test. Now the engine with the negative terminal disconnected from the battery continues to run. The generator output works, but does not produce the required current, it needs to be repaired, the diode bridge will need to be replaced.
Note! During such a check, it is better and safer to work together. Do not disconnect the battery terminal without at least turning on the heater fan or other load.
A voltage surge at the time of shutdown can “burn” the electronic elements of ignition systems
You need to be especially careful on a car with an injection engine.
The battery light is on - what does it mean?
There can be only one reason why the battery warning light comes on while the engine is running - there is no voltage supply from the generator or its value is insufficient.
The main malfunctions that lead to this:
- Lack of quality contact at the battery terminals.
- Damage to the alternator belt or loose tension.
- There is no negative contact with ground.
- An open circuit in the rotor excitation circuit or worn brushes in the generator.
- Failures of the diode bridge are usually accompanied by a dim lighting of the battery light on the dashboard.
- Fuse failure.
- Malfunction of the relay regulator.
Before you start troubleshooting, pay attention to why the lamp is on. If there is no voltage supplied to the battery at all, then the lamp lights up correctly. In another situation, the operation of the signal indicator while charging is present significantly complicates the problem.
First of all, determine whether there is voltage on the battery. To do this, take a voltmeter (multimeter), start the engine and measure the required characteristic at the battery terminals.
If everything is in good condition, you will see readings in the range from 13.6 to 14.2 V. In this case, the battery is charging properly. If the results obtained differ significantly from normal, then there is some kind of breakdown in the system.
Troubleshooting
If you have identified the reason for the activation of this indicator, it’s time to start eliminating it. Below are the main problems and methods for solving them:
- You can eliminate the weakening of the belt or its rupture by adjusting the degree of tension or resort to replacing it;
- in order to clean oxidized terminals, it is enough to clean them using fine-grained sandpaper;
- in the event that the battery is discharged as a result of prolonged operation of electrical appliances with the engine turned off, it is enough to recharge it;
- If there are various internal damages, you should contact a specialist.
Faults such as failed “brushes” and generator wires, as well as broken windings or broken relays cannot be eliminated by repair. In this case, it is advisable to replace the spare part.
conclusions
By carefully monitoring the dashboard readings, you will be able to independently identify problems in the operation of your vehicle at first and avoid serious consequences. We also draw your attention to the fact that you can always order the parts you need from our company. We offer competitive prices and will help you save not only money, but also time, because you will not need to look for the necessary spare part in stores. We guarantee high quality and excellent performance. To place an order, call the contact phone number.
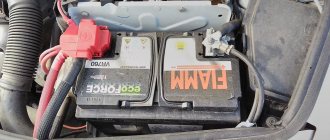
Poor contact at battery terminals
Check the condition of the battery terminals and battery contact wires.
It is not uncommon for oxidation to occur in these places and the contact to weaken significantly. When the lamp comes on and there is charging, this could be the cause. In this case, the generator operates normally, voltage is supplied to the battery, but weakens due to insufficient contact. As a result, the warning light on the dashboard comes on. As a rule, the indication lights up dimly.
To fix the problem, you need to clean the terminals and contact pins. Additionally, treat these elements with a water-repellent agent.
How to understand what exactly caused the light bulb to burn? How to fix the problem?
If the battery light is on while the engine is running, do not turn it off, open the hood and check the voltage at the battery terminals. If charging is supplied to the multimeter, the voltage should be 13.5-14.3V. If there is no charging, the voltage will be much lower - approximately 12V.
To solve the problem you will need:
- Two screwdrivers (flat and Phillips);
- “Control” (12V light bulb);
- Multimeter;
- Pliers, a knife and sandpaper to clean the contacts.
Diode bridge faults
The electrical circuit is designed to convert alternating voltage to direct voltage. If a breakdown of at least one of the diodes occurs, the functional unit ceases to perform its duties. The consequence of this is the supply of voltage that does not correspond to the required indicators.
The rectifier needs to be checked when the battery charging light is on, but there is charging.
You can determine the breakdown by using a multimeter. Take a tester and connect the red probe to the positive of the bridge, and the black one to one of the contacts marked AC.
The throughput voltage for diodes (silicon) ranges from 400 to 1000 mV. If the tester shows different values, then the bridge needs to be changed. Such a unit cannot be repaired.
Fuse failure
The electrical circuit for charging the battery is protected by a fuse. This element is located in the vehicle’s mounting block and is marked as F10. However, before checking for a malfunction in this place, it is better to first read the vehicle’s operating instructions, in which you will find out the exact designation of the required element.
If the fuse fails, the battery is not charged at all. However, there are times when the warning light comes on, but there is charging.
You can check the element using a tester (the part is removed from the mounting block). If the multimeter shows that the fuse is bad, all you have to do is replace it.
How to perform diagnostics without a tool?
To carry out self-diagnosis of the malfunction, you must turn off the engine, open the hood and perform an initial inspection.
Particular attention should be paid to the generator drive belt. Very often the reason why the battery icon on the instrument panel lights up is a broken drive belt.
With such a malfunction, the generator does not rotate and does not produce current. In this case, it is necessary to determine what other units were driven by the broken belt.
If the generator drive belt drove only the generator itself or the generator and the power steering pump, then you can try to get to the repair site on your own. To do this, it is necessary to turn off all electrical consumers that are possible (headlights, air conditioning, interior heater fan, audio system) and that will not affect traffic safety. Provided that the battery is charged, you can drive from ten to fifteen kilometers. If this belt also drives the engine cooling water pump, then you cannot drive. It is necessary to replace the belt on site or tow the vehicle to the repair site.
Next, we will consider the situation when the generator drive belt has not broken and it is sufficiently tensioned. It is easy to check the belt tension by pressing it with your hand; it should bend no more than one and a half centimeters. It is necessary to inspect the wires that are attached to the generator. The malfunction may be that one of the fasteners is loose and there is no necessary electrical contact. It is also necessary to carefully inspect the battery terminals.
Oxidized battery terminals are also often the cause of poor battery charging. This completes all preliminary diagnostic steps that do not require a special tool.
Failure of the relay regulator
A malfunction of the relay regulator is another reason why the battery charging light comes on.
This node is responsible for turning on/off the signal indicator. The principle of operation of the device is as follows: when the ignition is turned on, current flows through its closed contacts, which comes from the battery and feeds the indicator signals. When the internal combustion engine starts, the generator starts working, which supplies the relay with already rectified voltage and the contacts of the unit open. At this time the light should go out.
A little theory: scheme of work
To solve the existing problem, you must understand the essence of the interaction between the vehicle generator and the power source (battery).
While driving, the battery is in constant charging mode with a voltage of 13.6-14.2 Volts. As engine speed increases, the voltage at the generator output increases. But this is unacceptable.
To limit the voltage, a small relay regulator is inserted into the rotor excitation circuit. Its task is to reduce the current to a normal level (even with a significant increase in the speed).
The result is maintaining the battery charge voltage at a stable level. If the battery light is on, this indicates a lack of charging from the generator.
How does the scheme work? After turning on the ignition, voltage through fuse No. 10 (for VAZ-2107) is supplied to the battery charge indicator lamp.
Next, the “+12V” voltage passes through a diode, a built-in relay-regulator (we mentioned it above), a brush, a slip ring and a winding.
As soon as the rotor speed increases, the phase voltage also increases. As a result, the voltage at the terminals of the battery warning light is equalized and it goes out. At the same time, the battery is charging.
Useful tips
To prevent your car from having problems charging the battery, use the following tips:
- Don't ignore your car's dashboard signals. In this case, you will be able to solve the problem at the initial stage of its development.
- Inspect the alternator belt regularly. The correct operation of all electrical equipment on board directly depends on it. If there are any defects, replace it as soon as possible.
- Check the voltage from the generator to the battery. If you notice a discrepancy, diagnose the on-board network.
- Periodically pay attention to the condition of the battery terminals. If you notice oxidation, eliminate this defect. They can be treated with WD-40.
- Isolate the generator and battery from water to prevent short circuits. Leave engine washing to professionals.
- When repairing the battery charging circuit, do not use cheap spare parts.
To summarize, we note that the battery is the most important element in the car’s electrical network. Therefore, you should carry out timely maintenance of the charging circuit and, if necessary, change the necessary parts. In this case, you will ensure a proper system of work. In the article, we told you about the main malfunctions that can cause the battery charging lamp to light up and what to do about it. We hope our recommendations will help you in solving the problem at hand.
Source
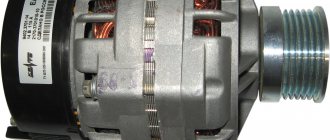
How to remove, disassemble and repair a generator on a VAZ 2106
The G-221 generator on the “six” cannot be called a simple device. Therefore, in order to carry out certain repair work, careful preparation will be required, since you will have to first remove the device from the car and then disassemble it.
Removing the generator from the car
To quickly and safely remove the G-221 from the machine, it is recommended to prepare the tools in advance:
- open-end wrench 10;
- open-end wrench 17;
- open-end wrench 19;
- mounting blade.
Of course, it is easiest to work with a cooled engine, so you need to let the car sit for a while after the trip.
The generator is held on by two long pins
The process of removing the generator is carried out according to this scheme:
- Loosen the lower generator fixing nut. Then loosen the nut on the other stud.
- Remove the nuts along with washers.
- Move the generator slightly forward (relative to the engine).
- This movement will allow you to easily remove the belt (first from the generator pulley, then from the crankshaft pulley).
- Remove the wires from the terminal.
- Disconnect the wire from the winding plug.
- Remove the wire from the brush holder.
- It is immediately recommended to label the wires by color and connection location, since problems may arise when reinstalling the generator.
- Next, unscrew the nut from the stud of the lower mounting of the generator.
- Remove the generator from the studs.
Video: dismantling instructions
Disassembling the generator
After the device has been dismantled, it must be disassembled for subsequent repairs. To do this, let's change the set of tools:
- open-end wrench 19;
- socket wrench 19;
- ratchet (you can add an extension);
- head at 8;
- head at 10;
- small hammer.
It is recommended to put small parts in separate containers so as not to lose them.
Next, if necessary, you can lightly clean the device body from dirt and begin disassembling:
- Unscrew the four fastening nuts on the back cover.
- Using a 19mm wrench, unscrew the pulley mounting nut (to do this, you will need to carefully fix the generator in a vice).
- After this, you can separate the device into two parts. If the halves are jammed, you can lightly tap them with a hammer. As a result, two equivalent parts should remain in your hands: a rotor with a pulley and a stator with a winding.
- Remove the pulley from the rotor.
- Pull the key and key out of the housing cavity.
- Next, pull the rotor itself along with the bearing towards you.
- The other part of the generator (stator with winding) is also disassembled into parts; you just need to pull the winding towards you.