Articles
- 2 Preparation for soundproofing
- 3 Trunk and its modernization
Soundproofing VAZ 2121
Do-it-yourself noise insulation of the VAZ 2121 is carried out using various materials with a special layer. It is also important to have special tools on hand, such as scissors, a roller, or a technical hair dryer, so that the process can be carried out without any problems. From the article you will learn the nuances and features of trunk tuning and how, in fact, sound insulation is carried out in general on the VAZ 2121.
I would like to immediately notice one feature of the Niva 2121 cars. The fact is that the interior of the Niva needs thermal insulation more than other models of the VAZ automaker. The reason for this is poor heating of the heater in winter. For this reason, insulation is carried out simultaneously with Shumka.
What makes the most noise in the field?
The car is noisy in almost every way. In the cabin you can hear the rumble of trim elements, the panel and the sound of the engine, which still has the unpleasant knock of the valve mechanism from the classics. The engine is especially loud in the summer, and if you drive with the windows open, it can sometimes be very annoying.
Another noisy part of the car is the arches. Fender liners are not standardly installed on these cars. The dealer offers them as extras. equipment. But the worst thing is that a good echo is created inside the arches, which appears during the noise of the tires on the track. However, this problem is not only Niva.
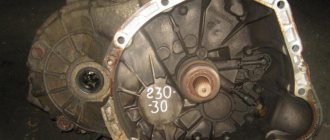
The noisiest part of the Niva is the transfer gearbox. It is responsible for changing gear ratios to higher and lower ones. The transfer case on the Niva is very noisy, and this is felt most of all on the highway.
Processing procedure
The price of all assembled components is definitely lower than the cost of professional sound insulation services. After all, you still have to pay extra for the work.
By following a certain sequence, following the instructions and adhering to the rules, you will be able to cope with the task yourself.
The procedure can be described as follows:
- Since this is the engine compartment, it also includes the hood. It's better to start with him. First, the structure is removed and cleaned of dust, dirt and rust. Next it is degreased. This needs to be done with all body elements to which Shumka will be glued;
- Surfaces must be as dry as possible. Therefore, do not be lazy to wipe them with a rag, reaching to each cavity;
- Make patterns from cardboard, then cut out pieces of soundproofing material from them;
- First, a vibration-absorbing material is applied to the metal;
- The piece is cut out and applied to the surface, rolling it in parallel using a special roller. You can't just glue it by hand. The quality and effect will be lost;
- Use strictly materials with heat-resistant film, since the engine gets hot, and a product that is not resistant to high temperatures may cause a fire;
- It is definitely recommended to stick a layer of foil. It additionally reflects heat and protects the Shumka from overheating and damage;
- Sound insulation can be glued under the factory Shumka, or completely replaced with madeline;
- When covering the engine compartment, follow the same rules. To remove or not to remove equipment is a purely individual question. It all depends on being able to access the interior panels and bodywork around the engine.
Bimast or Vizomat come first because they act as vibration-isolating materials. You can already use Splen, Madeline or Accent behind them.
If you get too confused, you can even dismantle the engine, tape everything under it, and then put it back in place. But usually this is an unnecessary event that requires additional time and effort. Often it is enough to remove attached and easily dismantled equipment. Since the motor is located in the center, it usually does not interfere with the wrapping.
Have you ever had to carry out soundproofing from the engine compartment yourself and what secrets can you share with us?
Thank you for your attention! Subscribe, leave comments and ask relevant questions!
Subscribe to updates and receive articles by email!
We guarantee: no spam, only new articles once a week!
Niva 21213 is considered one of the noisiest cars of the VAZ family, which is due to its design features.
Which material to choose?
Try not to chase a low price, especially when it comes to a personal car. The miser pays twice - this principle also applies to sound insulation. Linoleum, foam rubber, polystyrene foam and other materials will not work. For one simple reason - they are not intended for this.
We advise you to buy splen, vibration-proofing material and Kicx sound insulation in advance. All interior elements, except for the arches, will have two layers of 2 millimeters each, and the arches will have two layers of 4 millimeters each. In total, it can take about 40 sheets of products and this is not the limit.
How harmful is noise?
Noise surrounds us almost everywhere, most often we simply do not notice it, however, increased levels can be harmful:
- Noise is considered to be any extraneous sounds that reach your ears.
- Increased noise irritates and distracts the driver, causing rapid fatigue
- Fatigue and irritation often lead to accidents
- In addition, the driver’s reaction is reduced, which is associated with great risk on the road.
- Prolonged exposure to increased noise leads to a narrowing of blood vessels throughout the body.
- This can lead to headaches and increased blood pressure, as there is an increased load on the heart.
- Prolonged stress on the heart causes angina and even heart attack
- So noise is not just an annoying interruption to conversation or music, it is harmful to your well-being and health.
Where to begin?
To practice a little and understand the essence of sound insulation, we strongly recommend starting with the hood. To do this, open the hood and remove the factory sound insulation. This process will be long, but you will be able to determine your abilities and learn a little. It is best to remove old insulation with a plastic scraper so as not to damage the paint on the part.
After the old material has been removed, you need to wash the part well. First, with water (preferably under pressure), then we treat it with degreasers. Alcohol or brake cleaner, which is sold in aerosol form, is ideal for this.
What needs to be covered? You need to glue thin sheet metal. It is through it that vibrations are transmitted. There is no need to glue the stiffening ribs. They are not capable of transmitting so many vibrations. Therefore, we glue it as shown in the photo.
Don't forget to heat the material with a hairdryer before gluing it to the product. This way it sticks better and it won’t be easy to tear it off later.
External treatment
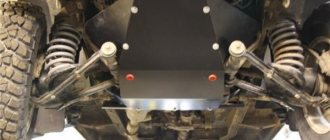
Noise insulation of the 2121 Niva will not be complete without treating the bottom (see Sound insulation of the underbody of a car: what needs to be taken into account when performing):
- Many sounds and noises pass through it
- These include transmission vibrations, noise from the muffler, and the sound of stones when driving.
- Can be treated in two ways - either by the usual application of layers of material, or by applying liquid sound insulation
- In both cases, a pit or overpass is needed
- Wash the surface of the bottom with water pressure
- Then degrease
- Then glue the materials according to the instructions
- Or apply liquid sound insulation using a sprayer
- This type of insulation is easier to apply, easier to handle difficult areas, and will last longer.
- A significant advantage is the fact that it is much lighter than sheet materials and will last longer. The price is paid off by the quality.
- After treatment, you can’t hear the rustling of tires, the knocking of stones, or the operation of the transmission.
- If your car has plastic fender liners, then you can glue them from the inside with a sound reflector (such as Splen)
Additionally, we recommend watching the video for a better understanding of the process.
Interior noise insulation
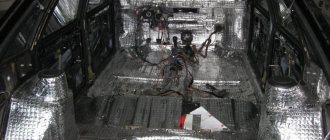
If everything turned out nice and neat with the hood, it’s time to move on to more serious things - soundproofing the interior. To do this, we completely disassemble it. For convenience, we remove all the seats and then the carpet and rear trim. After that, we remove the ceiling, disassemble the door trim, and now the longest process is a thorough wash.
You need to wash everything, or even better, vacuum it. The less dirt the better. Otherwise, there will be bubbles under which moisture will begin to accumulate. And this is a direct path to corrosion of the body under that same sound insulation. Try to make everything very high quality. It is better to wash the ceiling first. Then you can glue it.
Sheets need to be glued in pieces. We apply, mark, cut and then glue the desired area. After this, warm it up with a hairdryer and roll it out with a roller. The bubbles won't last long. The sheet should fit tightly to the metal. A lot depends on this.
After gluing the ceiling, you can glue the doors. The only difficulty is gluing it to the inside of the door. To do this, you will have to push the cut piece through the technological holes in the door and stampings. This is not easy to do and you need to approach the process very carefully.
After this, you need to glue the outer part under the casing. All unnecessary “windows” can be sealed. It won't get worse, but it will definitely get better. Once you've finished with the doors, you can move on to the interior.
The same principle remains here - we measure, cut into pieces and stick on. Particular attention should be paid to the area where the transfer gearbox is installed. As mentioned earlier, she makes a lot of noise. Therefore, we recommend gluing this part of the metal with sheets of 4 millimeters in two layers. You can also glue it with an overlap. But this should be done in such a way that the elements below are under the material on top. This is necessary to prevent moisture from flowing under the material.
The Niva has rear body panels that are hidden behind the arches. They need to be glued, like doors - through those same “windows”. Here, too, the windows can be sealed. The car will become much warmer, and the noise from the rear wheels will disappear altogether.
After gluing, you need to return the carpet to its place. Everything needs to be attached to the standard holes. Clips that are broken must be restored. After this, we install the seats in place and restore all the interior elements.
Why is this procedure needed?
The time comes, and most motorists, owners of the VAZ 2121, are thinking about carrying out a Shumka test. There are different things that push you to carry out this particular operation: it could be friends who have carried out noise insulation and shown how effective it is in practice, or the media, television and the Internet, where information about the benefits of such insulation is periodically found.
VAZ 21214 soundproofing yourself
In video reports about this process, the owners actually praise the car for its comfort, explaining this by the sound insulation carried out. There is practically no noise inside the cabin; the music sounds like in a concert hall.
It’s safe to say that a car owner who has soundproofed a VAZ 2121 will receive the following benefits:
- The car will become quieter, if not in the ideal sense of the word, then certainly in a comparative sense;
- The quality of music will increase several times;
- The owner will receive pleasant bonuses in the form of slow cooling in winter and prolonged heating of the interior in summer.
Indeed, the level of noise and knocks is reduced, even when driving over various uneven surfaces. Whether it's a puddle, gravel or railroad tracks, the driver will hardly feel the sound of the wheels.
Soundproofing VAZ 21214 yourself
- How to make a car soundproofing yourself
Having become the owner of an expensive and high-quality acoustic system, the owner of a Niva will no longer be disappointed in the speakers, since he will have the opportunity to “squeeze” everything out of them.
Acoustics in Niva
So, the question – is it worth doing sound insulation – is no longer relevant for many car owners. This is already clear, especially to Niva owners, whose level of standard “noise” is clearly disappointing. The question is: is it worth carrying out this operation on your own?
Putting the car in the hands of a pro is the easiest thing to do in this situation. But where to find them?
The level of repair operations carried out at service stations today, to put it mildly, leaves much to be desired. This will be confirmed by the majority of Russian motorists who have encountered amateurism in repair shops.
But it would be just the right place for the vehicle owner to start upgrading his favorite car. You can wait until you go on vacation or take a few days off and get serious about tuning in your own garage.
Lockers
It would seem that the sound insulation should end in the interior, but no, we recommend not stopping there and gluing the fender liners. If you don't have them, we recommend purchasing them. They are inexpensive, and they will be more than enough use.
We remove the old fender liners and thoroughly wash them from dirt. Over the years of operation, a lot of it accumulates there. After this, we degrease it in the same way as the hood. Now we apply the remaining sheets to them, measure and cut.
Sound insulation glued to the fender liners gives a very good effect. It’s enough to imagine winter tires that make terrible noise on the highway. 60% of sounds come from winter tires, so soundproofing the fender liner is a very useful thing. The material should be glued to the part that faces the car, not the wheel.
After gluing, we install the fender liners in place. If you don’t want to bother with standard fender liners, you can buy a more prestigious set. Fender liners with good sound insulating properties are made of a special fabric that absorbs sounds and impacts of small stones against it. Such fender liners are usually used on expensive cars, but you can make them yourself.
Engine insulation
This is the first place to start insulating the Chevrolet Niva. There are several options here.
Available means
Most car owners are trying to save money, so they use various available means, for example, pieces of felt, leftover foam rubber, old blankets, etc. As many years of practice have shown, this method is ineffective.
Special car blankets
They are made from high quality refractory material and are characterized by low cost and fairly high efficiency. In this case, the engine warm-up time is reduced by approximately half.
The most important thing here is the choice of quality products. There have been cases when car blankets began to smoke at elevated temperatures and caught fire. This is basically a cheap Chinese product. High-quality car blankets now cost from 1.5 to 2 thousand rubles.
Professional insulation
Complete sound insulation of the field
Among all materials, they are the most effective. Their main advantage is ease of installation. They are also easy to remove with the onset of spring warmth.
From this group we can highlight several of the most popular materials:
1. "Izolon". It is quite inexpensive and very effective at retaining heat. One square meter of Isolon, depending on the thickness, will cost approximately 50-150 rubles. The quality of this material is kept at the highest level and is often used to trap heat under the hood.
2. "Tiviplen-P". It is classified as a self-adhesive type material. It is based on polyethylene foam. "Tiviplen-P" is a three-layer material. The middle layer is polyethylene foam, and the outer two are the front and adhesive layers. Foil is not used here, since heat is retained perfectly without it. The thickness of the material ranges from 4 to 15 millimeters, and the cost is from 200 rubles per square meter.
Isolation goals
We make sound insulation in the field
Every driver who decides to soundproof his car sets several main goals:
- Reduce the amount of sounds coming into the cabin from engine operation. Due to this, the performance of the acoustic system is significantly improved;
- No sounds from outside enter the cabin;
- At the same time, thermal insulation occurs. Thanks to this, the cabin will be cool in summer and warm in winter.
Hood insulation
Who did soundproofing in the field?
The process begins by removing the hood cover. After this, all operations occur in this order:
Note: if it still performs its main tasks, then work can be carried out directly on it.
- Clean the surface from foreign particles. If you had to wash the surface using water, you should dry it before starting work;
- Prepare vibration material. For this purpose, you can use any domestic materials (for example, Vizomat);
- Spread it over the area occupied by flat elements. The material should be evenly distributed between the stiffeners;
- Prepare a second layer, which is called soundproofing. Here you need to use materials that can protect against the penetration of extraneous noise. Spleen is a good choice.
Note: when using a construction heat insulator, you must choose one that has a layer of foil.
- Carefully install it on top of the first layer, using any construction adhesive;
- If the factory sound insulation has been removed, it should be used as a third layer.