The ignition module (IM) of the Niva-Chevrolet car is highly reliable and, most often, provides sparking over many tens of thousands of kilometers. However, if it fails, it is difficult to diagnose due to the lack of obvious signs. The decent cost of a module does not always allow it to be replaced with a new one, which is called “blindly”. First you need to reliably verify that the old one is faulty. Read the article about how to check the ignition module of a Niva-Chevrolet.
Ignition order for VAZ 2123 injector
1.4.
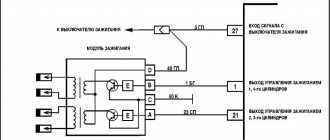
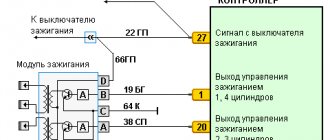
Chevrolet Niva engine ignition system (controller M7.9.7) The ignition system (Fig. 1.4-01) uses a 4-lead ignition coil, which is a block of two 2-lead ignition coils. The ignition system has no moving parts and therefore requires no maintenance or adjustment, with the exception of the spark plugs.
The current in the primary windings of the ignition coils is controlled by a controller that uses information about the engine operating mode received from the sensors of the engine control system. To switch the primary windings of the ignition coils, the controller uses two powerful transistor valves (Fig. 1.4-01).
The ignition system uses a spark distribution method called the “idle spark” method. The engine cylinders are combined in pairs 1-4 and 2-3, and sparking occurs simultaneously in two cylinders: in the cylinder in which the compression stroke ends (working spark), and in the cylinder in which the exhaust stroke occurs (idle spark).
Chevrolet Niva engine ignition coil (controller M7.9.7)
The four-terminal ignition coil (Fig. 1.4-02 and 1.4-03) has the following three circuits (see Fig. 1.4-01):
Primary winding power circuit
The vehicle's electrical system voltage is supplied from the ignition switch to contact “15” of the ignition coil.
Circuit of the primary winding of the ignition coil of cylinders 1 and 4, contact “lb”
The controller switches to ground the circuit of the primary winding of the ignition coil, which supplies high voltage to the spark plugs of cylinders 1.4.
Circuit of the primary winding of the ignition coil of cylinders 2 and 3, contact “1a”
The controller switches to ground the circuit of the primary winding of the ignition coil, which supplies high voltage to the spark plugs of cylinders 2 and 3.
If any element of the 4-terminal ignition coil malfunctions, the entire assembly must be replaced.
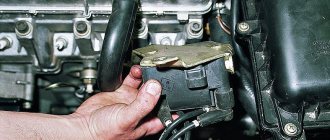
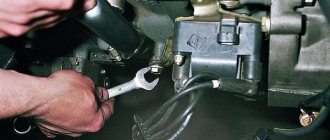
Removing the ignition coil 1. Turn off the ignition.
2. Disconnect the wiring harness block from the ignition coil.
3. Disconnect the high-voltage wiring harness.
4. Remove the ignition coil by unscrewing the mounting bolts.
ATTENTION. Dismantling of high-voltage wires should only be done using the protective cap.
Installing the ignition coil
1. Install the ignition coil on the bracket on the engine and secure with bolts, tightening to a torque of 9.6. 15.4 N • m.
2. Connect the spark plug wires.
3. Connect the high-voltage wire harness to the coil leads and spark plugs.
Dampening detonation of a Chevrolet Niva engine (controller M7.9.7)
To prevent damage to internal engine parts due to prolonged detonation, the ECM adjusts the ignition timing.
To detect detonation, the system is equipped with a knock sensor, see section 1.1.
The controller analyzes the signal from this sensor and, when detonation is detected, which is characterized by an increase in the amplitude of engine vibrations in a certain frequency range, it adjusts the ignition timing using a special algorithm*
Adjustment of the ignition timing to dampen detonation is carried out individually for the cylinders, i.e. it is determined in which cylinder detonation occurs, and the ignition timing is reduced only for this cylinder*
In the event of a malfunction of the knock sensor, the corresponding malfunction code is entered into the controller’s memory and the malfunction indicator turns on* In addition, the controller, depending on the engine operating mode, sets a reduced ignition timing, which eliminates the occurrence of detonation.
Source
VAZ models 8 and 16 valves
Despite the similarity in engine design, the ignition system of the 1.5-liter injection 16-valve engine differs from the 1.6 16-valve engine. The 1.6 liter engine uses an electronic contactless ignition system with individual coils on each spark plug. Therefore, there was no need for an ignition module. Such a system is more reliable and cheaper to operate, since if one coil fails, there is no need to replace the entire module.
The 16-valve 1.5-liter VAZ 2112 injection engine used the same non-contact ignition system as the 8-valve engine, but a different ignition module was installed. Its catalog number is 2112-3705010. The design of the module remains the same - two ignition coils (for cylinders 1-4 and 2-3) plus switch keys in a single block. The spark is supplied to the cylinders in pairs using the idle spark method. This means that sparking occurs in two cylinders simultaneously - in one on the compression stroke (working spark), in the second on the exhaust stroke (idle spark).
The principle of operation of the ignition module on a Chevrolet Niva
Ignition modules are structures equipped with both secondary and primary windings . Additionally, there is a commutator, inside which the current switches from one coil to another. The work is carried out from the computer or vehicle control unit. Analysis and collection of information is also performed using the specified blocks. This check gives an accurate result.
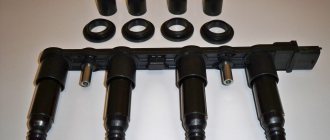
The ignition module has four sockets for connecting high-voltage wires . They then move on to the spark plugs.
Varieties
Over the entire period of production of these cars, manufacturers equipped them with two main groups of devices :
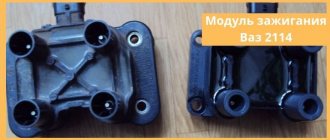
The indicated modules are not classified as interchangeable parts . Their design is different, so it is impossible to replace one type with another. By appearance it is easy to determine which part is used in a particular case. The old Niva Chevrolet ignition module has increased dimensions and weight.
Module design
Converting low voltage signals to high voltage is the main purpose of any module . It is based on the process of spark formation inside the cylinders. The design of the module is similar to a pulse transformer. The signal from the electronic control unit is supplied to the input of the device. In this case, the voltage is removed from the output to 20-30 kW. This means that each wire works stably.
The module has a connector to connect the low-voltage part and an additional four sockets . So-called armored wires are inserted into them.
High voltage is supplied to two cylinders at once . The formation of a spark takes up to 90% of the total energy of the device. The conductivity of the mixture is associated with high pressure, which is maintained on a constant basis. The module has only two independent coils.
Where is the ignition module located?
The part is fixed to the bottom of the cylinder block . For this reason, the ignition module is constantly exposed not only to corrosion, but also to high temperatures. The second factor for this system can be called the most critical. Therefore, owners often move the structure themselves to another place where the conditions are not so problematic.
Where is the Ministry of Health located?
The location of the Niva-Chevrolet ignition module was not chosen very well. It is attached to the bottom of the cylinder block. Thus, the module is exposed to two negative factors at once:
- Corrosion. This is facilitated by the low location. During operation, moisture often gets into the MH.
- High temperature. Mounting the module on the cylinder block forces it to operate at temperatures close to 100 degrees.
The second factor is the most critical for MH. The manufacturer guarantees normal operation of the device up to 120 C°. This kind of temperature under the hood is rare. But constant exposure, even to lower values, significantly reduces the service life of the MH. Therefore, conscientious owners move the module to a place with more benign conditions. Most often, on the partition of the engine compartment.
Common causes of malfunctions
It is rare to encounter a situation where both coils fail at once . The engine can be started even if the module is only partially faulty.
But when the following signs appear, it becomes easier to identify the problem :
However, these problems often appear when other parts of the engine break down . The main thing is to carry out correct diagnostics and figure out how to check the ignition module itself.
Attention! Operating a vehicle in the event of a breakdown is permissible, but only for the purpose of getting to the place of repair.
Types of breakdowns
The ignition module is highly durable and reliable . But there are problems that arise immediately or after some time during active use.
For example, when the ignition system is used with inappropriate components. It is important to select high-voltage wires depending on the characteristics of specific devices. Malfunctions occur if the voltage is too low or too high.
Poor assembly, the use of defective parts and low-quality structures also lead to problems . For this reason, entire systems and other components fail.
First signs of trouble
The signs by which a problem can be identified have already been written about. If two cylinders do not work at once, the problem is definitely in the ignition module . For example, cylinders 1 and 4, or cylinders 2 and 3 fail. Or misfires are shown in all cylinders during diagnostics.
High voltage wires
Often, the main difficulty when repairing a carburetor VAZ 2109 is the reconnection of high-voltage wires that were previously disconnected from the distributor cover. It's also an ignition distributor.
The difficulty is that many people forget the connection procedure or simply do not know. But in practice, returning high-voltage wires is much easier than understanding the ignition module used on the injection VAZ 2109.
By following a few simple rules, you can easily return the wires to their rightful places.
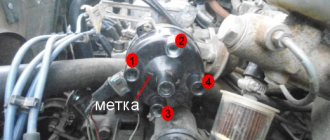
- The ignition distributor cover is installed in its place, that is, on the distributor, only in a single position. Therefore, even if you wanted to, you won’t be able to confuse anything here. Otherwise the lid simply won't fit.
- There is an installation mark on the cover, which indicates the location of the wire socket from the first cylinder.
- The wires must be connected in the following sequence - 1, 3, 4, 2. Move counterclockwise when looking at the distributor cover from the side of the expansion tank.
How to check the ignition module on a Chevrolet Niva - check procedure
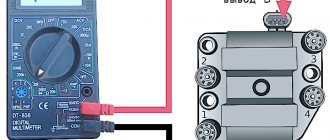
A multimeter will help you check the condition of the node . It is not necessary to use expensive instruments with high accuracy. The main thing is the presence of a digital display, then any measurements are simplified.
First you need to make sure that the wiring of the device remains intact. To do this , perform the following steps :
The resistance of the secondary winding is checked in the next step . Here you need to move the switch to the 20 K position. The probes are connected to wires with the appropriate voltage. 5.4 Ohms is the standard reading for instruments in this situation. Otherwise, the connection cannot be properly organized.
Checking with a multimeter
- The check is carried out on the removed device and begins with inspecting the condition of the terminals to which the high-voltage wires are connected.
- The probe is installed on pin D, the black one is shorted to ground. In 20V voltmeter mode, the device should show 12 volts.
- Then we switch the device to resistance measurement mode, and install the red and black probes on contact D and ground, respectively. A normally operating device should have a reading of less than 1 ohm.
- We check contacts A and B one by one. The device is switched back to voltmeter mode and readings are taken. If they are no more than 0.3V, then the device is considered working.
If any measurements show deviations from the norm, then the device is considered faulty. The continuity of the circuit should be checked.
Transferring the ignition module
In order for the ignition module to work better, it is moved to the engine compartment higher than it was originally located.
Before moving and installing additional parts, it is important to ensure that there are no foreign objects nearby. The wires are disconnected from the system only when the ignition is turned off. The main thing is not to touch them with your hands without any additional protection. The same goes for completely disconnecting the batteries when the need arises. Transfers are classified as simple operations.
Installation is carried out in the reverse order compared to dismantling. Bending the standard bracket is the main solution that is used in such situations. Each master decides for himself which way is best to weld the bracket - you can easily achieve the effect when all its parts remain even.
Factors determining the price level
On Chevrolet Niva, ignition modules are sold at different prices. The purchase price of such a spare part is influenced by the following characteristics:
- Technical condition.
- Quality.
- Design features.
- Company manufacturer.
The need for delivery makes the purchase more expensive. The cost also depends on the place where the spare part was purchased, the seller’s pricing policy (availability of discounts), and the need for delivery (which makes the purchase more expensive). In the capital, as a rule, prices for car parts are higher.
BOSCH F 000 ZS0 211, price - 3730 rub.
Chevrolet Niva Manual
Chevrolet Niva Engine
Cross section of the engine: 1 - oil pan; 2 — main bearing cover; 3 — connecting rod cover; 4 - crankshaft; 5 — connecting rod; 6 - piston; 7 — piston rings; 8 - valve; 9 — valve guide; 10 — valve springs; 11 - plate; 12 - camshaft; 13 — cylinder head cover; 14 — valve lever; 15 - hydraulic support; 16 — cylinder head; 17 — spark plug; 18 — cylinder head gasket; 19 — generator bracket; 20 — cylinder block; 21 — oil pump gear retainer; 22 — oil pump gear; 23 — oil filter bracket; 24 — oil pan gasket; 25 - oil pump
Front view of the engine: 1 — tension roller for the air conditioning compressor drive belt; 2 — air conditioning compressor drive belt; 3 — air conditioning compressor clutch; 4 — thermostat; 5 — throttle assembly; 6 — outlet pipe of the cooling jacket; 7 — coolant pump pulley; 8 - phase sensor; 9 — tension roller for the auxiliary drive belt; 10 — cylinder head; 11 - generator; 12 — power steering pump pulley; 13 — support roller for the auxiliary drive belt; 14 — cylinder block; 15 — auxiliary drive belt; 16 — crankshaft position sensor; 17 — auxiliary drive pulley; 18 — air conditioning compressor drive pulley; 19 — oil pan; power unit support; an exhaust manifold; receiver; cylinder head cover;
View of the engine on the left: 1 - generator; 2 — power steering pump; 3 — auxiliary drive belt; 4 — cylinder head cover; 5 — oil level indicator; 6 — oil filler cap; 7 — cylinder head; 8 — spark plug; 9 - flywheel; 10 - sensor for warning lamp of insufficient oil pressure; 11 — ignition coil; 12 — left support of the power unit; 13 — oil separator for the crankcase ventilation system; 14 — oil filter; 15 - oil pan
View of the engine on the right: 1 — starter shield; 2 - flywheel; 3 — exhaust manifold; 4 — inlet pipe; 5 - receiver; 6 — throttle assembly; 7 — thermostat; 8 — coolant pump; 9 — air conditioning compressor; 10 — cylinder block; 11 — oil pan drain plug; 12 — right support of the power unit
The procedure for connecting Chevrolet Niva spark plugs
In modern fuel-injected cars, the ignition module is an unchanged engine component. This device is responsible for generating a high voltage electrical pulse. The impulse is subsequently transmitted to the spark plugs to cause a spark in the cylinder and ignite the fuel mixture. But often problems may arise in the operation of this device and it may require replacement. Also, many off-road conquerors are not satisfied with the standard location of the device in the lower part of the engine, where water can get on it and there is a need to move it to another place.
The ignition module consists of a pair of windings and a commutator, which determines the direction of current flow through the coils. The operation of this component is fully regulated by the vehicle's electronic control unit. The ECU is also responsible for collecting and analyzing information coming from the unit. At the output of the module there are 4 sockets into which high-voltage wires leading to the spark plugs are connected.
The pulses inside are generated in such a way as to produce a paired discharge at the output. First, contacts numbered 1 and 4 are activated, then 2 and 3. This is necessary to synchronize with the operation of the corresponding cylinders in which a spark should occur.
There are 4 contacts suitable for the device, which are marked on the connector. The first 2, designated A and B, receive pulses that are responsible for redirecting contacts from one coil to another. Pins C and D carry power and ground. The letter designations must also be duplicated on the device body.
Design
A rather outdated model of the module is an induction coil, a kind of relay. The device generates high currents and sends them to the spark plug, which subsequently results in a spark.
Inside the device there are two insulated windings - high and low. There is also a metal core. A kind of transformer turns on when the low-voltage winding is closed and is magnetized.
Main causes of malfunctions.
Mostly, malfunctions occur due to damage to the winding. Since high voltage current is generated in it, over time, when using low-quality materials, damage to the wire sheath, breakage or rupture of turns may occur. This can happen for several reasons:
So, for example, if there is damage in the armor wires, then the coil impulse is not fully used, and it looks for another output, as a result of which it breaks through the secondary winding, where the wire cross-section is lower.
This problem manifests itself gradually, since the coils begin to fail gradually and one of them will continue to work for some time. Therefore, if the following symptoms appear, you must immediately check the functionality of the module:
These reasons may be associated with other breakdowns, but when conducting diagnostics, one should not forget about the Niva Chevrolet ignition module. If you suspect the functionality of a component, you must check the device. Diagnostics begins with checking the power contacts. They may be oxidized or the wiring may be broken. If this does not bring results, then you need to dismantle it to check it using additional instruments.
Purpose and principle of operation
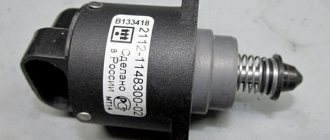
VAZ 2110 ignition module The ignition module of a modern car performs the function of generating high voltage to generate a spark on the spark plugs. It consists of two coils with a closed magnetic circuit and a two-channel switch. Sometimes the switch is made as a separate device, but in most cases it is combined with an electronic control unit for the engine. Externally, the modules differ in the number of wires in the connection connector: a module with a switch has 4 wires, and paired coils have 3.
The ignition module is controlled by the ECU, which supplies constant voltage in the form of low-voltage control signals to the windings of its coils at the right moment. The end of the signal is the beginning of the spark. Thanks to magnetic induction, at the moment of application, a high voltage is generated, creating a spark at the spark plug. The device is located in the engine compartment and can be easily identified by the high-voltage wires leading to the spark plugs.
Description of the camshaft sensor on Niva Chevrolet
Where is it located: in engines with a gasoline power system, the DPRV is installed on the camshaft pulley. In an engine with a diesel power system, the control system is somewhat different. Where the upper and lower position of the piston in each cylinder is fixed.
On engines with a carburetor fuel system, the role of the DPRV is played by the distributor. The design of the injector is different, the system was parallelized, injection and ignition were done in pairs.
During systematic operation, the household equipment wears out and becomes unusable. The process of self-replacement is not at all difficult. The task is feasible for a car enthusiast without technical equipment maintenance skills.
Repeated restart of the engine is the first sign of a malfunction of the DH (DPRV).
To determine which cylinder is on stroke, the electronic engine control unit controls the position of the camshaft using DPRV (SMR)
Data from the sensor is extremely important for setting and dosing fuel, sparks in the combustion chamber, and injectors. The camshaft sensor directly affects fuel consumption, acceleration dynamics, and the amount of emissions in the exhaust gases.
In cars, including Niva Chevrolet, magnetic and Hall effect sensors are preinstalled. Both types are designed to read and transmit data to the electronic engine control unit.
The latter, based on the analysis of indicators, adjusts the fuel supply, ignition timing, and spark frequency.
Signs of DPRV malfunction:
Frequent causes of premature wear of the controller:
Also interesting: Review of standard Niva Chevrolet alarm system Preparatory stage:
The controller replacement is complete. We start the engine and check the serviceability of the equipment.
Methods for diagnosing device performance
The simplest method that will help determine the performance of the coil is to replace it with a similar working device. This is possible if there is somewhere to get it. Please note that the module must match the parameters of the device under test . If the engine with a working coil works as before the breakdown, the ignition module is definitely faulty.
The main testing method involves using a multimeter. It consists in determining the resistance of the secondary windings of the coils built into the ignition module. The method is simple and does not require additional skills. The device does not need to be removed for testing. The check is done with the engine turned off.
This is how you check the resistance of the secondary winding with a multimeter
Fines for crossing the stop line and speeding will no longer bother you!
Video: How to check the secondary winding with a multimeter
Chevrolet Niva ignition module
After traveling through fords, another problem appeared: the engine was not running smoothly.
I changed the spark plugs and armor wires, but nothing helped. There was an assumption that the ignition module was to blame, and the contacts on it where the armor wires enter were all covered with blue powder. Clearly traces of water. My Chevrolet Niva is old, but it’s clear that the ignition module has never been changed. In the process of searching for a replacement, I looked through a lot of information. The ignition modules that came in cars from the factory lasted for a long time, more than 100 thousand km, but after replacing them, problems began. New modules traveled at most 10 thousand km, and sometimes they did not even travel 1000 km. The reason is that the Chevrolet Niva ignition module is sensitive to high temperatures, and it is mounted on the engine, where the temperature is always high. As a way out, people began to move it, for example, to the wing so that it would not get so hot. And this helped, but another problem appeared - low-quality spare parts. On the forum of Chevy Niv owners, somewhere I even came across a list of ignition modules from different manufacturers, where statistics were given on how long they last.
This problem is relevant not only for the Chevrolet Niva, but also for the VAZ 2112. Because before 2006, the Chevrolet Niva was equipped with an ignition module from the VAZ 2112, after 2006 from the VAZ 2111. The difference between them is that the ignition module from the VAZ 2112 is “smart” ”, i.e. It itself controls the process of supplying a spark, and from the VAZ 2111 this process is controlled by a computer and the module itself is essentially just ignition coils.
Naturally, I had a desire to change my module to a more reliable one from a VAZ 2111, but to do this, at a minimum, I would have to change the computer from Bosch 7.0 to Bosch 7.9.7, the latter has ignition control. This is all expensive and there is a cheaper solution from craftsmen.
On the Internet I came across a description of the “God’s Spark” system; it allows you to connect a reliable ignition module from a VAZ 2111 to a VAZ 2112 and Chevrolet Niva up to 2006. God's spark consists of an adapter cable and two modified controllers from the VAZ 2108. I didn’t quite understand why they needed to be modified, the only thing in the description was that with unfinished controllers there would be problems with ignition, which would be especially noticeable on turbocharged cars.
I ordered the “God's Spark” system before the New Year, but Russian Post took several weeks to deliver. And finally, after standing in line for a couple of hours, I got it. I bought an ignition module from a VAZ 2111 for it, a bracket for attaching it and a corner for attaching controllers.
Installation in the cold took several hours. I removed the old ignition module, its bracket and installed a new one. They are attached completely differently. Therefore, the new one, unlike the old one, is held on by one bolt, and not by three.
I secured the controllers to a corner, which I attached under the air filter mounting bolt. Having previously cleaned the metal, since the controllers require a good ground, just in case, I threw a separate ground wire to the battery. After that I connected everything and started checking.
Firstly, the car started up faster, and secondly, it began to pick up speed faster. Apparently the old ignition module was indeed faulty. By the way, I will carry it in the trunk, and I will attach the old bracket back, so if something happens to God’s spark, I can temporarily switch to it.
What to look for when purchasing
The spark plug design is not the only parameter that you should pay attention to when choosing such parts. Two more characteristics are important:
- overall dimensions of the candle;
- heat number.
As for the sizes, everything is simple here: a candle that is too small will simply fall into the candle well, while a large one will not fit into it. To accurately determine which spark plugs are suitable for your car, it is worth studying the recommendations from the car manufacturer. Most often, this information is in the car manual; you can also clarify this issue with the dealer or on the forums of a specific brand and model.
You can also easily find spark plug interchangeability tables
. They contain all the dimensional parameters of the candle, and there are many of them:
- thread size on the spark plug body;
- type of installation of the spark plug in the cylinder head (flat supporting surface or cone-shaped);
- wrench size (16.0 mm hexagon size, 19 mm, etc.);
- thread length on the spark plug body.
In order not to remember countless numbers and designations, it is enough to find the very interchangeability table or configurator, where you just need to enter the car make/model/engine type, and you will immediately be offered all the suitable options from all well-known manufacturers.
an important selection criterion, illustrating compression at which uncontrolled ignition occurs. Each brand has its own standards and scales for candle heat ratings. If you ignore this indicator, you can bring the engine to glow ignition
— uncontrolled combustion of fuel, provoked not by a spark, but by contact of the fuel mixture with hot engine parts or carbon deposits.
It is impossible to determine what heat rating is needed for your engine by eye - this is done by the manufacturer at the factory. The candle is marked accordingly. It illustrates the maximum permitted temperature load of the spark plug, its resistance to glow ignition and overheating.
This marking cannot be ignored, since it is almost impossible to determine by ear the line between normal ignition and glow ignition. But if the transition has taken place, the overheated pistons are destroyed in a matter of minutes, and the engine is sent for repair. Too low a temperature also has negative consequences on the engine - in this case, carbon deposits increase and engine power decreases.
Spark plug.
On the Niva Chevrolet, the spark plugs are closely related to the previous device. And if they malfunction, all the same problems as described above are possible. Spark plugs fail especially often in winter. This is due to the fact that the car is not used so often and mainly for short trips. Due to the low ambient temperature, the candles do not warm up to the maximum temperature at which they self-clean from carbon deposits.
If problems occur, it is necessary to replace the spark plugs in a timely manner so that this does not affect the performance of other system components. Spark plugs for the Chevrolet Niva must be purchased specially for eight-valve injection engines. When purchasing, you should pay attention to the gap between the electrodes. It should be no more than 1.5 mm. If this distance is greater, this will affect the duration of the candle.
Door harnesses
There are wires running through the cabin that connect to the door wiring - they ensure the operation of power windows, speakers, alarms, rear window heating, etc. Each line has a socket, thanks to which the door can be easily removed and replaced.
Let's note some features:
- each harness has wires going to the central locking moderator; in more advanced models, the rear doors have wires for the interior lighting and the window regulator;
- the driver's door harness goes to the buttons for the two power windows of yours and the passenger's;
- in the front doors there are wires going to the speakers that are located in them;
- The rear door harness is one of the most complex - it includes wires for the heated glass, wiper and washer gear, rear brake light, central locking and ground wires.
You can see door wiring diagrams in the picture. They all originate from the rear harness, which goes to the taillights.
How to check and identify faults in the ignition coil of a Niva Chevrolet
Let’s try to figure out how to diagnose and identify faults further:
When the need arises to change the ignition coil, it is not necessary to immediately go to a service station and pay money for it. You can do this kind of work yourself in your garage without spending too much time on it.
You can also view the procedure for connecting and replacing the coil on the Internet. Many videos allow you to figure out this work yourself and do it yourself.
The ignition module on the Niva Chevrolet and other domestic cars is nothing more than a pulsed high-voltage supply source. It happens that sometimes these devices break down and require partial repairs or complete replacement. In this article we will analyze in detail how to check this device in order to determine the fact of a possible malfunction.
Video about checking the ignition module:
Varieties
During its production, Shniva was equipped with two types of modules.
- MZ from a VAZ 2112 car. Installed until 2006. It includes a spark control system.
- The module is from a VAZ 2111. It is controlled by signals from the ECU, therefore, in essence, it is a regular ignition coil.
Please note that the modules are not interchangeable. This is due to their different designs. You can determine which ignition module on a Niva-Chevrolet by its appearance. The old one has large dimensions and weight, and most importantly, unlike the new one, there are not three, but four contacts on the primary winding connector. At the same time, the process of checking the Niva-Chevrolet ignition module will be considered using the example of a new module.