The parts that are responsible for opening and closing the engine valve are installed along with the drive belt. The belt is often subject to wear and tear and is quickly used up. change the VAZ 2109 timing belt yourself, without turning to specialists for help. In this article we have collected complete information. You will soon see that replacing the VAZ 2109 timing belt is simple and does not require special skills. Enjoy reading.
The engine GMZ controls the valves and cylinders. This set of parts begins to work using a belt. According to the standards, replacement of the timing belt and shaft belt in the VAZ 2109 and VAZ 21099 is carried out every 40-50 thousand km. Experts say: “If you have time to replace the belt, the driver will reduce the likelihood of cracks and breakage.”
Many car owners turn to specialists for help. But, as practice shows, it is quite possible to replace the belt on a VAZ 2109 yourself. Replacing the VAZ timing belt will not take you much time. Just follow the instructions.
How to replace the timing belt on a VAZ 2108-VAZ 21099?
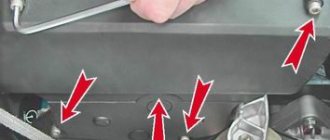
Removal: 1) First unscrew both side cover bolts.
2) Next, unscrew the last remaining central bolt that secures the cover.
3) Now, holding the cover with your hand, remove it from its seat.
4) Next, remove the generator belt from all the rollers. (For information on how to remove the alternator belt, see “this article”) 5) Then remove the front right wheel from the car. (see Removing the wheel)
Note! If your car also has fender liners installed, then they will also have to be removed!
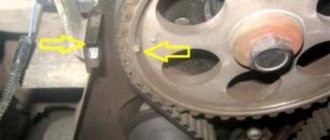
6) Then, using the central bolt that secures the pulley, turn the crankshaft strictly clockwise.
Note! After turning the crankshaft, pay attention to both marks that are indicated in the photo, they should coincide with each other, the first mark indicated by a screwdriver is the camshaft mark, and here is the second mark, this cover mark!
7) Now pull the plug with your hand to remove it from the clutch housing.
Next, look at the mark that is present on the flywheel; it should coincide with the slot on the clutch housing cover.
Note! In the photo, for easier viewing, the cooling hose has been removed!
9) Then remove the crankshaft position sensor. (see “Removing the crankshaft position sensor”)
Note! The screwdriver must be inserted between the teeth of the flywheel!
11) Next, using a wrench, loosen the central nut of the tension roller.
Note! After loosening the nut, rotate the roller to the position where the belt will be loosened the most!
12) Then remove the belt from all rollers, thereby removing it from the engine.
13) Next, after removing the belt, if you need to remove the tension roller to replace it, then completely unscrew the nut securing it, and then remove it.
Note! Immediately behind the roller there is a spacer washer, which must also be replaced if deformed!
Installation: 1) Install the new belt in the reverse order of removal.
Note! When installing a new belt, start with the lowest pulley, the “crankshaft pulley”!
2) Next, insert a pair of screws into both holes that are located in the tension roller housing, and then between these two screws, insert a screwdriver as shown in the figure, and then turn the roller strictly counterclockwise, thereby tensioning the belt to the desired state.
Note! Turn the roller strictly counterclockwise!
3) Next, install the generator pulley in its place, and then tighten the bolt that holds it until it stops.
Note! Before you begin installing the generator pulley, check that the crankshaft mark “indicated by a screwdriver” matches the mark on the cover “indicated by an arrow”!
4) Now turn the crankshaft bolt a few turns strictly clockwise.
5) After all the operations performed, check the alignment of the marks on the flywheel, as well as the marks on the camshaft; all these marks must coincide with the marks on the body.
Note! If at least some of the marks do not match, then reinstall the belt!
Checking the timing belt tension:
1) To check the tension, turn the belt 90° with a slight force, strictly in the place indicated in the photo.
Note! If the belt turns more than 90° with little effort, then adjust its tension!
Important! 1) After removing the belt, do not turn the pulleys on which it was installed! 2) Belt tension, adjust only by the tension roller!
The first domestic car with a belt in the gas distribution mechanism was the VAZ Five, and then all passenger cars of this plant with front-wheel drive began to be equipped with such a unit. Replacing the timing belt 2108 is much easier against a chain drive. You won’t need to look for a lift or inspection hole; if you have the appropriate skills, you won’t even need a car jack.
A similar engine is installed on the VAZ 2109, so the gas distribution mechanism on models 2108, 2109, 21081, 21083, 21093 is replaced in the same order.
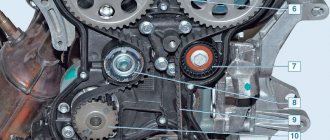
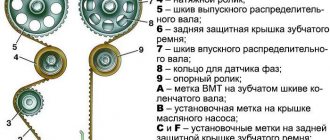
Timing marks (gas distribution mechanism) of engine 21083 (2108, 21081)
The engines of VAZ 2108, 2109, 21099 cars and their modifications in the timing drive have three pairs of installation marks.
When they are combined, the camshaft and crankshaft are in a position in which the pistons of the first and fourth cylinders of the engine are at top dead center.
It is necessary to set the timing drive marks when replacing the timing belt, when setting the ignition timing, when checking and adjusting thermal valve clearances, repairing the engine and replacing its parts, etc.
Timing drive timing marks for engines 21083, 21081, 2108 of VAZ 2108, 2109, 21099 cars
Mark on the camshaft pulley and mark-protrusion on the rear timing cover
Mark on the crankshaft pulley (“sprocket”) and the ebb of the engine oil pump housing cover
A number of engines of VAZ 2108, 2109, 21099 cars have an oil pump without an installation mark on the body. In this case, when setting the timing drive marks, we focus on the marks in the clutch hatch and the camshaft pulley.
Mark on the flywheel and mark-triangular cutout of the ignition timing scale
The mark on the flywheel is a long, shallow cross mark. If there is dirt on the flywheel, it may not be visible. To detect it, you need to gradually turn the flywheel and wipe its surface with a rag soaked in solvent.
Diagram: timing marks for VAZ 2108, 2109, 21099 vehicles with engines 21083, 21081, 2108
Notes and additions
— To access the timing marks on the camshaft pulley and the rear timing cover, it is necessary to remove the outer cover of the car engine timing drive. We align the marks by rotating the crankshaft by the ratchet bolt with a “19” wrench or a large slotted screwdriver by the flywheel teeth in the clutch housing hatch clockwise. It is not recommended to turn the camshaft pulley mounting bolt with a wrench.
— To access the installation marks on the crankshaft pulley and the oil pump housing, it is necessary to jack up the car and remove the wheel from the timing drive side. Then loosen the generator, move it towards the engine (or loosen the tensioner nut, if equipped) and remove the drive belt. Next, use a key set to “19” to unscrew the crankshaft ratchet bolt (in this case, the flywheel is fixed in the clutch housing hatch by the teeth with a slotted screwdriver). We remove the generator drive pulley and screw the ratchet bolt back (you can use it to rotate the entire timing drive).
— To access the installation marks on the flywheel and the ignition timing scale on VAZ 2108, 2109, 21099 vehicles, there is a hatch in the clutch housing closed with a rubber cover. It is located under the thermostat. The flywheel in the hatch can be rotated using a large slotted screwdriver using the teeth of the flywheel crown.
Source
Engine characteristics
Throughout the entire production period, these models were equipped with V8 power units of various modifications. They differed in their working volume, which varied by installing pistons of different diameters and a crankshaft with a reduced piston stroke. Later they began to install VAZ-2111-80 and VAZ-11183-20 engines with an injector in the power system. The first of them had a working volume of 1500 cm3, and the second was already 1600 cm3.
Replacing the timing belt on the 2108 engine, performed efficiently and in a timely manner, ensures a long period of operation of the engine. The engines are equipped with pistons with a working diameter of 76 mm; for engines with a volume of 1.5 or 1.6 liters, their diameter is increased to 82 mm, which have a recess for the valve heads. The piston stroke in the engine is 71 mm; for engines with a displacement of 1100 cm3 it was reduced to 66 mm. Replacing the timing belt on a VAZ 2108 can be done earlier than the factory recommendations if the operating rules of the power unit are not followed.
Owners of VAZ 2108, 2109 should be aware that untimely replacement of the timing belt can lead to its breakage, and this causes damage to the valves in the cylinder head of the power unit.
VAZ 21083 or VAZ 21093 engines do not have this drawback. In the event that the timing belt on these engines breaks, the valves do not meet the pistons, since the pistons have special recesses. To replace the timing belt, simply align the marks and install a new product.
Preparatory work
Replacing the timing belt requires some prep work to get to it. To do this, lift the hood and remove the air filter pipe by unscrewing the fastenings of the retaining clamp with a wrench. Next, the belt protective cover is removed, for which you need to unscrew the three bolts that hold it in place. This is done with a regular open-end wrench. In the opened space, the timing belt will be visible, which needs to be replaced.
The front right wheel and the protection under it are first removed to get to the crankshaft pulley, which drives the gas distribution mechanism via a belt. In the cab, put the lever in the fourth gear position and ask the assistant to press the brake pedal. We install the head 19 on a long wrench so that it is convenient to get to the crankshaft pulley, which we unscrew, which will require some effort. After the bolt is broken, you can put the gear in neutral and not hold the brake pedal.
Replacement features
The operation is not a complicated process, but requires care and concentration, since mistakes can lead to a major overhaul of the power unit. The car is placed on a level area. Wheel chocks should be installed under the wheels to prevent the machine from rolling away.
Replacing the timing belt on a VAZ 2108 engine is done as follows:
- It is necessary to remove the drive protection and the generator drive belt from the crankshaft pulley.
- You should unscrew the pulley bolt, remove it and return the bolt.
- It is necessary to remove the rubber plug from the clutch housing hatch. Next, rotate the crankshaft until the mark on the crankshaft flywheel aligns.
- The matching of the installation marks is checked.
- Loosen the tension roller fastenings and remove the timing belt in the following sequence: From the camshaft pulley.
- From the video.
- From the pump pulley.
- From the crankshaft pulley.
Note! When the timing belt is removed, do not rotate the crankshaft, because This can lead to bent valves and costly engine repairs.
Reassembly
Then everything is assembled in reverse order. First, install the crankshaft pulley. To tighten the bolt, set the fourth speed again and depress the brake pedal, after which the bolt is tightened with a head with great force using a collar. The generator belt is installed in place, the pulleys are moved apart using a pipe, a collar or a small pry bar. This is necessary for good tension of the generator belt, after which the nut is tightened using a wrench with a universal joint. The pulling procedure is repeated several times. This belt should be stretched very tightly and practically not bend under the force of your hand.
Video: Replacing the timing belt VAZ 21099, 2109
After this, the timing belt protection is put in place, for which you will need to install it in the seat and tighten the three bolts again. The air intake is put in place and secured with a clamp. The metal and plastic protection is installed in place and the removed wheel is secured, the car is removed from the jack. After this, you can start the engine. It will start without problems, its operation should be stable, without fluctuations or extraneous sounds. This will only be possible when all the marks match and the belt is tensioned with sufficient force.
Belt tension
If, after turning the crankshaft, the installation marks coincide, the final tension of the timing belt is carried out. To do this, the drive uses a tension roller, which is mounted on an eccentric. You can turn it with a wrench or a special wrench, it depends on the tension mechanism. If the roller has a special nut, turn it clockwise with a wrench, then fix the nut on the roller axis. If the roller has two holes instead of a tension nut, tension is performed using a special wrench.
When such a key is missing, you can insert two bolts of suitable diameter into the holes. Next, insert a powerful screwdriver between them. By turning it clockwise, the timing mechanism drive is tightened. Correct tuning and adjustment of the timing drive is important; this will ensure achievement of the characteristics of the power unit, which are guaranteed by the engine manufacturer. If something is done incorrectly, the timing belt slides towards the engine and may break, which will lead to an emergency stop of the engine. To check the correct tension of the timing belt, turn it (twist) around its axis with two fingers, after which it should return to its original position.
Adjustment
If you have identified a problem with out-of-phase phases, then you just need to find out how to set the ignition on a Ural motorcycle. This will make your life much easier in the future. Please note that the electronic ignition on the Ural motorcycle is regulated completely differently.
So, you need to adjust the ignition of the Ural motorcycle. To work, you will need wrenches, a screwdriver, and it is advisable to take a test light. Adjustments are made in the following order:
Izh Jupiter 5 ignition adjustment is done in approximately the same way. Now you know how to configure this system on your motorcycle.
Periodicity
The vehicle operating instructions recommend replacing the timing belt on a VAZ 2109 with a mileage of 75 thousand km. Experts recommend doing this a little earlier than the period specified by the car manufacturer.
It is advisable to change the timing belt on a VAZ after a mileage of approximately 60 thousand km. Sometimes this has to be done much earlier. This may happen when engine oil gets into the drive operating area and destroys the belt structure. It is recommended to periodically inspect the transmission and the condition of the belt working area. If the slightest leaks of engine oil appear, they are repaired immediately.
Replacing the timing belt on a VAZ 2108 can be carried out earlier than the factory recommendations if the operating rules of the power unit are not followed or it is operated in difficult conditions (using the car in a taxi, traveling in sub-zero temperatures without warming up the engine).
The VAZ 2108 is the first vehicle produced in the USSR using front-wheel drive. We can say that this model became revolutionary, unlike the old model of cars in the domestic automobile industry, amazing car connoisseurs. That is why the VAZ-2108 was very popular among car enthusiasts.
This car, like all its predecessors, has an engine with a timing belt. More information about what a timing belt is, what analogues it has and how to change the part in case of breakdown will be discussed in this article.
Checking the ignition by ear
This verification method is not the most accurate, as it requires some experience. You can check the correct ignition setting of the VAZ-2109 by ear on both an injection and carburetor engine. After warming up the car and accelerating it to a speed of approximately 50 km/h, you need to engage 4th gear. Then you need to sharply press the accelerator pedal and listen to the sound of the engine. If characteristic detonation occurs, everything is fine - the ignition is set correctly, but if this does not happen, the ignition timing is late. Detonation may be too strong, which indicates that the ignition is too early.
Timing belts for VAZ-2108
The timing belt is a special part that makes it possible to combine the action of two shafts - the crankshaft and the camshaft. By using the part, the technical characteristics of the engine are improved, and, therefore, the quality of the car itself increases.
The standard timing belt on a VAZ-2108 with an 8-valve engine has article number K015521.
Moreover, it is equipped with a roller, through which it is possible to tension the belt and secure it in the desired position. The price for such a design ranges from 500 to 2000 rubles. The cost depends on the manufacturer and region of residence of the car owner.
The table below shows analogues of timing belts with article numbers and approximate prices. Before purchasing, you should know how many teeth there are on the belt.
| Analogue | vendor code | price, rub. |
| CONTITECH | 111Z | 300 |
| BOSCH | 1987949139 | 400 |
| GATES | K015521xs | 500 |
It is worth noting that prices are for the belt only. However, the price does not include other spare parts used to secure the part. Thus, when replacing a timing belt, you will need to increase costs and calculate possible costs in advance.
Replacing the timing belt
On average, owners of a VAZ-2108 with an injector engine replace the timing belt almost every 75 thousand kilometers of the car. Sometimes this figure is lower due to premature wear. This happens because car owners install low-quality timing belts.
Thus, after approximately 70-75 thousand kilometers, the belt may wear out or completely rupture. In this case, a replacement will be required. To get started, you should stock up on the necessary tools, including:
- Socket wrench;
- Open-end wrench;
- 10.8 mm head;
- Thick screwdriver.
You will also need to purchase a new timing belt and tensioner pulley.
Main stage
- After these steps, you can proceed to the main stage. First of all, you will need to remove the right engine mudguard. Sometimes it is enough to unscrew the two mudguard screws with a wrench to open access to the crankshaft pulley.
- The next step is to remove the alternator belt. To do this, you will need to unscrew the nut of the lower mounting bolt. Then you need to move the generator towards the engine and remove the belt itself.
- The third step is to remove the protective cover. The work is done using a key. The cover is secured with three bolts that will need to be unscrewed.
When the above work is completed, it will be possible to make a replacement. For successful work, you will need to align the installation marks of the part elements. If this is not done, all steps will have to be performed again.
As for replacing the timing belt on a VAZ-2108, it is performed as follows:
- Loosen the timing roller mounting nut using a 17 mm wrench. The loosened roller is turned counterclockwise to reduce belt tension.
- Remove the faulty timing belt. To do this, it is shifted from the pulley and removed from the tension roller.
- Install a new part purchased in advance. It is important to ensure that all the necessary marks match, otherwise the process will have to be repeated. After installation, you will need to tighten the belt with a nut.
To properly tension, you need to insert a key into the hole in the tension roller. After this you will need to turn it clockwise. The belt will begin to tighten and it is important to stop the action in time to avoid achieving too much force.
Once the belt is tightened, you will need to check its tension. If all actions are performed correctly, the part will rotate 90 degrees. Otherwise, you will have to loosen the tension until the required value is achieved.
The final steps to replace the belt will be:
- Tightening the tension roller nut.
- Reinstalling the crankshaft pulley.
- Fastening the timing cover.
- Wheel installation.
- Lowering the car from the jack.
- Battery connection.
Only after this will it be possible to start the engine to check the operation of the correct replacement. If the car starts without any problems, then the replacement was successful. If the malfunction does not disappear, it is recommended to seek help from a service station.
To change parts, it is worth considering that they have marks that need to be connected. For example, there may be no identification mark. In this case, for a high-quality connection of the parts, it will be necessary to install the gear shaft pulley in the center of the cut on the lower ebb of the cover.
To avoid frequent replacement of the timing belt in the engine, it is recommended to regularly inspect the vehicle. This way, it will be possible to identify a possible problem in advance and fix it much faster and cheaper.
VAZ 2108 is a car that has gained trust among domestic car enthusiasts. This model is equipped with an engine with a timing belt. If this part wears out, you can replace it yourself, and if necessary, seek the help of professionals at a service station.
In this article I will tell you in detail how to change the timing belt on a VAZ 2108 2109 2113 and 2114 with an eight-valve engine. Whether it is injection or carburetor does not matter. You will also learn about the reasons why the timing belt breaks and about little tricks that make replacing it easier.
On eight-valve VAZ 2109 1.5-liter engines, if the timing belt breaks, nothing bad will happen to the engine except replacing this belt. The valve doesn't bend!
Why does the timing belt break on a VAZ 2109?
Many people wonder why the timing belt breaks only after it has happened. You will be lucky if such a breakdown occurs, for example, somewhere in the yards while the engine is warming up, and not on the highway between cities. Therefore, so that you do not find yourself in such situations, you need to know why this happens. There are several reasons for belt breaks:
- Natural wear of the part.
- Buying a defective belt.
- Contact with technical fluids on the belt.
- Malfunction of timing drive parts.
Let's discuss each point in more detail.
Natural wear of the part.
During operation, the belt not only wears out, but also bends, resulting in microcracks that subsequently grow and lead to belt breakage.
Each node has its own service life. The timing belt of the eight-valve VAZ engine operates for 60 thousand kilometers.
Buying a defective belt.
Don't skimp on critical spare parts. By saving 100-200 rubles you can be stuck on the road for a long time.
Contact with technical fluids on the belt.
Oil or coolant can easily get on the timing belt. Oil gets in due to wear on the camshaft and crankshaft seals, and antifreeze can leak out when the pump wears out.
Malfunction of timing drive parts.
Timing drive parts include:
- Camshaft and crankshaft gears.
- Tension roller
- Pump drive gear
Over many thousands of kilometers, the timing gears wear out and the possibility of the belt jumping over a gear tooth increases.
Due to a poor-quality belt tension roller or due to its long use, it may jam. Also, do not overtighten the belt. A belt that is too tight begins to whistle and can break very quickly.
During operation, the pump bearings wear out and play appears at the pump shaft, as a result of which the pump drive gear is crooked and the timing belt begins to slip and rub against the protective casing or the block.
Now comes the fun part - installing a new belt.
We check that all marks match. We first place the belt on the crankshaft and pump. Then we tighten the right descending branch of the belt and put it on the camshaft pulley and tension roller. We check all the marks again and tighten the belt with a roller. The tension is considered sufficient if, with the force of two fingers, you can twist the longest branch of the belt by a maximum of 90 degrees. It’s easier to take the right branch of the belt with two fingers and twist it, if more than 90 is not very bad, but less is very bad. An overtightened belt will wear out quickly and will also reduce the life of the pump.
We place the bottom protective plastic cover. And on the crankshaft pulley we mark the twentieth tooth after skipping two teeth. We count counterclockwise.
This mark corresponds to the top dead center of the first cylinder. We put the pulley in place and the mark should be against the crankshaft position sensor. More precisely, against the small iron core of the sensor. Sometimes it gets into the gap between the teeth, this is considered acceptable. We tighten the pulley in the same way as we unscrewed it, with the help of a partner.
We turn the crankshaft two turns and check the marks; this is where our mark on the pulley comes in handy.
If everything is in trouble, we collect everything that we took apart. As they say in smart books, install the parts in the reverse order of removal. Don't forget to add antifreeze.
We start the car, accept congratulations from family and friends and head off to adventure.
How to remove the timing belt on a VAZ 2109.
First of all, we engage fifth gear (this is done to make it easier to crank the engine when we align the marks), loosen the nuts on the front left wheel and jack it up. Open the hood, remove the protective cover and look at the position of the mark on the gear.
If you change the belt on a VAZ before it breaks.
Rotate the wheel until the marks on the gear and on the plate match.
After the marks coincide in this place, open the inspection hole plug in the clutch housing and check whether the slot on the housing coincides with the mark on the flywheel.
If there are no marks on the flywheel, then rotate the wheel so that the camshaft gear makes one more revolution. If this time no risk appears near the mark in the clutch housing, read how to change the timing belt on a VAZ 2109 if the belt breaks. If the mark coincides with the mark, unscrew the crankshaft bolt and go to the section “Lower timing mark of VAZ 2109”
If the timing belt on the VAZ 2109 is broken and you are planning to change it.
We remove the wheel, remove the plastic fender liner, if you have one. Unscrew the crankshaft pulley bolt.
If you don’t know how to unscrew the VAZ crankshaft bolt, then I’ll tell you a little trick.
If you have someone to help you, then ask the assistant, without removing the car from fifth gear, to press the brake as hard as possible. Meanwhile, we take the head and the larger lever and twist it counterclockwise with all our might.
If you are alone in this difficult situation, then the steps are as follows: check that the car is in gear and screw in 2 bolts that screw the wheels into the hub and between them insert a crowbar, reinforcement, a strong stick (whatever you find, as long as it doesn’t break) and press it into the ground. Next, take the head, extension and larger lever and unscrew the bolt, making sure that the car does not fall off the jack.
Lower timing mark of VAZ 2109.
After unscrewing the bolt securing the generator drive pulley, look at the alignment of the marks on the crankshaft gear and on the oil pump housing, they should match.
When the marks on the upper and lower gears are set, you can unscrew the tension roller and remove the roller and timing belt.
Begin
Everything we need.
We unscrew the three ten bolts securing the protective timing cover and remove it.
Next, loosen the nut thirteen that secure the generator and unscrew the tension bolt ten.
We take the generator to the engine and remove the belt.
Remove the engine protection and drain the antifreeze. We set the camshaft mark by turning the crankshaft clockwise. The ebb on the pulley should be opposite the bend of the protective cover fastening.
Unscrew the crankshaft pulley mounting bolt. We put the assistant in the cabin and force him to engage fifth gear and press the brake. And at this time we easily and naturally unscrew the bolt using a 19 meter head and a pipe of one and a half meters. It must be screwed properly, and some craftsmen lubricate it with sealant and then wait for kind words addressed to them.
On the left side we see the crankshaft position sensor. We will need it to subsequently check the correct installation of the timing belt. We remove the crankshaft pulley and see that the marks match.
Unscrew the nut on the tension roller 17 and remove it along with the belt. Then unscrew the camshaft pulley bolt and remove the last one. Be careful not to lose the key. We unscrew everything that secures the protective metal shield, namely one ten-point nut and a bolt securing the cover, three bolts securing the pump.
Remove the protective cover and pump. Antifreeze remaining in the block may leak out if you have not drained it. Carefully, it's sweet.
We clean all the parts from oil and belt residues, as well as the pump seat from the old gasket and sealant.
Lubricate the gasket of the new pump with sealant and put it in place. We install the metal protection and tighten all the bolts and nuts securing it. We tighten the pump bolts evenly in a circle, then check whether the pump is spinning. Recently a client brought in an original pump, which turned out to have slightly larger petals and after installation it began to bite. I had to modify it with a grinder and take measurements several times. These are the spare parts we have.
We check if the key is lost on the camshaft and install the pulley. We tighten its bolt to seventeen.