A modern car is a complex set of components and mechanisms that, unfortunately, are subject to wear and tear. The steering wheel control system wears out especially quickly due to the fact that most of its components operate under extreme conditions; a malfunction occurs, such as play in the steering. First of all, you need to keep in mind that its elimination should not be shelved, since we are talking about damage associated with a danger to the lives of not only the driver and passengers, but also other road users. And so, let’s look at the reasons why this malfunction occurs, and also find out how to remove the total play in the steering column.
What is backlash?
Backlash is a common term not only in automotive mechanics, but also in mechanics in general. It means a gap, a gap, a free play of the steering wheel (occurs when changing direction). Play in the steering of a passenger car most often begins with the fact that the car begins to pull to the side, the steering wheel vibrates in the front part when driving, especially off-road (and if the situation worsens, even just slightly on an uneven road). In addition, unpleasant “symptoms of play” are loss of smoothness, extraneous noise when turning the steering wheel.
Features of steering rack adjustment
Only the gap in the main engagement of the input shaft with the rack is subject to adjustment, that is, repair without replacing parts. But not always, since the rack stops are usually equipped with a compensation spring. Sometimes increasing its tension temporarily helps eliminate knocking.
How the steering shaft jumps
Longitudinal compensation for shaft play is rarely provided; it is mounted on two angular contact bearings. But if they are made conical or the design provides for a change in their position along the shaft axis, then “jumping” of the drive gear across the rack can be avoided by adjustment. Bearing wear will be compensated.
It is important not to overtighten them, which will greatly reduce the service life and increase the steering effort. Bearings are usually included in repair kits and are replaced during overhaul.
Where does the rack tightening go?
To eliminate the gap directly between the rack and the drive shaft with the gear, the sliding stop is moved along which the rack moves in its central part.
The gap may increase due to:
- wear of the gear engagement of the rack and pinion;
- wear of the guide bushings, due to which the entire rack will gain freedom;
- pressing the stop block of the adjusting nut.
In the first case, tightening is especially dangerous, since the size of the gap depends on the angle of rotation of the steering wheel. In the straight driving position, the wear of the joint is maximum, and at the edges it will remain in its original condition. If you tighten it in the middle, the steering wheel will wedge in extreme positions.
Other cases allow adjustment while maintaining the effect for several thousand kilometers. But long-term improvement is only possible by overhauling or replacing the mechanism.
How to tighten up
The machine is hung on a lift or stands until the steered wheels are completely free.
- the plug is removed from the adjustment unit if it is provided for by the design of a particular vehicle;
- using special keys, loosen the lock nut (if any), after which the adjusting nut is tightened until there is no play in the mechanism;
- You can estimate the gap by turning the wheel or turning the steering wheel;
- A noticeable increase in rotational resistance is not allowed in any position of the wheels, from lock to lock.
A compromise between the presence of a gap and the wedging of the rack is not always possible. If the gap is uneven, it is impossible to adjust the mechanism. Especially if adjustments have already been made several times.
How to remove backlash
A radical way to eliminate backlash is to replace the repair kit for the mechanism or rack assembly. This is the only way to guarantee that the gaps will be zeroed while maintaining smooth rotation of the steering wheel.
It is possible to eliminate backlash in the rack and pinion mechanism by simple adjustment in a limited number of cases and for a very short time. The result should be checked with the engine not running, otherwise the power steering compensates for the friction.
Therefore, if the car has a long mileage without repair, and when trying to adjust, it is not possible to find a compromise between high rack friction and the presence of backlashes, then it is better to replace the assembly.
On sale are both mechanisms from manufacturers for the aftermarket, as well as factory-restored original products.
Causes of backlash
Popular reasons for the appearance of a gap:
- Huge load on the suspension. Most often, due to driving on poor quality roads, the use of tires made of low quality rubber. The steering system is forced to take on the lion's share of the load.
- Due to wear, the rod ends “fly”. The service life of rod ends can vary greatly. It’s one thing if vehicles drive purely on city asphalt roads, and another thing if they drive on dirt and off-road country roads. Dirt contributes to very rapid failure of the tips.
- Loosening the nuts. The problem is theoretically quickly solvable, but many visually do not even realize that such a problem exists in practice. The fact is that the nut is “hidden” behind the airbags.
- Using low-quality hydraulic oil.
- Wear of splines and hinges.
- Failure of wheel bearings and ball joints.
Removing the steering gear
If the adjustment did not help solve the problem or it reappeared after a short period of time, then it is time to repair the steering gear. This is a complex process and first you need to purchase a repair kit, which will include oil seals, bushings, O-rings and other components.
Repair is divided into the following stages:
- dismantling;
- disassembly, cleaning, replacement;
- installation back.
The main problem and difficulty is removing the steering gear from the engine compartment. Remember, you should not try to remove the bipod from the gearbox while it is under the hood, it is sometimes tightened so that it breaks the keys. It is better to remove it together with the bipod, knocking out the steering rods. And already at the workbench, punch it with a hammer and easily remove it.
Permissible steering wheel play
If the vehicle documentation does not indicate other values of the maximum steering wheel play, then the figure (in degrees) should not exceed:
- More than 10 for passenger cars.
- More than 25 degrees – for trucks.
- More than 20 degrees – for buses.
Such standards for steering wheel play are prescribed in the Technical Regulations of the Customs Union “On the Safety of Wheeled Vehicles” (TR TS 018/2011).
This document is taken into account during technical inspection in Russia, Kazakhstan, and Belarus. The steering wheel play measurement, according to the document, is a measurement of the total play in the steering. By this we need to understand the angle of rotation of the steering wheel formed between:
- A position that corresponds to the beginning of the steering wheelbase turning in one direction.
- A position that corresponds to the beginning of the wheels turning in the opposite direction from the position corresponding to the linear movement of a car or bus.
Basic adjustment work on the steering of trucks and buses
Adjusting the steering mechanism. Includes adjustment of screw bearings 3, gear sector engagement 14 and rack nut 5 (Fig. 7). Implementation adjustment sequence:
- drain the working fluid from the hydraulic system;
- remove the steering mechanism;
- finally drain the working fluid from the steering gear housing by unscrewing drain plug 12;
- secure the steering mechanism in a vice by the housing eyes in a horizontal position with gear sector 14 upwards;
- by turning the input shaft, install the rack nut and gear sector 14 to one of the extreme positions (left or right);
- determine the moment of force required to rotate the input shaft from the extreme to the middle position (approximately at an angle of 30°). If the moment of force is less than 0.9 N m, then it is necessary to adjust the tension in bearings 3 by reducing the number of shims 2.
Rice. 7. Diagram of the steering mechanism of the MAZ bus: 1 - cover; 2 — adjusting shims; 3 - bearings; 4 — body; 5 — nut-rack; 6 - balls; 7 - screw; 8 - distributor; 9 — unloading valve; 10 — eccentric bushings; 11 — needle bearings; 12 - drain plug; 13 - thrust ring; 14 - gear sector
After adjustment, the torque required to rotate the input shaft should be 0.9...1.5 N m. To check the presence of play in the gear sector - rack-nut, it is necessary to rotate the input shaft to set the rack-nut and gear sector to the middle position (the total number of revolutions of the input shaft is divided in half) and install the bipod on the shaft of gear sector 14. By rocking the bipod in both directions, determine the presence of play (if there is play, a knock is heard in the gearing and, in addition, the gear sector shaft rotates, and the input shaft of the steering mechanism remains motionless).
The presence of play can also be checked by turning the input shaft of the steering mechanism left and right before the torsion bar begins to twist, while locking the gear sector shaft.
To adjust the gearing, it is necessary to remove the cover 1 (see Fig. 7) and the unloading valve 9, turn the eccentric bushings 10 clockwise to the same angle (as viewed from the sector shaft) so as to eliminate any play in the gearing . The covers and body of the unloading valve are installed in such a way that the pins fit into the holes of the eccentric bushings located in the same diametrical plane with the threaded holes for fastening the covers in the body. If the holes slightly mismatch with the threaded holes of the body, turn the bushings in one direction or another until the nearest holes coincide, while making sure that there is no gap in the gearing. The pins should be located opposite each other on the same line.
After installing the cover and valve, the torque required to rotate the input shaft in the middle position should be 2.7...4.1 N m.
After adjustment, the steering mechanism must be installed on the bus and, having been connected to the steering elements, its operation must be checked.
Adjusting steering components. The main components of the steering: bevel gear, pendulum lever, hydraulic booster.
When adjusted correctly, i.e. adjusted hinge joints of steering rods, front wheel hub bearings and pivot joints of steering knuckles, and the absence of air in the power steering hydraulic system, the force on the steering wheel rim when turning the steered wheels in place on an asphalt-covered area should be no more than 147 N with the engine running, and the play steering wheel - no more than 15°. During operation of the bus, the play is allowed to increase to 20°.
Maintenance and adjustment of the bevel gear. When performing maintenance, check the oil level of the angular gearbox and top it up if necessary. If the steering wheel play is increased, check the play in the engagement of the bevel gears of the bevel gear and, if necessary, adjust.
The tension of bearings 3 of the steering gear (Fig. is adjusted by a set of shims 7 and 25. The torque of the driven shaft 23 (with the drive shaft 16 removed) should be no more than 0.61 N m, and the axial play of the shaft with a force of 150...200 N should not exceed 0.05 mm.
Rice. 8. Diagram of the angular steering gear of the MAZ bus: 1 - o-rings; 2 - keys; 3, 11 — bearings; 4 — cuffs; 5, 14, 24 — covers; 6 - bolts; 7, 21, 25 — shims; 8 — driven gear; 9 - crankcase; 10 - retaining ring; 12 — gaskets; 13 - filler plug; 15 — boot; 16 - drive shaft; 17, 18 — nuts; 19 — bushing; 20 - glass; 22 - drive gear; 23 - driven shaft
The preload of the tapered bearings 11 of the drive shaft 16 is adjusted by nut 18 (tighten the nut until it stops and unscrew it until the shaft begins to rotate in the cup 20). The turning force moment of the drive shaft in the cup should be no more than 0.61 N m, and the axial play of the shaft at a force of 150...200 N should not exceed 0.05 mm.
The lateral clearance in the gearing should be 0.01...0.16 mm. The gap and contact patch are adjusted by moving the gears. The driven gear 8 is moved by moving the adjusting shims 7 or 25 from under one cover to another; drive gear 22 - by changing the thickness of the shim pack 21. After adjustment, the torque of the drive shaft should be no more than 3 N m, the shaft should rotate smoothly without jamming.
Maintenance and adjustment of the pendulum arm. When carrying out maintenance-1, lubricate the pendulum lever with Litol-24 grease through a grease nipple until fresh grease comes out of the control valve.
When carrying out maintenance-2, check the play of the pendulum arm bearings. If the play is more than 0.15 mm, it is necessary to check the condition and adjust the bearings 3 (Fig. 9).
Rice. 9. Diagram of the pendulum steering lever of a MAZ bus: 1 - body; 2 - shaft; 3 - bearings; 4, 9 — adjusting nuts; 5 - screw; 6 - cover; 7 - cuff; 8 — washer; 10 - plug
To adjust the bearings, remove the pendulum arm with the support from the bus, secure it in a vice and check the axial and radial play of the output shaft 2, as well as the ease of its rotation. To carry out the adjustment, it is necessary to remove the cover 6, unscrew the locking screw 5 several turns and unscrew the adjusting nut 9 by 1...2 turns. After this, tighten the nut 4 with a torque of 186...235 N m until the shaft rotates tightly, then unscrew it 60... 90° and check the ease of rotation of the shaft in the bearings; the shaft should rotate without noticeable axial play (when tightening the nut, housing 1 should be rotated to ensure correct installation of the rollers). If necessary, repeat the adjustment.
After completing the adjustment, lock the adjusting nut 4 by tightening the screw 5. If the adjustment fails to adjust the bearings, they should be replaced. When replacing bearings, it is necessary to clean the housing of old grease, and during assembly, generously lubricate the bearings and fill the cavity between them with Litol-24 grease.
Maintenance of power steering. At each oil change (during repairs), it is necessary to wash filter element 10 (Fig. 10). Before removing the cover 5 of the oil tank, it is necessary to thoroughly clean the tank itself and nearby parts to prevent contamination from getting into the oil. The filter is washed in kerosene or diesel fuel, and then the filter is blown with compressed air from the inside and outside. A heavily soiled filter should be replaced.
Rice. 10. Diagram of the power steering oil tank: 1 - seal; 2 — filler plug with dipstick; 3 - nut; 4 - level sensor; 5 - cover; 6 - stopper; 7 - rod; 8 - safety valve; 9 - drain plug; 10 — filter element (filter); 11 - spring; 12 — body; 13 - fill filter
Checking the level of the working fluid and adding it as necessary is done with the engine turned off and the wheels in a straight-line motion position. The level of working fluid in the oil tank should be between the lower and upper marks of the screw. TEXACO Texamatic 7045 Dexron III oil is used as the working fluid.
It is necessary to change the oil during the first maintenance-2. Subsequently, it is recommended to change the oil after repairing or replacing the steering mechanism or pump. In this case, the oil tank filter must be washed and the pipelines cleaned.
Sequence for draining the oil:
- hang the wheels of the front axle or install the wheels on turntables;
- Unscrew the filler plug 2 (see Fig. 10) and drain plug 9 of the oil tank, drain the oil from the tank;
- disconnect the hoses leading to the power cylinder from the steering gear distributor, lower them into a container and, slowly turning the steering wheel left and right until it stops, drain the oil from the power cylinder;
- remove and wash filter element 10, blow it with compressed air, and replace it if it is heavily soiled. If there is sediment at the bottom of the oil tank, it must be removed.
Oil refilling is carried out in the following sequence:
- attach the hoses to the steering mechanism, tighten the drain plug of the oil tank;
- pour oil into the tank (when refueling an empty hydraulic system, it is advisable to remove the oil tank cap);
- start the engine and let it run at low idle speed to fill the hydraulic system with oil. During this process, the oil level in the tank drops quickly, so to prevent air from being sucked in, it is necessary to constantly add oil.
When adding new oil, it is necessary to completely remove air from the system. To do this, after pouring oil into the tank, slowly turn the steering wheel all the way left and right until the release of air bubbles from the oil in the oil tank stops. In the final positions, do not apply more force than is necessary to turn the steering wheel. After removing the air, add oil to the level between the lower and upper marks of the dipstick.
Checking the hydraulic system. Before checking the hydraulic system, check the tension of the pump drive belt, drive pulley and tire pressure.
A pressure gauge with valve 6 (Fig. 11) or a special stand is connected to the hydraulic system between pump 5 and drive 2, after which it is necessary to pump the system to remove air.
Rice. 11. Scheme for checking the hydraulic system: 1 - high pressure hoses; 2 - drive; 3 - tank; 4 — low pressure hoses; 5 - pump; 6 — pressure gauge with tap; — direction of flow of working fluid
Start the engine and bring the temperature of the working fluid to working temperature. The engine warms up with the pressure gauge tap fully open (warming up with the tap closed can lead to an increase in temperature).
By turning the steering wheel all the way left and right with the engine running (the crankshaft speed is 1000 rpm), the pressure developed by the power steering pump is determined, while the pressure gauge valve must be open.
If the pressure is less than the values specified by the manufacturer, slowly close the pressure gauge tap for no more than 15 s and measure the pressure again. This measurement is repeated 2 times. An increase in pressure indicates proper operation of the pump and a malfunction of the steering mechanism. Low pressure when the pressure gauge tap is closed is a sign of a faulty pump. An increase in pressure in the system during checks indicates a malfunction of the pump safety valve.
After checking the hydraulic system, disconnect the pressure gauge and, if necessary, add working fluid, after which air is removed from the system.
How to check steering play?
Check the steering wheel play with the vehicle parked on a level, non-slip surface.
This could be, for example, an asphalt concrete area. Prepare the wheelbase. The optimal direction for installation is in the direction of the longitudinal axis of the body.
If there is dirt on the wheels, remove it. Otherwise, you may receive distorted data. Before taking direct measurements, it is important to turn the steering wheel left and right several times. This is important for understanding at what point the wheels change direction.
How to repair a steering gearbox?
Repairing the gearbox is quite difficult, because... This unit requires fine tuning and perfectly precise assembly. Therefore, it is better to entrust the work to specialists. But if you have enough experience and understand the structure and operation of car systems, you can:
- Adjust the steering gear for play and knocking. You will need a flathead screwdriver, a wrench of the appropriate size and an assistant. Loosen the locknut and slowly tighten the adjusting screw. At the same time, an assistant from the interior checks the play. After tightening the screw sufficiently, secure it with the nut.
- If a leak is discovered or adjustment of the steering gear does not help, the unit will have to be disassembled: removed, unscrewed from the rods. Then you need to remove the shaft plug, lock nut, lock ring, carefully knock out the shaft and remove the lower oil seal. To remove the upper oil seal, remove the locking pin and ring and remove the bushing and clamping mechanism. Thoroughly clean all parts, be sure to replace sealing elements, bearings, and bushings. At the service station, the shafts are checked for runout, and the gearing is checked for defects. If you do not have special equipment, you can only assess the condition of the parts visually.
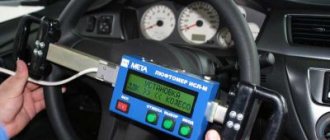
What tool is used to check play?
Use a backlash meter to check the angle.
The simplest measuring device is a mechanical one, the components of which are sliding brackets, a movable carriage, a dynamometer, and a goniometer scale. The playmeter is attached with stops to the steering wheel rim. The dynamometer is installed on the bottom bracket.
But electronic measuring equipment is more convenient to use and superior in accuracy. Instead of a dynamometer, which detects the beginning of the wheel rotation, there is a sensor on it. Using it, you can directly record the moment the wheel begins to turn.
List of faults and conditions under which the operation of vehicles is prohibited
Wheels and tires 5.1 Tires of passenger cars have a residual tread height of less than 1.6 mm, trucks - 1 mm, buses - 2 mm, motorcycles and mopeds - 0.8 mm. Note For trailers, standards for the residual tread height of tires are established, similar standards for tires of vehicles - tractors.5.
2 The tires have external damage (punctures, cuts, breaks), exposing the cord, as well as delamination of the carcass, peeling of the tread and sidewall. 5.3 There is no fastening bolt (nut) or there are cracks in the disk and wheel rims, there are visible violations of the shape and size of the mounting holes. 5.4 Tires do not match the vehicle model in size or load capacity.5.
How to eliminate backlash?
If the clearance norm differs from the norm, meticulous diagnostics is needed:
- It is important to determine the source of the knocking. Very often, drivers think that the reason is due to free movement, but in fact the reason is related to a malfunction of another component of the vehicle.
- Check suspension operation. Often it has to be repaired or even replaced.
- Check if everything is in order with the steering bar. Sometimes, to solve the problem, it is enough to simply tighten it by turning the adjusting screw.
- Be sure to check the ball ends and rubber boots. Their replacement is also necessary quite often for the problem under consideration.
- If there are problems with the steering wheel installation, it is important to understand the reason. Most often, the root of the problem is a worn gear mount. Replacing it will quickly “calm down” the free movement.
If the above steps do not help solve your problem, think about whether you have recently repaired the chassis. A poorly tightened bearing nut can be a direct cause of problems with the steering system. If the problem is low-quality oil, as was mentioned when considering the causes, then the surest method of dealing with “played out” free wheeling is a simple oil change.
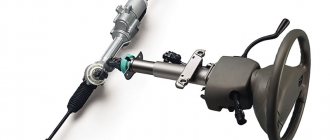
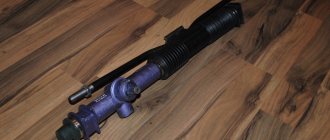
Steering gear design
This system is installed regardless of the hydraulic booster or electric power steering. And if various power steering appeared relatively recently, the steering gear has been installed since the very beginning of the automotive industry. The steering gear housing is made of durable materials such as welded steel or cast iron.
Today, a large number of steering gearboxes are produced and they are divided into:
And they are classified:
- by type of gears;
- by the number of steps;
- depending on the location of the shaft.
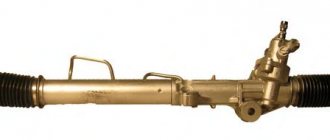
The worm type steering mechanism has been used for a long time, but in the modern automotive industry it is inferior to the rack and pinion type. It is characterized by the transmission of torque through a worm shaft and a toothed worm wheel. The shaft is made of high-strength alloy and has a trapezoidal shape. The thread of the worm wheel is precisely adjusted to the thread of the shaft; in appearance it resembles an ordinary wheel with teeth. This steering gearbox produces high torque at low angular speed.