When to change?
VAZ Lada Kalina vehicles use a belt drive for auxiliary units. On cars with air conditioning, the service life of such a belt is no more than 30 thousand km. On simple versions of cars, the strap can last longer, but most owners try to change it after the same 30 thousand kilometers traveled. For various reasons, the belt may fail earlier, so it must be checked periodically during vehicle operation. There should be no cracks on the working track, and delamination on the outer part of the belt is unacceptable. If such defects are present, we immediately change the strap. Another signal to replace this element is a whistle or other noise when the unit is operating.
The process of replacing the belt on a Kalina with air conditioning (sixteen valves) is presented in a video from the user Alexander.
DIY replacement instructions
How to change and how to tighten the alternator belt on a Lada Kalina car? If you have already completed a similar task before, then completing it will not take much time and effort. But if you are encountering such a problem for the first time, then, of course, it would be better to entrust this procedure to specialists at a service station. Be careful when performing this task as mistakes can have serious consequences.
Tools and materials
To perform all steps correctly, prepare all the tools and materials that may be required.
- a set of wrenches, you will need wrenches 8 and 13;
- new strap for installation;
- open-end wrench 19 (video author - Kalinin channel).
Stages
After all the tools and materials have been prepared, you can begin replacing the belt:
- To begin, turn off the engine and ignition and open the hood of your car.
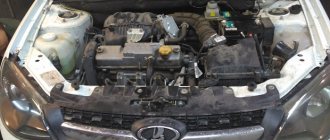
- The strap itself is located on the left side of the engine compartment. If you cannot find it, then start the engine and look in the engine compartment. The belt itself will rotate on special rollers, you will be able to see it, just do not confuse it with the timing belt.
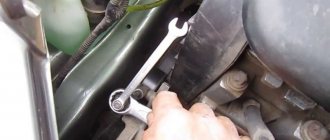
- Once the installation location has been found, you need to use a wrench to loosen the bolt that secures the adjustment rod to the bracket. Having done this, touch the RG itself to make sure how tightly it is stretched. This is necessary so that you can objectively assess how to install the tensioner after replacing the RG.
- When you loosen the nut, you will need an 8-mm spanner; use it to unscrew the adjusting rod, this will reduce the tension. The rod itself must be unscrewed almost to the very end. These actions will allow you to loosen the tensioner tensioner as much as possible. When this happens, you can start dismantling the lower mount; to complete this task you will need a 13 key.
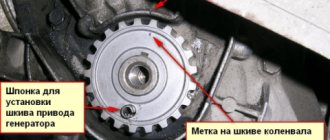
- After these steps are completed, you will need to move the adjusting rod as high as possible, this will allow you to dismantle the belt. But before you do this, you will need to remove it from the generator assembly shaft. Once you manage to remove the RG part from the pulley, you will be able to completely remove it from the crankshaft.
- Next, when the belt is dismantled, it should be carefully checked visually. If there are signs of damage on its surface, then, of course, the part must be replaced. The replacement procedure is performed in reverse order.
Belt and roller selection
Several types of belts are used on Lada Kalina cars.
The type of element depends on the engine model and its equipment:
- The motor version without air conditioning and tensioner has a belt length of 823 mm. Gates (number 6PK823) is standardly used, but such a part is not supplied as spare parts. To replace it, a slightly different strap is used - Gates 6PK823SF.
- The version of the unit with a belt tensioner, but without air conditioning is 882-884 mm. Standard part manufactured by Gates (article 6PK882). In addition to it, straps are often used - Finwhale BP6883, Dayco 6PK888 or the cheapest Balakovo belt BRT882.
- Engine with air conditioning and belt tensioner (motor 11183) - 1018 mm. Standard element manufactured by Gates (number 6PK1018). Alternative options are Dayco 6PK1018 or Continental 6PK1015.
- The 21127 16-valve engine with air conditioning and tensioner uses a 995 mm belt. The Gates part (6PK995) is supplied from the factory, and it is also used as a spare.
Sometimes when replacing a belt it becomes necessary to install a new tensioner. It is the same for all motors, its article number is 2123–1041056.
How to change it yourself?
The complexity of replacing the alternator belt on Kalina does not depend on the number of valves or additional units on the engine.
Replacement on 8 valve engines without tensioner
Replacing the belt on such an engine is the simplest; the only tools you need are a 13 mm wrench and a short flat-blade screwdriver. Since the tension in such a drive scheme is quite strong, when changing it is necessary to use only a Gates 6PK823SF or Dayco 825 six-V belt with the additional marking POLY-V. The remaining straps are too rigid, quickly collapse and damage the bearing on the generator shaft.
Stages of work
To complete the task you need to do the following:
- Unscrew the lower mounting bolt of the generator 2-3 turns.
- Unscrew the nut of the upper fastening, use a screwdriver to push out the bolt and remove it completely.
- Lower the generator down. The eye of the mechanism must pass through the gap between the radiator and the TV body.
- Remove the old belt and replace it with a new one. If the strap does not fit easily onto the pulleys, you can carefully tighten it using a screwdriver.
- Raise the generator up, ensuring the belt is tensioned.
- Insert the upper mounting point bolt and tighten the nut.
- Tighten the lower mounting point bolt.
- Check the operation of the belt.
The repair process on such an engine is clearly shown in the video filmed by the author Ilgiz Magafurov.
Replacement on 8 valve engines with tensioner
Here, the procedure for installing a new alternator belt is very different from that presented above.
Required Tools
To replace the alternator belt yourself, you will need at least the following tools:
- regular or box wrench for 13, 17 and 19 mm nuts;
- a head with a ratchet for 8 mm nuts; if it is not available, an open-end or regular wrench of the same size will do;
- a screwdriver with a thin flat blade;
- thin needle;
- rags;
- white spirit or gasoline, approximately 0.5 liters;
- container and brush for washing;
- CV joint bearing lubricant.
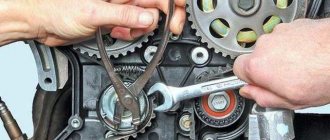
Stages of work
To adjust the degree of belt tension on Kalina engines, a mechanical tensioner is used, in contrast to the timing drive, which uses a hydraulic tensioner. When changing an element, it is recommended to carry out preventive maintenance of the roller by adding fresh lubricant.
To complete the work you need to do the following:
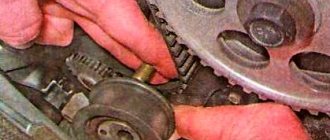
- Loosen the roller bolt. The thread on it is reversed.
- Use a screwdriver to pry up the plastic plug on the roller and carefully remove it.
- Unscrew the fixing nut on the tensioner rod a few turns.
- Loosen the belt tension by rotating the rod nut clockwise. The nut must be unscrewed until the rod begins to move freely in the seat.
- Unscrew the side bolt securing the rod end, located next to the tension roller.
- Remove the tensioner and set it aside.
- Proceed to dismantle the strap. The procedure must begin with the generator pulley, while overcoming the slight resistance of the belt.
- Remove the element from the crankshaft pulley and remove it completely.
- Unscrew the roller bolt and remove it.
- Using a needle, carefully pry up and remove the protective caps on the bearing. Wash the bearing with white spirit or gasoline.
- Refill with fresh grease and install protective rubber caps.
- Assemble all the parts and mount the roller in place. When assembling, you must remember that the bushing is in the bearing on the side of the bracket.
- Change the belt by installing it in the reverse order - from the crankshaft pulley to the generator pulley.
- Install the tensioner and begin tightening the belt by turning the nut counterclockwise. The nut must be tightened until the resistance increases. A well-tensioned strap should be slightly pressed when pressed by hand.
- Tighten the nut securing the tensioner rod.
- Check the operation of the mechanism; if a whistle occurs, tighten the strap.
Video “Replacing the belt on Lada Kalina”
The author Kalinin talks about the procedure for replacing the belt on his Kalina with a tensioner.
A few days ago I did a small inspection of my Kalina, and noticed the fact that too much noise was heard from the tension roller of the alternator belt - a kind of rustling sound. It was decided to look at its condition and replace it if necessary. When I loosened the belt and turned the roller by hand, the sound of its operation was too “dry”, and it was heard that it was no longer working as “smoothly” as a normal bearing should work.
In general, it was decided that it was not worth driving further with such a roller and a new one was purchased for 700 rubles, made in Vologda, which is considered a “Factory ORIGINAL” type. But to what extent this is true, I will do a review on my channel a little later, where I will tell in detail and show all the real original spare parts that have been used for more than 50,000 km, and the “original” that is sold in stores.
But for now, let’s look at the procedure for replacing the tension roller. Firstly, it is worth noting that to replace it you will need the following tool:
- 8mm and 19mm wrench (to loosen belt tension)
- 13 and 17 mm wrenches
- Flat blade screwdriver
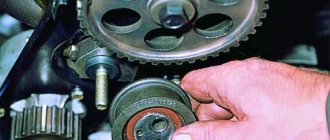
First of all, open the hood and loosen the tension on the alternator belt. To do this, slightly loosen the large nut with a 19mm wrench and turn the rod clockwise until it is completely unscrewed. We tilt it back so that it is not in the way, having first unscrewed the bolt securing it from below, as shown in the photo.
The result is shown below.
After this, you need to use a flat-head screwdriver or a sharp awl to pry off the protective cap of the roller. This is not very convenient to do, but it is quite possible without much effort.
Under it there is a bolt securing the bearing to the bracket. We unscrew it with a key 17 clockwise, since the thread there is left-handed:
And remove it carefully so as not to lose the bolt, bushing and protective washer:
Now we remove all the above parts from the old roller and install them on the new roller.
Then a washer, which is like a protective cap against the ingress of dust and other substances.
Now you can install the new roller assembly in its place:
Tighten the bolt and tension the belt properly. This procedure can be considered complete. After starting the engine, no extraneous noise is heard from the generator, everything works perfectly quietly! Time will tell how long this “factory” video will last! The price, as mentioned above, is 700 rubles.
Weaknesses of the product and signs of malfunctions
Whatever type of roller is used, the “bottleneck” point is the bearing. The thing is that the product is under constant load and operates in conditions of temperature changes, so breakdowns and wear of the device are quite common.
Signs indicating a faulty alternator belt tensioner:
- decreasing battery charge level;
- failure or malfunction of some energy-intensive consumers in the car;
- a hum coming from the side of the unit when the engine is running;
- noticeable play during roller operation;
- uneven wear of the alternator belt (usually occurs on one of its sides).
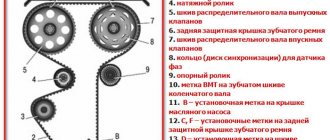
Design and principle of operation
Torque transmission (rotation of the belt with maximum efficiency) occurs only at a certain belt tension. The device that provides the necessary force is the tension roller of the viburnum generator.
In essence, the roller is a regular bearing with a plastic coating on the outside. The tape moves along the surface of the roll. There is a bushing inside.
Types of roller construction:
- Eccentric. One of the simplest types of products. Its design is quite simple and reliable. The product consists of a bearing, bushing and outer plastic cushion.
- Bracket type. In this case, adjustment is made by moving the bracket on the motor.
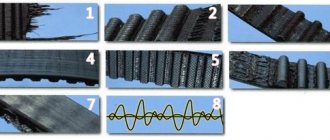
A few words about counterfeit timing belts
Given the popularity of well-known brands, there are a large number of counterfeit products on the market. At the same time, the visual quality of the belt itself and packaging can be at a high level (print clarity, serial numbers, holographic stickers, etc.).
In addition, even the sellers themselves (especially small entrepreneurs in car markets or novice dealers without experience) can be adamant that they are selling an original product and praise it in every possible way.
For example, consider the Gates situation. We are talking about reinforced belts that have a longer service life (as the same manufacturer guarantees, up to three times longer than other manufacturers). The advertising brochures specifically stated that instead of neoprene (chloroprene or CR), which is the basis for the production of many rubber products, the company uses nitrile (HSN, HNBR).
Thanks to these characteristics, the manufacturer can provide an extended warranty that covers the entire declared life of the belt (after proper installation and tension). However, fakes that look similar to the original can be made from cheaper neoprene with all the ensuing consequences.
The buyer himself believes that he has purchased an analogue of the brand, after which, in case of problems, complaints about the quality of a particular brand begin. As for the “officials” and original spare parts in their network, as a rule, there are much fewer fakes there.
Why, when and which belts are best to install: timing belt and features of belt drive
Let's start right away with when to change the timing belt. The timing belt replacement interval is on average 60 thousand km. However, it is important to understand that many additional factors affect the life of a product.
In some manuals for some cars you can find instructions that suggest replacing the belt after 70-80 thousand km, while for other cars the replacement is clearly stated at 50-60 thousand. Based on this, in practice, motorists have long developed a rule for themselves to change the belt at an average level. Thus, it turns out that such an indicator can be considered the mark of 50 or maximum 60 thousand km.
Let's move on. Before answering the question of which company to choose a timing belt and which brand of timing belt is the best, let us dwell on the problems associated with this element and its operation. It should be remembered that not only the camshaft drive, but also the precise synchronization of the valve timing with the strokes of the internal combustion engine depends on the timing belt.
Experts identify a number of reasons why problems may arise:
- The timing belt tension is too strong or too weak. In the first case, the problems are associated with incorrect installation, and the belt itself quickly stretches. Under such conditions, rollers, timing gear drive bearings and other elements (for example, a pump) are subject to increased wear.
If the timing belt is not tensioned enough, the life of the product is reduced and may even slip on the pulleys. Moving even a “tooth” leads to engine malfunction or failure of the internal combustion engine. To prevent possible consequences, it is recommended to check the tension closer to half of the total belt life. If the timing belt becomes loose, it must be tightened or replaced.
- The belt was replaced with a new one, but the timing rollers were not changed. This is a common situation related to the desire of owners to save money. Remember that the timing belt needs to be changed depending on the mileage. If the time has come to replace the belt, then the replacement is carried out along with the rollers and regardless of the general condition of these elements.
As practice shows, during testing the rollers may not make noise and rotate normally, but after a short period they may still stop. As a result, the belt breaks with all the ensuing consequences.
The only exception can be considered only a forced replacement of the belt under the influence of certain factors. These include: oil and technical fluids getting on the belt, delamination and cracking, mechanical damage, etc. In simple terms, if the rollers with the belt were changed not so long ago, but then the belt quickly became damaged, then you can simply replace the belt.
In this case, it should be separately taken into account that the declared service life of the new belt will no longer correspond to the total service life of the rollers. For example, if the total service life of a new set of belts and rollers is 50 thousand km, but the belt fails after 20 thousand km, after installing the new belt it is optimal to subtract the 20 thousand km that the rollers have already passed.
It turns out that it is better to replace the next belt installed together with the rollers after 30, rather than 50 thousand km. In this case, the main task is to avoid jamming of the rollers, which leads to breakage of the drive belt.
- The vehicle is constantly operated at high temperatures. As you know, the timing belt is a rubber product. In regions with constant high temperatures, such products tend to dry quickly, lose elasticity and crack.
The same belt manufacturers separately indicate the need to reduce replacement intervals (by at least 20-30%) for vehicles in similar conditions. We also add that any defects in the timing belt protective cover lead to dirt, engine oil and other technical fluids settling on the belt in the engine compartment (depending on the general condition and malfunctions of the internal combustion engine). In this case, the planned life of the product is significantly reduced.
The best timing belt manufacturers
So, having understood the features and nuances of operating / replacing belts, you can move on to the subtleties of their selection. Today, the market offers products from domestic and foreign manufacturers.
The entire list is quite extensive, so we will focus on the most popular solutions. When it comes to which timing belts are the best, Gates, Contitech, Dayco and Bosch are the most respected and popular in this segment.
- The undisputed leader, who always makes its presence felt, is the manufacturer Gates. This Belgian company specializes in the production of drive belts for internal combustion engines and various specialized equipment. Let us add that the manufacturer supplies its products directly to the conveyor belts of many of the largest automotive giants.
- The German company Contitech is also on the list of large manufacturers whose products are installed on new cars during assembly. In parallel, the company produces drive mechanisms, air suspension elements and other automotive parts.
- Dayco is an Italian company. The company specializes in the production of drive belts, rollers, bearings and other elements of transmission mechanisms. The German company Bosch, widely known among motorists, also offers high-quality timing belts in a huge range of auto parts.
Which timing belt is better to buy?
When it comes to choosing the right replacement belt, there are several options.
- The most expensive, but at the same time safer, purchase of goods from the official service and subsequent installation is usually carried out in one place. Let's see why this is so.
In other words, for example, an original brand timing belt for Opel/Chevrolet vehicles is offered under the GM brand under its own catalog number. At the same time, these products are not manufactured by General Motors itself; the well-known company Gates supplies belts for GM.
At the same time, the cost of an original GM belt from officials turns out to be on average 40-50% or more, and in retail it is 20-30% higher than exactly the same belt, but under the brand. Gates. It turns out that such a belt is cheaper and is in no way inferior in quality to its non-original counterpart.
Taking into account the above, it becomes clear why, after removing the old belt for the first replacement, it turns out that the car straight from the factory contains products under the Gates or Contitech brands, although the original part in the catalogs is designated as GM, AUDI, Volkswagen, etc.
To be fair, we add that there are different opinions on this matter, since many drivers argue about the difference in the quality of original and non-original spare parts. The main argument is that manufacturers supposedly put better products on conveyor belts, while lower quality products are sold at a lower price under their own brand.
- One way or another, this information allows you to choose a second and more convenient way to select a belt. If the vehicle was originally equipped with a Gates or Contitech product, or if you know exactly which manufacturers supply belts to your vehicle manufacturer, there is no need to purchase an original belt.
It will be enough to replace it with exactly the same high-quality analogue from one or another company supplying spare parts to the plant. As practice shows, such products serve no worse than the original.
- You can also not adhere to the rules at all, immediately choosing the appropriate option. In all cases, special attention should be paid to counterfeits. And this is a significant and undeniable drawback of both the second and third methods.
High-quality original belts from Contitech, Gates, Bosch or Dayco are reliable products that will perform just as well and perform reliably (as long as they are installed correctly and other vehicle maintenance and operating requirements are met).