Mounting the generator VAZ 21214
1. What you need to have.
1.1 Generator mounting bracket 21214-3701650. 1.2 Compensation bushing for mounting the generator 2110 (rubber silent block, I did not find the number in the catalog) complete with a counter-shaped washer 2110-3701638 (at least in Kemp it is this that is sold under this number, and not the bushing assembly). 1.3. Generator mounting bolt 2110-3701376 with nut 2110-3701686 (a grower doesn’t seem to be needed, but there’s enough space to put it). 1.4. Additionally, a bolt M10x1.25x20 (15970521) - my old bracket was fastened with 2 bolts. 1.5. Tension bar 21214-3701635. 1.6. Bolt M8×25 with nut 2110-3701686 (like the lower mount of the generator). 1.7. Instrument and beer :).
2. Replacement procedure.
2.1. Pull out the split steel bushing installed in it from bracket 21214 and install a silent instead (with the metal side inward). 2.2. Remove the generator. 2.3. Remove the contact extension 61 (excitation winding) from it under the protection cover - however, you can do it yourself :). 2.4. Unscrew the old bracket from below (head with 17, 2 or 3 bolts). 2.5. Unscrew the old strip from above (17 head, one nut). 2.6. Hang a new bar - but do not fix it completely, let it dangle. 2.7. Secure the new bracket with the silent insert inserted into it (metal ring inside). 2.8. Hang the generator 214, having first placed the excitation winding contact extension on it (so as not to do it by touch). Insert the bolt, put on the shaped washer (with the ribs inward, of course) and tighten with the nut (not too much). 2.9. Putting on the belt - by the way, is noticeably easier than on 213, insert the bolt into the bar and the upper ear of the generator, tighten it (not all the way, again). 2.10. Finally tighten the fastening of the bar to the engine. 2.11. Pull the belt, fix the ear fastening to the bar, fix the lower fastening. 2.12. Put the wires back. 2.13. After drinking beer first, start up and enjoy life.
Horseman aka K. Groom, 11/30/03.
Spare parts for generator installation.
A “silent block” from the 10 is installed in the generator bracket, consisting of 3 parts: the bushing itself, a rubber tube and a liner. Catalog numbers of parts: — generator mounting bushing 2110-3701634; — rubber support for generator bracket 2110-3701637; — bushing liner for generator bracket 2110-3701638.
After installing this hodgepodge into the bracket, as described above, and tightening the bolt, the liner presses the rubber bushing and expands it in the bracket seat.
Parts were purchased at Camp.
I don’t know what to do with the lower bushing, which is listed in the catalog for the 214 generator, but in extreme cases, it can be adapted with a piece of rubber hose. The picture is shown purely for informational purposes:
Schumacher Zabugorny, 04/29/05.
Update dated 03/04/08, by ALK.
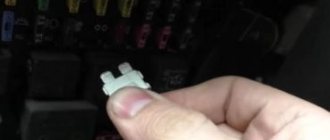
Currently, Auto49 sells a generator mounting bolt 2110-3701376 with a nut 2110-3701686 together with a compensation sleeve for mounting the generator 2110. This “sandwich” is called “Generator 2110 Bracket Bolt Assembly.”
The bushing is exactly the same as in the photo. The bushing itself, the elastic band and the shaped washer. The nut is made integral with the washer. It has serifs, i.e. no grower needed.
Guide to removing and connecting the generator
To remove the unit, you need to prepare a set of tools: keys “10” and “19”, ratchets with heads, a hammer and a small extension.
We recommend: Changing the oil in the automatic transmission
The process consists of the following steps:
- First of all, remove the negative terminal from the battery.
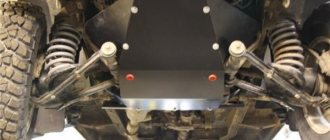
- Next, you need to remove the engine protection and the right mudguard.
- Then, using a hammer, carefully knock out the mounting bolt and remove it.
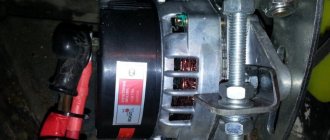
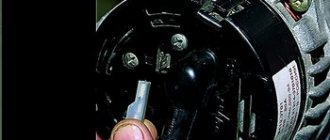
- At the next stage, you need to disconnect all the wires going to the generator: the plug and the wires secured with a nut.
- Then the fastening on which the belt tensioner is located is unscrewed.
- By removing the belt, the assembly can be dismantled through the hole that was formed after removing the protection.
- After replacement or repair, install the unit in reverse order.
The generator is connected according to the diagram.
Electrical connection diagram
Price issue
The VAZ 21214 generator has good repairability, which allows you to significantly save money if worn or broken parts are replaced in a timely manner.
If you change the complete unit, the cost of replacement will be as follows:
- generator 21214 – 3125 rub.;
- lower mount – 133 RUR;
- fastening bolt - 53 rub.;
- tension bar - 55 rub.;
- relay RS-527 – 57 rub.
Total: 3423 rub.
Mounting the generator VAZ 21214
Niva is an excellent domestic SUV that can compete with modern jeeps. VAZ 21214 received a durable body, a powerful power plant and a reliable suspension. Like any car it has its drawbacks. These include the location of the generator - the unit is installed in the lower part of the body. When testing for strength in forest and mountainous areas, dirt, sand, and water get into it. Another unpleasant point is that coolant constantly drips onto the unit.
The problem can be solved by moving the generator upstairs.
After reading this article, you will learn:
- What is needed to move the generator upstairs. How does the process work for cars with and without power steering? Is it worth buying a new unit for VAZ 21214.
Study this drawing carefully. The author decided to make a bracket for moving the generator with his own hands. The part is made of metal, the thickness of which should be 4 mm, and the width and length should be 80 mm. To assemble the bracket, you will need parts from other domestic cars:
- Belt 6РК1290; Adjustment bar; Crankshaft pulley from tens.
Photo, details of the manufactured bracket 21214:
As you can see in the photo, the standard fan is installed on a pump pulley from GAZ 3110, we also take a crankshaft pin from 2110 and a 6RK1290 brand belt. The generator should be located on the top left side. It must be attached to the top using an M8 cylinder head bolt; at the front, a standard bolt and studs are used. For fixation, the bracket must be secured with an additional lock nut.
This generator transfer drawing differs from the first one in that it uses a belt with a size of 1375 mm. There are fewer steps here, but you will have to work with a grinder - you need to reduce the plane on the head located in the area of the M8 bolt.
The front cover will need new bolts and studs. This drawing of a bracket for mounting a generator is also suitable for other models, for example, for 21213.
The drawing suggests moving the generator to the place of the hydraulic booster. To do this, you need to make a bracket and install it next to the power steering. You need to select washers for the bracket ears in advance.
This option uses a belt with a size of 1220 mm. It is important that the angle of its wedge must be exactly 40 degrees. An excellent solution would be to buy a belt with ZIL 157. The return hose has a center length of 1115 millimeters, and the high-pressure pressure hoses are 1450 mm. Check all dimensions carefully, remember the saying: measure 7 times, cut once, there is no need for mistakes here. There is no standard hole for these hoses in the right casing, so you will have to take it and cut it yourself.
The bracket itself for moving the device upstairs is made according to this drawing:
The pump must be turned upside down so that the generator is completely seated. The result of the transfer looks like this:
If you don’t have much experience in carrying out such upgrades, then you can buy a ready-made kit. It will include a new bracket for the Niva and the necessary fastenings. Reviews from motorists indicate that the cost of this simple part is too high.
Should I install a more powerful current generation unit?
We have already described above why the unit wears out quickly. An excellent solution is to install a new generator. Another common reason is the installation of off-site equipment that consumes a lot of electricity. The current strength of a standard unit is not always enough, so you should think about installing a more powerful generator.
The model depends on the year of manufacture of the car and engine. For example, the first Nivas with a 1.6 power plant have a device with a remote regulator, which was used in the “classics”. In more modern machines the regulator is already built-in.
If you want to buy an aftermarket unit, it would be wise to get a 2003 model year Chevrolet. The selection must be made according to the catalog numbers and parameters that are present in this table:
If you can modify the fastenings yourself, then the list of available gHepaTopoBs can expand significantly. Craftsmen even install devices from foreign cars.
In any case, you should strive to modernize and improve your car. And this applies not only to electricity. The Niva is a reliable SUV, but it lags far behind its foreign competitors in terms of comfort. You can move on to this issue immediately after improving the technical component of the car.
Device Description
On Niva 21214 cars there is a generator of type 9412.3701, on VAZ 21213 - type 371.3701, on Niva Chevrolet there is a generator 2123. All of them are alternating current electric machines with electromagnetic excitation, having a built-in rectifier unit with silicon diodes and an electronic voltage regulator. The maximum current produced by the generator unit type 9412.3701 is 80 A, voltage - 13.2 - 14.7 V, rotation - right.
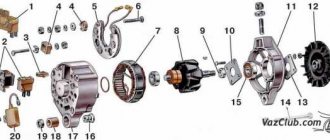
Design of unit 21214
The unit covers are attached to the stator using 4 bolts. The covers have bearings installed. They rotate the rotor shaft. In the front bearing, the inner race is clamped with a nut along with a thrust ring and washer. The 2nd bearing is also pressed into the back cover.
The stator has a 3-phase winding, one of the ends of which is connected to a rectifier unit consisting of 6 diodes. Of these, 3 diodes are negative, 3 are positive. According to the polarity, they are pressed into the plates. The entire structure consists of a rectifier unit, which is located on the back cover of the generator unit covered with a protective casing.
The design of the unit also includes contact rings and brushes. On the back side of the back cover there is a brush holder, which is structurally connected to the voltage regulator. The rectifier contains a capacitor that protects the electrical network from power surges.
The “B” terminal of the generator set must be connected to the positive terminal of the battery, and the negative terminal of the battery to the vehicle ground. If the connection is incorrect, this will lead to breakdown of the diodes.
Article: 21214-3701650, additional articles: 21214370165000
Order code: 007433
- Buy with this product
- show more
- Passenger cars / VAZ / VAZ-21311 drawing
- » href=»/catalog/vaz-3/legkovye_avtomobili-30/vaz_2131-73/generator_s_armaturoiy-252/#part65704″>Lower generator bracketElectrical equipment / Generator with fittings
- There are no reviews for this product yet.
The series of articles 'Crystal VAZs or typical breakdowns of domestic cars' introduces car enthusiasts to typical faults that arise when operating AvtoVAZ cars. This article is dedicated to the favorite of hunters and fishermen - “Niva”.
Hello, dear readers of the blog about the adventures of the Pale Goblin =))
On one of my last rides, my standard generator failed after drinking a fair amount of water with mud and sand. And finding myself in the forest at night and without a generator, I realized that I needed to move it upstairs like the right field guides. ))
Moving the generator to the top 21214 drawing
Niva is an excellent domestic SUV that can compete with modern jeeps. VAZ 21214 received a durable body, a powerful power plant and a reliable suspension.
Like any car it has its drawbacks. These include the location of the generator - the unit is installed in the lower part of the body. When testing for strength in forest and mountainous areas, dirt, sand, and water get into it.
Another unpleasant point is that coolant constantly drips onto the unit. The problem can be solved by moving the generator upstairs.
It is worth carrying out such an upgrade if you often use your Niva on real off-road conditions. Under normal conditions, the location of the part does not matter.
After reading this article, you will learn:
- what is needed to move the generator upstairs;
- How does the process work for cars with and without power steering;
- Is it worth buying a new unit for VAZ 21214.
Even a novice car enthusiast can understand the diagrams and drawings in this article. Photographic materials will also help you understand the information. To carry out the work, it is worth preparing in advance a set of wrenches, torsion bars and other standard tools.
Nuances
When replacing a generator with a Niva 21213, 2121, 21214, a number of subtleties arise, and one of them is the location of the generator unit. It is located at the bottom of the engine compartment.
Actually, this is why problems arise with the operation of the structure: while driving, various contaminants get on the generator, and coolant drips. If you don’t want to constantly change the generator unit, it is recommended to move it upstairs.
To ensure that no problems arise during the operation of the car, it is important to monitor the condition of the car. First of all, it is recommended to regularly inspect the generator.
So, when the “battery” light blinks on the dashboard, if suspicious noises or creaking sounds occur, you should be wary and think that the generator is not working correctly.
Timely inspection will help to avoid unpleasant situations in the form of breakdowns of the constituent elements of the generator, and as a result, failure of entire electrical systems.
Transfer process for carburetor Niva
Study this drawing carefully. The author decided to make a bracket for moving the generator with his own hands. The part is made of metal, the thickness of which should be 4 mm, and the width and length should be 80 mm. To assemble the bracket, you will need parts from other domestic cars:
- belt 6РК1290;
- adjustment bar;
- crankshaft pulley from tens.
In this option, you will need an upper adjustment bar. The author of the drawing decided to borrow this element from the Volga. The upper adjustment bar must be cut in place, and then a new hole for fasteners must be drilled, its diameter should be 8.5 mm.
Photo, details of the manufactured bracket 21214:
As you can see in the photo, the standard fan is installed on a pump pulley from GAZ 3110, we also take a crankshaft pulley from 2110 and a 6RK1290 brand belt. The generator should be located on the top left side. It must be attached to the top using an M8 cylinder head bolt; at the front, a standard bolt and studs are used. For fixation, the bracket must be secured with an additional lock nut.
This generator transfer drawing differs from the first one in that it uses a belt with a size of 1375 mm. There are fewer steps here, but you will have to work with a grinder - you need to reduce the plane on the head located in the area of the M8 bolt.
The front cover will need new bolts and studs. This drawing of a bracket for mounting a generator is also suitable for other models, for example, for 21213.
Fastening drawing
The drawing suggests moving the generator to the place of the hydraulic booster. To do this, you need to make a bracket and install it next to the power steering. You need to select washers for the bracket ears in advance.
This option uses a belt with a size of 1220 mm. It is important that the angle of its wedge must be exactly 40 degrees. An excellent solution would be to buy a belt with ZIL 157. The return hose has a center length of 1115 millimeters, and the high-pressure pressure hoses are 1450 mm.
Check all dimensions carefully, remember the saying: measure 7 times, cut once, there is no need for mistakes here. There is no standard hole for these hoses in the right casing, so you will have to take it and cut it yourself.
The bracket itself for moving the device upstairs is made according to this drawing:
The pump must be turned upside down so that the generator is completely seated. The result of the transfer looks like this:
If you don’t have much experience in carrying out such upgrades, then you can buy a ready-made kit. It will include a new bracket for the Niva and the necessary fastenings. Reviews from motorists indicate that the cost of this simple part is too high.
What to do if the generator breaks down on the road?
A breakdown entails not only loss of battery charge. If the generator jams, the forged belt may break. In this case, all attachments of the car will lose their functionality. Further movement will become impossible. If repair in the field is not possible, try to wait until the nearest service center on the battery. During the daytime, all lights must be turned off, including the DRL. The comfort units must be de-energized. Turn off one of the radiator cooling fans (unless it's too hot outside). With economical use of ampere-hours, you can drive up to 3 hours on one battery.
Should I install a more powerful current generation unit?
We have already described above why the unit wears out quickly. An excellent solution is to install a new generator. Another common reason is the installation of off-site equipment that consumes a lot of electricity. The current strength of a standard unit is not always enough, so you should think about installing a more powerful generator.
The model depends on the year of manufacture of the car and engine. For example, the first Nivas with a 1.6 power plant have a device with a remote regulator, which was used in the “classics”. In more modern machines the regulator is already built-in.
If you want to buy an aftermarket unit, it would be wise to get a 2003 model year Chevrolet. The selection must be made according to the catalog numbers and parameters that are present in this table:
If you can modify the mounts yourself, then the list of available generators can expand significantly. Craftsmen even install devices from foreign cars.
What is a generator
A generator is an alternating current device that produces electromagnetic excitation during operation. The generator design has a built-in rectifier unit, equipped with diodes made of silicon, as well as an electronic voltage regulator.
Thus, the unit creates electrical energy from mechanical energy and energizes the car’s battery, and also provides energy to its devices and systems. The connection diagram for the generator on Niva-2121, 21213, 21214 is shown in the figure.
Generator NIVA
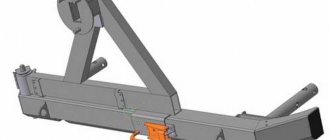
Bracket for transferring generator VAZ-2121 for NIVA
It took me a long time to decide to do this kind of work. I really didn’t want to deal with the change in the recently put order in the engine compartment: the electrical wiring was neatly laid in its place, the cross-section of the wires was chosen with reserve and satisfied my “today’s” needs, and to all that was said, you can also add the embarrassment of using a non-standard V-belt , which can only be obtained upon order. I became the proud owner of a VAZ-2121 generator transfer bracket
.
Generator transfer bracket from Z-IQ
The generator belt was not included in the kit and its size was not known to me, but a simple empirical method was used to determine, in my opinion, the most optimal belt size - 1350mm
.
V-belt, purchased to order
To install the bracket, you must: — unscrew and replace two studs and two M6×20 bolts of the camshaft drive cover with four M6×25 bolts; — use a file to modify the bead around the cylinder head bolt and the bead on the cylinder block (shown in the figure below) under the bracket mount. Carry out the work locally; the approximate work time, if you have suitable and working tools, is 1/2 hour.
The design of the bracket consists of three parts and implies the possibility of installing generators from different manufacturers. In my case, the KZATE VAZ-21214 80A generator is installed in the middle vertical position. Before finally assembling and pulling the bracket, you must first check the alignment of the belt on the pump, generator and crankshaft pulleys.
Finally, we move on to the final part: disassemble, break and assemble. There are also positive aspects, for example, I used a large cross-section wire for the generator from the battery, in connection with its transfer, and reduced the length of the wires to the ignition switch from the generator.
Disassembled
Ultimately
Transferring the KZATE 80A generator (step-by-step instructions for a carburetor internal combustion engine) for NIVA
What you need: - Generator 21214 or similar - Generator mounting bracket 21214-3701650 with two nuts and bolts with a thin head for fastening to the KIT kit - KIT generator transfer kit - generator belt 1350 mm long - mounting bolt for generator 2110 assembly - two M8x20 bolts and M8x30 with nuts
1) Remove the spare wheel from under the hood, unscrew the extension on which it rested 2) Unscrew the two studs and two bolts above the crankshaft pulley. We replace them with four longer bolts. If there are no problems with unscrewing the bolts, then there may be an ambush with the pins. It’s not difficult to solve; you can either weld it to the stud, or sharpen the stud with a file on both sides and turn it out with pliers. Everything turned out for us without any problems!
3) Now we take a grinder or a file and sharpen the engine block for the upper mounting of the bracket (the bolt to the left of the distributor, if you stand at the driver’s fender). On the block the tide has a round shape, but we reduce it to a rectangular shape!
4) We attach the generator mounting bracket 21214-3701650 to our massive structure
This is where the first difficulties appear. The generator bracket 214 should not rest against the outlet fitting of the fuel pump. On the KIT bracket there are three positions for installing the bracket from the 214 generator. We chose the middle one, there are also possible options: -upper (a 1375mm belt is required) -lower (replacement of the fuel pump with a 2108 is required) 5) Attach the bracket to the engine block 6) Disconnect the “-” from the battery, remove the belt from the generator, disconnect the wires from the old generator . We unravel the braid of wiring from the lower generator to the level of the battery itself and the electrics. wiper motor (this length was enough for me to reach the upper generator) We pack the wiring in corrugated paper.
7) Install the generator on the upper bracket, put on the belt. We check the alignment of the pulleys. If necessary, adjust the position of the bracket from the 214 generator. Install the tension bar. Let's tighten the generator belt!
We connect the wires, start the engine, check the voltage! (we didn’t succeed the first time due to a defective regulator relay. We secure the wiring with plastic clamps. We pull the coolant hose to the gas hose mounting eyelet, which goes from the fuel pump outlet fitting to the carburetor
9) We inspect the engine compartment for the presence of jambs, making sure that they are absent, close the hood.
Installation of a generator from VAZ 2110-2112 in Niva
I started to notice that the battery was undercharging. Especially when the lights, heater and wipers are on. I got up several times because of this. You arrive, turn off the car, and then you can’t start it. It was necessary to change the generator. I wasn't happy about buying a new one. I bought it used from 2110. Well, then I needed to install all this. I found several reports on the Internet about how people put them on classics. But... I went a different way. So, there is a generator with 2110-2112
You will also need the following parts: 1. Lower mounting bracket for generator 21214 2. Mounting bolt for generator 2110 assembly 3. Tension bar 21214 4. Bolt M8x1.25x75 5. Nut M8 for generator bolt 2110 6. Washer 8X24 - 5 pcs. 7. Collapsible generator pulley 2101 8. Rear shock absorber spacer bushing 2101 9. Generator lower mounting bushing 2110
I removed the pulley under the semi-V belt. There are two holes on the front of the generator housing; you need to insert M6 bolts into them and thereby lock the rotor. I have a generator with a pulley diameter of 15 mm. The pulley from 2101 fits perfectly on the shaft; its hole is also 15. (I also tried on pulley 21214, but its hole diameter is 17 mm.) To install, you only need to trim the thrust bushing. And the fan and the second thrust bushing will not be needed. I additionally welded the pulley halves, but in principle this is not necessary.
The steel bushing needs to be knocked out of the new lower mount 21214; it will be replaced with 2110. I unscrewed the old generator, the old tension bar and the lower bracket of the generator. And I screwed on the bottom bracket from 21214. I also had to buy one more bolt since the old bracket had two bolts.
Then I tried on the generator, but turned it upside down. So that the upper ear is below. I set the belt to be level and measured the distances between the front ear of the bracket and the ear of the generator and, accordingly, between the ear of the generator and the rear ear of the bracket. I got 6 mm at the front, 21 at the back. I put 3 8x24 washers in front, each 2 mm thick. I made a spacer back. To do this, I sawed off a 2101 piece from the spacer sleeve of the rear shock absorber and inserted a steel bushing for the lower mounting of the generator 2110 into it, it fits there perfectly! Here in the photo is just the manufactured bushing and the bushing for the lower mounting of the generator.
Then I just screwed on the generator.
The generator turns out to be upside down and the bottom mount is on top. To secure it from above, just use an M8x1.25x75 bolt, two 8x24 washers and a nut from the bottom bolt of the generator 2110.
The belt used is standard.
The only thing I encountered later was the generator’s unwillingness to start. It started working only at 3000 rpm. As it turned out experimentally, if 12V was applied to the contact of the battery charging lamp, the generator immediately started working. Unlike the old Nivsky, the new one does not have a self-excitation system. The voltage to this contact comes from the dashboard and is reduced to 3.2V by three 160 Ohm resistors each connected in parallel. I unsoldered them, after which the generator starts at 1500 rpm. Apparently the gear ratios of the pulleys also have an effect.
Maintenance Tips
The factory instructions require troubleshooting the ignition system in the following sequence:
Ignition system: wiring for Niva 21213
- From the ignition switch (terminal 15), connect the wire to the coil (terminal +B) to a test lamp;
- Connect its negative terminal to ground;
- Turn on the ignition - turn the key in the lock to position “II”;
- If the control lamp lights up, then the circuit is working. If not, look for damage to the wire;
- With the ignition on, pull out the central wire from the coil from the distributor;
- Bring its metal tip to the cylinder block so that a gap of 3-4 mm forms between them;
- Turn on the starter for a few seconds;
- If the spark jumps, the coil is working.
Tip: you can quickly check the switch in one way - take it from a working car. If the car starts with the new switch, then you need to buy a new one.
Generator NIVA
Bracket for transferring generator VAZ-2121 for NIVA
It took me a long time to decide to do this kind of work. I really didn’t want to deal with the change in the recently put order in the engine compartment: the electrical wiring was neatly laid in its place, the cross-section of the wires was chosen with reserve and satisfied my “today’s” needs, and to all that was said, you can also add the embarrassment of using a non-standard V-belt , which can only be obtained upon order. I became the proud owner of a VAZ-2121 generator transfer bracket
.
Generator transfer bracket from Z-IQ
The generator belt was not included in the kit and its size was not known to me, but a simple empirical method was used to determine, in my opinion, the most optimal belt size - 1350mm
.
V-belt, purchased to order
To install the bracket, you must: — unscrew and replace two studs and two M6×20 bolts of the camshaft drive cover with four M6×25 bolts; — use a file to modify the bead around the cylinder head bolt and the bead on the cylinder block (shown in the figure below) under the bracket mount. Carry out the work locally; the approximate work time, if you have suitable and working tools, is 1/2 hour.
The design of the bracket consists of three parts and implies the possibility of installing generators from different manufacturers. In my case, the KZATE VAZ-21214 80A generator is installed in the middle vertical position. Before finally assembling and pulling the bracket, you must first check the alignment of the belt on the pump, generator and crankshaft pulleys.
Finally, we move on to the final part: disassemble, break and assemble. There are also positive aspects, for example, I used a large cross-section wire for the generator from the battery, in connection with its transfer, and reduced the length of the wires to the ignition switch from the generator.
Disassembled
Ultimately
Transferring the KZATE 80A generator (step-by-step instructions for a carburetor internal combustion engine) for NIVA
What you need: - Generator 21214 or similar - Generator mounting bracket 21214-3701650 with two nuts and bolts with a thin head for fastening to the KIT kit - KIT generator transfer kit - generator belt 1350 mm long - mounting bolt for generator 2110 assembly - two M8x20 bolts and M8x30 with nuts
1) Remove the spare wheel from under the hood, unscrew the extension on which it rested 2) Unscrew the two studs and two bolts above the crankshaft pulley. We replace them with four longer bolts. If there are no problems with unscrewing the bolts, then there may be an ambush with the pins. It’s not difficult to solve; you can either weld it to the stud, or sharpen the stud with a file on both sides and turn it out with pliers. Everything turned out for us without any problems!
3) Now we take a grinder or a file and sharpen the engine block for the upper mounting of the bracket (the bolt to the left of the distributor, if you stand at the driver’s fender). On the block the tide has a round shape, but we reduce it to a rectangular shape!
4) We attach the generator mounting bracket 21214-3701650 to our massive structure
This is where the first difficulties appear. The generator bracket 214 should not rest against the outlet fitting of the fuel pump. On the KIT bracket there are three positions for installing the bracket from the 214 generator. We chose the middle one, there are also possible options: -upper (a 1375mm belt is required) -lower (replacement of the fuel pump with a 2108 is required) 5) Attach the bracket to the engine block 6) Disconnect the “-” from the battery, remove the belt from the generator, disconnect the wires from the old generator . We unravel the braid of wiring from the lower generator to the level of the battery itself and the electrics. wiper motor (this length was enough for me to reach the upper generator) We pack the wiring in corrugated paper.
7) Install the generator on the upper bracket, put on the belt. We check the alignment of the pulleys. If necessary, adjust the position of the bracket from the 214 generator. Install the tension bar. Let's tighten the generator belt!
We connect the wires, start the engine, check the voltage! (we didn’t succeed the first time due to a defective regulator relay. We secure the wiring with plastic clamps. We pull the coolant hose to the gas hose mounting eyelet, which goes from the fuel pump outlet fitting to the carburetor
9) We inspect the engine compartment for the presence of jambs, making sure that they are absent, close the hood.
Installation of a generator from VAZ 2110-2112 in Niva
I started to notice that the battery was undercharging. Especially when the lights, heater and wipers are on. I got up several times because of this. You arrive, turn off the car, and then you can’t start it. It was necessary to change the generator. I wasn't happy about buying a new one. I bought it used from 2110. Well, then I needed to install all this. I found several reports on the Internet about how people put them on classics. But... I went a different way. So, there is a generator with 2110-2112
You will also need the following parts: 1. Lower mounting bracket for generator 21214 2. Mounting bolt for generator 2110 assembly 3. Tension bar 21214 4. Bolt M8x1.25x75 5. Nut M8 for generator bolt 2110 6. Washer 8X24 - 5 pcs. 7. Collapsible generator pulley 2101 8. Rear shock absorber spacer bushing 2101 9. Generator lower mounting bushing 2110
I removed the pulley under the semi-V belt. There are two holes on the front of the generator housing; you need to insert M6 bolts into them and thereby lock the rotor. I have a generator with a pulley diameter of 15 mm. The pulley from 2101 fits perfectly on the shaft; its hole is also 15. (I also tried on pulley 21214, but its hole diameter is 17 mm.) To install, you only need to trim the thrust bushing. And the fan and the second thrust bushing will not be needed. I additionally welded the pulley halves, but in principle this is not necessary.
The steel bushing needs to be knocked out of the new lower mount 21214; it will be replaced with 2110. I unscrewed the old generator, the old tension bar and the lower bracket of the generator. And I screwed on the bottom bracket from 21214. I also had to buy one more bolt since the old bracket had two bolts.
Then I tried on the generator, but turned it upside down. So that the upper ear is below. I set the belt to be level and measured the distances between the front ear of the bracket and the ear of the generator and, accordingly, between the ear of the generator and the rear ear of the bracket. I got 6 mm at the front, 21 at the back. I put 3 8x24 washers in front, each 2 mm thick. I made a spacer back. To do this, I sawed off a 2101 piece from the spacer sleeve of the rear shock absorber and inserted a steel bushing for the lower mounting of the generator 2110 into it, it fits there perfectly! Here in the photo is just the manufactured bushing and the bushing for the lower mounting of the generator.
Then I just screwed on the generator.
The generator turns out to be upside down and the bottom mount is on top. To secure it from above, just use an M8x1.25x75 bolt, two 8x24 washers and a nut from the bottom bolt of the generator 2110.
The belt used is standard.
The only thing I encountered later was the generator’s unwillingness to start. It started working only at 3000 rpm. As it turned out experimentally, if 12V was applied to the contact of the battery charging lamp, the generator immediately started working. Unlike the old Nivsky, the new one does not have a self-excitation system. The voltage to this contact comes from the dashboard and is reduced to 3.2V by three 160 Ohm resistors each connected in parallel. I unsoldered them, after which the generator starts at 1500 rpm. Apparently the gear ratios of the pulleys also have an effect.
Sound signal NIVA
Sound signal GAZ in NIVU Installing a sound signal from GAZ (PAZ) in NIVU Sound signal repair