Many VAZ 2107 owners, in order to save on car service costs, master some repair and maintenance operations for their car. Sometimes during such operations it is necessary to remove the crankshaft pulley VAZ 2107 9) injector. The article provides detailed instructions and attaches a video that talks about replacing the crankshaft pulley when there is an oil leak.
How to unscrew the crankshaft pulley of a VAZ
On domestic cars of the VAZ “Classic” family, as well as on other cars, the element is removed in the same way. The only difference will be what kind of gearbox is installed on the car in which such work is being done. Which direction should I unscrew the crankshaft pulley bolt? Definitely counterclockwise.
To simplify the task, you can call an assistant, who must engage direct gear (3 or 4) and keep the brake pedal depressed. At the same time, you will unscrew the pulley bolt. If the car is rear-wheel drive, then you can do without an assistant. Just put the car on the handbrake and unscrew the bolt in the same way. The work can be done from the side of the hood or below in the inspection ditch. The main thing is that it is convenient to work. You can also jack up the car and remove the front right wheel.
This will provide good direct access to the crankshaft pulley, which is unscrewed with an extension socket. The mechanism bolt rarely “gives in” immediately and is constantly stuck with threads to the inner hole of the crankshaft flange. Therefore, it is always very difficult to rip it off. If you cannot unscrew the pulley mounting bolt, then a long wrench or pipe can come to the rescue. The element is put on the key. Grasping the very edge of the collar, gathering, as they say, all your strength into a fist, you should try to remove it again. Actually, the longer the lever, the easier it is to work.
Features of work
At first glance, there is nothing difficult in simply removing the bolt securing the pulley to the engine crankshaft flange. But this is not entirely true. The crankshaft pulley bolt comes loose very rarely and always sticks. Therefore, there is a risk of disrupting it. First we need to get to this pulley. To do this, unscrew the bolt securing the generator to the tension bar. The latter is attached to the engine cylinder block.
The generator moves towards the motor, and the drive belt is removed from the pulleys. It can be rivulet type or serrated. Now, having reached a suitable element, they begin the upcoming actions.
For LADA cars with automatic transmission
How to unscrew a pulley
automatic crankshaft? If an automatic gearbox is installed, then on a rear-wheel drive vehicle the “Parking” gear is set. The handbrake is turned on and then the element is unscrewed in the same way as on a manual gearbox. It is more difficult if the car is front-wheel drive. In this case, it will not be possible to remove the element as if it were a manual transmission (with the gear engaged and the brake pressed).
There is a high risk of damaging the gearbox. In this case, you need to lock the crankshaft so that it cannot rotate in any other way. Insert the assembly between the teeth of the engine flywheel ring gear through the hole in the gearbox bell. It is supported so that it cannot jump off and damage the teeth on the flywheel. In some cases, to get to the flywheel, you need to unscrew the engine starter. To do this, you will need an inspection hole, a lift or an overpass.
Work related to replacing the engine timing belt, crankshaft and camshaft toothed pulleys, the engine front oil seal, as well as the generator drive itself, requires dismantling the crankshaft
. This element is found on both domestic cars and foreign cars. Actually, most motorists have a question: how to unscrew the crankshaft pulley? And to be even more precise, the fixing bolt on the crankshaft flange, and in which direction to turn the key. Let's consider.
Second dismantling method
There is another tricky way to unscrew the crankshaft pulley. It is done independently without the presence of an assistant. Having previously removed the generator drive belt, put a head or a spanner on the bolt of the mechanism, the handle of which rests on some surface.
You should not rest it against the body or other parts of the engine compartment. When unscrewing, the key can damage units with rubber pipes, scratch and even damage the body. In the future it will become clear why. It is best to rest the key handle on the ground or floor, placing a wooden board under it. The main thing is that there is a hard and smooth surface. If the key does not reach the stop, then by moving the head or rotating the crankshaft, rest it against a hard surface.
Now, turning on the ignition, you need to crank the engine with the starter. Its force is more than enough to break the pulley fixing bolt. The main thing is not to overdo it and properly rest the key so that it stands firmly in place and does not wobble. Even a slight displacement will cause it to jump off the bolt head and damage the engine compartment. Under no circumstances should you start the engine, and if you do manage to do so, turn it off immediately.
To prevent the engine from starting, you can remove the fuel supply hose from the fuel pump to the carburetor if it is a carburetor engine, or the hose entering the fuel rail if the engine is injection.
Tools for work
In the case of a manual gearbox, the crankshaft pulley bolt can be unscrewed using a spanner or socket. It's better to take a regular wrench. In most cases, the ratchet cannot withstand such a load (even if it is the strongest) and as a result falls apart. It is not recommended to use an open-end or gas wrench when dismantling the crankshaft pulley.
The first tool may break, but the second will only damage the edges of the bolt, and next time it will be even more difficult to unscrew it. In case of severe damage to the edges, you will have to drill it out and remove it in parts, which will be unpleasant for a LADA car. This will increase the time it takes to replace the element.
How to unscrew the crankshaft pulley
How to unscrew the crankshaft
? In this article we will give you a detailed guide to action on this issue.
To remove the generator drive pulley from the crankshaft, you must first unscrew the central nut/ratchet on the crankshaft. You will unsuccessfully try to carry out this manipulation for a long time with the engine not running, swearing obscenely at the entire neighborhood and attracting the attention of neighbors in the garage.
Until one of them still can’t bear to look at your torment and comes to your aid with an old, proven trick that you can’t even dream about...
AFOCUS is this
The direction of rotation of the crankshaft of a running engine coincides with the direction of unscrewing the nut. Thus, if you simply hold the nut in place with a suitable wrench or socket and ask someone to swing the starter once or twice, the nut will come off without any additional torque on your part.
It is best to rest the tucked key on the floor; if necessary, it can be extended with a piece of pipe. Of course, you understand that the engine must be turned off immediately after the nut is torn off. This method is suitable for both cars with a longitudinal engine and a transverse one. Remember that there are cars where the crankshaft rotates in the opposite direction, for example, Honda.
Which way to unscrew the crankshaft pulley?
This question is asked by many car owners. In order to prevent the thread from breaking or, even worse, the bolt head from twisting, it will not prevent the driver from figuring out which way to unscrew the crankshaft pulley bolt.
Because the pulley fixing element and flange have a regular right-hand thread, it is unscrewed in the same way as other car nuts (counterclockwise).
Now you understand how to unscrew the crankshaft pulley without the help of others. The owner of the car must approach this work with great responsibility. By making the slightest mistake, you can provide additional repairs, which will be accompanied by large foreign exchange costs. If the head of the crankshaft pulley fixing bolt breaks off, the threads will deteriorate or parts of the engine compartment will be damaged. Therefore, by correctly following the tips listed above, the work will be fast and of high quality without the occurrence of unfavorable situations. At this point, the question of how to unscrew the crankshaft pulley bolt with your own hands can be considered closed.
READ Headlights of VAZ 2106 do not light up
Engine VAZ-2106
We carry out the work on an inspection ditch or a lift.
Remove the engine splash guard (see “Removing the engine splash guard”).
By engaging 1st gear and braking the car with the parking brake.
Using a 38 wrench, unscrew the nut securing the crankshaft pulley.
Remove the coolant pump drive belt (see “Adjusting the tension and replacing the coolant pump drive belt on a car with a VAZ-2106
» ).
Using a spatula, move the pulley from the toe of the crankshaft.
Use a screwdriver to pry off the front crankshaft oil seal.
and remove it from the socket in the camshaft drive cover.
Lubricate the working edge of the new oil seal with engine oil.
and press it in with a socket head (or a piece of pipe) of a suitable diameter.
How to remove a pulley and front cover from a VAZ classic engine
We install the crankshaft pulley in the reverse order, orienting it so that the key on the toe of the crankshaft fits into the pulley groove.
Tightening torques for threaded connections of the VAZ 2106 Zhiguli
- Repair manuals
- Repair manual for VAZ 2106 (Zhiguli) 1976-2005.
- Tightening torques for threaded connections
| Detail | Thread | Tightening torque, N.m (kgf.m) |
| ENGINE | ||
| Main bearing cap bolt | M1×1.25 | 68,31–84,38 (6,97–8,61) |
| Oil sump bolt | M6 | 5,10–8,20 (0,50–0,85) |
| Breather cover mounting stud | M8 | 12,7–20,6 (1,3–2,1) |
| Breather cover nut | M8 | 12,7–20,6 (1,3–2,1) |
| Cylinder head bolt: | ||
| M12×1.25 | 33,3–41,16 (3,4–4,2) |
| M12×1.25 | 95,94–118,38 (9,79–12,08) |
| Cylinder head bolt | M8 | 36,67–39,1 (3,13–3,99) |
| Nut securing inlet and outlet pipelines | M8 | 20,87–25,77 (2,13–2,6) |
| Connecting rod cap bolt nut | M9×1 | 43,32–53,51 (4,42–5,4) |
| Flywheel bolt | M10×1.25 | 60,96–87,42 (6,22–8,92) |
| Chain tensioner shoe bolt | M10×1.25 | 41,2–51,0 (4,2–5,2) |
| Camshaft bearing housing stud nut | M8 | 18,33–22,6 (1,87–2,3) |
| Camshaft sprocket bolt | M10×1.25 | 41,2–51,0 (4,2–5,2) |
| Oil pump drive shaft sprocket bolt | M10×1.25 | 41,2–51,0 (4,2–5,2) |
| Valve adjusting bolt nut | M12×1.25 | 43,3–53,5 (4,42–5,46) |
| Valve adjusting bolt bushing | M18×1.5 | 83,3–102,9 (8,5–10,5) |
| Spark plug | M14×1.25 | 30,67–39,0 (3,13–3.99) |
| Coolant pump mounting bolt | M8 | 21,66–26,75 (2,21–2,73) |
| Nut of the stud securing the exhaust pipe of the cooling jacket | M8 | 15,97–22,64 (1,63–2,31) |
| Crankshaft ratchet | M20×1.5 | 101,3–125,6 (10,3–12,8) |
| Generator bracket mounting bolt | M10x1.25 | 44,1–64,7 (4,5–6,6) |
| Generator mounting bracket nut | M10x1.25 | 28,63–45,27 (2,86–4,62) |
| Nut of the bolt securing the generator to the bracket | M12x1.25 | 58,3–72,0(5,95–7,35) |
| Nut securing the mounting plate to the generator | M10×1.25 | 28,08–45,3 (2,86–4,62) |
| Nut securing the cushion to the front support bracket | M10x1.25 | 21,6–35,0 (2,21–3,57) |
| Nut securing the front engine mount to the cross member | M10x1.25 | 27,4–34,0 (2,8–3,46) |
| Nut securing the plate to the pillow | M6 | 5,7–9,2 (0,58–0,94) |
| Nut securing the rear engine mount to the body | M8 | 15,0–18,6 (1,53–1,9) |
| Nut securing the rear support to the gearbox | M8 | 23,3–28,8 (2,38–2,94) |
| Nut of the bolt securing the rear support to the cross member | M8 | 15,9–25,7 (1,62–2,62) |
| Electric fan sensor | M22×1.5 | 40,0–49,4 (4,08–5,04) |
| CLUTCH | ||
| Clutch bolt | M8 | 19,1–30,9 (1,95–3,15) |
| Clutch and brake pedal mounting bolt nut | M12×1.25 | 12,7–20,6 (1,3–2,1) |
| Clutch and brake master cylinder nuts | M8 | 9,8–15,7 (1,0–1,6) |
| Connection of hydraulic brake pipes | M10 | 14,7–18,6 (1,5–1,9) |
| Connection of hydraulic clutch tubes | M12 | 24,5–31,4 (2,5–3,2) |
| TRANSMISSION | ||
| Reversing light switch | M14×1.5 | 28,4–45,1 (2,9–4,6) |
| Bolts securing the clutch housing to the engine | M12×1.25 | 53,9–87,2 (5,5–8,9) |
| Nut securing the clutch housing to the gearbox | M10×1.25 | 31,8–51,4 (3,25–5,25) |
| Nut securing the clutch housing to the gearbox | M8 | 15,7–25,5 (1,6–2,6) |
| Bolt securing the rod clamp cover | M8 | 15,7–25,5 (1,6–2,6) |
| Rear cover fastening nut | M8 | 15,7–25,5 (1,6–2,6) |
| Nut of the rear end of the driven shaft | M20×1 | 66,6–82,3 (6,8–8,4) |
| Intermediate Shaft Bearing Clamp Washer Bolt | M12×1.25 | 79,4–98,0 (8,1–10,0) |
| Bolt securing the fork to the gearshift rod | M6 | 11,7–18,6 (1,2–1,9) |
| CARDAN TRANSMISSION | ||
| Front propeller shaft fork nut | M16×1.5 | 79,4–98,0 (8,1–10,0) |
| Nuts of bolts securing the elastic coupling | M12×1.25 | 57,8–71,5 (55,9–7,3) |
| Nut of the bolt securing the propeller shaft flange to the gearbox flange | M8 | 27,4–34,3 (2,8–3,5) |
| REAR AXLE | ||
| Gearbox mounting bolt | M8 | 35,0–43,2 (3,57–4,41) |
| Differential bearing cover bolt | M10×1.25 | 43,3–53,5 (4,42–5,46) |
| Driven gear bolt | M10×1.25 | 83,3–102,9 (8,5–10,5) |
| Nut securing the flange to the drive gear | see rear axle | |
| Nut for the mounting plate of the axle shaft bearing and brake shield | M10×1.25 | 41,6–51,4 (4,25–5.25) |
| Steering | ||
| Steering housing mounting bolt nut | M10×1.25 | 33,3–41,2 (3,4–4,2) |
| Nut of a bolt of fastening of a bracket of the pendulum arm | M10×1.25 | 33,3–41,2 (3,4–4,2) |
| Steering linkage ball pin nut | M14×1.5 | 42,1–53,0 (4,3–5,4) |
| Bolt securing the steering shaft to the worm shaft | M8 | 22,5–27,4 (2,3–2,8) |
| Steering wheel nut | M16×1.5 | 31,4–51,0 (3,2–5,2) |
| Nut securing the steering shaft bracket and ignition switch | M8 | 15,0–18,6 (1,53–1,9) |
| Bipod fastening nut | M20×1.5 | 199,9–247,0 (20,4–25,2) |
| Pendulum arm axle nut | M14×1.5 | 63,7–102,9 (6,5–10,5) |
| FRONT SUSPENSION | ||
| Bolt securing the cross member to the body side member | M12×1.25 | 78,4–98,0 (8,0–10,0) |
| Nut of the lower bolts securing the cross member to the body side member | M12×1.25 | 66,6–82,3 (6,8–8,4) |
| Nut of the lower arm axle mounting bolt | M12×1.25 | 66,6–82,3 (6,8–8,4) |
| Lower arm axle nut | M14×1.5 | 63,7–102,9 (6,5–10,5) |
| Upper arm axle nut | M14×1.5 | 57,3–92,1 (5,85–9,4) |
| Nut securing the upper end of the shock absorber | M10×1.25 | 27,4–34,0 (2,8–3,46) |
| Nut securing the lower end of the shock absorber | M10×1.25 | 50,0–61,7 (5,1–6,3) |
| Front wheel hub bearing nut | M18×1.5 | see Front suspension |
| Bolt securing the caliper to the bracket | M10×1.25 | 29,1–36,0 (2,97–3,67) |
| Anti-roll bar mounting nut | M8 | 15,0–18,6 (1,53–1,9) |
| Nut securing ball pins to steering knuckle | M14×1.5 | 83,3–102,9 (8,5–10,5) |
| Wheel bolt | M12×1.25 | 58,8–72,0 (6,0–7,35) |
| Steering knuckle bolt nut | M10×1.25 | 50,0–61,7 (5,1–6,3) |
| REAR SUSPENSION | ||
| Shock absorber mounting nuts | M12×1.25 | 38,2–61,7 (3,9–6,3) |
| Nuts of bolts for fastening transverse and longitudinal rods | M12×1.25 | 66.6–82,3 (6,8–8,4) |
↓ Comments ↓
1. General information
1.0 General information 1.1 Safety precautions
2. Diagnosis of faults
2.0 Diagnostics of faults 2.1 diagnostics of faults in the engine and its systems 2.2 Diagnostics of faults in the clutch 2.3 diagnostics of faults in the gearbox 2.4 Diagnostics of faults in the driveline, rear axle, chassis, steering and braking system 2.5 Diagnosis of faults in the body 2.6. Diagnosis of electrical equipment faults
3. Engine
3.0 Engine 3.1 Cylinder head and timing mechanism 3.2 Lubrication system 3.3 Oil change 3.4 Replacing the camshaft drive chain guide 3.5 Replacing the camshaft and valve levers 3.6 Replacing the valve stem seals 3.7 Replacing the intake and exhaust manifold gaskets 3.8 Replacing the cylinder head gasket ov 3.9 Disassembling the head cylinder block, valve grinding
4. Engine power system
4.0 Engine power system 4.1 Replacing the air filter element 4.2 Replacing the fuel pump 4.3 Repairing the fuel pump 4.4 Replacing the fuel tank and its hatch cover
5. Carburetor
5.0 General information about the carburetor 5.1 Cleaning the fuel filter 5.2 Replacing the idle air system solenoid valve 5.3. Adjusting the carburetor 5.4 Replacing the carburetor 5.5. Carburetor repair
6. Engine cooling system
6.0 Engine cooling system 6.1 Replacing the coolant 6.2 Replacing the coolant pump 6.3. Replacing the thermostat 6.4 Replacing the engine radiator
7. Exhaust system
7.0 Exhaust system 7.1 Replacing exhaust system parts
8. Clutch
8.0 Clutch 8.1 Replacing fluid and bleeding the clutch hydraulic drive 8.2 Adjusting the drive 8.3 Replacing the clutch master cylinder 8.4 Repairing the clutch master cylinder 8.5 Replacing the clutch slave cylinder 8.6 Replacing the pressure plate assembly and clutch release bearing
9. Gearbox
9.0 Gearbox 9.1 Checking the level and changing the oil in the gearbox 9.2 Replacing the reverse light switch 9.3 Replacing the secondary shaft cuff 9.4 Replacing the gearbox 9.5 Repairing the gearbox 9.6 Replacing the speedometer drive 9.7 Features of repairing a five-speed gearbox
10. Cardan transmission
10.0 Cardan transmission 10.1. Maintenance 10.2. Replacing the driveshaft
11. Rear axle
11.0 Rear axle 11.1 Checking the serviceability of the rear axle 11.2 Changing the oil 11.3 Replacing the axle shaft and its cuff 11.4 Removing and installing the rear axle 11.5 Replacing the cuff of the drive gear 11.6 Replacing the gearbox 11.7 Repairing the gearbox
12. Front suspension
12.0 Front suspension 12.1. Maintenance 12.2 Replacing the bearings and hub cuff 12.3 Replacing the cushions and stabilizer bar 12.4 Replacing the ball joints 12.5 Replacing the shock absorbers 12.6 Replacing the springs 12.7 Replacing the upper arms and their rubber-metal hinges 12.8 Replacing the rubber-metal joints of the lower arms on a car 12.9 Replacing the lower arms 12.12 . Adjusting wheel alignment angles
13. Rear suspension
13.0 Rear suspension 13.1 Checking technical condition 13.2. Replacement of rear suspension parts
14. Steering
14.0 Steering 14.1 Adding oil 14.2 Checking the condition of the steering 14.3 Adjusting the gear engagement 14.4 Replacing steering rods 14.5 Replacing and repairing the pendulum arm 14.6 Removing and installing the steering wheel 14.7 Removing and installing the steering shaft 14.8 Removing and installing the steering mechanism 14.9 Removing the bipod
15. Brake system
15.0 Brake system 15.1 Checking the condition of the hydraulic drive 15.2 Checking the vacuum brake booster 15.3 Checking the functionality of the pressure regulator 15.4 Replacing brake fluid and bleeding the brake system 15.5 Replacing the brake pads of the front wheels 15.6 Replacing the brake pads of the rear wheels 15.7 Replacing the brake caliper of the front wheel 15.8 Replacing the brake cylinders of the front wheels 15 .9 Repair of front wheel brake cylinders
16. General information
16.0 General information 16.1. Checking electrical circuits 16.2 Fuse blocks 16.3 Replacing fuses 16.4 Replacing the main and additional fuse blocks 16.5. Replacing the relay 16.6 Replacing the ignition switch 16.7 Replacing the contact part of the ignition switch 16.8 Battery 16.9. Generator 16.10. Starter 16.11. Ignition system 16.12. Lighting, light and sound alarms 16.13. Windshield cleaner and washer 16.14. Repair of the electric heater motor 16.15. Control devices
17. Body
17.0 Body 17.1 Replacing the front bumper 17.2 Replacing the radiator grille 17.3 Replacing the hood latch 17.4 Replacing the hood 17.5 Replacing the windshield 17.6 Replacing the interior rear view mirror 17.7 Replacing the sun visor 17.8 Replacing the headliner 17.9 Replacing the ceiling grab handle
18. Heating and ventilation system
18.0 Heating and ventilation system 18.1 Replacing the electric heater fan 18.2 Replacing the heater radiator 18.3 Replacing the radiator casing 18.4 Replacing the heater valve
19. Car body care
19.0 Car body care 19.1 Car washing 19.2 Preservation and protection of paintwork
20. Applications
20.0 Applications 20.1 Tools used in addition to the standard set 20.2 Electrical diagram of VAZ-2106, VAZ-21061, VAZ-21063 cars produced in 1976–1987. 20.4 Tightening torques for threaded connections 20.5 Basic data for adjustments and monitoring 20.6 Characteristics of spark plugs 20.7 Fuel, lubricants and operating fluids used 20.8 Lamps used on the vehicle 20.9 Lip seals (oil seals)
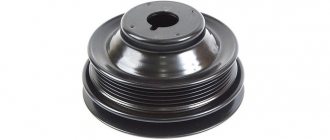
4.6.4 Removing and installing the crankshaft pulley
Removing and installing the crankshaft pulley
On 2.0L engines, a new sprocket mounting bolt will be required during installation.
Replacing the front crankshaft oil seal on a classic.
Refer to Removing and installing the crankshaft pulley ( Procedures for repairing SOHC gasoline engines without removing them from the vehicle).
Why is it difficult to remove the pulley?
Depending on the engine design, make and model of the car, the difficulty of removing the pulley varies. Some machines have a lot of space to comfortably carry out repair work, while others have very little free space. The pulley design elements cover the pulley.
In what cases is it necessary to replace oil seals?
- When an oil leak appears in the part of the pulley in the part of the car where the engine and gearbox are connected.
- When squeezing out oil seals and displacing them. This sign indicates that the oil pressure level has increased.
On fuel-injected vehicles there is a sensor that regulates the position of the crankshaft; its task is to measure the rotation speed.
Removal instructions
With the clutch disengaged, the crankshaft can be easily turned with a wrench.
To carry out the removal procedure, it is necessary to secure the shaft from turning.
There are special devices that are bolted to the pulley into the technological holes, preventing the shaft from turning. If there is no such device, then you need to install supports under the wheels and place the car on the fourth. You can also secure the crankshaft flywheel by inserting a long screwdriver or pry bar between its teeth.
Pulley removal
Unscrewing a fastening bolt or nut is only half the battle. Next you need to pull the pulley out of the shaft. The pulley cannot be removed easily by hand unless its seat is broken. In addition, if the pulley fits tightly onto the shaft, it is also secured against turning by a key.
There are special pullers for removing the pulley from the shaft. There are mechanical and hydraulic pullers.
The design of a mechanical puller is simple. Usually it has three legs, with which you need to hook the pulley itself, and rest the central rod against the shaft. the pulley towards you
. There are even simpler pullers that you can make yourself. If there is no removable device for the pulley, then you can use pry bars. If one person is filming, then take turns, moving it a little on each side so that there is no distortion. If there are two, then at the same time, from different sides, the pulley is pressed out from the crankshaft with a sharp movement.
It also happens that when using a puller, the walls of the pulley grooves cannot withstand and break off. Therefore, when using pry bars, they must be engaged as close to the shaft as possible.
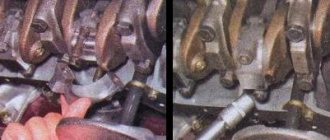
How to change the front and rear crankshaft oil seals on a VAZ 2107 with your own hands: step-by-step instructions with photos
Oil seals are a kind of plugs lying at the end of the shaft; they prevent oil from leaking out and dust particles from entering the motor. If oil drips appear, then it is time to replace the crankshaft seals. Typically, these spare parts last no more than one hundred and fifty thousand kilometers.
Removing the crankshaft position sensor
- Disconnect the contact chip from the sensor by first releasing the latch
- Using a Phillips screwdriver, unscrew the sensor mounting screw.
- After removing the crankshaft
, check its operation using a multimeter
Checking the crankshaft position sensor VAZ 2107
Welcome! Have you ever seen the bottom of an engine splattered with motor oil? Usually, people who have little knowledge of how a car works, the first question they ask is: “Why does this happen?”
A car's engine can become oily for various reasons, but the main reason is deformation of the oil seals. From time to time they require replacement with new ones. Let's figure out what they are and why they are needed. People say the oil seal, its real name is silent block, is a rubber-metal joint consisting of two metal bushings with a rubber insert between them. Oil seals serve as connections between suspension parts. Due to the elastic (rubber or polyurethane) insert between the bushings, vibrations transmitted from one unit to another are dampened. The silent block experiences very heavy loads, because its main task is to resist the deformation received by the car’s suspension.
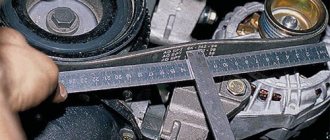
Note! You will need the following tools: wrenches, a special “36” wrench designed to unscrew the crankshaft pulley mounting nut, a pair of screwdrivers, a mounting blade, a mandrel, a hammer and a bit!
Installing the cover and gasket
After installing the oil seal, all that remains is to prepare the cover and install it:
- If the old gasket has become unusable, replace it with a new one, and apply sealant on both sides for better sealing.
- We install the cover together with the gasket in place, attaching all fasteners (bolts and nuts).
- We center the lid with a special mandrel.
- We do not fully tighten the cover fastening, and then tighten the bolts and nuts crosswise.
- We tighten the bolts securing the oil pan in the cover.
At the end of the described procedures, the crankshaft pulley and the generator belt are installed, after which it is tensioned.
Changing the front oil seal yourself
The first step is to disconnect the protection from the motor. We take an eight millimeter key. It is necessary to unscrew the front, rear and side screws. We remove the protection. If the car is fuel-injected, then removing the additional shield will not be too difficult.
Next you need to remove
generator, which made it easier to get to the pulley.
We unscrew the generator nut, then move the generator, the belt will relax and it will be easy to remove
.
Using a special wrench, unscrew the nut that secures the crankshaft and carefully remove the pulley.
This is where the seal itself is visible. It may have cuts or tears. Carefully remove it with a screwdriver and wipe the area. Lubricate the new oil seal with oil and place it in place. Using a hammer, carefully press the part into the lid.
The work of installing the new oil seal is completed. Then you need to install the pulley and belt. Next, we install the protection back.
Why might difficulties arise?
Removing a pulley is a difficulty in itself, even for a specialist, let alone a beginner. Difficulty may arise when removing the bolt or nut connecting the pulley and crankshaft. The fact is that the direction of the thread when unscrewing it coincides with the direction of the torque during engine operation. Thus, while the engine is running, the bolt is constantly tightened, which results in a serious problem when removing the bolt. Difficulty can also arise if you do not have the right tool.
How to unscrew the crankshaft pulley bolt?
The bolt holding the pulley is predominant in motors in front-wheel drive cars, when the block is located perpendicular to the axis of the car. In this case, you will have to tinker more, since it is more difficult to get to the bolt. To work you should prepare:
- jack;
- “tragus” (stump);
- a socket to the size of the bolt with an extension and lever;
- set of automotive tools.
In search of an answer to the question of how to remove the crankshaft pulley, many car enthusiasts begin to look for an opportunity to do this without prior preparation. By definition, such attempts cannot be successful.
In order to correctly remove the pulley, you must perform the following manipulations:
- the right front part of the car is lifted, the wheel is removed;
- the car is installed on a “tragus”;
- From the top side of the hood, all parts that impede access are removed: the air filter and the engine mudguard;
- the alternator belt is removed;
- to fix the crankshaft, the plug on the clutch block is opened and a pry bar is inserted into the resulting window to lock the flywheel teeth;
- under the wheel arch, a head with an extension and a lever is put on the pulley bolt;
- the bolt is unscrewed counterclockwise.
In the vast majority of cases, the bolt can be unscrewed. If it does not give in, then you can add the length of the lever. If this does not help, then you should use the help of the starter as described for the pulley nut in the “classic”.
What is the problem when unscrewing the crankshaft pulley?
How to remove a bearing from a crankshaft with your own hands
Even a person far from cars knows that the crankshaft rotates while the car is moving. Based on this, we can conclude that it will also rotate when you try to unscrew the bolt that connects the pulley and the crankshaft. The problem is that the direction of rotation of the unit and the thread of the bolt are the same. This means that by applying force to unscrew the bolt, it also affects the crankshaft, which rotates.
It should also be taken into account that while the car is moving, the bolt is strongly tightened, and this was not done by accident.
It is important that in no case does the pulley move away from the crankshaft while the car is moving, which can be dangerous not only for the car, but also for the people in it
There are other factors that do not allow you to easily unscrew the crankshaft pulley, in particular: corrosion, burning, coking, sticking, etc. Based on this, we can conclude that separating the parts is not so easy, and this will require not only special knowledge, but also a number of specific tools that are not available in every garage.
How to unscrew a bolt?
- As a rule, the pulley
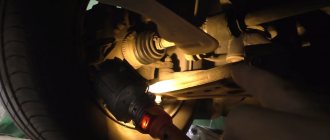
is attached to the crankshaft with a bolt only on front-wheel drive vehicles. To unscrew the bolt holding the pulley on the crankshaft, you will have to work hard, because getting to the bolt is not easy. Before you begin, you need to prepare the necessary tools: a jack, a head to match the size of the bolt and a lever with an extension, a tool kit for a motorist and a “tragus” (you can use a tree stump as a tragus). The removal phase looks something like this: - We install a jack on the right side of the car in the area of the front wheel. Jack up the car and remove the wheel;
- Under the car, near the jack, we slip a trestle or stump (whatever is at hand). This will ensure the reliability and safety of bolt removal;
- During the work it will become clear that the bolt cannot be reached. We open the hood of the car and remove all parts that prevent full access. The air filter, the protective brushes of the car engine and the generator belt are usually removed;
- To unscrew the bolt you need to fix the crankshaft. To do this, you need to lock the flywheel teeth. Open the plug on the clutch block and insert a pry bar or screwdriver into the resulting hole. It is not very convenient to carry out actions to hold the flywheel lock and at the same time unscrew the bolt alone. You can ask someone for help;
- We take a head selected to the size of the bolt, with an extension and an additional lever, push it under the wheel arch and put it on the bolt;
- Turn the lever counterclockwise.
By the way, not on all cars the crankshaft moves in the direction of the clock hand. On some Honda models it is reversed, which means that the bolt must be unscrewed to the right.
In most cases, the bolt gives in immediately, but if it is still in place, then you can use a slightly longer lever, and then it will definitely work.
Replacing the front crankshaft oil seal
In my case, everything was simple, since the engine was removed from the car and replacement was not difficult. I used the same puller to pry it from the inside of the oil seal and carefully pulled it out:
- The seat must be cleared of deposits
- Then take a new oil seal and lubricate its working surface with engine oil.
- Press it into place. To avoid distortions, use the old oil seal, placing it on the new one, and carefully punch it in a circle with a hammer.
Now you can install the pulley in place, making sure it is correctly installed on the key. The procedure can be considered completed, and VAZ 2106
ready for use!
I forgot to mention the price of the seal. For a VAZ “classic” it is about 100 rubles. Good luck with the renovation!
Every second car enthusiast who tries to repair his favorite four-wheeled friend with his own hands has encountered the problem of how to remove the crankshaft pulley. After reading the instructions in the maintenance and repair manual, at first glance, the procedure does not seem complicated, however, when you first try to unscrew the ill-fated bolt, it turns out that this is not so easy. It is completely unclear how to fix the crankshaft so that it does not rotate. Another problem is where is the best way to get to the treasured bolt. Removing the crankshaft pulley causes a lot of trouble because it is too tight. There is a high probability of damaging many parts of the engine compartment or the paintwork of the body.
The problem is that the crankshaft pulley bolt (or nut, depending on the model) is tightened with great force during installation. This is done so that it does not unwind spontaneously, since if unscrewed, serious damage and expensive repairs cannot be avoided. The degree of tightening gradually increases as the engine operates and is aggravated by sticking, coking, and corrosion.
In reality, the entire dismantling process can take 10-15 minutes, but there are some techniques you need to know and use. Different motor models use either a bolt or a nut to secure the pulley. Each option should be considered.
How to unscrew the crankshaft pulley nut?
The nut at the end of the crankshaft holding the pulley is a sign of the engine of a classic rear-wheel drive car like VAZ from model 2101 to 2107, “Niva” and the like. Such a nut is also called a “ratchet”, since it can have ledges for a “crooked starter”.
It is better to do the work above the inspection hole. The crankshaft should be secured by placing the gearbox in 4th gear and applying the parking brake. You should stock up on the following tools in advance:
- socket or socket wrench 36 (or 38);
- lever extension in the form of a piece of pipe.
While under the car, try to unscrew the nut with a wrench with a sufficiently long lever. If the attempt is unsuccessful, put the gearbox in neutral and proceed as follows:
- the candlesticks are removed;
- while in the pit, install the key and extension so that the end rests on the floor or spar as the shaft rotates;
- turning the key in the ignition switch gives a short-term impulse.
As a rule, on the first or second attempt the nut comes off and is then unscrewed with a regular wrench. Don't forget to loosen and remove the alternator belt.
Folk tricks
Let's look at a few folk auto tricks that have helped more than one driver.
- Each threaded connection, by the way, not only on the part of the car, can be unscrewed by previously lubricating it with a special oil, for example: HP, sunflower oil, vinegar, brake fluid.
- In the rarest cases, lightly tapping the edges of the bolt and nut with a hammer or wrench helps.
- Removing a bolt or nut does not mean removing the pulley. How to unscrew the crankshaft pulley without a special key? The pulley sits very firmly on the shaft, it can be removed using a pry bar or a screwdriver, and carefully pry it off in several places.
How to unscrew the crankshaft pulley nut?
The nut at the end of the crankshaft holding the pulley is a sign of the engine of a traditional rear-wheel drive car like VAZ from model 2101 to 2107, Niva and the like. Such a nut is also called a “ratchet” because it can have ledges for a “crooked starter”.
It is better to do the work above the inspection hole. The crankshaft should be secured by placing the gearbox in 4th gear and applying the parking brake. You should stock up on the following equipment in advance:
- Socket or socket wrench 36 (or 38);
- Lever extension in the form of a pipe section.
While under the car, you should try to unscrew the nut with a wrench with a rather long lever. If the attempt fails, put the gearbox in neutral and do the following:
- The candlesticks are removed;
- While in the hole, install the key and extension so that the end rests on the floor or spar as the shaft rotates;
- By turning the key in the ignition switch, a short-term impulse is given.
Usually, on the first or second try, the nut comes off and is then unscrewed with an ordinary wrench. Don't forget to loosen and remove the alternator belt.
Unscrew the pulley nut
The nut that holds the pulley at the end of the crankshaft
, indicates that we are working with a classic version of the engine, namely a VAZ-type car. So, before starting work, you need to prepare the necessary tool, namely a socket or socket wrench for “36” or “38”, you also need to prepare a piece of pipe about 30 cm (later you will find out why). It is better to do the work above the inspection hole. If this is not possible, then it is better to use a jack and definitely a tree stump (better to be safe).
We set the gearbox lever to the fourth gear position and turn on the parking brake mode (handbrake). We try to unscrew the nut using a wrench with a long lever while being under the car. If the attempt fails, you need to use another option.
Set the gearbox lever to the neutral position and remove the spark plugs. We install the key so that it rests (in the case when the length of the key is not enough, a pipe is used) against the floor or the rear spar in the direction of movement of the crankshaft. When the requirements are met, it is necessary to turn the ignition key to give short-term pulses. Sometimes the nut fits so tightly that you can’t get it off the first time. Mostly it is released on the third or fourth try. Once the nut is stripped, it can be tightened with a wrench.
How to remove a pulley from a crankshaft
So, first of all, having stopped the pulley, unscrew the nut securing it:
When the nut is completely unscrewed, you can try to remove the pulley itself. This can be done simply by prying it from the inside with the same chisel, or using a special puller, as demonstrated in
We remove the pulley using folk automotive experience
Any threaded connection, even if tightly tightened. can be untwisted with less effort if you use some folk-automotive tricks. The problem of how to unscrew the crankshaft pulley ceases to be such if you moisten the bolt head or nut in advance with special WD oil, vinegar or brake fluid. Sometimes lightly tapping the edges of the nut helps.
Unscrewing a bolt or nut does not always solve the problem, since the pulley is held quite firmly on the shaft. Take off
The pulley can be installed using a regular pry bar, carefully prying it off from different sides. It is important that the force application point is as close to the shaft as possible. For hopeless cases, it is necessary to use a crankshaft pulley puller. This is a special device, which is a pin with a nut on which 2-3 grips are attached. The ends of the grippers are secured to the edges of the pulley, and the end of the pin rests against the center of the shaft. By twisting it clockwise, you can gradually pull the pulley off the shaft.
You should not be sure that in all cars, without exception, the crankshaft rotates clockwise.
For example, in some Honda cars the crankshaft rotates counterclockwise. It follows from this that the thread on the pulley nut (bolt) will be left-handed.
So, let's say you need to figure out how to remove
crankshaft pulley. This is not an easy task, especially when it happens for the first time. Let's figure out how to unscrew the crankshaft pulley without falling out of love with your car?
How to remove a crankshaft pulley and not stop loving your car
Every second car owner who tries to repair his beloved four-wheeled friend with his own hands has encountered the problem of how to remove the crankshaft pulley. After reading the annotations in the maintenance and repair manual, at first glance, the procedure does not seem complicated, but the first time you try to unscrew the ill-fated bolt, it turns out that this is not so easy. It is not at all clear how to fix the crankshaft so that it does not spin. Another problem is where is the best way to get to the sacred bolt. Removing the crankshaft pulley causes a lot of hassle due to it being too tight. There is a great possibility of destroying many parts of the engine department or the paintwork of the body.
The problem is that the crankshaft pulley bolt (or nut, depending on the model) is tightened with enormous force during installation. This is done so that it does not unwind spontaneously, because if unscrewed, serious damage and expensive repairs cannot be avoided. The degree of tightening increases evenly as the engine operates and is aggravated by sticking, coking, and corrosion.
In reality, the entire dismantling process may take 10-15 minutes, but you should know and use certain techniques. In various motor models, either a bolt or a nut is used to secure the pulley. Either option should be considered.
How to unscrew the crankshaft pulley bolt?
The bolt holding the pulley predominates in engines in cars with front-wheel drive, when the block is placed perpendicular to the axis of the car. In this case, you will have to tinker more, because it is more difficult to get to the bolt. To work you should prepare:
- Jack;
- “tragus” (stump);
- A socket to the size of the bolt with an extension and lever;
- Set of auto tools.
In search of an answer to the question of how to remove the crankshaft pulley, many car owners are beginning to find the opportunity to do this without any preparation. By definition, such tests cannot be successful.
In order to correctly remove the pulley, you need to do the following manipulations:
- The right front part of the car is raised and the wheel is removed;
- The car is installed on a trestle;
- From the top of the hood, all parts that impede access are removed: the air filter and the engine mudguard;
- The generator belt is removed;
- To fix the crankshaft, the plug on the clutch block is opened and a pry bar is inserted into the resulting window to lock the flywheel teeth;
- Under the wheel arch, a head with an extension and a lever is put on the pulley bolt;
- The bolt is unscrewed counterclockwise.
In the vast majority of cases, the bolt can be unscrewed. If it does not give in, then you can add the length of the lever. If this does not help, then you should use the help of a starter because this is described for the pulley nut in the “classics”.
How to unscrew the crankshaft pulley nut?
The nut at the end of the crankshaft holding the pulley is a sign of the engine of a traditional rear-wheel drive car like VAZ from model 2101 to 2107, Niva and the like. Such a nut is also called a “ratchet” because it can have ledges for a “crooked starter”.
It is better to do the work above the inspection hole. The crankshaft should be secured by placing the gearbox in 4th gear and applying the parking brake. You should stock up on the following equipment in advance:
- Socket or socket wrench 36 (or 38);
- Lever extension in the form of a pipe section.
While under the car, you should try to unscrew the nut with a wrench with a rather long lever. If the attempt fails, put the gearbox in neutral and do the following:
- The candlesticks are removed;
- While in the hole, install the key and extension so that the end rests on the floor or spar as the shaft rotates;
- By turning the key in the ignition switch, a short-term impulse is given.
Usually, on the first or second try, the nut comes off and is then unscrewed with an ordinary wrench. Don't forget to loosen and remove the alternator belt.
We remove the pulley using folk automotive experience
Any threaded connection, even if it is tightly tightened. You can spin it up with the least effort if you use some folk-automotive tricks. The problem of how to unscrew the crankshaft pulley ceases to exist if you moisten the bolt head or nut with special WD oil, vinegar or brake fluid in advance. Lightly tapping the edges of the nut helps from time to time.
Unscrewing a bolt or nut does not always solve the problem, because the pulley is held quite firmly on the shaft. You can remove the pulley using an ordinary pry bar, carefully prying it off from different sides. It is important that the point of application of force be as close as possible to the shaft. For hopeless cases, you need to use a crankshaft pulley puller. This is a special device, which is a pin with a nut on which 2-3 grips are attached. The ends of the grippers are secured to the edges of the pulley, and the end of the pin rests against the center of the shaft. By twisting it clockwise, you can gradually pull the pulley off the shaft.
You should not be sure that in all cars, without exception, the crankshaft rotates clockwise.
For example, in some Honda cars the crankshaft rotates counterclockwise. It follows from this that the thread on the pulley nut (bolt) will be left-handed.
How to unscrew the crankshaft pulley bolt?
The bolt holding the pulley predominates in engines in cars with front-wheel drive, when the block is placed perpendicular to the axis of the car. In this case, you will have to tinker more, because it is more difficult to get to the bolt. To work you should prepare:
- Jack;
- “tragus” (stump);
- A socket to the size of the bolt with an extension and lever;
- Set of auto tools.
In search of an answer to the question of how to remove the crankshaft pulley, many car owners are beginning to find the opportunity to do this without any preparation. By definition, such tests cannot be successful.
In order to correctly remove the pulley, you need to do the following manipulations:
- The right front part of the car is raised and the wheel is removed;
- The car is installed on a trestle;
- From the top of the hood, all parts that impede access are removed: the air filter and the engine mudguard;
- The generator belt is removed;
- To fix the crankshaft, the plug on the clutch block is opened and a pry bar is inserted into the resulting window to lock the flywheel teeth;
- Under the wheel arch, a head with an extension and a lever is put on the pulley bolt;
- The bolt is unscrewed counterclockwise.
In the vast majority of cases, the bolt can be unscrewed. If it does not give in, then you can add the length of the lever. If this does not help, then you should use the help of a starter because this is described for the pulley nut in the “classics”.
How to properly remove a pulley
As already mentioned, the VAZ 2114 crankshaft gear is secured quite seriously, and therefore the dismantling process should be thoroughly prepared.
- jack;
- shoes;
- flat mount;
- a set of keys;
- flathead screwdrivers;
- set of socket heads;
- head extension.
The operation itself is best performed on a special platform equipped with a lift.
After the necessary tool is prepared, let's look at how to unscrew the pulley
crankshaft for VAZ 2114.
Fixing the flywheel
This procedure should be performed strictly in the sequence indicated below in order to avoid possible errors and accidental damage to the car’s mechanisms:
- Place the car on a platform or overpass and secure it.
- Loosen the alternator belt tension adjustment bolt.
- Remove the generator retaining bolt.
- Raise the car using a jack.
- Remove the front right wheel.
- Remove the alternator belt.
- Fix the flywheel in a stationary state (it is best for this purpose to use a screwdriver, which should be inserted into the hole under the plug located on the side of the transmission).
- Remove the timing belt (after setting its position marks).
- Impregnate the threads of the pulley mounting bolt as much as possible with VeDeshka or another composition that actively affects the oxide layer (for greater reliability, you can wait a while and then repeat the procedure again).
- Place a suitable head with an extension on the mounting bolt and turn the fixing bolt counterclockwise so that it moves (if this cannot be done by hand, use a hammer or a piece of wood, carefully striking the head extension).
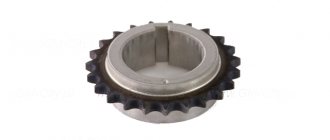
- Unscrew the fastening bolt (after it is removed, you should pay attention to the presence of a key located on the shaft. It can be easily removed, so it should be immediately removed to a safe place so as not to be lost during further dismantling).
- Remove the
crankshaft pulley using a special puller.Crankshaft key
Reinstalling the pulley is done in exactly the same way, but in reverse order.
After reading the removal procedure, some drivers may wonder what to do if there is no special puller available (especially since it is extremely rare to remove the crankshaft pulley, so such a tool can not be found in every garage).
The way out of this situation is quite simple - you should take a pair of flat pry bars (or powerful flat-head screwdrivers), which should be carefully inserted between the crankshaft and its pulley. Gradually rocking this tool back and forth, first move the pulley out of place, and then, moving it to the edge of the shaft, remove it completely.
Using a pry bar to remove the pulley
Before you begin dismantling the crankshaft pulley using pry bars, you should carefully tap the pulley itself using a small rubber or wooden hammer. This will allow you to move it slightly and avoid sticking.
As mentioned above, the installation of the old (or, in case of replacement, a new) crankshaft pulley is carried out in exactly the same sequence as its removal.
The only thing you should remember is that before you begin installing this part, its seat should be generously lubricated with grease or another lubricant similar in consistency, and the fastening bolt should be tightened with the maximum possible force.
Dismantling and replacement
Regardless of the design, where the part is located, it is important to remove and install it in the same order. Depending on the location of the motor, the part is located in the front part behind the cooling radiator
But if the motor is placed across the engine compartment, then your hand will not reach the part. Because to remove the crankshaft pulley you need to remove the right wheel
If it is difficult to change, it makes sense to pay attention to the drawing, the work will speed up
The vehicle is rolled onto the inspection hole and secured so that the car does not move from its place. To get there and remove the structure, you need to unscrew all the parts that impede access (air filter, mud flaps, etc.). Remove the generator belt. Next, open the clutch block plug and insert a pry bar into the hole to lock the flywheel.
The elements of the part are characterized by strong fixation, so they are not easy to remove. To turn a part, it is necessary to make a lot of effort. If dismantling is performed for the first time, it will be difficult to unscrew the crankshaft pulley. The reason is that factory production is characterized by strong tightening of the component parts.
How to unscrew the crankshaft pulley nut
When turning fasteners, it is important to follow the recommendations, then the process will take at least 15 minutes. The effort should be applied as close to the camshaft as possible:
- use a pry bar to pry it up from all sides;
- If necessary, use a special universal crankshaft pulley puller for this part.
The device is presented in the form of a hairpin with 2-3 grips. The end of the gripper is secured to the edges of the part, and the end of the pin is placed in the middle of the shaft.
Scroll clockwise. But not all brands of cars turn clockwise; in some cars, work must be done in the opposite direction
In this case, it is important to put your gear lever in 4th speed and turn on the handbrake
If you can’t turn it, the lever should be in the neutral position. The next step is to remove the candlesticks. The key is placed on the floor or on the rear side member and turned in the direction of movement of the device.
All maneuvers make it easier to scroll, so further actions must be performed manually; if necessary, lubricate with brake fluid or WD grease. In addition, tapping the edges of the head can make your work easier.
How to remove the crankshaft pulley bolt
To do the job efficiently, the disassembled machine is placed on a stump. The pin holds the part together and is usually found in front-wheel drive automatic cars. The thread is designed in such a way that it is tightened during the torque when moving.
It is necessary to perform actions that open access to the base
To do this, it is important to stop the rotation well. A mount is used as a fixation
The tool is inserted into the flywheel gears. It must be adjusted securely so that it does not fall out during the turning process. Therefore, it is better to do the work with an assistant. Next, put a socket head of the same diameter as the pin onto the pin, attach a lever and an extension (a piece of durable pipe). After this they begin to slowly unscrew it.
People's automobile experience
The difficulty of dismantling lies in the specially selected strong connection, without play. The fasteners are tightly screwed. They practice using a pry bar, while slowly pressing on the back surface of the part.
When purchasing a part, you must have new fasteners. You will need a front oil seal, hanging belts
When purchasing, you need to pay attention to the grooves and marks. They must be free of defects
Otherwise, after a while you need to replace everything with a new one.
Reasons for removing the crankshaft
As a rule, it is necessary to dismantle the VAZ 2114 crankshaft pulley in three main cases:
- When replacing shaft seals (you can tell that it’s time to change them by oil leaks at their locations).
- For a number of repairs related to the gas distribution mechanism (for example, when replacing a belt).
- When replacing the pulley itself (however, it is quite rare to remove it for this very reason, because serious wear of the pulley is an infrequent occurrence).
But, be that as it may, it’s quite difficult to remove the pulley correctly for the first time without breaking or losing anything. This is caused by a number of inconveniences, for example, the hard-to-reach location of this part, which causes significant difficulty in unscrewing the fasteners (a long socket wrench or a socket with a large extension is most suitable for this operation).
Crankshaft bolt VAZ 2114
In addition, the pulley threads are tightened at the factory using mechanical impact wrenches with the maximum permissible force in order to prevent spontaneous unwinding. For obvious reasons, it is unlikely that such fasteners can be easily unscrewed “by hand” (in addition, the right-hand thread during engine operation works in the direction of tightening, further aggravating this situation).
When starting to dismantle the crankshaft pulley, be sure to stock up on WD-40 or kerosene - without them, this operation may end in failure.
Although the crankshaft pulley
- an element with a colossal margin of safety, which practically does not require repair or replacement; sometimes it still has to be dismantled.
In today's article we will talk about how to remove
the crankshaft pulley of a VAZ 2114 and why to do it.
Crankshaft pulley VAZ 2114
In what cases should the pulley be removed?
Most often, it is necessary to dismantle the crankshaft pulley when changing oil seals. The role of the O-rings is to prevent oil from the crankcase from reaching engine components. Over time, the seals wear out, crack, and as a result, oil leaks appear. To fix this, you need to change the seals. During this procedure, you have to remove the crankshaft pulley.
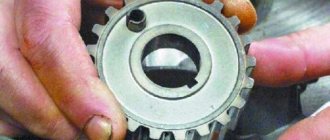
Also, the need to dismantle the crankshaft disk arises when replacing the timing belt on a VAZ 2107 injector. It is changed according to the regulations specified in the operating instructions for the VAZ 2107 injector, as it wears out after a visual inspection or if it breaks. During a technical inspection, the pulley must be inspected to identify any defects. If chips or scratches are found, the part should be replaced.
Damaged part with broken part
The procedure for removing the product itself is not difficult, but some problems arise.
Firstly, with access. The pulley we are interested in is located in the lower part of the engine compartment behind the generator. It is difficult to get to because other engine components are in the way. Before removing the pulley, you need to remove the alternator and power steering belt.
Secondly, the crankshaft pulley mounting nut is very difficult to unscrew. When it is put in place, it is screwed with great effort. This is necessary so that it does not unscrew accidentally while the car is moving, as this can lead to expensive repairs. While the engine is running, the nut is tightened even more. In addition, the process is aggravated by high operating temperatures, at which oil coking and metal corrosion occur under the influence of the external environment.
Useful video
You can get additional useful information on this issue from the video below:
Sources:
https://autoprivat.ru/remont_avto/kak_otkrutit_shkiv_kolenvala_vaz_2106.html https://avtohaker.ru/drugoe/kak-snyat-shkiv-kolenvala-vaz-2107-inzhektor-samomu-instrukczii-s-foto https://prodemio. ru/otkrutilsja-shkiv-kolenvala-vaz-2106/ https://remontvazov.com/shkiv-kolenvala-vaz-2114