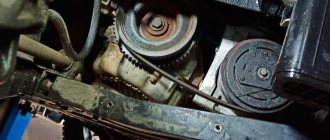
The VAZ-2112 engine was installed on LADA cars of the “tenth” family: 2110, 2111 and 2112. Two timing shafts in this engine are driven by a belt. When replacing a belt, you need to be able to control the tension, and it seems that special equipment is produced for this. We believe that tensioning the timing belt on a VAZ-2112 can be done using a dynamometer. In this case, the tension force can be set without errors. You just need to make a technological plate used instead of a tension wrench. The drawing will be given below.
The following video shows how exactly the tension is checked, without even using a dynamometer.
Then, replacing the timing rollers and correct belt adjustment
Happy Monday everyone, from the moment I bought the car I immediately changed the belt and rollers to new ones.
But today I have already driven 23 thousand km and therefore my hands and head were itching to change the rollers and adjust the timing belt tension. I took the old rollers that were removed from the machine to replace new rollers, but as it turned out, the rollers were wear-free, only there was no lubrication, so I washed and filled them with fresh and recommended lubricant for rollers TOTAL ALTIS SH2: High-temperature lubricant and voila, the rollers were just like from the store. There were no problems with installation and adjustment; I made a special device to check the belt tension, as well as a clamp for the camshaft gears. The old rollers that were removed were really worn out—they felt loose when held in the hands. I adjusted everything as it should, not according to the Murzilka, but according to this entry from the site www.autolada.ru/viewtopic.php?t=101198&start=125 and verified by me, you write obvious things known to everyone. bboyan Have you seen the technique proposed by VAZ? “When applying pressure with a force of 10 kgf on a belt with a tool 3 mm wide, it should bend by 5.2-5.6 mm. The adjustment is carried out on a cold engine." The creator of such methods should be shot. Firstly, catching tenths of a millimeter while hunched over the engine is extremely inconvenient, secondly, this technique definitely leads to overtightening, thirdly, 99% of service stations do not use any devices at all when tensioning the belt, and fourthly, the design of the 1.5 engine itself is not enough calculated for the shock loads of the belt (IMHO, for example, during engine braking with a sharp downshift), so a derated 1.6 engine appeared - the capitulation of VAZ designers to a belt that was “difficult” for them to understand. The complex of these problems leads to the accelerated demise of the belt; I get the impression that it cannot be tensioned correctly at all. And all this is aggravated by the colossal number of fakes.
You need to tighten or loosen it a little, just 2-3 degrees on the tension wrench. I personally tighten it when the belt hits the casing during a cold start. Immediately turn it off, tighten it 2-3 degrees - and the belt no longer hits. If it still hits, we give it another 2-3 degrees of tightening. If you remove the cover and turn the engine by the wheel in 5th gear, then at some point the belt becomes a hump between the pulleys. This hump is what knocks on the casing, and it needs to be removed. I personally adjusted the belt correctly on the 6th attempt, as they say, measure seven times and cut once!
Source
Timing belt - checking condition and adjusting tension
The timing belt should be checked every 15,000 km of the vehicle.
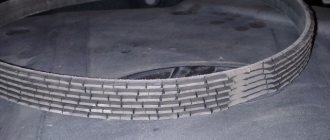
The belt must be clean - without traces of dirt and oil on its surface. A belt with tears, cracks, delaminations, cut or worn teeth, or abrasions down to the cord must be replaced immediately (see “Timing Belt - Replacement”). Oil and dirt getting on the belt will shorten its service life.
To complete the work you will need: a caliper and a household steelyard (only for 16-valve engines), a wrench for tensioning the timing belt (see “Tools, accessories and operating materials”).
Checking and adjusting the belt tension should be done with the engine cool.
1. We prepare the car for work (see “Preparing the car for maintenance and repair”).
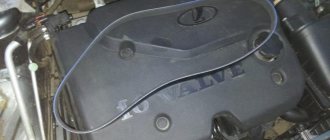
2. On engines 2112, 21124 and 21114
remove the decorative trim of the engine (see “Decorative trim of the engine - removal and installation”).
3. Remove the front cover of the engine 2112, 2111, 21114
or the top of the
21124 engine
(see “Timing Belt - Replacement”).
4. Remove the front right wheel (see “Wheel - replacement”) and place the car on a reliable stand.
5. Remove the right mudguard of the engine compartment (see “Mudguards of the engine compartment - removal and installation”).
6. Rotating the crankshaft with a 17 mm
or
19 mm,
inspect the belt.
When checking the timing belt, you can rotate the crankshaft in the following way. Engage fourth gear, lift the right front side of the car using a jack (see “Preparing the car for maintenance and repair”), rotate the right front wheel clockwise. This will cause the engine crankshaft to rotate.
Checking on 16-valve engines
1. Hook the steelyard hook onto the handle of the socket wrench extension. Use insulating tape or tape to secure the steelyard hook to the extension cord.
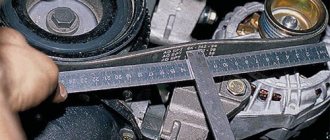
2. Check the belt tension in the middle part of the branch between the camshaft pulleys. We apply the edge of a ruler to the pulleys. Using the extension cord, pressing the belt with a force of 10 kgf, we measure its deflection, which should be 5.4 mm.
If the belt deflection is greater than specified, tighten the belt; if the belt is overtightened, loosen its tension.
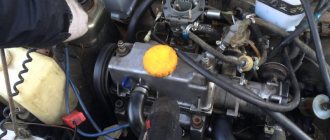
To check the condition and tension of the belt on the 2112 engine, simply remove the plug from the front cover. In this case, the belt deflection can be measured from the edge of the front cover. You must first measure the distance from the edge of the cover to the timing belt and take this dimension into account when measuring.
Checking on 8-valve engines
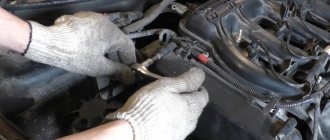
Using two fingers, we try to rotate the belt 90° in the area between the crankshaft and camshaft pulleys, applying a force of 15-20 Nm (15-2.0 kgcm).
If the applied force is not enough to turn the belt to the required angle, the belt will be overtightened; If the belt can be turned to a greater angle, it is not tensioned enough.
1. 17 mm
loosen the nut securing the tension roller.
2. Using a special key, turn the roller to adjust the belt tension. Without releasing the roller, tighten the nut securing it (the operation is shown on the example of engine 21124; on other engines it is performed similarly).
3. Turn the engine crankshaft 2 turns and check the belt tension (see above). If necessary, repeat the adjustment.
4. Finally tighten the roller fastening nut to a torque of 33.23-41.16 N m (3.4-4.2 kg cm)
Excessive belt tension will shorten its service life and can lead to failure of the coolant pump bearings, tension rollers and guide rollers.
5. Install the parts in the reverse order of removal.
Replacing the timing belt 16 cl. engine
Replacing the timing belt VAZ 2112 1.6 16 cl.
1. Remove the timing belt protection. The timing belt guard is secured with six bolts. Remove the chip from the crankshaft sensor, unscrew one bolt and remove the sensor.
2. One tooth is missing on the pulley, this is not without reason, this allows the crankshaft sensor to determine the top dead center, and also allows you to block the crankshaft in order to unscrew and tighten the pulley mounting bolt.
3. This is done like this: the pulley is aligned with the hole for the crankshaft sensor and through the hole for the sensor, a suitable size tube or other suitable object is inserted, in my case it is a hexagon, the pulley is blocked, and then unscrewed and removed.
4. Loosen the tension roller nut and remove the old timing belt.
5. Install a new belt, the belt can be installed by turning the right camshaft with a wrench, or you can remove the tension roller, whichever is more convenient for you.
6. Tighten the pulley mounting bolt back and align the timing belt drive gear according to the marks. If there are no marks on the oil pump housing, put marks on the flywheel and, using a chisel, make a mark on the oil pump, this will be more convenient.
7. Align the marks of the camshaft pulleys so that the timing belt drive gear does not go astray
8. Using a special wrench, tighten the belt with a tension roller. If there is no key, don’t be upset, you can tighten it with two nails and a screwdriver between them, or you can take a steel fork, remove the two middle teeth completely, and shorten the two outer ones in half and bend them. Be sure to remember to tighten the tension pulley nut. (To tighten the belt, turn the tension roller counterclockwise (about 10–15°); to loosen it, turn it clockwise)
9. Turn the crankshaft two full turns and check the marks; if all three marks match, put the pulley in place, do not forget about the generator belt and crankshaft sensor, then the belt protection and you can start the engine.
Timing belt tension
1. Check the belt tension. A correctly tensioned belt should rotate 90° from finger force (1.5–2 kgf) in the middle between the crankshaft and camshaft pulleys.
2. I take it with two fingers between the camshafts and up and down. 5-6 mm fluctuates back and forth, then I leave it.
3. Adjust the timing belt tension using a special device. The most correct belt tension is 2 kGs. Having achieved this result, fasten the fastening nut.
4. In the "Manual", the manual verification method is described in detail. It involves checking the tension of the toothed belt in the middle part of the branch between the camshaft pulleys. It should be such that under the action of an object 3 mm wide with a force of 10 kg, the belt deflection is 5.4 mm. Deviations in any direction are allowed no more than 0.2 mm. The engine must be at “room” temperature (+15-30°C). An overtightened belt breaks - the strength of the cord threads is limited. And the tighter the belt is, the faster the threads will break. A loose belt will also not last long, because... when entering the pulley, the belt teeth do not fall into the cavities of the pulley teeth - undercutting occurs and the subsequent separation of the teeth from the base.
How to check the condition of the VAZ 2110 timing belt
To check the condition of the timing belt you need to:
- remove the front timing belt protective cover plug,
- remove the alternator belt so that it does not interfere,
- unscrew 6 bolts and remove the front protective cover,
- Having gained access to the timing belt, we inspect it.
If during your next inspection you notice:
- cuts on the timing belt, bulges,
- delamination, appearance of broken threads,
- numerous cracks, folds, severe abrasions,
- oil leaks on the belt,
it must be replaced immediately.
As a rule, young drivers perform such repairs in specialized auto repair shops or car repair centers. But, if you decide to replace the old belt with a new one yourself, prepare the tools and materials: heads “10”, “17”, a special wrench used to tension the belt, a screwdriver, a new timing belt, detergent, clean rags.
Lada 2112 2007, 89 l. With. - with your own hands
Cars for sale
Lada 2112, 2005
Lada 2112, 2007
Lada 2112, 2008
Lada 2112, 2006
Comments 53
There are a lot of opinions on this matter... If you tighten counterclockwise, then the angle of the belt is more correct and there is no need to tighten the nut too much (broken threads in the cylinder head are not uncommon)... During the process, the roller works on self-tightening. There was a case, I personally saw how almost half of the belt was eaten (on a Prior 8kl) precisely because the roller was tensioned clockwise... Maybe, of course, there was something wrong with the geometry, but after correcting there were no problems. Well, according to the manual, counterclockwise. I’m not imposing my opinion, it’s just logical, like, counterclockwise. PS I’ll add that many people have no problems with any option...
It’s logical to tighten it clockwise))) like a thread