Today, wheel alignment can be adjusted on a car, both foreign and domestic (VAZ 2101, VAZ 2106, etc.) at almost every service station. However, not every service station can boast of having special high-precision equipment that ensures the proper quality of such work. You can still find services that offer instead to perform wheel alignment, so to speak, using “old-fashioned” methods. Therefore, more and more car enthusiasts are asking the question: how to make a wheel alignment with your own hands? After all, the procedure does not take much time, and the tools necessary to perform it are commercially available. In this review, as an example, we will look at how to adjust the wheel alignment yourself on a VAZ 2107. In addition, the method is suitable for other models of the presented manufacturer.
Adjusting wheel alignment at a service station
Work on adjusting wheel alignment at service stations is carried out using special stands, which are:
- optical;
- laser;
- computer
Optical stands work as follows: special tubes are attached to the wheels, directing a beam of light onto a plane with vertical and horizontal scales. The angle of inclination is determined by the position of the point of light relative to one or another scale. Such stands were widely used during the Soviet period and today are more often used to adjust wheel alignment on cars from the USSR era. Stands of this type give a high measurement error and allow you to determine the camber on only one pair of wheels (front or rear), so it can be quite difficult to set all the wheels of the car at the same angle.
The optical stand is the least advanced device for adjusting car wheel alignment
In technical terms, laser stands are the next step in optical ones, i.e. the laws of optics are also applied here, but instead of a light beam a laser beam is used. To adjust the camber:
- Special laser emitters are installed on the machine;
- mirrors are attached to the wheels parallel to the plane of rotation;
- the measuring scale is mounted opposite the mirror and the laser beam emanating from the zero point of the scale, with correct adjustments, should return to its place from the mirror.
If the beam returns to a different point, adjustment is required. The accuracy of measurements on a laser stand is much higher than on an optical one.
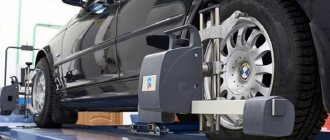
The laser stand is currently used in most service stations
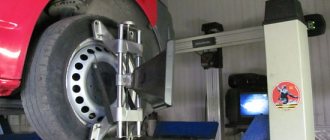
The most advanced device for adjusting camber today is a computer stand. There are several types of such stands. Most often, a computer stand determines all the necessary quantities using special sensors installed on the wheels of the car. Information from the sensors is transmitted to a computer, where it is compared with the standard parameter values for a given car brand, after which automatic wheel balancing occurs.
The 3D stand is capable of creating a three-dimensional model of a car using:
- special cameras;
- photocells located on the stand;
- processor with database.
A computer stand, as a rule, in addition to its main function, is capable of performing many other related tasks. The measurements taken on such a stand are as accurate as possible, and the adjustments fully comply with the manufacturer’s requirements.
The most advanced device for adjusting camber today is a computer stand
How to adjust wheel alignment
Of course, every driver knows that the most effective check of wheel alignment can only be carried out by qualified specialists in a special workshop at a specific stand. But if the driver does not want to spend extra money or other parts are expected to be replaced soon, after which the wheel alignment will be adjusted, then the wheel angle can be adjusted without using the services of specialists.
For rear-wheel drive cars, the wheels must be turned towards each other, i.e. it is necessary to ensure positive toe-in; for front-wheel drive vehicles, the opposite is true.
Periodicity
Few people know how often it is worth checking the wheel alignment. Oddly enough, if you are the owner of a domestic car, then you need to stop by a service station to check and adjust this parameter every 15-20 thousand km. In the case of a foreign model, this distance increases to 30 thousand km. However, unplanned situations also happen when it is simply necessary to check the wheel alignment angle.
Most often this happens after a minor accident, such as driving into a hole, during which the wheel can be deformed, causing camber and toe to be disrupted. Don’t forget about repair work on the car’s chassis, and changing the ground clearance can lead to a violation of the wheel alignment angle. Poor feedback from the steering wheel after exiting corners will tell you that you need to adjust the wheel alignment yourself.
Features of performing a VAZ 2107 wheel alignment yourself
The alignment of the VAZ 2107 must be checked regularly or after an accident, when the first signs of deviation from the norm appear.
It is better for the adjustment to be carried out by service specialists, but this procedure can be done with your own hands. The main thing is to do everything as carefully and carefully as possible.
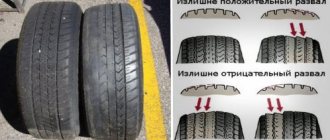
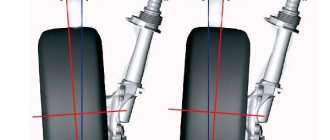
The described definition refers to the vertical angle of inclination of the VAZ 2107 wheel. If the top is tilted outward, there is positive camber. Accordingly, if the element is inclined inward, then such an angle has a “-” sign and is called negative camber.
The second part of the wording “wheel alignment” means that while the car is moving, alignment will occur. On front-wheel drive cars it is usually negative, and on rear-wheel drive cars it is positive. Such a device ensures that when moving, alignment occurs and the position is parallel.
When adjustment is necessary
Adjustment may be necessary if:
- the car pulls to the side on a flat road;
- deviations of wheel angles on the VAZ 2107 became visible;
- premature or uneven tire wear occurs;
- the increase in fuel consumption was higher;
- the suspension was damaged.
If the alignment does not correspond to the norm, then the car will constantly be “pulled” to one side. To determine this, just remove your hands from the steering wheel. If the adjustment is performed poorly, the car tires will wear out very quickly, and some suspension parts may also fail.
To perform a VAZ 2107 wheel alignment without the help of specialists with your own hands, you must have:
- thread with hooks at both ends;
- ordinary thread;
- bars 6 mm and 22 mm thick;
- Cobra type pliers;
- set of wrenches;
- calipers.
What is needed for successful adjustment
In order for the adjustment to be completed successfully, it is not at all necessary to use the services of a specialized service. Both negative camber and positive camber can be brought back to normal with your own hands.
Before carrying out the procedure, you should check the condition of the suspension. All its elements must be analyzed for backlash.
If they are present, wheel alignment on a VAZ 2107 car is problematic and sometimes simply impossible.
Experts recommend loading the car before adjusting the wheel alignment yourself. A weight of approximately 320 kg is required. To do this, you can use some weights or seat four people of average build. It is also recommended to refuel the car to the recommended level. This is also a load that must be taken into account.
The last stage of preparation is checking the VAZ 2107 tires. Before performing wheel alignment, you should make sure that the pressure is correct. Help is required to complete the entire procedure from checking to setting the required angle. It is not possible to carry out the entire process on your own.
Check and adjustment
First of all, you need to make sure that the steering wheel is level. After that, the front and rear bumpers of the VAZ 2107 must be pressed with a force of up to 50 kg.
Then from the top point of the wheel you need to pull the thread vertically down. Using a caliper, find out the distance from below and above. If the difference is, for example, 3 mm, then this means that the angle is approximately 30°.
In case of any deviations, a wheel alignment must be performed immediately.
If the car's wheel alignment is normal, then the angle is 0°5'+20' without load and 4°30'+20' with load. To check the alignment, you need to take a thread with hooks and attach it to the end of the rear wheel on one side, and to the front wheel on the other.
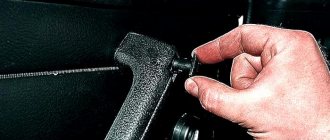
Now you need to place two bars with a total thickness of 28 mm under the thread. If the front slope does not touch at 2 points, then it is necessary to adjust the toe of the front wheels. To do this, you will need 2 wrenches, which are used to loosen the clamps on the tie rod couplings.
Afterwards, you can take pliers and move the clutch with your own hands until the thread touches the wheel at 2 points. The wheel alignment requires accuracy, so it is better to check all measurements several times.
You can adjust the wheel alignment if you perform a simple procedure with each wheel until the desired result is obtained. In order for the alignment to meet the norm, sometimes you have to spend a lot of time, so you need to be patient.
Stages of work
To make it easier to understand how to adjust wheel alignment yourself, let’s describe the entire algorithm of actions step by step. Before making the actual adjustment, you should find a flat area where the car will be installed. It is advisable that the work site be equipped with an observation deck. In addition, you will need a driving tool, as well as chalk and a cord with a plumb line.
Adjusting the camber angle
The first step is to place the car on a flat surface. Its wheels must be strictly straight. Next, using chalk, two marks (upper and lower points) are applied to the tires of the front axle wheels.
At the second stage, we take our cord with a plumb line and apply it to the wing so that it is in the same plane with our marks. Using a regular ruler, we measure the distance from the marks to the cord, but the ruler should be applied not to the tire, but to the disc itself (the outermost part of the rim).
Measurements are performed three times. After each such measurement, you need to roll the car forward a little so that the wheel makes a quarter of a full turn (90 degrees). We advise you to write down all measurements so that you can compare them later.
At the next stage, we lift the car and remove the wheels. Using two keys (19 mm), unscrew the bolts connecting the shock absorber strut bracket and the steering knuckle. By turning the latter, you can set the desired camber amount. Depending on the earlier measurements, the fist turns in one direction or the other. If your vehicle has front axle drive, then the normal value is a difference of within 1 mm. If the car has a rear axle drive, then a difference of up to 3 mm is considered the norm.
Installing toe-in
To adjust the toe, you will need an additional tool. Its name is telescopic ruler. Measurements must be taken strictly on a flat surface. Marks are drawn on the inside of the wheels at the front parts. Next, we place the ruler on these marks, and set the scale on it to the zero position. After this, you need to roll the car so that the wheel makes half a revolution and the ruler is in the rear.
We look at the readings and draw conclusions. If the initial value is greater than the final value, then the steering rods need to be lengthened; if less, the steering rods must be shortened. This can be done by unscrewing the control nut with a 27 mm wrench and adjusting the rod extension using a 24 mm wrench. With correct toe-in, the difference between the distances at the front and rear points should be no more than 1 mm.
To check the wheel alignment angles, you need the simplest tools - a ruler or caliper with a length of at least 100 mm, a plumb line (thread with a weight), a cord about 3 m long - and a horizontal platform. Since in most cases, after checking, it becomes necessary to adjust the angles, it is better to carry out this work on an overpass or inspection ditch so that the tool can be reached to the front axle of the car. The platforms on which the wheels will stand must be in the same plane and located horizontally. It should be noted that correct wheel alignment angles can be ensured only when the position of the wheels themselves is stable while driving. Therefore, the camber and toe are checked after first making sure that the front suspension and steering are in full working order, that there is no increased play in their moving joints - the front wheel hub bearings, the ball joints of the swivel struts, the tie rod ends, the bushings of the suspension arms and the axle of the pendulum arm. In addition, the condition of the rubber bushings of the rear suspension rods is monitored; tighten all mounting points of the front and rear suspensions, loading the car (320 kg). Then check the fastening and condition of the wheels and tires, bringing the pressure in them to normal (or 0.1 atm more than prescribed in the instructions).
Determination of wheel equal runout points
Only after all this do they begin to adjust the unloaded machine. Having hung the front wheels and turning them, we determine and mark with chalk diametrically opposite points of equal runout on the protruding parts of the tire sidewalls. Then we remove the decorative caps from the front wheels and install the steering wheel in a position corresponding to the linear movement of the car - its spoke should be located horizontally.
Wheel position when checking camber
Now we turn the front wheels so that the previously marked points of equal runout of the tires of both wheels are located vertically. By pressing on the bumper, we roll the car forward and backward to eliminate the influence of the supports on the position of the wheels.
Determination of wheel camber
: 1 - cross member; 2 — adjusting washers; 3 - lower lever; 4 - plumb line; 5 — wheel tire; 6 — upper lever; a and b - distances from the thread to the edges of the rim
Finally, you can begin to determine the camber angle of the wheels. To do this, we bring a plumb line to the top of the tire and measure with a ruler the distances “a” and “b” between its thread and the rim at the lower and upper points of the wheels. If the difference in the obtained values (b-a) is in the range from 1 to 5 mm, then the camber angle of the wheels is normal. A difference of less than 1 mm indicates that the angle is insufficient. To increase it, you should remove the required number of shims (washers) located between the axis of the lower suspension arm and the cross member, after first loosening the two fastening nuts. If the camber angle is excessive (b-a is more than 5 mm), washers must be added. Remember that the change in their total thickness should be the same under the front and under the rear bolt. Otherwise, the longitudinal angle through which the steering axis of the wheel tilts will be disrupted, and as a result the car will be pulled to the side.
Wheel toe determination
: 1 — points of equal runout; 2 - cord; 3 - ruler; c is the distance from the cord to the front part of the sidewall of the rear wheel tire.
After checking and adjusting the camber of the front wheels, we will determine their toe angle. To do this, we will install the car so that the previously marked points 1 of equal tire runout are located in a horizontal plane. The steering wheel, as before, is in the straight-ahead position. We invite an assistant and pull the cord with him at the level of the axles of the front and rear wheels, making sure that it touches points 1 on the front wheel without bending. In this position, use a ruler to measure the distance “c” from the cord (replacing in this case a beam of light or a stand ruler) to the front part of the sidewall of the rear wheel tire. Distance “c” should be 26-32 mm. In cases where “c” is outside the specified limits, we will determine the toe-in of the wheels on the other side of the car in the same way. If the sum of the “c” values measured on both sides of the car corresponds to twice the required value (52-64 mm), and the steering wheel spoke is at a slight angle (up to 15-20°) to the horizontal during straight-line movement of the car, toe-in may not be possible. regulate. If the value equal to “2c” does not fit within the specified limits or the spoke is located at a large angle, it is necessary to ensure the required toe-in by adjustment.
Adjusting the length of the outer tie rods
: 1 - tip; 2 - clamps; 3 - coupling; 4 - traction.
As is known from the instructions, this is achieved by rotating the threaded couplings on both steering rods after loosening their elastic clamps. The adjustment result will be more accurate if, before final fastening the clamps, the couplings are rotated in the direction of lengthening the outer rods. It happens that it is not possible to change the length of the rods. The reason is that the thread is dirty or the tip and rod rest against one another. Then you need to remove the couplings and clean the threads or shorten the tip and rods by the required amount. And one more piece of advice. When tightening the coupling clamps, do not use excessive force, and position the coupling joints so that the ends of the bolts do not point forward. This will prevent them from touching the lower suspension arm. Having completed the adjustment, let's check its results again. It should be borne in mind that changing the camber of the front wheels always causes a violation of their toe. Therefore, if there is no visible change in the camber, then it is enough to periodically check only the toe-in. By spending only 10-15 minutes on this, you can detect a malfunction in time and prevent its disastrous consequences. The recommended method for checking front wheel alignment and camber can be used on all passenger cars. The only difference is in the measured values, which for the VAZ-2101, “2102” and “2103” were found by calculation and confirmed by experiments. A two-year practical test of this method on Zhiguli cars showed that it gives good results.
Wheel alignment is an important characteristic of a car. If the alignment is incorrect, the car loses power, fuel consumption increases and overall tire wear accelerates. If the camber is set incorrectly, then the car’s controllability decreases, it begins to “pull” to the side, and the tires wear out very quickly, and only on one side. You can check the wheel alignment of the VAZ 2101-2107 yourself without any special equipment. You can adjust the toe yourself. To do the camber, you need to contact a specialized service station.
What is camber and toe
?
Camber is the deviation of the front wheels' turning axis from the vertical. The permissible values of this deviation are 0.5 degrees. If the camber is greater than this value, then the load on the wheel is distributed unevenly, but on one of its sides.
Toe is the angle between a pair of opposing wheels. It can also be characterized as the angle of deviation of the longitudinal plane of the wheel axis from the longitudinal axis of the car. The maximum permissible deviation from the norm is 0.5 degrees.
How to check wheel alignment
?
First of all, you need to check the tire pressure - it should be the same for each pair of wheels. You can check the wheel alignment on an unloaded car, but there may be a slight error in the measurements. The steering wheel must be level and all wheels must be parallel to the longitudinal axis of the vehicle.
In order to check the camber, you will need a thin thread with a weight, which must be used as a plumb line. We strengthen the thread on the wing so that it is located exactly opposite the middle of the wheel. Then you need to measure the distance between the thread and the top and bottom of the disk. If the difference in the obtained distances is 3 mm, then this corresponds to a deviation from the vertical of 0.5 degrees. If the difference is more than 3 mm, you should contact a specialized service station and have the alignment done.
Checking alignment is a little more difficult. To do this, you will need a thin thread with a metal hook made in such a way that it can be hooked onto the front of the front wheel. You need to attach the same hook to the other end of the thread so that it can be put on the back of the rear wheel. The thread should be tensioned so that it runs opposite the center of the wheel. Under the thread on the back of the rear tire you need to place a small block of 22 mm thickness. In this case, the thread on the front wheel should touch both sides of the tire - rear and front. Then, instead of the block, put another one, 28 mm thick. The thread on the rear wheel should not touch the front of the tire. If everything happens this way, then the toe is set within normal limits.
How to adjust toe
?
In order to adjust the toe-in on a VAZ 2101-2107, it is best to go to the inspection hole. The outer tie rod is secured with a coupling that is supported by two clamps. It is necessary to loosen the clamps and turn the coupling using a gas wrench in the desired direction. This way we will move the tie rod relative to the steering tip and turn the wheel a little. Now you need to check again whether the thread touches the tire in two positions (with bars of different thicknesses placed). If with a 22 mm bar the thread touches both sides of the tire, but with a 28 mm bar it does not, then the toe is set correctly and the clamps can be tightened. If this does not happen, we repeat the procedure with the coupling and achieve the desired result.
Finally, I would like to say that the wheel alignment needs to be checked periodically, and especially after work on the chassis. It must be remembered that every time the camber is adjusted, the toe must be adjusted. Therefore, you should not do toe-in if the camber angle is too large.
We do not always undertake to do wheel alignment on VAZ 2101-2107 (classic). In this case, this is rather an exception, since the chassis on this car was in very good condition. In all other cases, before sending such a car for wheel alignment, it is advisable to make sure that it is possible to unscrew and move the lower arms (the fastening bolts should not turn, and the threads on them should be intact).
We drive the car into the workshop. Check and equalize tire pressure. We attach measuring targets and cameras to the wheel rims. You can start measuring.
The most important step when measuring wheel alignment is the wheel runout compensation procedure. Using it, the stand can calculate the real plane of rotation of the wheel, taking into account errors from the curvature of the wheel rims. On modern 3D wheel alignment stands, to do this, it is enough to roll the car a quarter turn of the wheel back, and then forward.
So, the measurement is completed and the result is displayed on the stand screen. At first glance it looks scary, but everything can be fixed.
In general, there is nothing difficult in adjusting classic VAZs, provided that everything unscrews normally. The main problems include turning the bolts securing the lower arm axle (sometimes to solve this problem it is enough to slip a flat-head screwdriver under the head of the bolt) and sticking of the axle to the cross member (the manufacturer prohibits using a chisel to separate the lever axle from the cross member).
To adjust (on the front axle) caster and camber, it is necessary to loosen the nuts of the lower arm mounting axis, move the arm away with a mounting blade and add or remove adjusting washers (1). To adjust the toe (2), you need to loosen the nuts of the tie clamps and turn the split threaded bushing on the steering linkage rod.
For the convenience of calculating the required number of shims, the manufacturer generously shares a table in which the values are given for washers with a thickness of 0.8 mm.
We take repeated measurements. All values are within tolerance. The wheel alignment has been adjusted. We print the report and return the car to the owner.
When purchasing a car, every buyer should have a good understanding of the vehicle maintenance features. Knowing the main points, it is easier to ensure reliable operation of the car for a long period of time. By identifying a specific breakdown at an early stage, it will be possible to quickly eliminate it. Owners of Lada or other brands of cars must constantly monitor the condition of the car; in particular, it is important to be able to adjust the wheel alignment yourself on a VAZ 2107. Incorrect wheel alignment is not only rapid wear of the tires, it also significantly increases the risk of getting into an accident.
Self-adjustment
First, you need to place the car on a flat surface so that the wheels are straight. After this, you need to prepare all the tools and devices for the chosen method of performing the procedure.
Using thread
In this case, you will need a caliper, thread and weight. Stages of self-repair:
- The thread with a weight at one end should be secured so that it hangs down exactly along the central axis of the wheel. Next, using a caliper, you need to measure the distance from the thread to the end of the rim in the upper and lower directions. The difference between the measurements taken will be the collapse. If you don't have a caliper, a ruler will do, but the accuracy will be slightly lower. The difference in measurements of no more than 4 mm for a rear-wheel drive VAZ-2107 is normal. For a front-wheel drive car, the difference should be less than 1 mm.
- If adjustment is required, you need to loosen the steering knuckle fastenings and move it in the desired direction. After this, fasten all the nuts back.
- To check the installation, it is recommended to measure the difference in the same way, only with the wheels turned first in one direction and then in the other direction.
After this, you should proceed to adjust the convergence parameter:
- It is required to fasten the thread to the front and rear wheels so that it runs along the central axis, but horizontally. On the "seven" the fender liners will interfere, which must be removed before starting work.
- Since the manufacturer’s classic models almost all have a narrower rear wheel track, to make adjustments you need to place a prepared block 22 mm thick under the thread. Next, by turning the steering wheel, you need to make sure that the thread touches the front tire both front and rear. If everything works out, then no adjustment is required.
- Then you will need to carry out the same actions on the other side of the car. However, here it is already necessary to use both prepared bars: 22 and 6 mm at once. After this, you also need to check whether the thread is touching the front and rear parts of the wheel rim.
Using a block
Using a ruler
The second method is an alternative to thread tension. In this case, a special ruler is required, which must meet the following indicators:
- made of oval profile pipe;
- To make adjustments on different cars, the front shock absorber rods are welded to the device. All actions are performed with ordinary 10 mm keys;
- the second end of the ruler must be motionless;
- the second end has a special pin with a slot. This is done so that it does not jump off the wheel rim;
- the second side of this pin is movable.
Special ruler for adjustment The toe adjustment process itself goes like this:
- Ideally, the entire procedure should be carried out in a special pit. From the center of the wheel in both directions, two marks are made on the tires themselves.
- After this, you need to measure the distance along the rim of both wheels using the marks.
- The same procedure should be carried out with the front wheels. After this, it remains to determine the difference in indicators and install the wheels in accordance with the special values for the VAZ-2107.
↑ Angle of longitudinal inclination of the axis of rotation. What to do if it does not meet the norm?
↑ Front suspension:
- front wheel hub bearings;
- hub cap;
- adjusting nut;
- washer;
- steering knuckle axle;
- wheel hub;
- stuffing box;
- brake disk;
- ball pin of the upper support;
- rounded fist;
- ball pin protective cover;
- upper support bearing;
- upper suspension arm;
- upper support bearing housing;
- compression progress buffer;
- compression stroke buffer bracket;
- shock absorber support cup;
- shock absorber mounting pads;
- cushion washer;
- suspension spring insulating gasket;
- suspension spring upper support cup;
- upper suspension arm axis;
- inner bushing of the hinge;
- outer bushing of the hinge;
- rubber bushing of the hinge;
- support washer;
- adjusting washer;
- spacer washer;
- bracket for fastening the cross member to the body side member;
- front suspension cross member;
- stabilizer bar mounts;
- stabilizer bar cushion;
- stabilizer bar;
- body spar;
- lower arm axis;
- lower suspension arm;
- lower arm axle mounting bolts;
- suspension spring;
- stabilizer bar mounting clip;
- shock absorber;
- shock absorber mounting bolt;
- nut securing the shock absorber bracket to the suspension arm;
- bracket for attaching the shock absorber to the lower suspension arm;
- suspension spring lower support cup;
- lower support liner clip;
- lower support bearing housing;
- ball pin race insert;
- lower support bearing;
- ball pin;
- front wheel rotation limiter.
If, when checking, the angle value does not correspond to the data given above, change the number of adjusting washers 27 installed between the axis of the lower arm and the cross member.
Front suspension of VAZ-2107: replacement, repair, tuning, diagram and price
It must be said right away that the front suspension of the VAZ-2107 is of a double-wishbone type, as on most rear-wheel drive cars. From time to time it is necessary to monitor the technical condition of all suspension components, as this affects the normal handling of the car, as well as the comfort of the driver and passengers. Unfortunately, the quality of many components leaves much to be desired, so any element can unexpectedly fail. All work on checking and replacing suspension elements can be easily done independently. True, for diagnostics, for example, it is best if there is an inspection hole in the garage or an overpass.
Diagnostics of suspension condition
And now about how to carry out a technical inspection of a car, or rather its suspension, to identify faults. First of all, take a close look at the tires. They should wear evenly. If the rubber begins to wear off more on one side and less on the other, then the wheel alignment is clearly impaired. In addition, uneven tire wear indicates that there is a breakdown in the steering rods. Then what is needed is not repair of the front suspension of the VAZ-2107, but replacement of the steering.
Then you need to check the clearance in each of the front wheel hub bearings. This must be done with the car parked on a flat surface. You need to grab the wheel, or rather its upper part, and then sharply pull it towards you. If the play in the bearings is very large, then you will hear characteristic knocking sounds.
Please note that the front hub of the VAZ-2107 car has tapered bearings. They should have very little play
If adjusting the bearing does not help, you will need to replace it.
ABOUT WELDING AND STRAIGHTENING A DAMAGED BEAM
A beginner who decides to weld fatigue cracks in a garage does not have the proper equipment or skills to do this. The same applies to the process of straightening a deformed beam: by trying to straighten this part in the garage, as they say, “on the knee,” a novice car enthusiast can only deform the beam even more. And the service center has a special device for straightening beams, which allows you to restore the original shape of the beam literally down to the millimeter. We should not forget one more important point: after repairing the transverse beam, the driver will again have to adjust the camber and toe of the wheels. That is, you will have to go to the service center to the stand in any case.
Taking into account all of the above, the only rational repair option for a novice driver is to replace the cross beam. And the restoration of a damaged beam should only be carried out by specialists with the appropriate skills and equipment.
So, it is possible to replace the cross beam in a garage. The main thing is to carry out all the preparatory operations correctly and under no circumstances remove the beam without first hanging the engine. It is this mistake that novice drivers who are new to the design of the “seven” often make. Well, regarding the restoration and finishing of the beam, the driver will have to contact specialists.
Preparation and procedure for adjusting wheel alignment angles of VAZ 2107
Having a level area, balanced equal-sized wheels and tires with the required pressure are far from the only requirements
It is equally important to remove the decorative caps before starting the adjustment and ensure:
- lack of free movement in “running” units;
- permissible play in the steering;
- proper tightening of all connections in the chassis;
- serviceability of the depreciation system.
It is advisable to check and adjust the chassis by first placing 70 kg on each seat and 40 kg in the trunk. However, adjustments can also be made on an empty car. With the steering wheel in the direction of straight-line motion, you should remove all the play in the suspension by shaking each of the four bumpers several times.
The geometry specified by the manufacturer should be installed according to a strictly defined relationship: castor-wheel-alignment.
Self-adjustment of wheel alignment on a VAZ 2106
Lada cars of the sixth model do not cause any particular problems during repair work. Therefore, visiting a car service center every time there is a suspicion that the UCC has been violated can be a costly undertaking. In this regard, many owners of the car in question check and adjust the wheel angles themselves.
Preparatory work
To carry out adjustment work, the car will need to be driven onto a flat horizontal surface. If this is not possible, then to install the wheels horizontally, chocks are placed under them. Before diagnosing, you need to check:
- tire pressure;
- performance of dampers;
- steering play;
- clearance in wheel bearings and front suspension joints.
If suspension malfunctions are discovered during preparation, we will eliminate them. The machine must be equipped with wheels and tires of the same size. On a VAZ 2106, you need to set the tire pressure according to the following values: 1.6 kgf/cm² at the front and 1.9 kgf/cm² at the rear, which also depends on the tires installed.
Table: pressure in the wheels of the “six” depending on the tire size
| Tire size | Tire pressure MPa (kgf/cm²) | |
| front wheels | rear wheels | |
| 165/80R13 | 1.6 | 1.9 |
| 175/70R13 | 1.7 | 2.0 |
| 165/70R13 | 1.8 | 2.1 |
It is recommended to check and set the angles when loading the car: in the middle of the luggage compartment you need to place a load of 40 kg, and on each of the four seats 70 kg. The steering wheel must be set to the middle position, which will correspond to the linear movement of the car.
Castor adjustment
Castor is adjusted as follows:
- We make the device from a piece of metal 3 mm thick, in accordance with the given figure. We will use the device with a plumb line.
Camber adjustment
To measure and set the camber, you need to prepare the following tools:
- key to 19;
- adjusting washers;
- plumb line (thread with a load);
- ruler.
We perform the procedure as follows:
- We swing the front and back of the car by the bumper several times.
- We hang the plumb line, fixing it at the top point of the wheel or on the wing.
- Using a ruler, determine the distance between the lace and the disk in the upper (a) and lower (b) parts.
Toe adjustment
Toe is installed using the following materials and tools:
We make hooks from wire and tie a thread to them. The rest of the procedure consists of the following steps:
- We pull the thread so that on the front wheel it touches points 1 (at the front we fix the lace with a hook on the tread), and an assistant holds it at the back.
Video: do-it-yourself wheel alignment using the example of a VAZ 2121
Classic Zhiguli cars are not difficult to repair and maintain. You can set the angles of the front wheels using improvised means by reading the step-by-step instructions. Timely adjustment will allow you to avoid a possible accident, get rid of premature tire wear and ensure comfortable driving.
Source
The procedure for adjusting wheel alignment using a ruler
Another way of adjustment is using a special ruler.
Let's look at the device of this line.
| The ruler is made of an oval pipe. |
| To adjust for different cars in this line, the front shock absorber rods are welded. Adjustment is made using keys 10. |
| The other end is motionless. |
| There is a pin with a slot installed on it so that it does not jump off the disk. |
| On the other hand, the pin is movable. |
Toe adjustment is performed as follows.
| It is best to perform the adjustment operation in a pit. From the center of the wheel on both sides of the tires, make two marks on both wheels. |
| Then measure the distance with a ruler along the rear marks on the rim of one and the other wheel |
| The same is done with the front marks. They identify the difference and set the wheels to the values required for your car brand. |
Don't forget to make a 0.5mm thread allowance.
Operations that the driver can perform independently
The only operation that drivers cannot handle on their own is fine adjustment of the castor. If, after the accident, the body geometry remains unchanged, then it is possible to make symptomatic adjustment of the castor. If your car has completely stopped listening to you, it skids to the side, it turns into turns with a delay, in this case it is worth increasing the caster by 20 or 40 minutes.
It also happens that when accelerating quite sharply, the steering column is torn out of your hands, then the castor is reduced. It is also necessary to remember that as this indicator increases, wheel camber may also increase. If the body is too damaged, dramatic changes in the geometry of the body will be observed, then in any case it will be pointless to adjust the suspension. This will take a lot of time, but the result may completely upset you. Experts recommend checking the indicators even after minor accidents associated with changes in body geometry.
In this article, we looked at how to adjust wheel alignment using a thread and a ruler. These are the two most popular ways to adjust wheel alignment in garage conditions.
Basic Concepts
If we consider the concept of wheel alignment, it means how the wheel of a car will be installed vertically. If the upper edge of the wheel is pointed outward, this fact means that the camber is positive. If the edge of the wheel goes inward, then the camber is negative, and it is designated accordingly: “-”.
If the camber is adjusted incorrectly, and to be precise, when the camber of only the front wheel is adjusted, the car can drift to the side while moving; this is determined quite simply - the driver takes his hands off the steering wheel, and the car “steers away”.
As for toe-in, it shows how the wheels can converge with each other relative to the road. If we consider cars with rear-wheel drive, then their wheels are placed at a positive angle, but on front-wheel drive the angle is determined by a negative indicator. This adjustment is necessary so that at the time of movement and during further driving the wheels can be aligned and continue to remain in the same position. Of course, incorrect toe adjustment quickly wears out tires and other elements of the car, so the motorist must pay close attention to his car and promptly adjust the wheel alignment himself or with the help of specialists.
Video: consequences of incorrect wheel alignment
Why adjustment is needed
It is recommended to check and adjust wheel alignment for domestically produced cars every 10–15 thousand km. mileage This is due to the fact that even with a serviceable suspension, over such a mileage on roads with poor surface quality, the parameters can change quite a lot, and this will affect the handling. One of the common reasons why UUCs go astray is when a wheel falls into a hole at speed. Therefore, even an unscheduled inspection may be required. In addition, the procedure is necessary in the following cases:
- if steering tips, levers or silent blocks have been changed;
- in case of change in standard clearance;
- when the car is pulled to the side;
- if the tires are heavily worn;
- when the steering wheel does not return on its own after turning.
What is camber
Camber is the angle of inclination of the wheels relative to the road surface. The parameter can be negative or positive. If the upper part of the wheel is tilted toward the center of the car, then the angle takes a negative value, and if it is tilted outward, it becomes positive. If the parameter differs greatly from the factory values, the tires will wear out quickly.
What is toe-in
Toe-in refers to the difference in distances between the front and rear points of the front wheels. The parameter is measured in millimeters or degrees/minutes, and can also be positive or negative. With a positive value, the front parts of the wheels are closer to each other than the rear ones, and with a negative value, vice versa. If the wheels are parallel to each other, the toe is considered zero.
Video: when to do a wheel alignment
What is caster
Caster (caster) is usually called the angle at which the axis of rotation of the wheel is tilted. Correct adjustment of the parameter ensures the stabilization of the wheels while the machine is moving in a straight line.
Table: angles of installation of the front wheels on the sixth model Zhiguli
| Adjustable Parameter | Angle value (values with vehicle without load) |
| caster angle | 4°+30′ (3°+30′) |
| camber angle | 0°30’+20′ (0°5’+20′) |
| toe angle | 2–4 (3–5) mm |
How does an incorrectly installed wheel alignment manifest itself?
There are not so many symptoms indicating a violation of the wheel angles and they usually boil down to a lack of vehicle stability, incorrect steering wheel position or excessive tire wear.
Road instability
If the car behaves unstable when driving in a straight line (pulls to the side or “floats” when a wheel hits a pothole), attention should be paid to the following points:
- Check to see if the front tires affect traction even if new tires are installed. To do this, swap the wheels of the front axle. If the vehicle veers in the other direction, then the problem is with the tires. The problem in this case is due to the quality of the rubber.
- Is the rear axle beam of the VAZ Six damaged?
Uneven steering wheel position when driving in a straight line
The steering wheel may not be level for several reasons:
- There is significant play in the steering mechanism, which is possible both due to problems with the steering gear, and with the steering linkage, pendulum or other elements.
Increased tire wear
Tire tread can quickly wear out when the wheels are unbalanced or when the camber and toe angles are incorrectly adjusted. Therefore, first of all, you need to check and, if necessary, balance. As for the UUK, because the tires are worn out, it is sometimes possible to determine which suspension parameters need adjustment. If the camber angle on a VAZ 2106 is set incorrectly, the tire will have excessive wear on the outside or inside. If the camber is too positive, the outer part of the rubber will wear out more. With negative camber - internal. If the toe is set incorrectly, the tire wears unevenly, which leads to the appearance of burrs (herringbone) on it, which are easily felt by hand. If you run your hand along the tread from the outside to the inside, you will feel burrs, then the toe angle is insufficient, and if from the inside to the outside, it is too large. It is possible to more accurately determine whether the UUC values have gone astray or not only during diagnostics.
Castor angle: measurement and adjustment
corner
angleThe angle between the vertical and the axis of rotation of the wheel when turning the steering wheel, which ensures automatic alignment of the tires due to movement, is 4º±30′ for a loaded car and 3º±30′ for an unloaded car. The angle is measured using specialized templates.
Important:
- any adjustment of the caster angle on a VAZ 2107 with your own hands affects the camber and does not actually change the toe-in of the wheels;
- the error in the caster angle between the right and left sides is no more than 30′;
- U-shaped washers must be mounted with the groove down.
The parameter is adjusted by rearranging the washers on the bolts that fix the lower arm relative to its axis (located at the ends of the axis). The angle is increased by installing the washer on the bolt located closer to the interior.
How to adjust wheel alignment on a VAZ 2107 car with your own hands: key points
Adjusting the wheel position parameters is difficult to do on your own, so it is better to use the services of a good assistant. But even if you couldn’t find one, then don’t despair - by slowly acting on the points listed, you will be able to implement the setup operations in full.
Setting the Camber Angle
To adjust the camber or toe of the front wheels on a Lada with your own hands, it is enough to perform several simple operations. To measure actual values, take a plumb line and a caliper. Further actions are carried out according to the following scheme:
- Place a plumb line at the top of the tire sidewall.
- Using a caliper, measure the distance from the disk rim to the string at the lower and upper points.
- Determine the difference between the results obtained. For example, if the difference between the numbers at the lower and upper points is 3 mm, then this indicates that the camber angle is 30°.
The technology for changing the camber angle consists of installing or removing washers on two bolts, which are screwed radially into the axis of the lower arm. By adding or removing a 0.5mm thick washer, the adjustable angle will change to 7-9′
It is important to know that the castor angle remains unchanged
Setting the toe angle
The parameter represents the deviation factor of the wheel rotation vector from the gradient of rectilinear motion. In numbers, this gap is expressed as 2-4 mm with a fully loaded car and 3-5 mm with an empty one. These indicators are determined using twine with two hooks:
- Secure the steering column in a straight direction.
- Install and tighten the string, securing the hooks to the edges of the inner rim of the front and rear discs at the level of their axes.
- Place a 28mm thick piece of wood between the string and the side of the rear wheel that is closest to the front axle. In this case, there should be a gap of 2 mm at both points of the front tire at the level of the string.
If the condition is not met, you need to adjust the camber and toe angles on a VAZ 2107 car yourself by adjusting the steering linkage couplings:
- Loosen the fixing units on the traction coupling using 13mm wrenches.
- Unscrew or tighten the coupling to the required amount.
- Tighten the end ties.
Let's sum it up
You need to set the correct front suspension geometry on a level surface using the following tools:
- Template for determining the castor angle.
- Plumb line and string with hooks.
- Caliper or ruler.
- Bar 28 mm thick.
- Set of keys.
Having adjusted the caster by rearranging the washers, you can begin adjusting the angles of the front wheels in the following sequence: adjusting the camber by adding/removing washers and adjusting the toe by rotating the steering linkages.
On VAZ cars of the “classic” family 2101-2107, an axle is installed on the rear axle, which has no adjustments, and on the front axle there is a double-wishbone independent suspension, which has the maximum number of possible adjustments. Wheel toe-in, camber and longitudinal inclination of the king pin (caster) are adjusted.