Sooner or later, light sources burn out in any car. And Renault Logan 2 lamps are no exception. Depending on the availability of skills, each driver can go to a service station or correct the situation on their own . This article will discuss how to replace Renault Logan 2 light bulbs on your own .
Lamps used on Renault Logan 2nd generation
| Lamp | Type | Power | |
| Front optics | Low beam lamp | H7 | 55 |
| high beam | H1 | 55 | |
| turn indicator | PY21W | 21 | |
| size daytime running lights | W21/5W | 21/5 | |
| PTF | H16LL | 19 | |
| Side turn signal lamp | W5W | 5 | |
| Lamp (rear block headlight) | brake light lamp | P21/5W | 21/5 |
| PTF | P21W | 21 | |
| reverse light | P21W | 21 | |
| turn signal | PY21W | 21 | |
| Additional brake signal | W16W | 16 | |
| Room lighting | W5W | 5 | |
| Interior and trunk lamps | trunk light | W5W | 5 |
| lampshade | W5W | 5 | |
| individual lighting | W5W | 5 | |
| glove compartment lamp | W5W | 5 | |
We study the icons on the dashboard of Renault Logan 2
Where and what kind of light bulbs are located?
Before starting this operation, it is necessary to determine which light bulbs need to be prepared for replacement. All necessary information is given in the table:
Currently reading: Tires and wheels for Renault Logan and Megane, choosing the size and the best model
| Installation location | Name | Brand | Characteristics | Appearance |
| Brake and side lights | Two-pin incandescent lamp with a metal base. When purchasing, please note that the antennae should be located in the same row (without an angle between them), but at different heights. | P21/5W | 12V 21/5W | |
| Rear turn signals | Single-pin incandescent lamp with metal base | PY21W | 12V 21W | |
| Reversing light | Single-pin incandescent lamp with metal base | P21W | 12V 21W | |
| Rear fog lamp | Single-pin incandescent lamp with metal base | P21W | 12V 21W |
Having selected consumables, you can begin replacement, which begins with dismantling the rear light.
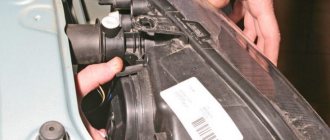
Replacing lamps in the front headlight unit of Logan 2
Do not touch the bulbs when replacing Renault Logan 2 light bulbs, as they are exposed to high temperatures. And any dirt that gets on the glass will leave black marks.
As a result, this will end first with a local increase in the temperature of the flask, and then with its destruction. While working, you need to hold the flask with clean gloves or lint-free wipes . In case of accidental contact, marks should be immediately wiped off with microfiber .
Front headlight bulbs Renault Logan 2 (link)
Changing low beam bulbs
Replacing the low beam on a Renault Logan 2 is not such a difficult task to do on your own.
To do this you need :
- Open the hood and disconnect the wiring minus terminals Battery
Remove the negative terminal of the battery. - Remove the rubber plug from the headlight.
Remove the cover from the headlight housing - Using little effort, remove the light source from the reflector.
By pulling, disconnect the wire block. - Remove the lamp from the terminal block.
Removing the light bulb from the headlight - Insert a new one and fix it in the reflector and connect the wiring harness block.
We install the new molded part up and press it into the headlight unit
https://autonissancar.ru/renault/logan/doveli-reno-logan-ne-zavoditsya
High beam
Replacing a lamp in a 2nd generation Renault Logan is also easy .
Necessary:
- Take off rubber cap from the headlight.
Remove the headlight housing cover - Disconnect the terminal block from the lamp, and with it spring retainer.
By pulling, disconnect the wire block. We press on the wire holder and move it down, disengaging it from the stops. - Then remove the burnt out element from the reflector and replace it with a new one, securing it with a spring clip.
Install the new one in the reverse order
https://autonissancar.ru/renault/logan/logan-1/kakie-i-kak-zamenit-lampy-lampochki-reno-logan-1
Turn signal and marker
To replace the bulbs in the Logan 2 turn signals, you need to do the following :
- Crank cartridge light bulbs in the direction "counter-clockwise" and then remove the headlight unit from the housing.
Turn counterclockwise until the holders release - Then, with a little effort, press in part into the cartridge, also crank in the direction "counter-clockwise" and remove from the cartridge.
Removing the light bulb socket from the headlight - Next, perform all the steps in reverse order: place the new lamp in the socket, and return it to the headlight unit.
Install in reverse order
Regarding the replacement Logan 2 dimensions
- Need to remove the rubber plug on the headlight.
Remove the cover from the headlight housing - Pull out the cartridge with the illuminator from the housing, and then apply a slight force to pull out the lighting, despite the resistance of the fasteners.
Turn counterclockwise until the holders are released and remove the lamp socket from the headlamp. - As with the turn signals, end up putting everything back in place in the reverse order of removal.
Install the light bulb in the reverse order.
https://autonissancar.ru/renault/logan/proveryaem-vybiraem-i-menyaem-akkumulyator-na-reno-logan
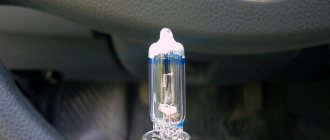
Lamp type h4
Lamps with h4 socket have a two-wire design and can simultaneously perform two functions: low beam and high beam. This versatility saves space in the Renault Logan headlight, providing optimal balance and customization of both functions. However, there are also disadvantages:
- the price of x4 lamps is higher than the cost of other samples;
- if one stream fails, the second continues to work normally, but the entire lamp will have to be replaced;
- The service life of double-strand lamps is shorter than that of single-core lamps.
The main advantage of x4 light bulbs is ease of replacement. It is much easier to navigate the design of the headlight, and there is less chance of mistakenly removing the wrong lamp if there is only one. In addition, you need 2 units instead of 4, which is cheaper even taking into account the difference in the cost of the h7 and h4 devices.
Which lamp is suitable for the first generation Logan
The standard lamps in the headlight optics of the first generation Logan Renault are h4 halogen lamps. Device power 55/60 W (low/high beam). Used for cars produced in 2004-2013 (pre-styling models). Halogen lamps are factory installed, although there are other types of h4 lamps suitable for installation in a Logan headlamp.
Interesting! However, practice shows that of all possible options, the factory-made one is optimal - halogen designs have the optimal combination of price and quality, provide sufficient strength and operating conditions.
Which one is suitable for the second generation?
On the second generation Logan, high and low beam are provided by two separate h7 lamps. This allows you to optimize the operation of lighting devices, since a situation often arises when, due to a burnt-out filament, the user has to get rid of a working lamp and a semi-finished lamp. There are also downsides to using two blocks - they increase the cost of purchasing lamps and increase heating inside the headlight block housing.
The size of the case itself also had to be increased, but not by much. The factory model is a halogen design, demonstrating the optimal combination of quality and properties. It is noteworthy that it is impossible to change the type of lighting fixtures without consequences: according to the current rules, changing the type of lamp is considered unauthorized intervention in the design of the car and entails penalties.
Choosing a manufacturer
The list of manufacturers of automotive lighting equipment is long; compiling it entirely is extremely difficult and impractical. It is easier to identify several well-known companies that provide the market with exemplary and reference models with various distinctive characteristics and capabilities. Among the most popular companies:
- Philips;
- Osram;
- Bosch;
- Electrical general;
- Koito;
- MTF.
Changing PTF light sources
PTF are fog lights . And in order to replace the lighting sources in them, in the case of the 2nd generation Renault Logan, you will have to perform the following sequence of actions :
- Having opened the headlight, crank just a lamp by a third in the direction "counter-clockwise" and release it from the reflector.
1. Turn the lamp a third of a turn counterclockwise and remove it from the reflector. 2. Press out the fastening clamp of the wiring harness block, disconnect the fog light block and remove the light source. - Press out the clamp securing the wiring harness block .
- Separate the block from the fog light bulb and remove it.
- Install the new lighting element in reverse order.
Replacing rear side lights
- Unscrew the upper and lower fasteners with a screwdriver. Please note that when replacing the side light bulbs on a Logan II (2016), instead of self-tapping screws, plastic clips are installed; they need to be unscrewed by hand
- Removing the headlight
- We replace a burnt out light bulb. To do this, you need to put a little pressure on the light bulb and turn it slightly. We take out the worn lamp and insert a new one (pressed and turned)
- Putting the headlight in place
- When servicing Renault Logan, lamp replacement should be carried out immediately from both sides
Check out the video tutorial on how to replace a rear light bulb:
Light Source Recommendations
Some experts recommend using a diode analogue instead of the classic W5W light bulb. There are side light bulbs with 13 diodes. This is an energy efficient lighting option.
These two types of light bulbs are approximately equivalent in cost, but diode light is stronger and uses slightly less electricity.
I hope it has become clear to you how to replace a light bulb in Logan in the front headlight and on the rear side.
For 15 years I have been repairing various types of cars, including brands such as VAZ, UAZ, Chevrolet, Mazda, Kia and many others. Everything related to the gearbox, engine or chassis. You can write me your question below in the comments and I will try to answer it in detail.
Turn signal on the front fender
The operation to replace the front turn signals on a 2nd generation Logan looks like this :
Move the pointer forward until the stop is released
- Carefully promote lamp forward And pull out it from the hole in which it is located.
We remove it from the wing. - Cartridge necessary to turn at right angles in the direction "counter-clockwise" and then pull the part out of the housing.
We turn the socket counterclockwise and remove it together with the lamp from the pointer housing. - Release the light source and repeat all steps in reverse order.
We remove it from the cartridge.
We install everything in reverse order. https://autonissancar.ru/renault/logan/reglament-to-reno-logan
Possible lighting malfunctions when braking
Continuing to drive when the Renault Logan brake light does not light up when braking, then you will expose yourself and other road users to danger, so periodic monitoring of the serviceability of these devices is necessary. Among the types of problems, the most common problems are:
- When braking, one light does not light up;
- When turned on, both brake lights do not light up;
- The additional brake light does not work.
Since the operation of these devices is directly related to the vehicle’s electrical network, first of all they pay attention to its condition. It is necessary to check the serviceability of fuse F3, which is responsible for the power supply circuit for the brake lamps. The fuse circuit is installed in the interior block on the left side of the dashboard.
You can check it by installing a known-good fuse or using a measuring device such as a multimeter or tester. If replacing it has not made any changes and the flashlight still does not work, then the search must be continued. The next step should be to check the condition of the machine's electrical wiring for broken wires.
Particular attention should be paid to the places of its bends, as the most possible places of breakage.
The next element that you should pay attention to should be the stop lamp switch for the Renault Logan car. It is installed on a bracket with pedals. For better convenience when checking, it is best to remove the switch from the pedal bracket. This can be done this way:
- It is necessary to disconnect the battery terminal, since the circuit of this circuit and the sensor are always energized;
- The next step is to remove the connector with wires;
- To remove the sensor from the installation socket, you need to rotate it 90 degrees around its axis and lightly pull it towards you. The device will be in your hands.
You can check the sensor with a tester in resistance measurement mode, or by connecting a known good one. To do this, connect the terminals of the measuring device to the connector of the switch and press and release its protruding rod several times by hand. The device must show serviceability, otherwise it needs to be replaced.
If the sensor has confirmed its serviceability, and the inspector is convinced that it is working, then you need to check the supply of on-board network voltage to it. To do this, replace the battery terminal and use the device to check its presence at the connector with wires. When there is on-board voltage at the sensor connector, you need to proceed to checking the rear lights and their lamps. Replacing it with a new sensor is carried out in the reverse order to its removal.
Replacing headlight bulbs for Logan 2
It is noteworthy that to replace the light sources in the rear light of Renault Logan 2, no special tools are required, but you need to remove the light itself. All you need :
- Disconnect the wire from the negative terminal of the battery and then open the trunk.
- Crank so-called wing bolt attaching the light to the 2nd generation Logan body, and divert the light source to the length of the connected wiring harness.
Unscrew the wing bolt A securing the rear light to the body and move the light away from the body to the length of the attached wiring harness, removing clamp B from the hole in the body. - Then remove the retainer from the hole in the Renault body.
- Separate the bracket on the flashlight body, from the body holder.
Disconnect the bracket on the lamp body from the holder on the body and the wiring harness block by pressing its lock, and remove the lamp. - Then separate the harness block from the rear light by pressing its lock.
- Now you can remove the light source.
Installation of this element, as in all other cases, proceeds in the reverse order.
Stop light, turn signal
To replace the lamp in this case, you need :
- Separate the “negative” wiring from the Renault Logan 2 battery and remove the rear light .
- After release a few fasteners and remove the back cover along with the cartridges.
Release the five holders and remove the back cover of the flashlight - Having identified a faulty light bulb, you need to apply a little force, lightly press at her, crank her in the direction "counter-clockwise", remove and replace with a working one.
By pressing, turn counterclockwise and remove the faulty one.
When installing a new one, it is important to make sure that it is locked into the cartridge until it stops.
Installing a radio in Renault Logan 2
On a note!
The low and high beam headlights installed in the car are halogen. This means that it is strictly not recommended to touch their flasks before installation and operation.
A reasonable question arises: why?! And we will answer you! The grease stains your fingers leave on everything they touch, and in this case on a halogen lamp, have a very negative impact on the life of the lamp itself. Everyone knows that such lighting devices have a very high temperature during operation, so if you accidentally touch the light bulb with your hands, you can be sure that instead of this contact, black soot will appear, which will subsequently fade and turn black, heating the bulb, which can subsequently lead to to its swelling and destruction.
Therefore, installation work should be carried out with gloves, and if this is not possible, make sure that the lamp is clean before installing it.
Now you yourself know that in such a matter as replacing a light bulb, there is nothing complicated and the whole process from the beginning to the completion of all the work took 15-20 minutes, which allows you to carry it out simply in the parking lot of your home.
Number plate illumination lamp
To replace the light bulb in the license plate light of the 2nd generation Renault Logan, you will need to arm yourself with a flat-head screwdriver.
The manipulations are as follows:
- Carefully pry off the edge of the flashlight body screwdriver and remove the light source from the socket.
Using a thin slotted screwdriver, press the lock and remove the license plate light from the bumper. - Carefully remove the cartridge and then extract from it baseless lamp.
Turn the socket counterclockwise until the latches are released and disconnect it from the flashlight. - Install new, and do everything in reverse order.
By pulling, we remove the lamp from the socket. Install the new lamp in reverse order.
What malfunctions may be present?
It is not recommended to continue driving in a car whose brake light has stopped lighting up. This breakdown can provoke a dangerous situation on the road. The performance of lighting devices requires periodic checks and if malfunctions are detected, immediate elimination will be required.
Among the most common breakdowns are the following.
- One of the brake lights stopped showing signs of glow.
- Both elements do not light up when the brake pedal is activated.
- The additional brake light lamp does not function.
Due to the fact that these elements belong to the on-board vehicle network, the first action will be to check its condition. We check the integrity of the fuse marked F3, which is assigned the function of providing power to the brake lamps. This fuse link is located in a block located in the cabin on the left side of the Renault Logan front panel.
The power withstood by the fuse element is stated at 10 Amps. Indirect confirmation of the failure of the insert is the lack of functionality of both lamps. The check is simple - just replace the suspected fuse with a known good element. Alternatively, you can use a multi-tester to monitor circuit integrity.
If the above actions do not produce results, then the continuation of the troubleshooting will be to examine the supply cable network for a break. Among the priority areas for increased attention are areas of wiring bends.
We continue the search. Let's look at the switch in the brake light circuit. This unit is located in the pedal module and secured with a bracket. To ensure convenient control, it is recommended to dismantle this element. This can be done using the following algorithm:
- disconnect the terminal from the battery, since the circuitry of this section of the on-board network is under continuous voltage supply;
- disconnect the supply wire connector;
- To remove the element from the mounting socket, turn it at a 90-degree angle and, using slight manual force, pull it towards you. In a couple of seconds the design will be in your hands.
To check the sensor, we measure its resistance using a tester. You can connect a new analogue. To measure, we connect the leads of the testing device to the contacts of the sensor and at the same time carry out several periodic presses on its rod. If the device registers a malfunction, then the additional brake light lamp must be replaced.
When the sensor turns out to be working and the inspector is convinced of this fact, the next step is to check the power supply to this element through the adjacent section of the Renault Logan on-board network. To implement this action, we return the terminal to the battery terminal and use a tester to measure the presence of voltage at the sensor terminals.
Test drive Renault Captur video
Renault Sandero air filter
Engine Renault Sandero
Trunk lighting
To replace, you will need a flathead screwdriver and a small plastic spatula.
execution algorithm is as follows :
- Pry off the edge of the lampshade Logan 2, located in the rear parcel shelf amplifier, and remove it from the slot.
We move the lampshade, disengaging the stop - Separate the harness block postings.
- Carefully pry the lock with a screwdriver diffuser and remove the spare part from the lampshade.
- Remove the faulty lamp and replace it with a new one.
- Perform the manipulations in the reverse order of removal.
Valve adjustment Renault Logan (K7M)
Connection diagram
To connect the reverse lamp, a switch is installed at the base of the gear lever. When reverse gear is engaged, its contact closes and current flows through fuse F15 and through the control unit to the rear lights.
Reversing light switching diagram
Turn signals on Renault Logan operate through an electrical control unit. Current is supplied through fuse F29 to the steering column switch, which selects which lamp to supply power pulses to: left or right. Fuse F7 is used to supply current to the alarm, and a special switch is installed to turn it on.
Diagram for switching on direction indicators and hazard warning lights
There is a switch near the brake pedal that turns on the brake lights. Its contacts close when the pedal is pressed, creating a circuit for current to flow through fuse F7 to the lamps.
Brake signal switching circuit
Changing light sources in the cabin
To perform this operation on Renault Logan 2, you need, as in the previous case, a flat screwdriver and plastic spatula
Necessary:
- Carefully pry off the edge of the diffuser lamps.
- Then apply a little force remove the spare part.
- Replace the faulty part with a working one and return the diffuser to its place.
Do-it-yourself Logan starter replacement
Features of choice
To choose a lamp for your car, you need to take into account the recommendations of the manufacturer, which are specified in the instructions for the vehicle. It is important to carefully read them when deciding to purchase and replace the lamp yourself. Besides:
- study the alphabetic, digital and other indices indicated directly on the lighting device;
- take into account not only the car model, but also the year of manufacture and engine size;
- select a lamp according to the type of element indicated on the lamp bulb or base, as well as the power.
When choosing a high-quality and inexpensive Renault Logan light bulb, pay attention to the parameters, otherwise if you install an unsuitable device, it will immediately burn out.
Do you doubt the correctness of your choice? Then contact our online store to get a free specialist consultation on all your questions. We will quickly and accurately select an identical lighting fixture that will meet the requirements of the manufacturer.
Our company has been professionally selling original and analog lamps for Renault Logan for a long time, which meet the highest requirements of European standards.
To order, call 8-911-199-89-79 or simply leave a request on the website.
Expert opinion
It-Technology, Electrical power and electronics specialist
Ask questions to the “Specialist for modernization of energy generation systems”
The final version of a simple circuit As a rule, models of daytime running lights in the price category of 5,000 rubles are produced under the brand of well-known foreign brands and are equipped with an intelligent device control module. Ask, I'm in touch!
Replacement of rear marker
The taillights of Renault Logan I and Renault Logan II have almost the same design. The only difference is that in the first generation the flashlight is secured using screws for a Phillips screwdriver (the second generation uses screw plastic wing nuts) and main board latches 5, not 2.
Let's first consider the process of replacing tail lamps (also known as brake light lamps) with Renault Logan II, since this modification is more common in Russia. First of all, unscrew the two plastic nuts securing the flashlight. They are made in the form of lambs, and a key is not needed.
Location of the rear light latches in Renault Logan II
Now we remove the lamp: swing it and carefully pull it back along the direction of the car.
Disconnect the power connector by pressing the latch.
Place the device face down on a soft surface and remove the soft sealing gasket.
The board with the light bulbs is secured using two latches. We squeeze them out and remove the board.
I marked the lamp responsible for the dimensions with an arrow. It can be removed by lightly pressing and turning counterclockwise until it stops. We replace the lamp with a working one, install the board in place, connect the power connector, and attach the headlight.
With Renault Logan I the actions are somewhat different. First of all, we remove the part of the trunk upholstery opposite the lamp. Under the upholstery we will see two self-tapping screws located in the same place where the wing nuts are located in the Renault Logan II (see photo above). We unscrew them with a Phillips screwdriver and remove the lamp. The remaining steps for replacing side light bulbs are similar. The only thing is that the lamp board in Logan I can be mounted on either two or five latches - depending on the modification of the lamp.
That seems to be all about replacing side light bulbs in a Renault Logan car. If you read the article carefully, you can easily cope with this task yourself, spending no more than 5 minutes on the replacement.
Comparison of the best low and high beam lamps for Renault Logan
For a more substantive and visual comparison of the parameters of car lamps used for installation in Renault Logan headlights, let’s create a table:
| Renault Logan | ||
| Model | Base | Peculiarities |
| Philips H4 3200K Vision +30% | h4 | Increased brightness |
| Osram H4 Night Breaker Unlimited +110% | h4 | Optimally selected color temperature of the light flux |
| General Electric H4 Megalight Ultra +90 | h4 | Good visibility in snow, rain or fog conditions |
| Bosch Xenon Blue | h4 | Clear visibility of details, cool blue luminous flux |
| Renault Logan II | ||
| Model | Base | Peculiarities |
| Philips X-treme Vision | h7 | Increased light brightness, good readability of details on the sides of the roadway |
| Osram H7 Original | h7 | Longest service life |
| Bosch Pure Light H7 | h7 | The most affordable prices |
| Hella H7 | h7 | Optimal combination of parameters |
This table should not be considered as a set of only possible options. These are just some of the most popular and in-demand lamps.
Rear optics tuning
Today, the retail chain offers chrome or black analogues of classic taillights. They install LEDs and bi-xenon lamps. In addition, they use different linings that can give the car an original look.
Or you can do headlight tuning yourself and without spending a lot of money. These are the taillights anyone can make for their Renault Logan 2 if they have the desire and the hands in place.
Self-tuned headlights
LEDs can be installed along this dividing line.
Determining where to install LEDs
The LEDs are connected in series in groups of 4, since each of them is powered by a voltage of 3 V. It must be remembered that a minus is connected to the short legs, and a plus to the long legs.
Connecting LEDs
Part of the partition will have to be broken using pliers. If you do not do this, you will not get a smoothly curved contour.
Removing the interfering partition
Using a soldering iron, holes are burned in the flashlight body into which LEDs are installed. To secure them, hot melt adhesive is used, for example, from FIX PRICE.
Tool used
This is what the headlight looks like when it's off
View of the headlight with LEDs installed but not turned on
And like this after turning on the LEDs
With the LEDs turned on, the headlight looks like this
Of course, the work requires diligence, perseverance and attention. But the result is worth it.
The total costs for everything look like this:
- 100 pieces. LEDs - 60 rub.
- Hot-melt adhesive from fixed price - 50 rubles.
- 4 m of two-core wire with a cross section of 0.5 - 50 rubles.
TOTAL - 160 rub.
Replacing a burnt-out light bulb, as well as tuning a headlight, can be done by every driver. This does not require any special knowledge or equipment: just follow our recommendations. To ensure that the work done is of high quality, you must use only lamps recommended by the car manufacturer. If these requirements are met, your car will delight your eyes for a long time and surprise surrounding motorists.