Many VAZ-2114 owners try their best to improve the appearance of their car. Moreover, special attention is paid primarily to the exterior. But in no case should we forget about the interior design. After all, this is where the driver mainly spends his time.
In this material we will talk about how door trim is done on a VAZ-2114 on our own. In reality, this is quite easy to do - you just need to be patient and careful. The procedure here is as follows:
- door disassembly;
- removal of old casing;
- installation of a new one.
In some cases, it is also necessary to remove the trim when repairing the door if:
- it rattles when driving;
- her power windows squeak;
- lock is faulty, etc.
Dismantling
So, to change the door trim, the first step is to remove the door components and get rid of the old trim material.
Basically, all you need to get started is a set of screwdrivers and a good mood. Removing the VAZ door trim
- First remove the podium. To do this, there are three mounting bolts under the podium, which can be unscrewed with a simple Phillips screwdriver.
- Remove the podium carefully, take your time. Otherwise, there is a risk of damaging the wiring from the power windows.
- Disconnect the connector with wires from your power windows.
- Now you need to remove the door handles. Pry off the covers with a flat-head screwdriver. Under them you will find mounting bolts. They are unscrewed with the same screwdriver, after which the handles are easily removed.
- The next step is removing the door opening mechanism trim. To do this, you need to carefully pry off the cladding using a flat-head screwdriver and remove the element.
- There are locking mechanisms on top of the doors. Plastic pins. They have a hole where a Phillips screwdriver fits perfectly. The stoppers are removed by simply unscrewing them with a screwdriver.
- There are probably speakers on the front doors. To remove them, simply unscrew the mounting bolts. If these are not standard speakers, the dismantling procedure may be slightly different.
- Carefully remove the speakers from the casing and disconnect the wiring. Do not pull anything sharply until you are sure that all wiring is disconnected.
- Remove the plastic lever that adjusts the side mirrors and get rid of the decorative moldings.
- Now you can remove the casing itself. It is held in place by plastic pistons, which are inserted directly into the metal part of the doors.
- Using a flat-head screwdriver, pry up the trim, smoothly detaching the material from the surface.
- Don't be afraid to break the caps as they are consumables. New ones will cost a small amount of money.
Dismantling is in full swing. Each door will take you about 30 minutes, maybe more. It all depends on the skill and level of preparation.
Sheathing
The doors have been stripped of everything unnecessary, so you can start covering them.
Door trim for VAZ 2114,2115 “Success”.
Clean the surfaces, get rid of traces of rust, debris, and damage. Once you have disassembled the doors, it would be a good idea to check the condition of the metal and carry out a number of preventive maintenance works; If you want to increase the soundproofing properties of the door, you can glue foam rubber under the new cladding material; Cut out the new trim pieces. To do this, you can use a pattern or simply attach the material to the door cards and cut out the necessary elements; Do not forget to provide allowances around the perimeter of the sheathing material so that it can be bent; Cut holes in the material for handles. Leave a little more so that when installing the handles, they will pull the material along with them, and you will not have any traces of cutting on the outside; Apply glue to the base of the sheathing material
The choice of adhesive largely depends on the type of sheathing you are using; In the case of the VAZ 2114, special attention is paid to the armrest, where careful and thorough tension is required; Straighten out any irregularities and make sure there are no wrinkles. To do this, it is better to use glue that does not dry instantly. This will give you the opportunity to correct unevenness; Perform the procedure for reassembling the door elements when the glue is completely dry
This will give you the opportunity to correct unevenness; Perform the procedure for reassembling the door elements when the glue is completely dry.
Replacement example
The work is completed. There is nothing particularly complicated about door trim. The only most problematic parts are the door disassembly stage. But if you have at least a little experience, you can easily cope with the task.
Loading …
How to properly remove the door trim on a Granta fret
Tuning elements
If you want to turn your regular interior into a full-fledged, complete project, in addition to the door panels and seats, you cannot ignore the other components.
Salon element
What can be done
By default, the rear parcel shelf serves as a luggage compartment delimiter, although in most cases, during modification, acoustic equipment is installed there. The standard shelf is weak and of poor quality, so there is no point in trying to remake it. Just make a new one from sheets of quality plywood. Don't forget to add a thicker pad to make the acoustics sound clearer. Plus, it’s not scary to put something weighing more than 5 kilograms on the modified shelf
You should not try to change the steering wheel yourself unless you are an expert in this field. The easiest way is to find a ready-made steering wheel in the required color and material. Today they offer a huge range of products for the VAZ 2109. But it is important to consider two main points:
- The thick steering wheel will quickly tire you from driving;
- You should not use hygroscopic or porous materials for steering wheel trim, because if your hands become foggy or control with wet hands, they will begin to slide along the steering wheel.
Gearbox lever
The factory trim is far from perfect. Let's face it, she's disgusting. The available substitutes on the market have not gone much further, so it is best to sew the element. New sections are cut using the old casing, and the cover is placed on the lever. It is not necessary to change the lever head, since even in the stock version it is very good
The factory equipment does not include an armrest, although many motorists will agree that this is a useful element. So if you want, buy it and install it. Depending on the armrest you choose, you may have to make a couple of extra holes for installation.
You will see them only when the sun begins to hit your eyes. It’s not difficult to modify them - just change the trim, combining them with the front part of the cabin
Pads on the pedals
As a standard, rubber pads are put on the pedals. If you want, you can replace them with aluminum, special sports kits or similar ones. Just keep in mind that aluminum creates a rather slippery surface from which your foot can slip off at the most inopportune moment. This is not an isolated incident, so it is better to leave the old pad for safety reasons. Or install a new one on which the foot does not slip
Here you take an LED strip and install it wherever your heart desires. LEDs consume a minimum of electricity, so you definitely won’t have to buy a more powerful battery or generator to connect them
Pedal pads
There are a lot of ways to improve the interior of the VAZ 2109. Therefore, choose for yourself the method and what modification measures you use specifically for your car.
Most people do not dare to tune their own crayfish because they are afraid of doing something wrong or even causing a malfunction. Personally, I will tell you that tuning the interior of a VAZ 2114 is truly a great pleasure. This is explained by the simple design of the VAZ car. In order to do such work, hands, a head and the necessary tools are enough.
Many argue that to perform this work, without anyone's help, requires special education and a lot of practice. However, after you do the tuning of the VAZ 2114 interior with your own hands according to the instructions below, you can be convinced of the opposite.
How to tune the interior of a VAZ 2114 yourself?
First you need to change the appearance of the interior. To do this, we will need a fairly popular material - “vinyl leather”. It is sold in stores in a very large assortment. Therefore, you decide the problem of choosing a color yourself. Let's start with the sun visor.
Sunshield.
At the very beginning of the work, let's pay attention to the sun visors. First we have to remove them. Carefully cut the polyethylene, remove it and apply it to the underside of the “vinyl leather”. The next stage: we trace the outline, retreating one centimeter. Then we cut out the upholstery for the visors from our material. We make a bag from the pattern by sewing. The seam must be internal. We put the resulting bag on the visor and, using any long object, for example, a ruler, stuff the foam rubber into it. Then we sew up the hole through which we stuffed the “stuffing.” The sun visors can now be replaced.
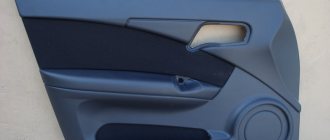
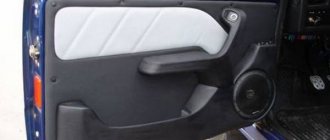
Door inserts.
The next step in our tuning is door inserts. Factory door inserts are made of fiberboard covered with regular fabric. Naturally, we remove these inserts along with the casing. In the same way as we did with the canopies, we make our own trim. Now comes the most difficult moment of our work - attaching the manufactured insert to the plate. Of course, this stage will not stop us from our goal! Using a staple gun we will solve this problem. Due to the risk of damage to the appearance, we buy staples number 8. Using a regular pistol, we shorten the mustache by about half. We load our staple gun with these staples and aim our workpiece against the fiberboard. A prerequisite for this work is a smooth surface of contact between our material and the slab. We put it back and admire our creation.
Conclusion.
You see, it’s not at all difficult to do the tuning of the VAZ 2114 interior with your own hands. At minimal cost, we were able to make the interior of your car the way you wanted it. In order to make tuning of the entire car you only need a little more effort on your part. Moreover, if you want to change something under the hood, then you will need a lot of literature about the design of your car, in particular the VAZ 2114 car.
Stage 5. Putty, primer and painting
We decorate the interior by tuning or replacing the door trim of the VAZ 2110 with our own hands.
Here we are already approaching the finish line. We take fiberglass putty and a rubber spatula and apply a small layer to the surface of the card. Once dry, I used a screwdriver attachment with sanding discs. I took 3 types of sandpaper, 100,400 and 1000.
After drying, you can prime them.
I took regular primer in cans and a spray gun. The only difference is the painting time.
After the primer came black paint as a base and white splashes from the brush.
And here is the final result. Very satisfied. They turned out quite tough and not too heavy.
Material:
- Glass mat - 2 meters for 275 rubles.
- Lycra-1 linear meter for 500 rubles.
- Resin-3 kg for 310 rub.
- Rings - 4 pairs for 250 and 1 pair for 170 rubles.
- Putty-500 g for 690 rub.
Sources
Tuning the interior of the VAZ 2107
Tuning a VAZ 2107 with your own hands, what can be done in the cabin? This question worries many car enthusiasts, and we will try to answer it for you. The domestic auto industry did not particularly care about the beauty of the interior of its cars. In this regard, many owners try to create the aesthetics inside the car themselves. Today, on the Internet and beyond, you can purchase various parts of materials that will help with tuning.
1. Since passengers in the car spend the entire journey in a sitting position, it is necessary to make the seats more comfortable compared to the factory version. Sports anatomical seats, which are created on the basis of foam, have increased density and are an excellent option for creating additional comfort. They are equipped with special lateral supports for the seat and back. Their design is designed to support the neck in a comfortable straight position without straining the lumbar muscles. After such modifications, driving a car will become much more convenient. A simpler option is to replace the seat covers.
2. Since childhood, many of us have felt like a racer. If you replace the standard steering wheel with a sports one, you can feel like a real Formula 1 car driver. The interior will have a unique and unique look if the steering wheel is also covered with leather, carpet, Alcantara or other material. For many, Alcantara is a new material. It has different structures and colors, but, among other things, it is durable and abrasion-resistant, but, accordingly, it is more expensive than leather.
3. Car enthusiasts often tune the VAZ 2107 torpedo. To remake it, you do not need to use expensive materials, and the possibilities are limited by our imagination. You can cover it with leather, velor, or beautifully trim it with carbon fiber or wood. When the design of the torpedo is changed, you can move on to tuning the dashboard.
Stage 2. Covering with Lycra
Tips for proper and high-quality soundproofing of car doors with your own hands
Now we take our door for covering. We need Lycra to give shape to our skins. To do this, you can use any thin and well-stretchable material; tights from your wife, sister, or mother are suitable (underline as appropriate).
Now we take a construction stapler and punch through all the indentations; you can also use Akfix glue for this.
At the back of the card, along the edges, we turn two blocks to give rigidity to the cards, otherwise they will turn out to be “banana-shaped”.
Be sure to pull the lycra very tightly; after pouring the resin, folds may appear that can be removed with putty, but do we need it?
At this stage, we immediately think about the fastenings for the door opening handles if we remove the factory ones.
How to remove
The disassembly process is the same for all doors, including the driver's door. To replace the casing, you will need to remove interfering structural elements and remove old material. You need to prepare a set of screwdrivers.
Initially, the podium is dismantled. There are three screws underneath, which can be easily removed with a standard Phillips screwdriver. You need to remove it carefully and with feeling. Otherwise, you may break the wires supplying the power windows. After dismantling the podium, you will need to disconnect the terminal from them.
Next, remove the inner handles
The pads must be carefully pryed off with a flat screwdriver or knife. The bolts are hidden behind them
After unscrewing them, the handles themselves are removed.
Then it will be necessary to dismantle the lining of the closing mechanism. It is pryed off with a flat screwdriver. Then comes the turn of the stoppers - these are plastic pins located on top. Unscrew with a Phillips screwdriver.
We should not forget about the speakers, usually located in the front doors. They are secured with screws. It is worth noting that if they were not installed at the factory, the latches may be non-standard. Having pulled out the speakers, you need to disconnect the wires leading to them. You shouldn't pull them sharply, as they are quite thin and tear easily.
After this, remove the lever that moves the side mirrors. Then you can remove the decorative moldings as well. Only after this will it be possible to remove the old cladding material. It is held in place by plastic caps. They are attached directly to the metal of the doors. The casing is pryed off with a knife or screwdriver, after which it is detached from the base. There is no need to worry about breaking the caps - they cost mere pennies and are sold everywhere.
There is no point in replacing Euro screws with self-tapping screws in the future if they reliably fix the upholstery. On average, one door takes about half an hour. If you have minimal experience, you will have to spend significantly more.
Designer interior makeover
After modification, or rather complete replacement of sound insulation, work can be carried out to change the interior design. Such work can lead to various costs - it all depends on the final result. There are several ways to change the interior:
- Use of new skin. The original material used to finish the car in question, roughly speaking, does not have attractive performance qualities. VAZ 2114 interior tuning with a complete replacement of the headliner, side panels and floor will be quite expensive, but you can try to find better quality panels from other cars. It is quite difficult to stretch the fabric yourself, but it is still possible.
- A fairly simple way to modify the interior is to install new seats. Recently, you can find sports seats with lateral support on sale, which will fit the car in question. Their cost is quite high, but the result will be impressive. You can also select seats from other cars, but in this case it may be difficult to fit the mounting. If it is planned to install new seats and create a separate fastening for them, then this work should be carried out before insulating the body.
- Nothing catches attention like the front panel of a vehicle: material, shape, central dashboard, installed player. When completely changing the interior of a car, it is practically impossible to do without dismantling the front panel and changing it. However, there are several difficulties here: it is quite difficult to modify an old one, but choosing a new one for your car is also not easy. Work on changing the front panel is also complicated because it involves electrical wiring. In order to avoid difficulties with connecting the wiring during assembly, individual wires should be combined into groups and labeled. Some craftsmen modify the central dashboard, which is often expressed by creating a large seat for a multimedia system. Note that there are quite a lot of similar systems on sale that have a relatively low cost, but at the same time decent functionality. Made in China, the quality is average, but high-quality multimedia systems can cost several hundred.
- Another fairly simple way to modify the interior is to modify the instrument panel. You can make this change yourself: stick on a new scale, create an original backlight, and so on. The work will not take much time and will not cost much, but the changes will be significant. Some craftsmen install instrument panels from other cars, but here it is quite important to choose the most suitable version.
- Small details of the interior, such as the gear shift knob, handles for opening doors, keys on the center panel and many other elements, may also undergo changes. Every little detail can significantly change the interior design if you choose it correctly.
- Recently, interior lighting has become very popular. This can be done using special diode strips, which are inexpensive and last quite a long time. The color of the diode strip can be very different; it can be attached to illuminate the central panel, floor and other elements of the car.
- Most car owners like to listen to music in the car. In order for it to be of high quality, it is not enough to install a good radio. Particular attention is paid to improving the car's acoustics: new speakers, a subwoofer, and an amplifier are installed. At the same time, the quality of the radio or multimedia system must correspond to the quality of the acoustics, since otherwise the investment will be in vain and there will be no significant changes.
Stage 2. Covering with Lycra
Now we take our door for covering. We need Lycra to give shape to our skins. To do this, you can use any thin and well-stretchable material; tights from your wife, sister, or mother are suitable (underline as appropriate).
Now we take a construction stapler and punch through all the indentations; you can also use Akfix glue for this.
At the back of the card, along the edges, we turn two blocks to give rigidity to the cards, otherwise they will turn out to be “banana-shaped”.
Be sure to pull the lycra very tightly; after pouring the resin, folds may appear that can be removed with putty, but do we need it?
At this stage, we immediately think about the fastenings for the door opening handles if we remove the factory ones.
Stage 4. Glass mat
After shaping, it is not rigid enough for us. For this we use glass mat. I use a density of 450 g/m2.
For our convenience, it is better to cut them into small pieces. I always first coated the place where I would lay the glass mat with a thin layer, laid it down and spilled it again.
Be sure to lay it in all places, even hard-to-reach ones, otherwise there will be air voids there.
I do 2 layers with 4 hour intervals for better resin drying.
Once completely dry, we can trim off the remaining lycra around the edges, unscrew the bars and cut out holes for the speakers.
Making a door card
To manufacture the part, marks are made: cutting lines, places for standard holes for handles, fasteners, speakers. Manufacturing instructions:
- A perimeter map is cut out of plywood.
- Holes are drilled.
- The foam rubber is glued to the plywood, then to the fabric base. There should be a 1 cm allowance at the edges.
- Holes are cut for self-tapping screws; for this it is better to use an awl.
- The substrate is cut with an allowance of up to 10 mm.
https://youtube.com/watch?v=BfDOt3Gea9Y
The panel is sheathed in one piece
To ensure that the tensioning process goes smoothly, it is important to lay the selected material face down. The covering is fixed with a single injection. Folds are straightened out before finishing fastening
Before finishing fastening, the folds are straightened out.
Substrate
Sheathing alone is often not enough to reupholster a door card. Additionally, a soft backing is used to provide volume. A common option is to use foam rubber with a thickness of 3 to 6 mm. It is not recommended to use a thicker product.
For reliability, it is better to choose foam rubber with a knitted backing, which ensures thread fixation and prevents the passage of fastening material.
There is no need to make a stock when cutting. On the contrary, the size of the substrate around the perimeter should be slightly smaller (by about 1 mm). This option provides a better appearance and sharper edges. It is better not to fold the back side of the insert, because otherwise it creates excessive volume at the edges.
When choosing foam rubber, it is better to give preference to hard and dense materials. The optimal solution is high-density matter with overlapped cells. This product lasts longer, retains its shape and characteristics.
Dismantling the casing
Changing the cladding involves removing and installing a new door card. Required equipment:
- plywood;
- screwdrivers;
- knife;
- fastenings: clips or pistons;
- self-tapping screws;
- glue;
- foam;
- drill.
During dismantling, the pistons break, so to install new ones you will need a soldering iron or hot glue. This fastener is replaced with plastic clips. New plywood will be needed if the old structure is deformed or cracked. Dismantling steps:
- The bracket that secures the window regulator is pulled out.
- The handle is being dismantled. To do this, remove the bolts on the inner and outer parts of the armrest.
- Speakers and other pieces of electronics are removed.
- The panel is removed from which the covering fabric is cut.
The process of dismantling a Eurocard is similar.
Materials for upholstery
On a VAZ 2114 euro, the door trim is made from various materials. Choose fabric based on price, quality and ease of use. For example, a knitted piece is easier to secure than a silk piece, but velvet looks more impressive. Eco-leather and Alcantra are durable, while leatherette and carpet provide a combination of price and quality. Velvet flocking is also popular.
Main types of fabric, their advantages and disadvantages:
- Leather – luxury upholstery. It is resistant to moisture and temperature changes. Traces of chemical contaminants are easily removed from leather.
- Eco-leather and leatherette are durable and wear-resistant materials. The technical characteristics of this fabric are similar to natural leather, but the price is lower. There is only one drawback - the fabric requires special care. Microcracks will appear on the canvas if you use abrasives or heat the leatherette during cleaning.
- Alcantra is a modern material that consists of ultra-fine fibers. This coating will not deteriorate from moisture, will not stretch, or shrink even after a long period of use.
- Carpet is made from artificial fibers and is considered a traditional automotive fabric. It repels dust, is resistant to fungal compounds, does not fade, and does not stretch. Convenient for re-tying. Provides heat and sound insulation.
- Velvet - gives the interior a noble look, is wear-resistant and durable. This upholstery will last for many years.
- Vinyl or leatherette is the most durable and durable option; it will make the skin durable. These types of fabrics withstand climatic changes and do not deteriorate due to treatment with detergents. However, when used for covering leatherette, you will need to install an additional layer of insulation.
Stages of modernization of the VAZ 2114 car
There are several stages of changing the interior of a vehicle. These include:
- Dismantling works. Of all the factory elements, only a few may be useful, but you should still be careful when performing dismantling work. This is due to the fact that some parts can be sold, others can be reused.
- Insulating the interior is an important step. VAZ 2114 interior tuning must necessarily include soundproofing work, since domestic cars have a very noisy interior.
- Particular attention is always paid to the front panel and instrument panel. The vehicle in question used poor quality materials to create this item. It should also be noted that the shield is difficult to read and looks unattractive. Problems can be corrected by upgrading these elements.
- Upholstery, seats, side panels can also be changed. It is worth noting that this work is the easiest to do, since you can find quite a lot of different sports seats and ready-made panels on sale. If you want to remake the original seats, then difficulties may arise, since they are of poor manufacturing quality.
The above stages can be called the main ones when tuning a car’s interior.
Table of technical characteristics of the VAZ-2114
2114 1.5i
Body
Body type / number of doors
Number of seats
How to remove the door trim on a VAZ 2114 and 2115
Removing the trim on Lada Samara cars, such as the VAZ 2114 and 2115, is a fairly common task for many car owners, and they have to do this for completely different reasons, the main ones of which are given below:
- When soundproofing doors from the inside
- To repair or replace glass, lifts, or door opening and closing mechanisms
- For installing an acoustic system that does not fit in standard places on the casing
So, to remove the casing yourself, you will need a minimum of tools, namely:
- Flat and Phillips Blade Screwdriver
- Sharp and thin knife
How to transform the interior of a VAZ 2109
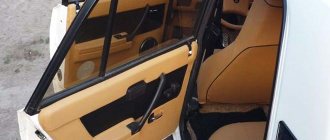
Do-it-yourself tuning of a VAZ 2109 interior is an integral element with which the car can be given an original and unique look. Since the main disadvantage of the interior of the domestic “nine” is the relatively cramped space, internal modernization often consists mainly of installing sports seats, a beautiful europanel, and also changing the appearance of the gearbox. In the process of tuning the interior, it is necessary to touch the upholstery of the seats and the internal parts of the car.
As an upholstery material, it is better to use genuine leather. In a situation where you plan to use leather as a kind of “highlight”, you will also have to tint the windows, since leather heats up very quickly and is susceptible to fading in the sun. Covers, which are best purchased to order, can also extend the life of such seats. If reupholstering the interior using leather is not planned due to the high cost of such tuning, you can try using carpet of different colors. They can be used to cover podiums and false panels, boxes and acoustic shelves.
This way you can give your salon a unique look. Since the carpet is quite viscous, its use will not lead to the formation of all sorts of unattractive folds.
The interior of the "nine" also needs to be supplemented with a lighting system, but not connected to the car's on-board network. An alternative is a Chinese LED lamp, which does not quickly drain the battery. It is capable of providing quite good lighting. If you install a modern sound system in the “nine”, then your favorite music sounding from the new speakers will always create a great mood.
Material selection
The first thing you need to start with is the choice of sheathing material. The current range is quite wide, which allows each car owner to choose the ideal option in accordance with their wishes, requirements and financial capabilities.
The most attractive options are:
- Genuine Leather;
- Faux leather;
- Alcantara;
- Velours;
- Flock;
- Carpet.
For more information about the nuances of these materials for creating door trim, see the table.
Material
Peculiarities
Genuine Leather
This is a strong, reliable and durable material, the only significant drawback of which is its high cost. It's not easy to work with, but the end result is a stunning finish. A true classic that will never go out of style
Leatherette
Noticeably cheaper compared to genuine leather, but the service life is not as long. In just a year, leatherette may become covered with miniature cracks in the form of cobwebs.
Door cards for VAZ 2114
Alcantara
Many call this material ideal for the fourteenth model. It has an attractive appearance, similar to suede, but has increased durability and practicality. Easy to care for, easy to install and comes in a wide range of colors. Alcantara has no disadvantages as such
Velours
Well suited for door trim, as opposed to seats. The material is pleasant to the touch and beautiful in appearance, but with constant contact, abrasions form. The peculiarity of the structure will require you to frequently clean the fabric, because velor collects a large amount of dust
Flock
It feels like velor to the touch, but unlike it, it is much easier to clean, does not get wet and is not afraid of even sudden temperature changes.
Carpet
Almost carpet, but softer and more pleasant. The material is easy to work with, costs little, does not wear out in a short period of time and stretches well
For the VAZ 2114 this is especially true, since when replacing the trim it is important to carefully repeat all the bends of the doors
Dismantling and subsequent installation of door trim in Kalina-2
The choice depends on your goals for refining the car interior. Thus, flock is suitable for a sporty style, leather is for class, and velor is for sophisticated ideas.
Re-upholstery of VAZ 2114 door cards
Seats
By replacing or upgrading the seats, you will have done almost half of the entire job of upgrading the interior. Just as for external tuning it is sometimes enough to install beautiful wheels, so for internal tuning it’s worth starting with the seats.
There are three main ways to add something interesting to your chairs:
- Use covers;
- Cover with leather or other material;
- Buy new seats.
Covers are the simplest and most versatile way to modify the interior of your VAZ 2109 without capital investments and with minimal installation costs.
Example of original cases
Cases
When purchasing and installing seat covers, be sure to pay attention to a few key points.
- Fasteners. The fastening systems used for current cases come in a wide variety - through cords, adhesive tapes, hooks, and braid. But all of them are far from perfect and are not capable of reliably and effectively fixing the pillow in its proper place. Over time, the fabric will stretch, the fasteners will lose their quality, and you will have to tighten the covers every time. The situation is exactly the same with the back row. To avoid this situation, sew the cover onto the edge of your seat trim.
- The backs of the front covers. They are put on separately, pulled over the chair. But the problem is that over time the backs become twisted. The defect is eliminated by sewing to the ends of the seat. The back of the rear seat has a folding lever, and there are grip holes on the back side. Therefore, be sure to choose covers with slots or make them yourself. Plus, we advise you to unscrew the decorative protection and attach the edges of the cover to the stiffeners. Putting the unit back together is not difficult.
- Cover maker. The VAZ 2109 car has been around for quite a long time. During this time, accessory manufacturers were able to study in detail all the strengths and weaknesses of the model’s interior, its features, and key nuances. Therefore, we advise you to choose trusted studios that have proven themselves well in the accessories market.
- Price issue. It is stupid to purchase consumer goods that will become unusable after just one season of use. But it’s not entirely reasonable to purchase sets of covers costing 10-15 thousand rubles. Today, eco-leather is considered the best option.
- Foam inserts. Many people use cases that have shaping inserts. They transform the shape of the seats, creating the effect of completely different chairs. Yes, lateral support will improve, but this will cause great harm to your health. Foam inserts create a greenhouse effect, which is why such inserts are harmful for car owners who spend a lot of time driving.
Bright and original
Why is it optimal to choose eco-leather for covers? This is due to the excellent characteristics of the material, which make it better than traditional leather and all similar options.
When choosing other materials from which covers are made, be prepared to personally become familiar with their negative sides.
Material
Features and Disadvantages
In winter, it will be cold on such covers, and in summer, due to the active heating of the interior by the sun's rays, it is almost impossible to sit in shorts inside the car
Tapestry, flock and other fabrics
The fabric actively accumulates dust, it quickly becomes dirty, but cleaning the covers is not so easy. They have to be removed, washed regularly, and special cleaning agents must be used.
They do not absorb moisture at all, so you will constantly sweat. This can cause allergic reactions, skin irritations and other troubles. Plus synthetics create static electricity
Interior reupholstery
Another good way to modify the interior. To do this you will need:
- Remove the seats;
- Remove the old sheathing, tear it apart, remove the pattern;
- Sewing elements of the new interior;
- Cover the chairs with them.
At the same time, it is recommended to change the padding to a more durable, wear-resistant material. Many additionally install a heating system, which has a positive effect on comfort, especially in winter.
The result of the constriction
Buying a new salon
Let's be honest, for the VAZ 2109, buying a new set of seats is the most effective, best, but at the same time the most expensive way of modification.
Much depends on which seat option you decide to purchase. Some people choose sports buckets, making the usual nine look like a sports car. Yes, it looks impressive and original, but you won’t be able to ride in buckets for a long time.
There is another option - comfortable, more modern sets of seats that will provide comfort. They are not so unique in their external characteristics, but they transform the appearance of the interior and change the understanding of comfort.
Chairs from a third party manufacturer
Purpose of the cladding
To understand how to remove the door trim of a VAZ 2114, you need to find out the purpose of this automobile fragment. The fabric insert enhances the appearance of the interior. If stains, mechanical damage or abrasions appear on it, you will need to disassemble the inside of the door, remove the panel, and attach a new lining. Thanks to this element:
- the interior becomes more attractive;
- additional sound insulation is created;
- a speaker is installed in the facing fragment;
- electrical wiring and fasteners are hidden;
- The corners of the closed plastic panel and iron parts are softened.
The canvas is removed for a number of reasons: increasing sound insulation, installing speakers, deformation, replacing material. There are many options for cladding on the market, but drivers prefer to buy special automotive fabric.
When replacement is necessary
The VAZ 2114 door card consists of iron, and the element is covered with fabric on top to give the body part an attractive appearance. Replacement of upholstery is provided if:
- the material has ruptured, it could be a hole from a knife or a burn through a cigarette;
- abrasions were found;
- there was a rupture at the base of the door;
- the inner gasket cracked and the outer casing ruptured;
- There was a deformation of the body part.
When deformed, it becomes difficult to close the door. In this case, you can modernize the interior and install homemade cards, choose fabric, decide on the design and read the instructions for replacing the fabric.
Glass replacement
It is better to buy glass and a glass holder as a set for replacement.
To replace, you need an extension, a wrench, an 8 and 10 mm socket and an assistant.
The side glass is blocked with a screwdriver to prevent it from falling out. The door trim is removed. A felt-tip pen marks the places where the glass frame is attached to the door on the frame and on the door. The bolts securing the glass frame to the window regulator are turned out.
The window regulator bar must be fully raised. The cable on the roller from the bottom of the glass is dismantled. Then the seals (velvet covers) are carefully removed.
Hold the glass during this time so that it does not fall out. After removing the seals, the glass is lowered down about 10 cm, tilted to the side and removed from the groove.
Replacing the door glass of a VAZ 2114
The new glass is installed in the reverse order. Apply WD-40 or a similar lubricant to the glass frame, insert the glass and leave to dry. After the grease has dried, the glass is installed in the door. New glass is installed in the seals.
If the seals have become unusable, new ones are cut out of rubber, while the old ones are used as patterns.
The glass with seals is inserted into the groove, aligned and lowered into the stopper. The window lifter handle is lowered to its lowest position. The glass is fixed with bolts and the cable is installed in its original place.
The operation of the window regulator is checked and, if necessary, the cable tension and the position of the seals are changed.
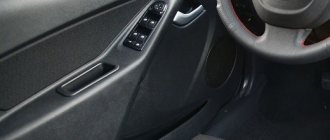
Removing the front door trim
Plastic spikes or “herringbones” for fastening may break during the process of removing the skin. We purchase in advance a quantity sufficient for the update. It is better to buy double white-orange or transparent clips.
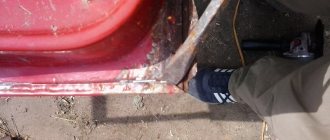
- Open the door and remove the 3 screws securing the podium. The screws are unscrewed with a Phillips screwdriver. The podium carefully turns down and detaches from the body.
Do not remove the casing with jerks or sudden movements. The sockets that attach the trim to the door can be damaged.
If you are planning to replace the trim, before purchasing it, compare the dimensions of the trim installed in your car with the new one in the store. The location and diameter of the holes for the handle and for fastening may not be the same.
Installation of the casing occurs in the reverse order.
Stage 3. Pouring resin
Now begins the most interesting and tedious task
It is best to use small disposable containers for mixing the resin; I used the proportions for 100g of resin: 1g of hardener
It is best to use plastic cups for beer, they have thick plastic, which is what we need. When the resin reacts with the hardener, it generates heat that can melt our container.
!Attention! Use resin only in well-ventilated areas, wear a respirator and gloves. I usually spray the outside twice with drying intervals of 2-3 hours. I usually shed the outside 2 times with drying intervals of 2-3 hours
I usually spray the outside twice with drying intervals of 2-3 hours.
Now we pick up a grinder or any other tool for cutting our cards.
Here you can clearly see the bars for rigidity
We cut out the entire inside of our cards, leaving space for the clips.
Main stages
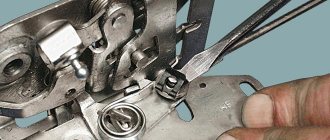
Plastic is considered a wear-resistant coating. Rubber is characterized by high noise insulation and rapid wear. The device is adjusted after treating the main elements with silicone grease. Experts recommend using a composition that retains its elasticity and sound insulation characteristics at low ambient temperatures.
In auto stores you can buy a simplified version of a silent lock. To install the mechanism, you will need to open and lock the door. Then unscrew the bolts that secure the lock. The impact driver is applied to the top bolt. They deliver light blows. If necessary, this procedure is repeated.
Auto mechanics prohibit simultaneous unscrewing of 2 mounting bolts. Otherwise, the inner lock will fall. In this situation, you will need to open the door and remove the top and bottom bolts. Then turn the outer lock body. After dismantling the case, a new lock is installed. The fasteners are screwed in one by one. The bare pin of the latch is replaced with a silent analogue. It will take 20 minutes to install 4 door locks. Then the VAZ doors are glued using the method described above. This work is done by two people.
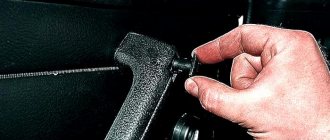
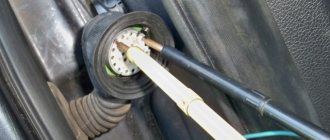
1. Remove the door trim. How to remove the door trim on a VAZ 2114, 2115? 2. Apply the podium to the door trim. (Fig. 1) 3. From the inside, through the door trim, we fasten the podium with two galvanized screws 4.2×16. (Fig. 2) 4. We cut through the door trim for the speaker (for VAZ 2114, 2115 podiums, we cut through the door trim to connect the wires to the power window button). (Fig. 3) 5. Secure the podium around the entire perimeter with 4.2×16 self-tapping screws. (Fig. 4) 6. We check the “hedgehogs” of the fastening of the casing - we replace the bad ones. 7. For VAZ 2114, 2115 podiums, we install and connect power window buttons. We carefully cut through the skin, leaving allowances along the edges! (Fig. 5) 8. Install the trim back on the door. (Fig. 6) 9. Through the petals in the podium (in the hole for the speaker), we screw two 3.5×41 screws through the casing into the iron. This allows the podium and trim to be firmly secured to the door. (Fig. 7) 10. From below, under the podium pocket, trying to ensure that the heads of the screws are not visible and do not touch the podium, we screw the trim to the door - into the iron with two 3.5x25 self-tapping screws. (Fig. 8) 11. Connect the speaker. (Fig. 9) 12. Install the speaker and its grid.
Good day to all! I think I said it, but I’ll repeat it... At the beginning of May, I purchased door trims from 2114. I was tired of the creaks of door trims on 2109, so the first thing after purchasing the trims was to look for the so-called “pistons” from Gazelle. To my surprise, I searched for a long time, and in the end I found it, of course! I took with a reserve: 30 pcs. piston from Gazelle (set: piston, self-tapping screw, plug) - 16 rubles * 30 = 480 rubles 30 pcs. clip shelf s/o 2108 - 5 rubles * 30 = 150 rubles
Everyone knows that Russian cars are a rattle, and a dozen are no exception. Some try to somehow deal with the creaking and rattling in the cabin, and some turn up the music louder and do not pay attention to all this. If you belong to the first category of people, then this article may be useful to you.
Getting rid of noise in the VAZ 2106
Noise in the interior of “our” cars is, unfortunately, an integral feature, as, indeed, are potholes on the roads. Absolutely everything in the car rattles. Sometimes a simple car enthusiast gets used to this and does not pay attention. However, of course, there are owners who are trying to get rid of this drawback. There are several ways to eliminate noise in the cabin, each effective in its own way.
Do-it-yourself tuning of a VAZ 2106 at home involves eliminating the noise in the cabin by pulling it through and mounting everything that rattles on screws. Here, both ordinary rubber mats and polyurethane foam are used, which are used to fill the voids in the car body.
It should be recalled that if you have started a repair, the result of which should be the elimination of noise in the cabin, you will first have to completely disassemble the interior itself. This will subsequently allow you to get to problem areas.
The main noise comes from the front end, that is, the area under the driver and passenger seats. The hole for the gearbox, the front panel, and the internal cavity of the sills are also noisy. It is these places that need to be finished with high quality, first of all. Standard factory sound insulation is most often represented by several sheets of pressed tarred glass wool, which are glued piece by piece under the feet, as well as several sheets under the instrument panel.
Of course, this is not enough to avoid annoying noises. It is advisable to spray the front end with an anti-corrosion compound. But you need to glue sound insulation on top of it. You should not neglect regular polyurethane foam. It absorbs noise well. This material can be used to seal all corners and fill hidden cavities of car sills and side members.
You can also apply a thin layer of foam to the area where the gearbox will be located. This should be done from the inside of the cabin. The area under the rear seats is also better soundproofed. Attention should be paid to the wheel compartments through which noise from the wheels passes.
Selecting the material
There is now quite a large selection of materials suitable for the purpose in question. Therefore, choosing the one that suits you best will be quite simple.
Most often used:
- leatherette;
- velours;
- alcantara;
- flock;
- carpet;
- skin.
Genuine leather has gained the reputation of a reliable and durable material. Its only drawback is the high price. It is very convenient to use, and the results are always excellent.
Alcantara has a pleasant appearance and high strength. It is not difficult to care for her. Externally it resembles suede. The color palette allows you to satisfy the most whimsical taste.
Velor, as they say, looks rich on car doors, but wears out very quickly on seats. It needs regular cleaning, as due to its structure, literally everything sticks to it.
Flock looks very similar to velor, but is more practical and easy to clean. He is not afraid of water, he is not afraid of the cold.
Carpet, in fact, is a type of carpet. The difference is that it is softer and more pleasant to the touch. Wear-resistant, ideal stretch. Inexpensive.
General provisions
Door card (panel) is a special insert in car doors that covers internal elements, namely the glass lifting mechanism, wires, etc. On older cars, leather or a special type of material was used as a base. Today, in order to save money, manufacturers use plastic or other “budget” material.
The need to reupholster the door card arises in the following cases:
- desire to improve the appearance of the interior;
- bringing the design of the door card and seats into line;
- wear or peeling of the old surface;
- other reasons.
A common reason for door card retightening is damage. The material often peels off due to damage to the foam layer. Attempting to glue the problem area gives a temporary effect.
It is better to remove the old element, remove the foam rubber and then stick on new material. If you are not satisfied with the appearance of the door card, you can do a complete reupholstery yourself.
This work is simpler than updating the interior trim, but even here certain experience and skills are required. If you cannot do without a sewing machine when reupholstering, it is better to entrust the work to the craftsmen. If you have the appropriate experience, you can solve the problem yourself and even combine different materials.
An important point is weather conditions. When choosing the time to complete the work, it is better to give preference to warm weather or do the reupholstery in the garage.
This requirement is due to the characteristics of the glue, which at low temperatures does not stick or spray well. In addition, there should be no foreign elements around the workplace, and hands should be washed so as not to accidentally smear the casing.
Sheathing process
After removing the old material, you can begin to install the new one.
The metal surface must be cleaned of traces of corrosion. Carefully remove any debris that has accumulated inside and repair any damage found. Since the upholstery has been removed, nothing prevents you from carrying out preventive maintenance along the way.
To improve sound insulation, foil foam rubber is installed inside with glue. This, among other things, will ensure better heat retention in winter.
Using a pattern, which is easy to download on the Internet, or, at worst, old cladding, new elements are cut out from previously selected material
In the latter case, it is important not to forget to leave a few centimeters of margin around the perimeter in order to be able to tuck it inside
A hole is cut in the workpiece for the handle. It should be slightly less than necessary. This way, when it's put in place, it will pull some of the material in and the edges will be hidden from view.
Glue is applied to the inside of the cut fabric. Which composition to use depends on the material you choose.
The most difficult thing is with the armrest cover. Here you need to apply the fabric carefully and very carefully. All irregularities must be stretched and folds straightened. It is also unacceptable to leave air bubbles. It is better to choose glue that dries for a long time. This will allow you to correct defects on the new upholstery if necessary.
It will be possible to fix the finished elements only after the fixing composition has completely dried. Assembly is carried out in reverse order.
To better imagine the whole process, you should watch this video:
Do-it-yourself VAZ interior tuning
Do-it-yourself tuning of a VAZ interior is today one of the most popular activities for domestic car enthusiasts.
In this article you will find a lot of useful information, photos and videos, as well as various modification options for the most popular VAZ cars that will help you change the interior of the car according to your own preferences.
By tuning VAZ cars, you can add something unusual to the interior appearance of the vehicle. Therefore, it’s better to start with noise and vibration insulation. It often happens that this “element” can be easily improved with your own hands. After such work is completed, the car immediately becomes quieter and calmer. Of course, it does not reach the S class, but the overall level of comfort will depend only on your patience, work and partly on the money spent.
Tuning the VAZ interior photo of possible options opens up the widest scope for all sorts of improvements and modifications. One of the main stages of updating a car interior is the work that is done with the seats. Here you can install everything: from T-shirts or massagers on the seat to the installation of sports buckets.
Another original tuning option is replacing used seats. Here you should be careful with the size of the donor seats. It often happens that installing a seat from a BMW 7 leaves no room in the interior and a welder has to work. It is also possible to install new sports seats.
However, it should be noted that not everyone will be comfortable wearing them later. Here your own preferences come to the fore. Tuning the VAZ interior can be supplemented with various kinds of modifications to the dashboard, ceiling, steering wheel, maps. Here there is an opportunity for the tuner's imagination to run wild.
Replacing a door on a VAZ 2113-VAZ 2115
Note! The front door on cars of the Samara 2 family is removed in the same way as the rear door. To avoid repetition, in this article we will look at the instructions using the example of a door from the front, and you, if necessary, do a similar procedure from the back.
Since the work of removing the door comes into contact with electronics, we recommend disconnecting the negative terminal from the battery to avoid short circuiting the wiring. Read more here: “Replacing the battery on a VAZ”, point 1.
Removal
1) First you need to remove the door trim. Use a screwdriver to remove the bottom screws that secure the pocket, and then remove it from the car.
Note! After unscrewing the bottom screws, do not rush to completely remove the pocket. There are built-in switches that regulate the glass (raise and lower it). They need to be removed:
- unscrew the screws from the bottom and slightly move the pocket away from the trim;
- use a screwdriver to pry up a switch and pull it up;
- then release the clamps of the wire block and disconnect it together with the switch (shown in the small picture below);
- repeat the procedure with the second switch;
- Remove the bottom pocket completely from the car.
2) Now use a knife or screwdriver to pry up the decorative trim holding the door handle.
Note! After removing the trim, you will see two large screws in front of you that secure the handle to the door. Using a screwdriver, completely remove both screws (only one screw is visible in the photo below) and completely remove the handle from the car.
3) Next, use a screwdriver to pry and remove the plastic lining (indicated by the arrow) located on the door opening handle. This cladding is attached inside with clamps; sometimes it is enough to pry off any corner with a screwdriver and it will begin to come off little by little.
4) Then grab the button that closes the car door with your hand and simply turn it out. In case of difficulties, take a screwdriver in your hands and completely unscrew the button using the upper thread (shown in the small photo below).
Replacing the window regulator
To replace the window regulator, you need an extension, a wrench and a 10 mm socket.
Having freed the front door from the trim, remove the 2 bolts securing the glass to the bar. Usually they are tightened tightly, so it is more convenient to use the head as a lever.
Remove three nuts securing the electric motor, one nut under the glass, two in the center and one nut at the bottom of the door.
After removing all the nuts, disconnect the power plug from the electric motor.
After removing the structure, the electric motor is first checked. If it is faulty, it is replaced. If the cause of the breakdown is not obvious, replace the window regulator.