We disassemble the front door to replace parts and the door itself
Removing the outside rear view mirror
We pry off the plug of the mirror control knob
Using a Phillips screwdriver, unscrew the screw securing the handle and remove it.
Use a screwdriver to pry up the inner mirror cap and remove it.
Using a Phillips screwdriver, unscrew the three self-tapping screws securing the mirror and remove it.
Install the mirror in reverse order
Photo report on the dismantling and installation of the casing
Now you can proceed directly to the work itself. So, open the car door on which all this needs to be done and unscrew the three screws securing the lower door pocket. Look clearly at the photo below:
Then you need to do the following:
- push the bottom part back slightly
- carefully move the pocket down, thereby removing it from the grooves in the casing itself
If you have front speakers installed in the doors on a VAZ 2110-2112, then you need to unscrew the 4 bolts securing them along the entire diameter:
Then we perform the following procedure:
- carefully push the speaker back to pull it out of its seat
- disconnect the power wires from the contacts on the inside
Now you can proceed further. We take a thin screwdriver or knife and carefully pry up the trim on the door closing handle, after which we simply remove it by hand.
As you can see, under it there are two more bolts that also need to be unscrewed:
Then you can remove the handle, since nothing else holds it:
- turn it up slightly
- and disengage with the door opening handle
Almost everything is done. There are several points left, one of which is unscrewing the latch locking the front door of the VAZ 2110.
Now, carefully, starting from the bottom corner, we pry up the casing and also carefully try to tear it off the latches (plastic clips) that secure it to the metal part of the frame:
And then we move in small sections in a circle, but we must act carefully so as not to damage or break the upholstery itself. At the last step, we lift it slightly up to free it from the door lock control rod (on which the latch, which we have already unscrewed, is screwed on):
This repair procedure can be considered complete. Then we carry out those actions for the sake of which all this was started; for everyone here there will be their own goals. After completing the repair, install in the reverse order.
Home » Car brands » VAZ » VAZ 2110 » Removing and installing the front door trim on the VAZ 2110, 2111, 2112
Tools and materials
To reupholster yourself you will need to prepare:
- Sheathing material.
Experienced drivers recommend using vinyl, but keep in mind that the material shrinks significantly. Before purchasing, you must take measurements and leave at least 10 cm for allowances and internal bends. If genuine leather or suede is used, allow up to 5 cm for allowances.
- Scissors with a long blade.
- Glue. For repairs they use Moment, Master, Titan.
- A construction knife with a small blade and a sharp end.
- Construction or household hair dryer. It is not recommended to use a heating lamp as it may deform the material.
- Glue brushes: thin, wide.
- Set of clips.
For the VAZ 2110 they produce special sets of fasteners, the cost of a set of 10 clips is 30 rubles. Each door will require 8 clips. It is recommended to buy latches with a reserve. During installation, several clips often break, since the fasteners are consumer goods and the quality of the fasteners is not regulated.
- Self-tapping screws. If you use independent re-upholstery of the cladding on the old casing, then use standard short self-tapping screws; when installing factory casing or Eurocard, purchase a set of long self-tapping screws.
- Crosshead screwdriver.
- A thin screwdriver with a wide blade.
Lux 2 panels and Euro casings have standard places for speakers with a diameter of 17 cm. If the standard Lada audio system has smaller speakers, then you will need to select it to fit the size of the hole or add a rubber or plastic insert to the part to fit the speaker tightly to the mesh.
Removing and installing front door trim on VAZ 2110, 2111, 2112
Hello, today we will tell you how to remove the door trim on a VAZ 2110, 2111, 2112. There are many situations that require removing the trim, for example, repairing a window regulator, door lock, speaker wiring, or in order to make noise insulation. Before removing the trim, you need to buy new pistons for attaching the trim to the door, because... Often they break or wear out, and as a result, the trim will begin to hang and knock on the door.
So let's start removing the casing. First, pry up and remove the window handle lock and the handle itself
Removing the window handle
Now we unhook and remove the plug from the inside door handle.
Removing the handle cap
Behind it, unscrew the 2 bolts securing the handle and remove it
Unscrew the 2 bolts securing the handle
After this, unscrew the door closing bolt and the side view mirror control lever bolt.
Unscrew the door lock button
Unscrew the bolt securing the side mirror adjuster
Next, unscrew the lower door pocket and remove it
Unscrew the door pocket
All that remains is to pull off the casing from the pistons, there are 8 of them in total. If you can’t remove it by hand, pry it off from the side with a screwdriver.
We install the casing in the reverse order, having previously changed the pistons.
Self-upholstery
Before directly reupholstering, it is recommended to check the condition of the inner door panel, remove pockets of corrosion, check or replace sound insulation, replace rubber seals, so the doors will open better. For VAZ 2110, the service life of door seals is up to 3 years.
The process of re-covering a door part yourself step by step:
- Clean the outside of the card. You can sand it with fine-grain emery for better adhesion of glue and leather.
- Attach the door card to the material, cut around the perimeter, leaving at least 7 cm around the edges.
- Treat the outer surface with glue and the inside of the future cladding with glue. Apply glue according to the manufacturer's recommendations. If an adhesive composition is used, then after coating you need to wait up to 10 minutes.
- Place the vinyl on the door card, constantly heating the material with a hairdryer, and level the surface so that the leatherette fills all the curves of the part: the space for the speaker, for the central panel, the recesses for the handles.
- Cut out all the holes that are covered with vinyl in the door card from the center and not reaching the perimeter, carefully wrap it on the wrong side, making sure that the edges of the fold do not exceed 2-3 cm. Trim off the remaining vinyl.
- After gluing the card, trim off the remaining vinyl, leaving at least 3-5 cm on the inside of the card perimeter.
After the glue has completely dried, install the door card on the car in the reverse order, having first changed all the clips.
How to remove the door trim of a VAZ 2110
Very often situations arise when you need to remove the door trim of a VAZ 2110. Either in order to install sound insulation, or to see why the window regulator does not work, or to install a speaker in the car door. So, in this article I want to show you how to do this quickly and without much difficulty.
I’ll say right away that performing this action is very simple, and you won’t need mountains of tools. Prepare only a knife (or flat-head screwdriver) and a Phillips screwdriver. I would like to warn you right away that it is advisable to buy new clips for the door trim, as they may break when removing the trim. Moreover, if you have already decided to remove the door cards, it would be a good idea to work on eliminating their creaking. You can read how to do this here.
Installation of a ready-made kit
Re-upholstering the cladding yourself does not always help save time or money. If you don’t have time to do this yourself, then you can use ready-made cladding.
The set of door elements Lux 2 from AvtoVAZ has additional sound insulation, a set of standard fasteners, mesh for speakers and screws. Installing a finished panel takes up to 20 minutes for an inexperienced driver. When choosing a casing, choose original replicas; if the set contains only four panels, then the speaker grids, caps and screws must be purchased separately.
The lower part of the door trim needs to be screwed in only with long screws; if the standard kit offers short ones, then you need to change the screws yourself.
Installation of Lux 2 cladding in steps:
- Remove the old card.
- Attach a new panel, check the gaps and the alignment of the fastener locations.
- If the car is equipped with a mechanical window lift, then the panel needs to be modified. Lux 2 does not have a hole for the handle of a mechanical lift.
- Secure the trim to the clips.
- Tighten all the bolts and secure the outer trim panels.
Door trim for VAZ 2110 – removal, installation, reupholstery
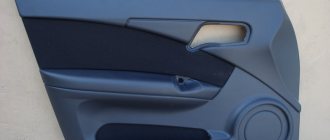
Car enthusiasts who want to completely transform their car by tuning should pay attention not only to its appearance and powertrain, but also to the interior, one of the main components of which is the trim. The standard door trim of the VAZ 2110 does not look very attractive, so in order to give their iron friend uniqueness and modernity, many drivers make or purchase ready-made sets of such parts. Fortunately, the range allows you to do this.
In today's article we will look at how to remove the door trim of a VAZ 2110 luxury and reupholster it.
Cost and types of finished skins
At a specialized service station, the cost of reupholstering a door trim starts from 3,000 rubles. excluding the cost of the door card.
Depending on the model, in 2022 the following prices for ready-made kits for the VAZ 2110 will remain:
- factory replicas from AvtoVAZ and KAMAZ - from 2300 rubles;
- Luxury cladding panels – from RUB 3,200;
- door cards Lux 2 for 16.8 cm speaker – 3500 RUR;
- plastic trim linings - from 300 rubles. thing.
Clips and nets for speakers must be purchased separately.
Why is it better to do the cladding yourself?
Of course, ready-made kits will significantly speed up the reupholstery process, however, when they see the cost of such parts, car enthusiasts begin to think: “Shouldn’t I make one myself?” Moreover, today’s range of fabrics and other materials allows you to create upholstery according to your own design. But in order for the finished part to really be more beautiful than the standard one, and not vice versa, you need to work hard. And the better the work you do, the better the cladding will look. Therefore, if you have a lot of free time and are not very busy on weekends, creating such a product with your own hands is quite possible. At the same time, you will save up to half the cost of the original cladding, which is sold in stores. But creating or purchasing cladding is only half the battle. You will have an “impossible” task ahead of you with installing this part into the car. Let's talk about how exactly the door trim of a VAZ 2110 is removed and how the process of reupholstering it occurs right now.
How is installation done?
Reupholstery begins with replacing the plastic latches from the previous set. In most cases, this procedure is carried out simply if a high-quality upholstery set is purchased. Even if the seller assures the buyer of the high quality of his products, it is best to disassemble the door first and go shopping for new upholstery with one of the stock clips. This will help you select the most similar fastening elements.
When disassembling, you must remember that the self-tapping screws on the VAZ 2110 trims are different. The mounting screws for the bottom of the trim are usually longer, so it is advisable to place them separately from other hardware. European panels can be secured with the same screws if they do not spoil the appearance of the updated upholstery.
The stock audio preparation of the VAZ 2110 provides openings for speakers with a diameter of 13 cm. This is a good reason to replace the speakers with new ones, since the old ones will spoil the overall appearance. Of course, they can be covered with black protective mesh caps if it is not possible to replace them with new ones.
When purchasing an upholstery kit, you need to consider the type of window regulators on your vehicle. The panels are different for power and manual windows. If your car has a manual type of lifts, and you were unable to find upholstery for such doors, reupholstering can still be done. To do this, you will need to slightly alter the trim panels by cutting out a small opening for the window lift handle.
This process is simple because the upholstery has a soft backing that can be cut through with a small knife. Don't forget to mark with a pencil. Remember that the hole must be smaller than the diameter of the handle. Otherwise, it will fall inside the casing.
Removing car door trim
It is worth noting that even a novice car enthusiast can handle this work, since this part has the most primitive design and simple fastening elements. But there are some nuances here. For example, removing the euro door trim of a VAZ 2110 does not occur without dismantling the window lift lever (if one is installed on your car). Experts also recommend stocking up on plastic clips in advance, because most of them burst during dismantling.
Why do doors sag?
There are several reasons that affect the reliability of door fixation and sagging:
- The hinges and axles are badly worn. The door of the vases began to close poorly, and when opening it required considerable force.
- The fastening has become loose and a metallic creak is heard when driving on uneven roads.
- The pairing of the door fixing elements was broken: the hinges were skewed, and cracks formed in the door body. This leads to uneven gaps and the appearance of water in the cabin after rain.
- The door was hit in an accident.
- The doors have not been installed or adjusted correctly.
How to fix sagging doors
Advice: Before carrying out work, it is necessary to determine the cause of the sagging.
Why the door sagged, a small test can help:
- With both hands you need to grab the bottom of the door and, with slight loosening, check the gap in the vertical plane. Play in the VAZ 2110 door hinge is not allowed.
- The door is grasped with hands from above and below. Then you need to try to turn it in a horizontal axis; there should be no movement of the door, no gap is allowed.
- A visual inspection is made of the places where the door hinges are fixed to the car body on a VAZ 2110 car, the hinges of the sagging door are compared with the same elements of a working one, the differences in them are determined and a conclusion is made.
Once the cause of the sagging is identified, repairs can begin. It could be:
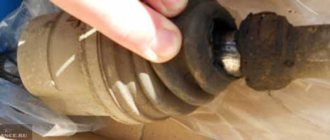
- If the door sag due to excessive wear on the hinge axis, it is necessary to replace the pin in the VAZ 2110 door hinge.
- If the entire mechanism has signs of wear or wear, then the VAZ 2110 door hinge assembly needs to be replaced, then the price will be less than installing several new parts simultaneously with heavily worn elements.
After replacing failed parts, it is necessary to adjust the door position. For this:
Tip: To make the adjustment procedure easier, it is better to remove the mating part.
- The door is closed and its best vertical position is visually determined.
- If the door line runs parallel to the body, and the door itself is shifted down or up, it is necessary to slightly loosen the fixation of the upper and lower hinges and raise or lower the door. After this, secure the position with a fixing screw.
- If the corner of the door, the end of which is equipped with a lock, is located slightly below the desired level, while the door hinges on the VAZ 2110 are working properly, the fixation of the lower hinge is unscrewed and the door position is leveled. To do this, thin metal plates or washers are placed under the loop itself, as shown in the photo.
If the edge on which the door lock is located is pulled up strongly, then the fixation of the upper hinge is unscrewed, and the adjusting plates are placed under it.
Tuning of VAZ 2110 door trim – reupholstery process
Here, during the work, we will need furniture leather (in stores it is called vinyl leather). The tools you should prepare are a hair dryer, a brush, glue and a stationery knife. It's best to start with the front doors and then move to the rear. First, the casing is cleaned of accumulated dust and dirt, treated with alcohol and degreased. Then you can safely start gluing. The work begins with applying a layer of glue to the door trim. After the substance on the surface has dried (no more than 5-10 minutes), begin processing the back side of the element.
Replacement options
Drivers have several options for replacing door trim, each of which has its own advantages and is chosen based on taste:
- Eurocard;
- European cladding;
- panels from the manufacturer;
- independent re-upholstery.
Factory trims from AvtoVAZ are replacement kits for the original trim. They are made of plastic and additionally covered with decorative inserts. The advantages are the exact overall dimensions, ease of installation of clips, and compliance with the door dimensions. Frequently used sheathing kits Lux 1 or Lux 2.
With European cladding, the door lining is made of high-strength polymers and comes in a variety of colors. Manufacturers are small companies specializing in car tuning.
Self-upholstery does not require large investments and is within the capabilities of every driver. The material you can use is textiles, natural, artificial leather, velor, etc.
The final stage is pasting
Next, using a hairdryer, the leather substitute is glued to the trim. Due to the effect of high temperature, our material will become more elastic, accordingly, all bulges and irregularities will be eliminated (that is, the work will be completed without “jambs”).
The edges of the leather are carefully folded and trimmed with scissors. The same work is done with the rear pair of doors. By the way, the hole for the door handle is processed in a similar way - first, 2 diagonal cuts are made, glue is spread on both sides and the material is bent inward.
Fastening
The cost of one door trim piston is from 3 rubles. AvtoVAZ produces plastic fasteners in its workshops. Product code 2108-6302015, 21080630201500, width, clip length 1.5 cm.
The mount has a simple shape and holds the door panel trim using a plastic skirt. The manufacturer claims high quality parts, but in practice, when disassembling the door card, two of the six required clips break. When installing Euro sheathing, on average one clip breaks, this is worth taking into account.
Advantages and disadvantages of updating
The main advantage of replacing door trim is a significant change in the interior, since European trim makes the interior more attractive. At the same time, owners of an expensive audio system will have the opportunity to install larger speakers in the opening for audio preparation. In addition, the fabric covering is reupholstered separately; the owner does not have to completely disassemble the door.
The main disadvantage of installing modern trim on a VAZ 2110 is the need to modernize the car's interior, since the new panels do not provide openings in the doors for ventilation. High-quality European cladding is not cheap, and more affordable panels are made too sloppily in the edge parts, where there are almost always noticeable flaws made during production.
If you want to replace worn upholstery with a new one, you must remember that although this process is simple, it takes a lot of time. The work is small and voluminous, since you will have to upholster each of the doors separately. You should decide to install Euro upholstery only if you are not bothered by the cost of the kit and the amount of time that needs to be spent on its installation.