VAZ 2110 is a four-door sedan with front-wheel drive, developed by AvtoVAZ. Design began in 1983, the first cars were released in 1995, and mass production began a year later. Production of the configuration continued until 2007. Today, the Zhiguli 2110 is one of the most common cars in Russia and the CIS. Below we will look at a number of features and nuances on the topic of “VAZ 2110 headlights” and everything connected with them.
Causes of poor headlights
This is what we should strive for
You need to look for the reason:
- Faulty lamp.
- Dirty glass.
- damaged or peeling reflector.
- Insufficient voltage.
- The direction of the light flow is not adjusted.
Replacing a dim lamp
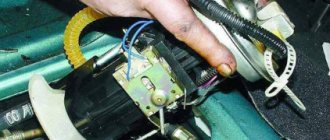
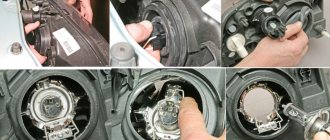
The lamp is replaced with a screwdriver (thin) or an awl. The protection box is removed by unscrewing the screws on the headlight unit. Under the cover you can see the holder mechanism and the three-pin block.
Changing the lamp
The procedure begins by disconnecting the contact block. Next, pressing on the fastening spring, the lamp is removed and then replaced. At the same time, condensation is removed from the reflector block. The presence of this disables the lighting device. Moisture is removed through the drainage duct, after preliminary cleaning. Installation of the lamp, assembly is carried out in the reverse order.
We recommend: Changing the gasket under the valve cover on a Chevrolet Lacetti: articles, tips and sealant
Dirty headlights and cloudy windows
Dirty headlights reduce road illumination by 50%! Moreover, glass ages and becomes cloudy over time. Wiping with a dirty cloth contributes to this, which causes microscopic scratches.
The brightness of the car light is 50%! Depends on the condition of the headlight glass
It is possible that there are cracks that allow dust particles and water to pass through (during washing). They settle on the outer and inner surface of the glass, the reflector and lead to low transmission of light rays.
An irreparable mark on the glass is left by specks of dust, grains of sand, and pebbles flying out from under the wheels of oncoming or passing cars. Scratches and microcracks refract and scatter light in different directions, as a result of which the direction of the beam is lost.
Replacing glass in headlights
Lamps and glass cannot produce any effect if the reflector has peeled off due to prolonged use. On domestic VAZ-2114 cars, it is possible to replace the reflector, for which you should:
- Disconnect the battery and remove the headlight unit (see “Removing the headlight on a VAZ-2114”).
Front view, headlight mounts
- Remove the glass from the sealant, having previously heated it with a household heating element, if there is no construction heating element.
Unfasten the fastening latches and, cutting off the layer of sealant, remove the glass - Unscrew the lamp, remove the defective reflector, replacing it with a new one.
Fresh sealant is applied to the grease-free ends of the glass and the assembled headlight is mounted in place. We mount the assembled headlight in place
Lamp voltage low
Low voltage at headlight terminals can cause dim light
Low voltage occurs due to a malfunction of the current generator, oxidation or broken contacts. When checking this unit, you need to ensure that the voltage, including at the lamp contacts, is 13.8÷14.2 V. Low voltage can be detected by ringing the circuit and finding a defect and eliminating it.
Distorted headlight position
This happens as a result of a minor impact, even a light touch of the bumper, for example, with a wall when parking, a tree or a curb.
Adjusting the headlights is accompanied by placing the car on a flat area in front of a smooth wall at a distance of 7–10 meters. The accuracy of the direction of the rays can be obtained provided that the tank is filled (more than 50%!) and tires are properly inflated. The machine is loaded as it is normally used.
Two headlight adjustment screws
On the wall, draw with chalk the center of one headlight (the other is covered, for example, with a piece of cardboard) and the center of the body. A second line is made 12 cm lower. The third line is drawn 22 cm below the first. Based on these three projections, a vertical line is drawn covering the center of the headlight and the body. One of the two screws located inside the headlight adjusts the tilt of the light, and the second forms a directed beam.
Turning on the low beam will result in a projection on the second line. Having completed the procedure with the second headlight, you get an adjusted low beam. In this case, the high beam will also be adjusted.
Sensor diagnostics
First of all, an external inspection is carried out. We check the integrity of the wiring and the condition of the contact group. It is better to test the wiring with a multimeter from the removed connector to the nearest input into the car's distribution contact box. Next, we test the sensor itself:
- We put the car on a pit or on a lift.
- Disconnect the connector and move it to the side.
- Turn on the ignition without starting the engine.
- We connect the multimeter probes to the sensor and ask an assistant to engage reverse gear.
- A working sensor will show zero resistance between the contacts.
If the test fails, the sensor must be removed from the transmission. In this case, some of the transmission oil will leak out of it, so it is better to prepare a plug in the form of a bolt with the same thread or temporarily screw in another sensor.
Tip: Do not throw away the broken sensor; it may be useful for temporarily closing the hole.
After washing the outside of the housing and cleaning the contacts, you can check the sensor with the same multimeter. The pressing force on the rod is small, provided that it is not blocked by corrosion. Therefore, just press it with your finger and look at the results of measuring the resistance.
Differences in disassembling Kirzhach and Bosch headlights
Note: headlights, as mentioned above, come in two varieties. One of them is called “Kirzhach”, this type is explained on how to take it apart. Disassembling the lanterns of these two varieties is different and each in its own way. In order to disassemble the second type of headlights, called “Bosch”, you need to carry out even less complex operations.
Farah Bosch
So:
- The glass should be removed from the headlights; it will come out by itself when the latches on the headlight are unfastened.
- Now you need to unscrew the adjusting bolt of the reflective surface until the end.
- Pull out the cap, which is located inside the reflector itself; it covers the near-view bulb. To do this, you can also use a screwdriver to pry up the reflector on the other side of the lamp.
- We are changing the parts in the headlight that were planned.
- Reassemble the car headlight in reverse order.
Note: when the headlight is reassembled, no matter after replacing which part, you must always use a special sealant. If it is not there, take note that you can also use a rubber seal for these purposes.
As you can see, everything can be done with your own hands, at no cost, very quickly and without harming the car. We remember that replacing only the glass is much easier than replacing the entire headlight. The instructions will tell you how to do this easily. This way you can save a lot of money, because the price of glass is much lower than for a new headlight.
We turn on the brake lights forcibly
Relay K1 is successfully replaced with a pad with jumpers. In Fig. 1 just shows its diagram. If there is no such platform, you can temporarily close contacts 4-5. First, check everything mentioned above.
Have an observer watch what happens to the lamps. Press the pedal with one touch and release it. If the lamps do not turn on, check that the fuse is working properly. It's burned out, which means you're looking for a short circuit.
How to and how not to check the “0 Volt” potential
Let’s agree right away that we only work with a voltmeter. Voltage “+12” is caused by connecting one probe to ground. The presence of potential “zero” is checked differently: any of the probes is connected to a terminal with positive voltage, and then the second probe is connected to the wire being tested.
Consider the error: one probe is connected to ground, the second to the terminal being tested, and vol. Here they conclude that there is a “mass” potential, but this is wrong! If the contact with ground is broken, the device will also show “0”. That is, the number “0” does not contain information.
Symptoms of a malfunctioning reverse sensor
It is better to find the primary circuit from the sensor using the electrical diagram of your car, and route this signal to a new device. Of course, you should use a relay rather than connecting the device directly. A fuse must be added to the circuit.
Expert opinion
It-Technology, Electrical power and electronics specialist
Ask questions to the “Specialist for modernization of energy generation systems”
Common problems with optics and how to fix them It transmits information, turns on the voltage to the lights, thereby allowing drivers around you to see that you are about to reverse. Ask, I'm in touch!
How to disassemble a VAZ 2110 headlight
The design of dozens of headlights can vary greatly depending on the manufacturer (see types of headlights). Disassembly of the headlight will be shown on the two most popular models: Kirzhach (Avtosvet Plant) and Bosch.
Headlights VAZ 2110 Kirzhach
To remove the headlight glass, carefully insert a flat screwdriver into the corner of the glass, and then insert a utility knife into the resulting gap and cut off the sealant step by step, helping with the screwdriver. If the sealant does not yield, then it needs to be heated using a hairdryer; this is described in more detail in the video:
After the headlight glass is removed, remove the headlight reflector by unscrewing three bolts:
To remove the board with the reflector and module from the headlight, remove the pressure spring through the hole in the hydraulic corrector. Then we tighten the adjustment as much as possible and slip in the screwdriver handle, after which we begin to unscrew first one adjustment screw, then the other. We remove the board from the headlight.
Headlights VAZ 2110 Bosch
Replacing Bosch headlight glass is easier because... Instead of sealant, a rubber seal is used. We remove the headlight glass, having first unfastened the latches. To remove the headlight reflector, we had to completely unscrew the adjusting screws and pull out the cap inside the reflector (covering the low beam lamp), prying it off with a screwdriver from the other side. When reassembling the headlight, the glass is installed using a sealant or sealant (you can use soft, construction). By the way, do you know how to tune the headlights of a VAZ 2110?
Tuning and repair of VAZ 2110
The information presented in this article will concern the disassembly of the VAZ 2110 headlight. Why do you need to disassemble the headlight? In my case, I did this in order to insert the diode strip inside the headlight. This will also be useful for those whose headlights sweat. The reasons may be different.
I will not describe how to remove a headlight from a VAZ 2110 in this article, since you can find detailed information about this HERE.
Well, let's get down to the process itself. In order to disassemble the VAZ 2110 headlight, you need to be patient. Since the parsing process is simple, but it can take a while.
First, let's look at how to disassemble the headlight of a VAZ 2110 (Kirzhach)
So, the first thing you need to do is remove the glass from the headlight. I consider this stage the longest and most dangerous
Dangerous because if you are not careful you can break the glass.
A) Insert a screwdriver or knife into the edge of the headlight, between the glass and the plastic block.
B) This will create a small gap through which you can insert a utility knife and begin cutting the sealant.
C) be careful, do not rush, do not insert the screwdriver too deeply, otherwise the headlight glass will simply crack.
D) We go through the entire perimeter of the headlight with a knife. If the sealant does not yield, you can warm up the headlight with a hairdryer.
Disassembling headlights Kirzhach VAZ 2110
Video tutorial on disassembling headlights of the tenth family (Kirzhach) The video is a complete example.
Repair of headlights VAZ 2110 boch
D) When the sealant has been slightly trimmed around the entire perimeter of the headlight, you can carefully push the screwdriver deeper into the headlight or insert a thicker screwdriver.
E) And again we go through the entire contour with a knife. (I played with the first headlight for 2 hours, with the second one less, either I gained experience, or there was less sealant. The second one succumbed to me in half an hour).
G) When the glass has completely come off, remove it from the headlight. Be careful, as the glass caught on the chrome plastic inside the headlight. And then it is fastened behind the headlight with three bolts. Therefore, if this happens to you, pry it with a stationery knife so that it comes unstuck from the glass.
We've sorted out the glass, let's move on.
2. Remove the chrome insert. To do this, unscrew 3 bolts from behind the headlight.
3. If you need to remove the headlight module and reflector, then remove the spring through the hole for the hydraulic corrector.
4. Now tighten the adjustment screws as much as possible, insert the screwdriver handle and unscrew the adjustment screws.
5. Now you can remove the board from the plastic headlight housing.
That's all, now let's look at the analysis of the VAZ 2110 (Bosh) headlight. Everything is much simpler with her.
- The glass on a Bosch headlight is very easy to remove, since it is not sealed with sealant. Unfasten the headlight latches.
3. To remove the reflector, you need to unscrew the adjustment screws and pull out the cap that covers the low beam bulb; to do this, pry it off with a screwdriver from the other side.
Information that a motorist must know before replacing existing wiring
First of all, the car owner must know when and in what cases the car wiring is replaced. At the same time, it is also necessary to have information about the final operational life in order to objectively understand when the wiring may need to be replaced. List of the most common reasons that cause wiring to malfunction:
- the appearance of cracks in insulation during a long period of operation;
- oxidation;
- corrosion;
- fuse blown, etc.
Components needed to perform wiring replacement:
- multivariate set of wires;
- fuse block for VAZ 21104;
- housing for the heating system;
- various types of sensors: brake fluid, cooling system, etc.;
- pads;
- many terminals;
- Of course, it goes without saying, duct tape.
A practical look at rewiring
So, a detailed step-by-step algorithm for replacing the wiring:
- first you need to dismantle the front part of the cabin;
- then you can deal with the proper degree of isolation, if there is a desire for it;
- after which, you need to pay special attention to the front headlight switch;
- The windshield wiper (see Replacing windshield wipers on a VAZ 2110 on your own) operates using its own mini-motor, the wiring of which must be checked for serviceability, since very often it simply becomes acidified;
- understand all heating modes;
- the connection of all electronic devices must be carried out strictly sequentially, by increasing the number of connected wires.
Note. Before disconnecting all electronic devices, it is necessary to draw your own conventional electrical circuit by hand in order to correctly make the appropriate connections in the future.
- now it’s time to tackle the fuse blocks, or rather their installation;
- most wires exceed the required length, so they simply do not fit into the allotted space;
- the bracket is the most rational solution to the problem; it will allow you to successfully replace the fuses with new ones;
- with the installation of a new fuse, the position of the front light indicator light, as well as the emergency warning light, will change;
- the heater will also have to be affected: first you need to remove the old radiator and then disassemble it to make it possible to replace the fan;
- Assembly is carried out strictly in reverse order.
Note. Before you begin the wiring replacement procedure, you need to find its current diagram. Otherwise, during the process of assembly and disassembly, you can quickly get confused, and you will have to send the car to a car service center.
The main advantages of the new wiring:
- the emergence of a practical opportunity to connect any gadget;
- longer service life compared to old wiring;
- high degree of reliability of everyday functioning;
- improving the quality and stability of electronic devices and much more.
It is always necessary to remember that installing homemade wiring is an easily feasible technical manipulation; the main thing is to understand all the necessary nuances.
The main objective signs of a car wiring fault
- the car engine does not start;
Note. If the essence of the malfunction lies in the ignition system, then one of the diagnostic signs is that the car will not start. Moreover, if the car starts poorly, but still starts, then problems with the wiring can be excluded from the list of possible causes.
- the central ignition lock has stopped functioning properly;
- the car’s electronics begin to function intermittently or do not work at all;
- headlights function intermittently or do not function at all;
- the characteristic smell of burnt rubber began to appear regularly in the car interior;
- the battery discharges too quickly, although it was functioning properly before;
- and of course, it goes without saying, multiple problems associated with the ignition system.
Which headlights for VAZ 2110 are better and easier to adjust?
On VAZ 2110 cars, two types of front optics were installed from the factory:
- domestic production, the so-called Kirzhach headlights;
- imported components made by Bosch.
The diagrams and design of the parts are somewhat different, but the methods for adjusting the angle of inclination are no different. Spare parts are often supplied from Chinese or handicraft products, which are not of high quality. Such headlights often cannot be adjusted to work together within the limits allowed by the standard.
Headlights Kirzhach
The design of products manufactured by Avtosvet JSC (Kirzhach) uses lens optics for low beam lamps. In theory, such a solution should provide a directed and intense beam of light that is easily adjustable. In practice, light is distorted by an external diffuser, as well as by weather phenomena (rain, snow, fog).
The high beam lamps are installed in a standard reflector located closer to the radiator grille. The reflective element is small in size and unreliably mounted. Because of this, the effect of light shaking when moving is observed.
Today, the Avtosvet enterprise is bankrupt, part of the equipment has been transferred. Spare parts sold under the Kirzhach brand are fakes and have nothing to do with the original products.
German Bosch headlights
German optics are equipped with conventional reflectors, but due to the high quality of components they allow you to obtain an intense and stable beam of light. According to owner reviews, the headlights provide better illumination in any weather than domestic products.
The production of headlights was carried out in Ryazan. Currently, the Automotiv Lighting enterprise, which is a structural division of Magnetti Marelli (Italy), is located there. It is these products that are supplied to the plant and for spare parts. The name “German Bosch” is used by car owners from old memory.
Photo and video instructions on how to remove a headlight on a VAZ 2110
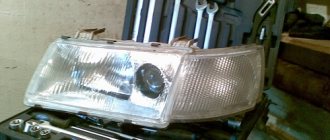
In order to replace a light bulb, removal, much less disassembly, of the headlight unit is not required. But in the case when there is a desire to tune, replace glass, etc., it won’t hurt to know how to remove the headlight on a VAZ 2110. Headlight for VAZ 2110
Types of lighting devices
Depending on the year of manufacture, the VAZ 2110 can be equipped with either Kirzhach or Bosch headlights. Both of them are a block that includes high and low beam headlights, side lights, and direction indicators.
No matter how much difference there is, there are some nuances:
- In Kirzhach, the glass is sealed, so both removing it and replacing it with a new one is more difficult. In addition, the low beam glass has a lens that makes the light output more focused, although limited;
Left headlight block Kirzhach
Right headlight block Bosch
It’s difficult to say unequivocally which headlight unit is better. But disassembling Boshevskys is definitely easier. In any case, it doesn't hurt to know how to do it in both cases.
Dismantling
To remove the headlight unit, you need to open the hood:
- De-energize the VAZ 2110 (this must always be done during repairs, especially anything related to electricity) by disconnecting the negative terminal from the battery;
- Remove the lining from the radiator;
- Disconnect the block with wires from the headlight;
- Press the latch of the hydraulic corrector cylinder and, turning it 90° to the right, remove it from the socket. There is no need to disconnect the hoses;
- Unscrew the three bolts securing the headlight unit, then move it back;
- After which, move the device to the side, towards the center of the car, until it disengages with the wing hook;
- Loosen the upper bumper bolts;
- Press the pad from below until its flange disengages from the buffer, then remove the pad;
- Unscrew the nut securing the headlight from below;
- By pulling the headlight unit towards you and disconnecting the block from the turn signal, you can remove it.
Parsing
Having carried out the correct removal without breaking anything, you can replace it with new equipment. Or you can disassemble and perform tuning or independent repairs.
The disassembly goes like this:
- Unscrew the fastening screws (there are two of them);
- Disengage the two hooks on the turn signal from the headlight. Now you can disassemble it into two parts.
How to remove glass?
Removal will be necessary if, for example, it is necessary to replace broken glass on a VAZ 2110 or it has become cloudy, covered with microcracks, etc.
If you are dealing with Bosch, then you need to release the latches, then easily remove the glass. When installing a new one, it’s worth inspecting the rubber; replacing it won’t hurt either. Some also use sealant, although there is no particular need for this, unless, of course, you are dealing with genuine products and not Chinese fakes.
You'll have to tinker with Kirzhach a little longer. Here, in order to remove the glass, you must first carefully insert a flat-head screwdriver into the corner of the glass, forming a gap. Then connect a thin stationery knife to the process.
So, with the help of a knife and a screwdriver, you may be able to detach the glass. If the sealant “sticks”, you need to warm it up with a hairdryer and immediately continue removing the sealant while it is warm.
When installing new glass, the headlight block can be placed on a softer, construction sealant. In addition, by removing the glass, you can disassemble the reflector from the outside of the car if it also needs replacement.
How to change?
- Place the VAZ 2110 in a pit or drive it on an overpass.
- Remove the engine protection, if any.
- Have a small container for the oil. Because when you open the sensor, oil will begin to flow out.
- Get under the car and disconnect the wires going to the part.
- Open the old sensor, immediately insert the container and screw in the new one.
- Add the leaked oil into the box.
- Stick in the wires, wipe the surfaces on which oil has gotten.
- Start the car and check if the lights come on when you put the vehicle in reverse.
For reference: A new one is inexpensive - from 100 rubles. Usually at the factory they install them from the VAZ 2108.
Reverse sensor VAZ 2110: where is it located, how to remove, how to replace, signs of malfunction
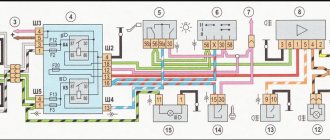
Now let’s start troubleshooting, and start with the reasons that are easiest to diagnose. But before we begin, let’s digress a little and take a look at the electrical diagram of the VAZ 2110 lighting devices. It will be useful to us.
Expert opinion
It-Technology, Electrical power and electronics specialist
Ask questions to the “Specialist for modernization of energy generation systems”
The brake lights on the VAZ 2112 do not work. Find the reverse sensor. Let me remind you that in the VAZ 2110 it is located on the left side of the power take-off box if you stand in the direction of the car. Ask, I'm in touch!
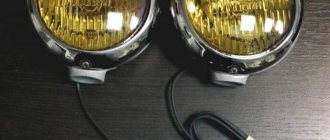
Fog light
A very useful device, provides light in bad weather environments. The factory version is supplied for the VAZ 2110 “Lux” configuration. In other versions you need to install them yourself. At the same time, the place in which they will be placed is determined. Most often, this is the bottom of the bumper, there are holes for fastenings.
- transparent - they give light in spots, they are a little worse;
- corrugated - scatter light well on the road surface.
They purchase frames, relays, a power button, and wires for them. The latter are placed under the hood from the instrument panel, they are connected to the connectors on the instruments, they are isolated, the instruments are fixed in frames and secured to the bumper, and the wires are connected. The button is mounted in the break of the supply wire. Then the devices are adjusted.
Principle of step-by-step action
Let's start removing the lamp from the headlight unit. To do this, we need a thin screwdriver and an awl, as well as a magnet on a long handle (if possible). We unscrew the lamp protection box on the headlight unit on both sides by hand.
Remove the cover. Below it you can see the three-pin headlight power connection block, as well as the spring mechanism of the lamp holder.
Replacing the low beam bulb on a VAZ 2114 Before disconnecting this unit, you need to disconnect the contact block. Then you need to compress the lamp fastening spring and release the lighting element itself. With a slight movement of the hand, we remove the lamp from its standard mounting location and replace it in the reverse order.
Before changing the low beam bulb on a VAZ 2114, it is advisable to make sure that there is no condensation in the reflector unit. If moisture is present, this may be the main reason for the failure of this device.
To eliminate it, it is important to clean the drainage channel, which is located in the area where the turning lamp is mounted (left or right)
When performing this work, you must adhere to basic safety rules. When the lights for the VAZ 2114 stop shining on the road, you don’t need to stand on the side of the road, creating an emergency situation, but try to get to the nearest gas station or service station.
BOSCH headlight wiring harness for VAZ 2110, 2111-2115
Dear customers, in order to avoid errors when sending the headlight connector 2110-3711010РХ assembled with wires, in the “Comment” line indicate for which headlight BOSCH or Avtosvet, your car model, year of manufacture.
In any car, optics play an important role, since the driver’s safety depends on the quality of road surface lighting at night. Accordingly, because of this, many car enthusiasts periodically check their headlights to ensure better illumination.
When replacing a light bulb in the headlights of a VAZ 2110-2112 car, the car enthusiast usually saw a depressing picture: all the insulation was stale, the contacts were oxidized and the wire cores broke after each lamp replacement, the space under the light dimensions crumbled and there was no proper contact.
The reason for this is the daily load on the headlights: overheating of the contact part due to the small cross-section and prolonged operation.
Connectors 0301050014РХ with wiring assembly, designed for connecting high and low beam lamps, as well as side light lamps in the BOSCH headlight of cars of the VAZ 2110-2112 family, through the front (under the hood) harness.
Bosch and Avtosvet direction indicators are not interchangeable. When installing headlights from another manufacturer, you will also have to spend money on turn signals.
Connector 0301050014РХ headlight assembly VAZ 2110 BOSCH with wires, are highly resistant to adverse environmental influences (high humidity, salt solutions, oil, gasoline and their fumes, aggressive detergents). Connectors with Cargen wires use wires with copper cores with a cross-section from 0.5 mm to 6 mm.
Lamps used on VAZ 2110, 2111, 2112 (Zhiguli) cars
| Name | Designation according to GOST | EEC designation | Power, W | Position in the photo |
| Headlight block: | ||||
| AKG12-55-2 | H1 | 55 | 1 | |
| AKG12-55-2 | H1 | 55 | 1 | |
| A12-21-4 | PY21W | 21 | 2 | |
| A12-5-2 | W5W | 5 | 6 | |
| Fog lamp | AKG-12-55-1 | H3 | 55 | 4 |
| Side turn signal lamp | A12-5-2 | W5W | 5 | 6 |
| Rear Exterior Light: | ||||
| A12-21-3 | Р21W | 21 | 3 | |
| A12-4-1 | T4W | 4 | 7 | |
| A12-10 | T10W | 10 | 7 | |
| A12-21-3 | Р21W | 21 | 3 | |
| Rear interior light: | ||||
| A12-21-3 | Р21W | 21 | 3 | |
| A12-21-3 | Р21W | 21 | 3 | |
| License plate lamp | AS12-5-1 | C5W | 5 | 5 |
| Luggage compartment lamp | AS12-5-1 | C5W | 5 | 5 |
| Interior lamp | AS12-5-1 | C5W | 5 | 5 |
| Glove box light bulb | AS12-5-1 | C5W | 5 | 5 |
| Instrument cluster illumination lamp | A12-1.2 | W1,2W | 1,2 | 8 |
| Instrument cluster indicator lamp | A12-1.2 | W1,2W | 1,2 | 8 |
| Individual lighting lamp | A12-4-1 | T4W | 4 | 7 |
| Cigarette lighter lamp | AMN12-3-1 | T3W | 3 | 7 |
| Heater control unit illumination lamp | A12-1.2 | W1,2W | 1,2 | 10 |
| Illumination lamp for the damper control lever of the ventilation and heating system | A12-1.2 | W1,2W | 1,2 | 9 |
| Clock light | A12-1.2 | W1,2W | 1,2 | 10 |
| Switch symbol illumination lamp | A12-1.2 | W1,2W | 1,2 | 10 |
Connector 0301050014РХ assembled for the VAZ 2110 BOSCH headlight in VAZ 2110-2111-2112 cars - satisfies the needs of consumers and complies with the requirements of GOST R51814.1-2004 (ISO/TU 16949:2002).
Replacing the wiring harness 2110-3711010РХ, located in the BOSCH headlight, connected to the front harness through the “female” connector in cars of the VAZ 2110-2112 family, can be done independently, without contacting specialized service centers.
Since for headlights, depending on the manufacturer, there are different connectors assemblies, we ask you, in order to avoid errors, when ordering “In the cart / in the order comment line” indicate the model of your car, /
Other article numbers of the product and its analogues in the catalogues: 0301050014РХ, 2110-3711010РХ.
VAZ 2110, VAZ 2111, VAZ 2112 with BOSCH headlight block.
Any breakdown is not the end of the world, but a completely solvable problem!
How to independently wire a BOSCH headlight on a VAZ 2110-2112 family car.
With the AvtoAzbuka online store, repair costs will be minimal.
Just COMPARE and BE SURE!!!
Don't forget to share the information you find with your friends and acquaintances, because they may also need it - just click one of the social networking buttons located above.
Basic principles
It doesn’t matter what kind of engine the Lada is equipped with - it could be a VAZ 2110 injector or a 2110 carburetor - the basic electrical components in this model will not be different.
Below are the main features that the VAZ 2110 wiring has:
- Any electrical equipment, as well as devices that are powered by electricity, is based on a single-wire connection. Lada engineers equipped the electrical wiring with wires of different colors, and each of them is responsible for the operation of certain functions. Accordingly, certain devices will be connected to the circuit through a specific wiring harness. Thanks to this, the car enthusiast has the opportunity to understand the nuances of the wiring himself, especially since, if necessary, he himself will be able to repair certain elements.
- The VAZ 21102 has 8 or 16 valves, it makes no difference, the minus is the ground, that is, it is connected to the vehicle body.
- As for the positive cable, on an 8- or 16-valve engine it will always be red. So, if the VAZ 2110 wiring is being replaced or repaired, there is no need to change the color of the wires, otherwise you will confuse yourself in the future.
- Each equipment or system associated with the vehicle’s electrical circuit is equipped with a separate cable harness.
- The tenth model of the VAZ family is designed in such a way that when the battery is activated, the entire electrical circuit and equipment operate under voltage. Therefore, when performing any work related to the on-board network, you should always disconnect the battery.
- Remember that there is also a contactless system. As a rule, it is necessary in order to create a high-quality spark when starting the engine, which also contributes to better combustion of the combustible mixture. For the normal functioning of such a contactless system, it is necessary to use high-voltage cables (the author of the video is MR. BORODA).
Carburetor models
The first models of 8- and 16-valve VAZ 2110 cars were equipped only with carburetor engines. A few years later, the domestic automobile concern began to equip its vehicles with injection engines. Of course, the injection model is more advanced, but today in Russia and the CIS countries tens of thousands of carburetor cars with 8- and 16-valve internal combustion engines are used.
Most likely, dozens of owners are interested in the question: is the circuit different on carburetors and injectors 21102 or not? In principle, there are no special differences between these versions in terms of the electrical circuit. Almost all systems used on injection 8- and 16-valve engines are identical to carburetor units. Accordingly, if you need to replace a carburetor engine with an injection one or install additional devices, then there will be no problems with this. If you look into the engine compartment, you will notice that both versions of the car even have the same outputs and plugs.
One of the main points that must be taken into account when replacing a carburetor with an injector is the connection of the fuel pump. In order for the fuel pump to always work correctly, it is necessary to additionally install wiring to power it to the control unit.
Injector
In addition to the fact that the electrical wiring in the carburetor and injection versions is virtually identical, the injector has certain features. For example, it is equipped with fuses, and also in the injection versions of the car there are a larger number of sensors.
In fact, as a result of the fact that these vehicles are equipped with a large number of different sensors designed to provide ECU functionality, the system itself is more complex. It should be noted that carburetor versions do not have an electronic control unit. To repair the system if necessary, you need to clearly know about all its components and their installation locations. The electrical circuit itself in any car is divided into the engine compartment and the interior. Above you can familiarize yourself with the electrical circuit diagram, and below are its main symbols.
Replacing headlight parts
In some cases, a complete replacement of headlights may not be necessary; sometimes breakdowns can be eliminated by replacing headlight parts. Quite often, car owners notice that the light flickers noticeably when the car is moving. This may be due to reflector rattling. To eliminate light flickering, you need to check:
- positioning the reflector in place in the latch;
- presence of adjusting bolt rods;
- emphasis in the seating recesses of the hydraulic corrector rod;
- sagging thread (high and low beam lamps are swapped);
- integrity of the hydraulic corrector tube.
More successful methods for eliminating jitter are:
- replacing the hydraulic collector with an electric corrector;
- increasing the length of the hydraulic corrector rod to tension the spring.
The caps can be replaced with a plastic dowel 8 millimeters long; a cap that can be removed from the brake fitting; another plastic cap. This is done in this order:
- the hydraulic corrector is removed from the illuminator;
- The cap is screwed tightly onto the corrector rod, preventing it from jumping inward;
- The corrector is installed in the mounting socket.
Replacing the headlight hydraulic corrector method 1
Headlight hydraulic corrector
It is also common for the headlight hydraulic corrector to break down, causing the adjustment to stop working and the reflector to lower. The light beam has to be adjusted quite often, especially when the trunk of the car is heavily loaded, when the light is directed into the eyes of drivers of cars moving towards you. Repairing the headlight hydraulic corrector takes a little time:
- First, the headlight fasteners are unscrewed and removed;
- The headlight is disassembled: the glass and metal clips are carefully removed;
- Using a knife, the glass is cleaned of sealant;
- The convex profile on the glass is cut off;
- The screws are unscrewed from the reverse side;
- The paper reflector is removed.
The same actions are performed with 2 plastic rosettes from 2 “turntables” fixing the reflector. During the repair process, the broken latch is replaced with a gasket, which does not allow you to clearly feel that the adjustment rests in the extreme position.
As a result, there is a possibility that the corrector will be compressed again.
After completing the necessary steps, the headlight is assembled in the reverse order of disassembly.
Replacing the headlight hydraulic corrector method 2
There is also a second way to repair the hydraulic corrector. To do this:
- The adjustment screws are threaded (metric 3);
- The screws are screwed into the illuminator, then the washers are put on;
- The plastic fasteners are removed;
Replacing the hydraulic corrector for a VAZ headlight
- A bar with low and high beam modules placed on it is put on;
- Put on top: a washer, a spring on the washer, on top of which another washer is put on. It is worth using locknuts;
- Everything gets twisted;
- The structure is fixed using anaerobic sealant.
Lighter repair
The illuminator can be repaired without the need for disassembly. The ball can be snapped into place through the hole in the lamps on the back side of the illuminator without removing the glass. So:
- First, a hole is drilled directly opposite the latch at the top of the headlights;
- A screwdriver is inserted into the hole made;
- A collet is attached to the corrector ball;
- Then the drilled hole is sealed;
- Using a hinged loop from a furniture cabinet (loops 5-6 centimeters long, with a cutout on top and mounting holes where it is attached) it is attached to all broken corrector units;
- The canopy is inserted into the slot of the adjusting screw;
- The screw is moved so that the slot is in a narrow section of the canopy;
- Holding the canopy, the screw is unscrewed until it stops with force. This is how the canopy is fixed, which must be placed in a horizontal position;
- Using an electric drill, using a 3mm drill bit, holes are made in the base of the light where there are holes on the canopy;
- A shortened self-tapping screw is screwed into the hole so that it does not reach the high beam reflector. This slot will allow you to securely fix the adjusting screw, which will not be broken again.
Before carrying out work, it is recommended to watch this video, which shows how to replace the headlight on a VAZ 2115, which is completely similar to the ten.
https://youtube.com/watch?v=2etXMEe8cnY
replace headlight glass
Replacing headlight wiring on a VAZ 2110
- Registration
- Entrance
- To the beginning of the forum
- Forum Rules
- Old design
- FAQ
- Search
- Users
The light bulbs are the most ordinary Lighthouse.
In Kirzhach everything is arranged differently.
Nsk
The updated BOSCH terminal has a + ordinary female connector. And the minus is supplied through the lamp holder body.
1 minus tendril broke off on my old headlights. The plus and minus went there at terminal 1. And the headlight kept going out!
So I advise you to just buy new optics. (Car: VAZ 21102 2004) My car is also 04 years old. The headlights were already tired, the glass looked like it had been sandblasted and the reflector was already faded... When I installed new headlights. It seemed as if xenon had been stuck there! 1500 rub. thing. Not that much money for normal light.
When I installed new headlights.
55 W lamps. The trick is very clever. It won't be possible to re-embrace the mothers. If I'm wrong, can someone explain exactly how to do this? In Kirzhach everything is arranged differently.
Disassembling the VAZ 2110 headlights
The information presented in this article will concern the disassembly of the VAZ 2110 headlight. Why do you need to disassemble the headlight? In my case, I did this in order to insert the diode strip inside the headlight. This will also be useful for those whose headlights sweat. The reasons may be different.
I will not describe how to remove a headlight from a VAZ 2110 in this article, since you can find detailed information about this HERE.
Well, let's get down to the process itself. In order to disassemble the VAZ 2110 headlight, you need to be patient. Since the parsing process is simple, but it can take a while.
First, let's look at how to disassemble the headlight of a VAZ 2110 (Kirzhach)
So, the first thing you need to do is remove the glass from the headlight. I consider this stage the longest and most dangerous
Dangerous because if you are not careful you can break the glass
A) Insert a screwdriver or knife into the edge of the headlight, between the glass and the plastic block.
B) This will create a small gap through which you can insert a utility knife and begin cutting the sealant.
C) be careful, do not rush, do not insert the screwdriver too deeply, otherwise the headlight glass will simply crack.
D) We go through the entire perimeter of the headlight with a knife. If the sealant does not yield, you can warm up the headlight with a hairdryer.
D) When the sealant has been slightly trimmed around the entire perimeter of the headlight, you can carefully push the screwdriver deeper into the headlight or insert a thicker screwdriver.
E) And again we go through the entire contour with a knife. (I played with the first headlight for 2 hours, with the second one less, either I gained experience, or there was less sealant. The second one succumbed to me in half an hour).
G) When the glass has completely come off, remove it from the headlight. Be careful, as the glass caught on the chrome plastic inside the headlight. And then it is fastened behind the headlight with three bolts. Therefore, if this happens to you, pry it with a stationery knife so that it comes unstuck from the glass.
We've sorted out the glass, let's move on.
2. Remove the chrome insert. To do this, unscrew 3 bolts from behind the headlight.
3. If you need to remove the headlight module and reflector, then remove the spring through the hole for the hydraulic corrector.
5. Now you can remove the board from the plastic headlight housing.
That's all, now let's look at the analysis of the VAZ 2110 (Bosh) headlight. Everything is much simpler with her.
- The glass on a Bosch headlight is very easy to remove, since it is not sealed with sealant. Unfasten the headlight latches.
3. To remove the reflector, you need to unscrew the adjustment screws and pull out the cap that covers the low beam bulb; to do this, pry it off with a screwdriver from the other side.
Well, since for some reason you have had to make such a repair as disassembling a VAZ 2110 headlight, then I advise you to also read such articles about installing an LED strip in a headlight. We blow out the headlight of the VAZ 2110 in black. This way you will kill two birds with one stone. Well, that’s all, see you again at vaz2110-remont.ru.
(votes: 2, average: 5.00 out of 5)
Wiring test for non-working brake lights (ground test)
Let's look at the basic diagram: the brake lights and the reversing lamps have a common ground pin. If contact with this pin is broken, the reverse lamps will not turn on. Well, brake lights too.
On the left side there is a connector through which the wiring goes to the fifth door. The connector has black and red wires. Check the voltages on them. Most often the ground on the black wire does not ring. But maybe the connector itself needs to be cleaned.
Usually, if the ground breaks, another pin is used - the one that is connected to the glass heating coil.
If the “plus” does not come to the red wire, we check the “frog”. It's simple here:
By the way, one of the connector terminals receives a voltage of “12 Volts”. Check it!
If all the steps do not lead to results, there is only one thing left: contact a qualified electrician. We wish you success.
Expert opinion
It-Technology, Electrical power and electronics specialist
Ask questions to the “Specialist for modernization of energy generation systems”
Flashlight In this case, some of the transmission oil will leak out of it, so it is better to prepare a plug in the form of a bolt with the same thread or temporarily screw in another sensor. Ask, I'm in touch!
Fog lights for VAZ 2114: Installation
Today, no car is recommended to drive without fog lights. First you need to buy the appropriate models of lighting fixtures. Next, if you carry out the process yourself, you will need:
First you need to open the mounting block. It contains relays and fuses. We unscrew the screws, pull the body towards us and then turn it over. You need to find the connector marked Ш1, where there is terminal 6. Next, open the hood and disconnect the washer reservoir. You should crimp the two yellow wires with a terminal and insulate them.
Using steel wire, you should stretch the wires along the corresponding spar wires and then two wires should be brought out at the place where the car's lighting fixtures are mounted. Then we leave no more than 15 centimeters and squeeze the mass onto each of them.
How to change?
- Place the VAZ 2110 in a pit or drive it on an overpass.
- Remove the engine protection, if any.
- Have a small container for the oil. Because when you open the sensor, oil will begin to flow out.
- Get under the car and disconnect the wires going to the part.
- Open the old sensor, immediately insert the container and screw in the new one.
- Add the leaked oil into the box.
- Stick in the wires, wipe the surfaces on which oil has gotten.
- Start the car and check if the lights come on when you put the vehicle in reverse.
Replacing the reverse sensor of a VAZ 2107 For reference: A new one is inexpensive - from 100 rubles. Usually at the factory they install them from the VAZ 2108.
Why did it happen so?
You may have add-ons installed in your browser that can make automatic search requests. In this case, we recommend that you disable them.
Expert opinion
It-Technology, Electrical power and electronics specialist
Ask questions to the “Specialist for modernization of energy generation systems”
A few words about the “serviceability relay” At the same time, lightly tug the wires entering them; any of them could easily rot and hang on the same insulation, creating the impression of serviceability. Ask, I'm in touch!
Replacing the front headlight on a VAZ 2110, VAZ 2111, VAZ 2112
Welcome! A front headlight - when driving outside the city or even in the city itself behind any car, in some cases it does not lead to anything good, because the cars in front are a very high source of danger, since when driving, for example, on gravel at high speed, the front car can cause good damage to the rear one, since all the stones from under the wheels will fly into the rear moving car and thus they can damage the hood, radiator grille, headlights, fog lights of the car that is driving behind and after that you will have to change some parts.
Reverse sensor for VAZ 2110
Driving out of the garage in the evening, did you notice that nothing behind you illuminates the path? This is not good. After all, the reverse lights should be on. And if they don’t light up, they either burned out, or the fuse has failed, or the reverse sensor of the VAZ 2110 has broken down. We’ll talk about the latter today. To find out for sure whether it is really out of order, do the following:
- Look at the condition of fuse No. 19 at 7.5 A. It is located under the instrument panel in the mounting block.
- Now check the light bulbs. If they are also in order, then you need to check the functionality of the reverse sensor. Only a question arises...
Reasons for replacement
Replacing glass on a VAZ 2110 headlight
Why do you need to change the glass on your headlights? Here are just a few reasons:
- A separate glass will cost much less than a whole headlight, and the reason why you have to replace the glass is a small stone that hits and breaks the headlight glass. A crack in the glass causes the headlight to shine dimly and the road illumination becomes poor at night.
- Over time, the glass of your car's headlights can become significantly dull, which also leads to poor road illumination at night. Polishing the glass is unlikely to help in this situation; it is much easier to buy new glass and replace it on the headlights.
- The easiest way is to find glass for a headlight on the private market and buy it second-hand. It will be much cheaper than in a store, and it’s not profitable to buy the headlight itself in auto stores; it will cost at least five thousand rubles for each headlight.
- The headlights fog up and do not have time to dry on short trips. A regular flashlight may sweat, but it dries completely after a short trip. If this does not happen, it means moisture is somehow getting into the headlight. This can happen either through a damaged case or through a crack in the glass.
Prevention measures
If you notice that the electrical circuit of your ten is not working correctly, first of all you need to seek help from an electrician. Or you can independently diagnose high-voltage wires; for this you need to use a multimeter.
The diagnostic procedure is carried out as follows:
- First of all, the black wire must be installed in the left hole.
- The red cable should be installed in the middle.
- Next, the diagnostic device itself turns on. The multimeter must be activated in blue twenty mode.
- Now you need to carefully connect the multimeter probes to each other.
- If the arrow on the device display points to zero, that is, zero resistance, this indicates that everything is in order with the high-voltage wires. This means that the problem must be looked for elsewhere. If the multimeter needle on the dial points to one, this indicates that the resistance level is quite high and exceeds the norm. In this case, you can understand that the problem lies in a certain wire. Most likely it is interrupted or has poor contact. In order not to have to deal with repairs, the best option would be to purchase a new wire and install it.
When repairing wires, you need to use not only electrical tape, but also corrugated tape; it is more resistant to rubbing than electrical tape.
Step-by-step removal of headlights
Whatever manufacturer makes the light unit, every car owner should know exactly how to remove the headlight on a VAZ-2110 before starting work. It is carried out in stages:
- Having opened the hood, you need to disconnect the “–” terminal from the battery in order to completely cut off the power to the car;
- it is necessary to remove the protective lining from the radiator very carefully and slowly;
- lighting devices are disconnected from the block and wires;
- The fixing element of the hydraulic corrector must be pressed tightly and turned to the right at a right angle. Next, the hydraulic corrector is simply removed from the socket, and there is no need to unscrew the connecting hoses;
- using a wrench of the appropriate size, unscrew the bolts securing the headlight in order to be able to move the block to the side;
- the fixation of the upper connecting bolts that hold the car bumper is weakened;
- by pressing on the lining, you need to ensure that the flange is disconnected from the buffer so that the lining can be freely removed;
- the lower headlight clamp is unscrewed;
- The reflector must be disconnected from the block and the block can be quietly pulled out by pulling it towards you.
If the removal of headlights is carried out step by step and according to the rules, then you will not break parts, but installing new parts or repairing old ones, and maybe even making original tuning, is within the power of anyone. You can learn more about the algorithm of actions in the video, which was made by professional machine masters.
The headlight unit can be dismantled for repair, replacement with a new one, or for tuning or modification. In this article we will talk about the removal and disassembly of a VAZ headlight of the tenth family, depending on its manufacturer (Bosch or Kirzhach).
Sensor diagnostics
First of all, an external inspection is carried out. We check the integrity of the wiring and the condition of the contact group. It is better to test the wiring with a multimeter from the removed connector to the nearest input into the car's distribution contact box. Next, we test the sensor itself:
- We put the car on a pit or on a lift.
- Disconnect the connector and move it to the side.
- Turn on the ignition without starting the engine.
- We connect the multimeter probes to the sensor and ask an assistant to engage reverse gear.
- A working sensor will show zero resistance between the contacts.
If the test fails, the sensor must be removed from the transmission. In this case, some of the transmission oil will leak out of it, so it is better to prepare a plug in the form of a bolt with the same thread or temporarily screw in another sensor.
Tip: Do not throw away the broken sensor; it may be useful for temporarily closing the hole.
After washing the outside of the housing and cleaning the contacts, you can check the sensor with the same multimeter. The pressing force on the rod is small, provided that it is not blocked by corrosion. Therefore, just press it with your finger and look at the results of measuring the resistance.