The question is how to check oil pressure sensor (hereinafter referred to as DDM) is of interest to drivers who have encountered problems with the operation of the engine oil system, in particular when the oil light is on. You can check this unit using an electronic or dial multimeter, a test light or a working pressure gauge. The verification procedure is simple, and even a novice car enthusiast can do it. The following are detailed verification algorithms indicating the subtleties and nuances.
Operating principle of the oil pressure sensor
Before figuring out how to check the oil pressure sensor, it is necessary to briefly discuss the theory, in particular, how the oil pressure sensor works. This will give a complete understanding of the process. First of all, it is necessary to point out that there are two types of oil pressure sensors - mechanical (installed on old cars, in particular Soviet models) and electronic (more modern, widely used in the automotive industry).
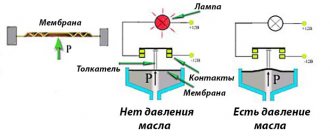
Mechanical Sensor Design
Mechanical DDM device
Inside the mechanical sensor there is a membrane that changes its shape depending on the pressure applied to it. Accordingly, the larger it is, the more the membrane bends. By bending, it acts on the rod present in the design, which is responsible for compressing the liquid in a special sealed tube. At the other end of this tube there is a rod on which this liquid pressed, and the second rod moved the needle of a device - a differential pressure gauge, or simply a pressure gauge. The pressure increases - the arrow goes up, the pressure drops - the arrow goes down.
There is also another, more common device, a mechanical oil pressure sensor. It is similar, but with the addition of a variable resistor - rheostat. So, a resistor is placed on the membrane present in its design, which changes its resistance depending on the actual value of the applied forces. Accordingly, the greater the membrane deformation, the more the sensor resistance changes. If there is no membrane deformation, the resistance value will be zero. This change is recorded by the electronic engine control unit (ECU), to which the corresponding signal is sent. Its software is designed in such a way that it controls whether the signal from the DDM is within a certain interval corresponding to the normal operating oil pressure in the engine oil system. As a rule, dial pressure gauges are attached to mechanical sensors, the scale of which shows the absolute value of the oil. Although in fact these devices are voltmeters, the needle of which changes its position in accordance with the resistance value coming to the device from the DDM.
Electronic sensor design
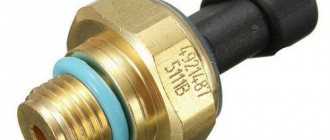
Electrical DDM device. 1 — rod, 2 — signal lamp, 3 — contacts, 4 — membrane
The design of the electronic oil pressure sensor (by the way, is installed on VAZ-2114 cars and its analogues, new Lada models) implies that when the membrane is flat (not under pressure), the supply circuit of the signal lamp on the instrument panel is normally closed, so it turns on under appropriate conditions. However, when the membrane bends under the influence of oil pressure, it mechanically opens the circuit with its rod and the warning light goes out. This, in fact, happens when the engine starts, which can be judged by the fact that the oiler light is in the active state (lit) when the ignition is turned on, as well as for the first 1...2 seconds.
Thus, the essence of checking a modern DDM is to measure the resistance of the sensor winding with a multimeter switched to the mode of measuring electrical resistance (ohmmeter). However, it can also be checked using other methods.
Features of work
Then, membrane sensors began to be used on machines to determine the operating parameters of the lubrication system. They come in two types:
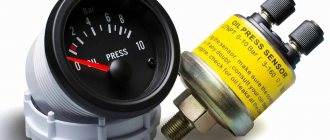
Mechanical ones are outdated and not used. The measuring device consisted of two sensors - membrane and measuring. They were connected by a tube filled with oil. The essence of the work is very simple - increasing pressure in the system leads to bending of the membrane installed inside the sensor. The membrane moves, pushes the rod, which squeezes out the oil in the tube. The resulting pressure caused the needle on the measuring sensor to move, and the driver determined the pressure in the system using a set scale. This is how diagnostic analog pressure gauges work now.
Sensor diagnostics
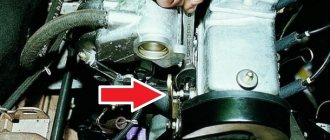
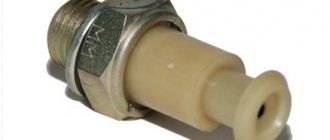
As mentioned above, there are two types of pressure sensors - mechanical and electronic. Accordingly, the procedures for checking the emergency oil pressure sensor in both cases will differ, albeit slightly (only the design features of these sensors apply). First of all, you need to make sure that the oil pressure sensor is faulty. To do this, you will need to perform additional diagnostics of the oil system - check the oil level in it, the condition of the filter, pump, and so on. If suspicions fall specifically on the serviceability of the oil pressure sensor, then first of all it is necessary to remove it from its seat with the engine turned off (as a rule, it is located in the area of the oil filter).
Where is the oil pressure sensor
Find out where the oil pressure sensor is located on different car models, since it depends on the design of the engine, and on some cars there are as many as two Read more
Typically, keys of various diameters are used for this, for example, 24, 27 or others (depending on the specific car model). After this, do not forget to plug its seat with a rag so that when the engine is running, oil does not leak out of it, and various debris or small parts (bolts, nuts, etc.) do not get into the oil system!
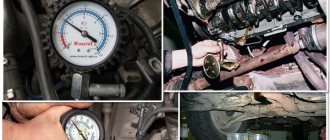
It is also advisable to check the pressure in the car's oil system. To do this, you need to screw a pressure gauge into the seat from which the DDM was unscrewed, with which you can take a control measurement of the oil pressure at various engine speeds. Please note that in this case it is necessary to ensure maximum tightness so that the pressure gauge readings are extremely accurate. You definitely need to look at the pressure when the engine is running at idle, as well as at medium and high speeds.
The corresponding pressure will be different for different machines, so you will find the exact information in the manual or technical documentation for a specific machine. If the pressure value is normal, but the information does not reach the ECU, then the sensor is most likely to blame, so it needs to be checked.
How to find out if the engine oil sensor is faulty using an auto scanner
On all modern cars, problems with the sensor can be indicated not only by the oil lamp, but also by the “check engine” indicator. Scan Tool Pro Black Edition helps to find out the reason , which should be connected to the ECU connector and connected to the engine control module (ECM) from a smartphone or tablet via Bluetooth or Wi-Fi through an available application.
Oil pressure and check engine indicator
Engine Oil Sensor Error
Depending on the nature of the problem, engine oil pressure sensor error codes may be stored: P0520, P0521, P0522, P0523 and P0524. In real time, you can connect to the control unit and see the presence of errors, as well as the reading of the oil pressure sensor (voltage to the sensor and oil temperature). This will allow us to more accurately determine the cause of the malfunction.
Thanks to the 32-bit chip, Scan Tool Pro will not only allow you to read and reset engine errors, but also measure operation in other car systems (gearboxes, transmissions, ABS, ESP, etc.) at certain time intervals and save the data in mind.
Malfunctions
- Persistent deformation of the bimetallic plates, which subsequently leads to incorrect readings.
- Failure of the heating element of the bimetallic plate.
- The appearance of parasitic resistance (oxides, wire breaks), which affects the accuracy of readings of resistive devices.
- Oil supply channel is clogged.
- Membrane damage.
- Wear of the resistive layer.
- Malfunction of the emergency oil pressure sensor relay. The relay is installed on some cars and is designed to activate a buzzer when there is insufficient oil pressure at certain engine speeds (for example, the buzzer may only sound when the speed rises above 1600).
Checking the electrical oil pressure sensor
Checking the sensor with a multimeter
Electronic oil pressure sensors, used both on foreign and domestic cars, in particular on VAZ-2114 cars and other modern Ladas, are easy to check. Their design is similar to that of a rheostat, but they simply open the circuit at a certain pressure. Accordingly, its verification is even simpler. To do this you need:
- Set the multimeter to the “continuity” (break) mode of the electrical circuit.
- Ensure a tight connection between the air pump and the inlet (sensitive) hole where air is supplied. Here, similarly, it is necessary to ensure high-quality sealing, since the result of the experiment directly depends on this.
- Place one multimeter probe on the central output contact of the sensor, and the second on its body, “ground”.
- At the same time, use a pump to apply air pressure of about 1...1.5 atmospheres to the sensor. There is no need to blow hard so as not to damage the membrane. If the sensor is working properly, the electrical circuit will open almost immediately, under the mechanical action of the rod, which is in rigid connection with the bending sensitive membrane of the oil pressure sensor.
As is clear from the operating diagram of the sensor, if the circuit is open (detected with a multimeter), then the sensor is working. Otherwise, no. In rare cases, instead of the sensor, the problem why the oil light is on must be looked for in faulty (broken or damaged insulation) wiring.
You can also check the performance of the oil pressure sensor using another method. So, you need to remove the power wire from the sensor and short it to ground. If the sensor is working properly, the warning light on the dashboard should not light up. Otherwise the sensor is faulty.
Checking two sensors
On some modern machines, two pressure sensors of the same type (“new”) are installed. The first is designed for an absolute pressure value in the range of about 0.15...0.45 atmospheres, and is designed to open the warning lamp after starting the engine. Its verification is similar and follows the procedure described above. That is, the connection is the same. Its circuit should open when pressure is pumped into it in the specified range.
The second sensor is designed to monitor oil pressure while the engine is running. It is similar in type to the first, but its difference is to control the upper limit of the oil (in order to prevent it from increasing to a critical value). The upper value may vary and differs for specific car models. However, in most cases it is around 1.8 atmospheres. When this pressure level is reached or higher, the contact circuit should close and the engine oil pressure warning light should be activated on the instrument panel.
Checking the pressure sensor using a light bulb
To check the electric (new) oil pressure sensor, instead of a multimeter, you can use a light bulb designed to operate under 12 V DC voltage, as well as a power supply (battery) and a compressor (preferably with a pressure gauge). The verification algorithm is as follows:
Connection diagram
- Two wires must be connected to the contacts of the light bulb.
- Connect one end of the wire going to the light bulb to the output contact of the pressure sensor.
- Connect the ground from the power supply (or minus from the battery) to the housing (ground) of the sensor.
- Connect the plus from the power supply or battery to the other wire on the light bulb.
- If the sensor is working properly, then after turning on the power supply (or simply when contact is made from the battery), the light should light up. Otherwise, the sensor can immediately be considered faulty.
- Next, to check, you need to apply a pressure of about 0.5 atmospheres to the sensitive element of the sensor using a compressor or pump. The pressure value can be different, and it depends on what pressure the sensor is designed for. Usually it is around the already mentioned 0.5 atmosphere.
- When the pressure increases to the specified value (critical for the sensor), the light should go out, since this will open the control electrical circuit in the sensor body. If this does not happen, then the sensor can also be considered unusable.
Instead of a compressor, you can easily get by with a regular car or even bicycle pump, which will easily produce the required half-atmosphere air pressure.
Importance of the device when operating a car
The data transmitted by the device to the on-board panel is important information.
They indicate possible malfunctions in the operation of the machine:
- the oil level drops below the minimum value;
- clogged oil filter;
- violation of the controller wires;
- the appearance of sediment in the oil pan;
- malfunction of the oil supply pump;
- engine oil leakage.
The indicator can also indicate a malfunction of the oil pressure device itself, unlike other breakdowns - this one is minor.
Mechanical sensor check
Checking an old mechanical sensor (for example, installed on some VAZ “classic” models and old foreign cars, for example, “Volvo 240”), with the help of which it is possible to directly find out what pressure is currently available in the car’s oil system, can be done even without multimeter, but using additional devices (air pump and electric car pressure gauge). The sensor similarly must be removed from the car, since it will not be possible to test it directly on the engine.
Checking the sensor with a pressure gauge
The test is a little more complicated than with electronic ones, but this lies, first of all, in some difficulty in assembling the electrical circuit. You need to act according to the following algorithm:
How to check a mechanical sensor, connection diagram
- On the sensor you need to find a contact that produces a signal for the oil pressure warning light on the car's dashboard, as well as another contact from which a signal is sent to indicate oil pressure. For further measurements, you will simply need to take the “ground” from the sensor housing (under normal conditions, all sensors simply take “mass” from the engine housing).
- Similarly, on an electronic pressure gauge, you need to figure out where to connect the plus and minus of its power supply, as well as the signal directly from the sensor (that is, there are three contacts).
- Connect the electrical circuit and tightly connect the air hose connecting the pump and the sensor sensing element.
- Next, you need to use a pump to apply 1…2 atmospheres to the sensitive element of the sensor. If it is working properly, then the dial pressure gauge will clearly show the incoming pressure. If this does not happen, it means the oil pressure sensor is faulty.
As a rule, oil pressure sensors cannot be repaired, so if they are found to be faulty, the unit must be replaced. Fortunately, these elements are inexpensive and are available everywhere in almost any auto store.
Please note that when installing the sensor on its seat after checking, it is recommended to lubricate it with heat-resistant sealant.
Operation and care
To avoid malfunctions, you should adhere to the operating rules:
- periodically carry out preventive maintenance of the oil system;
- check the operation of the pump;
- clean the filter from waste materials;
- control the lubrication of power plant units;
- if the technical fluid has changed color, change it immediately;
- If the low pressure signal constantly sounds, immediately diagnose the vehicle yourself or contact a car service center.
It is recommended to use engine oil only from trusted companies and suitable for a specific vehicle model. In inexpensive technical fluids, there is an excessive amount of impurities that settle in the lines and cylinders. They disable the main elements of the engine. It is also recommended to change the engine oil after a mileage of 10 or 15 thousand kilometers. Therefore, it is worth reading the car’s service book to find out all the details of the operating rules.
To summarize, we can conclude that the oil controller is one of the main measuring instruments of a vehicle. If it is faulty, then over time the internal elements of the power plant will be damaged, and then you will have to spend a lot of money on repairing the car. You can carry out the replacement yourself, without contacting a service center.
One head it's good, but two better
On numerous forums on the Internet, you can often find stories from experienced car enthusiasts that, along with an electronic oil pressure sensor, they installed a mechanical one in parallel with it. In particular, this is expressed in the fact that in the event of a drop in oil pressure, not only the corresponding warning lamp on the instrument panel will light up, but the absolute value of the pressure will also be visible on a pressure gauge installed somewhere in the area of the instrument panel.
This is done for the reason that sometimes, for example, after a major overhaul on the engine or when using low-quality (or outdated) engine oil that has become clumped, the sensor’s sensitive element does not work properly, respectively. Accordingly, when the pressure drops, the warning lamp does not light up, which is a critical fact, since the engine in such conditions runs “dry”, that is, without proper lubrication. This significantly reduces its resource and can completely damage the motor in the shortest possible time.
Thus, car enthusiasts install a so-called tee at the connection point of the pressure sensor, at one output end of which a traditional electronic sensor is connected, and at the other - a mechanical one. The hose with wires is mounted in the engine compartment in accordance with the engine design. The main thing is that it does not interfere with other elements of the motor, and is not subject to mechanical or significant thermal effects. A pressure gauge is installed at its end, for example, from a VAZ classic, UAZ or another similar device. In fact, its model is not important, the main thing is that it is convenient to navigate the scale, that is, it must have detailed graduations.
Conclusion
The pressure sensor is a fairly reliable unit and rarely fails. Therefore, if problems arise with the oil system indication system, it is necessary to check other parameters - oil pressure, the presence of leaks, the condition of the oil itself, its level and the oil filter, and only after that check the condition of the oil pressure sensor. In general, checking the serviceability of this unit is not very difficult, and even novice car enthusiasts can do it, literally using a car compressor and a multimeter. If the sensor fails, it is hardly possible to repair it, so it is better to buy a new DDM at a car dealership, since it is inexpensive.
Where is?
It’s difficult to say anything definitive about the placement of the sensor. It is clear that logically it should be in the cylinder block, but where exactly is the question. Cars have few general characteristics of where to look for this sensor. It is better to focus on the instruction manual. For example, it is not uncommon for manufacturers to mount it behind the cylinder head, in the area of the timing case or on the camshaft block; on Ladas it is placed there. On foreign cars, they are often installed somewhere at the bottom or in the middle of the engine, in the area of the oil filter or pump, in the crankcase (typical for Mercedes models).
In the photo: the VAZ 2115 oil pressure sensor is leaking oil. Sensor replacement required
By the way, do not forget that on most foreign cars there may be several sensors, in such cases they are located according to this scheme: one in front of the oil pump, the other somewhere behind it. In general, it depends on the model of the car, read the manuals, it’s difficult to say right away where exactly it may be located.
Location of the Gazelle oil pressure sensor
How does it work
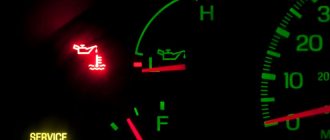
If everything is fine with the pressure/level, when you start the engine, the oil pressure light comes on only for a short time, then immediately goes out. If the indicator remains active, then it’s time to look for the problem and the fastest ways to eliminate it. On modern cars, the “oiler” can be either red (low engine oil pressure) or yellow (low level), and in some cases it may blink. If the above problems occur, a description of the malfunction may also be displayed on the on-board computer screen.
How does it work?
Many pressure sensors use the principle of converting one type of energy into another. A mechanical force is generated, which either acts directly on the measurement indicator (the needle on a pressure gauge, for example), or subsequently generates an electrical signal that is read and analyzed by the car’s on-board computer.
Second device type
used in more modern machines where there is computerization. In an old-style car, on the instrument panel we see a classic of the genre - a device similar in principle to a pressure gauge (based on the deformation of a membrane, which, changing, presses through a rod on the liquid located in a special tube, hermetically sealed) - a differential pressure gauge. But all this is already yesterday and the day before yesterday.
Of course, such parts have been preserved, rather, as rarities in very used cars. And in modern products of the automotive industry, there is a completely different device, which includes an intermediate converter, which is built into a block with cylinders, information from which is transmitted to a scale or processed using an on-board computer.
How to determine the oil level
In order to determine at what level the lubricating fluid is in the system, you must:
- find the most flat surface possible, drive onto it, turn off the engine, and then wait a little (5-10 minutes) so that the oil spreads in an even layer over the crankcase;
- open the hood lid, find the tube, remove the dipstick from it and wipe it thoroughly, then insert it into place and remove it again;
- Look carefully at what level the oil line remains noticeable.
If the oil boundary is located right in the middle between the minimum level mark “Min” and the maximum level “Max”, then everything is in perfect order with the fluid level in the system. If the oil limit is at or below the minimum mark, then the fluid must be added.
In addition, using a dipstick, you can determine the condition of the lubricant and understand whether it is time to replace it with a new one. To do this, it is necessary to evaluate the degree of transparency of the oil; if it is too low, and the liquid has a color close to black, then the engine oil must be changed as soon as possible. Otherwise, you will have to overhaul the engine or replace it entirely.