Wear of the liners leads to a decrease in oil pressure in the engine lubrication system. We can notice this when reading the engine oil pressure gauge. When the connecting rod or main bearings wear out, they must be replaced with new ones, as this can lead to significant wear of the shaft elbows.
If the crankshaft is damaged due to wear, it must be removed and sent for grinding on a machine. The most common causes of liner wear are metal shavings, dirt, debris, normal aging of the liner, poor oil lubrication in the system, etc.
The inserts cannot be restored; they are simply replaced with new ones. You can replace the liners yourself if you have experience in engine repair and the necessary tools for this.
Liners are plain bearings, there are two types of them, main and connecting rod. They withstand heavy loads when the engine is running. The inserts consist of aluminum and tin alloys.
wear of liners
Description
The crankshaft bearings act as plain bearings to ensure rotation of the crankshaft. This process occurs as a result of combustion of fuel in the cylinder chambers. Active friction of parts caused by increased loads and high speed conditions can damage the motor. To prevent such a situation and reduce the degree of friction, all the most important components are coated with a thin micron layer of oil. This function is assigned to the engine lubrication system, and a film is formed on existing parts only under conditions of high oil pressure. A layer of lubricant also covers the contact surfaces of the bearings and the crankshaft journal. This significantly reduces the generated friction force.
Lubrication of crankshaft bearing units
Sliding bearings can operate in liquid or semi-fluid friction mode. In the liquid friction mode, the surfaces do not touch, rotation occurs on a layer of oil, and under load a so-called “oil wedge” is formed. In the case of a semi-fluid mode, friction will be liquid and boundary (mixed). With boundary friction, work is carried out on a thin film of oil. Mixed and especially boundary operating modes are dangerous for the engine. Due to friction, the surfaces can heat up to a critical temperature, which will lead to damage to the bearings and shaft journal.
When starting the engine, the mode will be semi-liquid; low speeds will not allow the oil pump to provide the necessary pressure. Further, after starting, with increasing speed, conditions will be created for liquid operation and for sufficient lubrication of the engine.
Types and sizes
VAZ crankshaft liners act as protective elements that prevent premature wear of mating parts. Depending on their location, they are divided into two types: main and connecting rod. The latter, as mentioned earlier, are located on the journals of the shaft, the main ones are located on the crankshaft at the point where it passes through the internal combustion engine and have a similar purpose. Different types of power devices require the use of appropriate elements; first of all, the internal diametrical size must be selected.
Cranked connecting rod bearing: consequences and repairs
Diesel engine idling and vibration
Let's start with the fact that turning the connecting rod bearings of the engine when a breakdown is detected in a timely manner is a less serious problem compared to turning the crankshaft main bearings. If the problem is detected late, then the consequences for the internal combustion engine may be different. It happens that after cranking the connecting rod bearing, the engine may require an expensive overhaul.
A common situation is when a cranked connecting rod bearing is simply replaced with a new one and the engine continues to run. Note that it is not recommended to do this due to the fact that the service life of the connecting rod-crankshaft journal coupled pair repaired in this way can be greatly reduced (by 60-70%). A more acceptable option is considered to be the approach of changing the connecting rod in which the liner was turned. Also, the connecting rod often needs to be replaced due to the fact that as a result of turning the liner, the connecting rod lock breaks. The optimal method of repair is considered to be boring the crankshaft and replacing the bearings/rods.
Grinding the crankshaft after turning the liner is usually a necessary operation, since scuffs appear on the journal. After disassembling the engine, the crankshaft must be measured, after which it is bored, taking into account the subsequent installation of new bearings of repair size. This is the only way to achieve the required condition of the surfaces and the correct tension of the liner after installation.
Purpose
The crankshaft is constantly exposed to high physical and thermal loads during operation, connecting rod bearings hold it on the axis, while the functioning of the crank section is supported only by the elements indicated above. The mechanism of action of the journals is represented by internal races; as a result, the crankshaft liners are external. Lubricant is supplied to them through a special oil pipeline network in which the liquid moves under high pressure. This creates the thinnest film that is so necessary for the crankshaft.
Aluminum, copper, lead: pros and cons
The advantage of aluminum liners is that they are quite inexpensive and wear-resistant. In addition, aluminum hardly wears off during operation and, therefore, its particles do not contaminate the oil.
The weak point of aluminum liners is their too soft surface, which is not resistant to scratches. Therefore, if the oil is contaminated, foreign particles will leave grooves on the metal of the liner. Parts made of copper and lead are more resistant to scratches; foreign particles simply stick to them without causing much harm.
Manufacturers have learned to mitigate this drawback by grinding the surface of the liners rather than rolling it. In this case, microscopic grooves remain on the surface of the part, which do not affect the characteristics, but increase the ability to absorb contamination. Foreign inclusions settle in them, at the same time, such a surface better retains the oil film.
Another advantage of aluminum is that it can withstand higher melting temperatures than copper or lead. Therefore, an engine with an aluminum liner is more stable during overheating that occurs during detonation or overloads.
Therefore, we can confidently say that aluminum liners are suitable for any type of engine, of course, subject to the oil change period. At the same time, parts made of lead and copper alloys are not so picky about oil cleaning or uneven shaft journals.
Nevertheless, sports car manufacturers still prefer to equip engines with copper-lead elements, since they can withstand overloads better than aluminum ones.
Typically, copper and lead liners are made of three layers. It is based on steel, onto which babbitt is applied in a layer of 0.0125 to 0.015 millimeters. For decorative purposes, the element can be coated with tin spraying. This layer is characterized by the ability to accumulate solid inclusions and provide wear resistance and strength. The part can easily withstand pressure up to 25 thousand kPa per square cm, while aluminum can withstand only 13 thousand kPa.
Despite the good performance of aluminum and copper-lead alloys, automakers continue to experiment and develop in this area. For example, they recently released a liner made of pure copper, coated with tin and nickel. The top layer in it is the same babbitt. With the same characteristics in terms of strength, such elements are much more environmentally friendly and durable, but their price has become noticeably higher.
Since the most common cause of liner failure is detonation, such parts with a high safety margin can withstand loads. But still, not everyone can afford the price of such elements.
Another option for the liner is a combination of aluminum with Teflon coating, which gives the aluminum surface additional scratch resistance.
Causes of failure
Structural damage and wear during operation are the most common reasons for replacing parts. Despite the regular supply of lubricant and careful operation of the motor, this process is inevitable. Over time, the surface of the journals becomes thinner, the free space between them becomes larger, because of this the crankshaft acquires free movement, the oil pressure decreases and, as a result, its supply decreases. All this causes premature failure of the entire engine system.
Scrolling is the second reason for repair work. Many people have heard about this or dealt with this problem on their own, but not all car owners know why this situation arises. Connecting rod bearings have thin plates that fit into a special bed. In this case, small protrusions are placed along the entire outer surface of the half rings; they should come into contact with the front part of the block, as is the case in new motors. Some conditions reduce the resistance of the antennae in relation to the liner; it sticks to the crankshaft journal and rotates. In such a situation, engine operation stops. It is worth noting the most common reasons for its development:
- the operation of the motor is associated with constant exceeding of the established loads;
- the lubricant has too liquid a structure;
- bearing caps are installed with low interference;
- lack of oil, its excessive viscosity or the presence of abrasive compounds in the composition.
Signs and causes of wear
Now let's move directly to the types of damage that contribute to wear of the liners and their failure.
Entry of foreign bodies
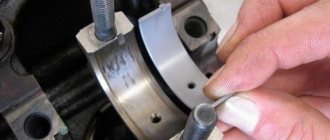
Signs . A sign of foreign bodies or dirt ingress is a situation where local damage to the working surface on the liner occurs. In some cases, there may also be some (less) damage on the back of the part. Typically, debris or dirt on the surface of the liner is the root cause of further wear. Therefore, it is necessary to identify this malfunction as early as possible. Otherwise, the wear will spread further and a significant surface area will be damaged, up to 100%.
Causes . As stated above, this situation is caused by dirt or debris getting between the liner and its support. This also causes the formation of places with high oil pressure, in which the oil film is destroyed. In turn, this leads to destruction of the surface of the liner during its operation.
Elimination methods . First of all, it is necessary to check the bearing surfaces of the liner and shaft for damage. If they exist, they must be eliminated. After this, you need to make sure that the surfaces are clean. This is especially true when new liners are installed.
Mud erosion
Signs . A sign of mud erosion is the presence of burrs or inclusions of dirt. Sometimes both. In particularly advanced cases, mud erosion can move to areas near the oil holes.
Causes . The reason in this case is low-quality oil, which contains dirt impurities or abrasive materials.
Elimination . It is necessary to check the operation of all moving engine parts. The lubrication system must be checked especially carefully. It also makes sense to check the oil and air purification system (primarily the filters). When assembling the engine, you must prevent dirt from getting into it. After all this, you must definitely change the oil to a new one.
Corrosive abrasion
Signs . We are talking about the presence of corrosive abrasion on the rear steel surface of the liner. As a rule, traces of corrosion are located closer to the connection of the halves of the liner body.
Causes . In this case, there may be several reasons. Among them:
- Reduced pressing force. This leads to slight movements of the liner body relative to the surface of their support.
- The mounting bolts were loosely tightened during installation.
- There are foreign bodies on the contact surfaces of the liner support.
- Prolonged engine operation at high speeds (especially if this occurs frequently).
- Using inserts with inappropriate dimensions (width).
Elimination . According to the different causes of the problem, the resolution methods may also be different. In particular:
- Tighten the mounting bolts to the torque recommended by the vehicle manufacturer.
- Inspect the seat diameter of the liner support.
- Check the cleanliness of the contacting surfaces between the liner and the support.
- Use the insert of the prescribed size (width).
- Try not to use the engine at high speeds for a long time.
Metal fatigue
Signs . Fatigue can be caused not only by prolonged use of the liner, but also by excessive load on it. Signs of its failure will be a situation when particles of material are literally torn out of its body, especially in places of significant load.
Causes . There may also be several of them:
- Using unsuitable or poor quality earbuds. This leads to their significant overload.
- The main load during operation falls on the edges of the liners.
- Incomplete combustion of fuel in the combustion chamber.
- Incorrect car engine tuning.
Elimination methods . Accordingly, elimination methods may also be different. Need to check:
- axial shape of the shaft journal.
- shape and geometric dimensions of the liner supports.
- engine assembly conditions, and in particular, installation of liners.
It also makes sense to install a new high-quality liner that fits in size.
Wear due to tin penetration
Signs . A significant layer of tin at a specific location on the surface of a steel base. This is usually accompanied by very severe local wear in that area.
Causes . The occurrence of small movements of the liner in its seat, which arose due to the low pressing force.
Elimination methods . Typically, you need to do the following: The first thing is to check the bore diameter of the liner support. Second, check the cleanliness of the mating surfaces of the liner and support. Third, check the tightening torque of the bolts and adjust it in accordance with the manufacturer's recommendations.
Surface corrosion
Signs . Corrosion, depending on its degree, always damages the surface of the liner. It becomes porous and loses its color.
Reason . As a rule, the described phenomenon is caused by the use of low-quality oil, during the decomposition of which acids are released, which cause corrosion.
Elimination methods . It is necessary to inspect the engine, and especially the lubrication system. If there is significant damage to the shaft and liner, they must be repaired. At the end of the repair work, it is imperative to change the oil to a high-quality new one recommended for this machine.
Insufficient lubrication
Diagnostics of wear of liners
Signs . A small amount or absence of oil can lead to abrasion and/or melting of the working surface of the liner. And this in turn causes metal fatigue and damage.
Causes . Destruction of the lubricating film between the liner and the shaft. Because of this, friction increases significantly during operation and the temperature increases. Materials melt. The cause may also be a failure of the engine lubrication system. If the bearing of the liner is deformed or the surface of the shaft journal is damaged, there is a high probability of destruction of the lubricating film.
Elimination methods . It is necessary to inspect the engine lubrication system, including oil cleanliness. It also makes sense to check the condition of the surface of the shaft journal and bearings of the liners. If necessary, repairs must be made. It is also possible to install new liners.
Incorrect machining of the crankshaft journals
Signs . The inner surface of the liner is in contact with the shaft journal on one or both sides of the liner body. It is also possible that the material of the inner surface is very worn from the ends around the circumference.
Causes . The reasons for this situation may be:
- The size of the liner does not correspond to the required value, usually too wide.
- The internal lock of the liner body is small in size.
- The shaft journal is not installed correctly.
- The fillet (or fillets) of the neck are very wide.
- Thrust bearings have very large clearances.
- Thrust bearings are not adjusted correctly.
Elimination methods . Elimination methods may also be the following, you need to check:
- type of liner body, its width, size and shape of the lock.
- the shape of the shaft neck fillets.
- crankshaft axial clearance.
Scratches on the surface
Signs . There are isolated scratches that do not look like working abrasions from the operation of the mechanism.
Causes . For some reason (most often due to lack of cleanliness during installation), there are small foreign particles on the working surface of the liner. Perhaps their formation is caused by casting or drilling technologies.
Elimination methods . Flush the engine with new, clean oil using an external oil pump. It is better to perform flushing after assembling the engine and before the car is run-in.
Excessive erosion due to cavitation
Signs . The material from which the liner is made has local washout points. They are usually located symmetrically or centrally on the working surface of the liner. It is also possible for them to occur on the reverse side of the oil channel.
Causes . There are several possible reasons:
- coolant entering the oil system;
- increased oil flow rate in the system;
- detonation;
- incorrect liner clearances.
Elimination methods . Elimination methods may be as follows, it is necessary to check and eliminate:
- presence of coolant in the engine lubrication system;
- gaps on liners;
- oil flow rate;
- operating parameters of the ignition system, as well as inspect the engine.
Misalignment
Signs . If misalignment occurs, excessive wear occurs only in the area of the top of the liner body towards the edge. In this case, the wear zones are located diametrically opposite on the circumference.
Causes . Misalignment of the central axes of the liners and neck.
Elimination methods . The following options are possible:
- Check the large diameter of the connecting rod. In this case, ideally the connecting rod should be located exactly perpendicular to the thrust planes. In this case, you need to check that both thrust planes are parallel.
- For the main liner, you need to check the alignment of the “beds” of all the main liners on the engine.
Preliminary work
If it becomes clear that it is impossible to do without repairing the power device, it is necessary to identify the degree of wear of all elements and determine the required dimensions of the crankshaft liners. Most car enthusiasts solve the problem of selecting dimensions by visual inspection; for greater accuracy, you can use a micrometer. It is also worth paying attention to the possibility of boring. If scrolling of elements is detected, they must be immediately replaced with new ones. Before starting repairs, this can be determined by the operation of the engine, in particular it may often stall, or by specific sounds of the crankshaft. When the necks jam, further movement becomes impossible.
Regardless of the current situation, all parts of the mechanisms must be carefully inspected. There may be wave-like damage on the journals, which can be easily felt with your hands; in this case, it is necessary to bore and install repair parts, the dimensions of which correspond to the installation location. Due to the large amount of damage, more intensive boring may be required, and as a result, parts of a completely different size than before will be required. Therefore, the crankshaft connecting rod bearing is purchased after all procedures have been completed, so you can avoid the need to return the element to the store.
Crankshaft VAZ classic
Rice. The main dimensions of the connecting rod and main journals of the crankshaft and their fillets VAZ 2103
Rice. Permissible runout of the main surfaces of the crankshaft
Good evening. Although for me it’s not good at all.
I prepared everything for installing the crankshaft, put on the thrust bearings (set to NOMINAL), put on the gear. I installed new bearings, well, in general, it’s clear what needs to be done.
The crankshaft was lubricated and installed. I measured the axial clearance (tolerance 0.075 — 0.175
) - I have somewhere
0.1
.
Next comes the most interesting and offensive part.
I tightened the covers, the crankshaft turns with both hands, ok, normal. Next, I took a torque wrench and began to gradually tighten it. At the specified tightening torque of 12.5 - 13.5 kgf-m, I tightened it to 7 and that’s it! The crankshaft is jammed! I took it apart and reassembled it 4-5 times. I tighten it by hand, it turns tightly. I start to pull the wedge further! :(((
The last time I tried to pull it gradually and at the same time constantly twist it. As a result, the effort increases. And I noticed that the knee did not rotate evenly and oil was squeezed out of the third bed and the liner there was the most worn! These are the things...the only thing I will check is to buy other liners...it’s a bad thing...anything can happen in life, my crankshaft is turned, I checked it with a micrometer, everything is OK! If not, then:
When boring, it should have been checked for curvilinearity... but if this was not done, then such problems could arise. If the next one fails, I’ll take my knee to have it checked. If the knee is crooked, let them fix it. If the knee is straight, then the problem is in the block... you will have to bore the beds :(((((
It's that bad :((((
The knee was checked, the runout was minimal. The block was removed to restore alignment. 2 and 3 covers are definitely defective. They promised to do it in the best possible way.
The internal combustion engine structurally has a large number of associated parts, which experience significant loads during operation of the internal combustion engine. For this reason, assembling a motor is a responsible and complex operation, for the successful implementation of which the technological process must be followed. The performance of the entire power unit directly depends on the reliability of fixation and the accuracy of fit of individual elements. For this reason, an important point is the accurate implementation of the calculated interfaces between mating surfaces or friction pairs. In the first case, we are talking about attaching the cylinder head to the cylinder block, since the cylinder head bolts must be pulled with a strictly defined force and in a clearly designated sequence.
As for loaded rubbing pairs, increased demands are placed on the fixation of connecting rod and main plain bearings (main and connecting rod bearings)
After engine repair, during the subsequent assembly of the power unit, it is very important to maintain the correct tightening torque of the main and connecting rod bearings of the engine. In this article we will look at why it is necessary to tighten the bearings with a strictly defined force, and also answer the question, what is the tightening torque for the main and connecting rod bearings
Read in this article
Installation algorithm
The most common method for solving the problem among many people is to contact a car service. But replacing crankshaft liners can be done by any person who has even the slightest experience in carrying out repairs and has a certain set of tools. To simplify the task, it is worth following a certain procedure.
First you need to check the gap located between the liner and the crankshaft. The test is carried out using a calibrated plastic wire, which can be found on the required neck. Then the cover is mounted together with the liner, they are tightened with a certain force corresponding to a value of 51 Nm. It is worth using a torque wrench to measure. After removing the cover, the size of the gap will be similar to the degree of compression of the wire. Using the nominal gap, you need to evaluate the resulting parameter, the value of which is different for each individual brand. If it becomes clear that the gap exceeds the nominal value, that is, the degree of compression, then you cannot do without installing repair parts.
Crankshaft loose
The crankshaft driller may make a mistake and loosen the crankshaft, then the engine will not have good oil pressure, and also because of this the engine may knock quickly.
Photo. This way you can turn the crankshaft on a VAZ engine with a key.
You can check for weakness in the crankshaft like this. Tighten the cushion and spin the crankshaft; if it spins very easily, it doesn’t hurt to check whether the crankshaft is loose or not.
Usually, after a good boring, the crankshaft does not clamp and turns easily. Remove the cushion, take out the liner and place chocolate foil under the liner, tighten the liner, if the crankshaft gets tight or starts to turn noticeably more difficult, it means that this crankshaft journal is bored perfectly, pull out the foil from under the liner and check the next pillow.
Photo. It is shown how to place foil under the liner, and be sure to cut off the excess foil with the tip of a knife; it is shown here that the foil is cut off on one side and not on the other.
If, after placing foil under the liner, the crankshaft does not turn more difficult, it means that this crankshaft journal is weakened, place more foil under this cushion between the liner until the crankshaft begins to turn more difficult. After all the pillows have been checked and found to be loose, and if more than one foil had to be placed under the liner, then you will have to completely remove the crankshaft and under those journals that had to be placed more than one foil, you will need to divide the foil strips into two and place half of the foil under the liner in the block. Install the crankshaft, tighten it, that's it, you have perfectly adjusted the liners, and the crankshaft will work perfectly in the engine.
Be sure to put a nail in the foil under the liner and make a hole through the holes in the liner for the oil to pass through.
Boring
All connecting rods are removed after sequentially checking the clearances, and the crankshaft is also dismantled and ground. Boring is possible only on special equipment - a centripetal, which is rarely found among ordinary car owners. Therefore, here you will need to contact specialists. After grinding, the crankshaft liners of the appropriate size are selected. Here you cannot do without a tool such as a micrometer and trying on selected elements. Next, all crankshaft parts are installed in the reverse order and the caps on the main bearings are screwed on.
It is worth noting some features of the reverse installation of connecting rods and bearings. The latter are pre-lubricated with oil, and the lids must also be screwed on. Compared to the preparatory work carried out, installation takes much less time. At the same time, we should not forget about the operation of the crankshaft, which is characterized by high loads, as well as its high cost. Everything possible must be done to increase the period of operation. The main role here is played by grinding carried out at the appropriate time. This procedure ensures the smoothness of the necks and prepares them for further use.
Procedure before unpressing the engine
Depressing is usually required when one of the support type bearings is faulty.
All procedures are done very carefully; if disassembled carelessly, you can accidentally bend the shaft. The most vulnerable places and the highest probability of damage occur when removing the generator, when removing the variator, when removing the bearing and when disassembling the crankshaft.
To remove the crankshaft, first remove the crankcase cover, do it this way: first you need to unlock it, then unscrew all its bolts and only now can you remove the shaft. To remove the shaft you need a special device, since it is installed quite tightly
If there is no device, then you can lightly but not forcefully tap the shaft with a hard tool, without sudden strong movements, and carefully remove the part
After removing the shaft, it is worth inspecting it and looking for deflections, play, etc. It would be a good idea to measure the circumference with a caliper; if this procedure does not help find the problem, then continue the inspection using a micrometer. It allows you to find flaws down to mm. The deviation is considered normal if its reading is no more than 0.05 mm.
The bend of the shaft is determined by clamping it in a vice in a vertical position. For high-quality centering, it is worth loosening the cheeks a little with conical blocks of wood.
How to choose
Regardless of the reason for repairing the engine and replacing the liners, boring the crankshaft is a must. Installation of new parts is only possible on a polished or new mechanism. If there is damage and potholes on only one neck, all elements are processed to achieve a single overall size. Standard parts are installed during the engine assembly line. For example, repair crankshaft liners for VAZ cars are sold in four versions. That is, boring can be done a maximum of four times. Motors for cars such as Moskvich and GAZ have an additional fifth and sixth grinding of up to 1.5 and 1.2 mm, respectively. The best option would be for the person who did the grinding to select the required sizes. Boring may lead to the need to select elements whose size will significantly exceed the previous one. This depends on the depth of the potholes on the necks and their number. The inserts are sold as sets for both types of necks.
To bore the crankshaft or not
Now you need to determine whether the crankshaft should be bored or not, pay attention to the crankshaft journals, marks and wavy grooves are visible on the journals, run your finger along the journal, if marks and grooves are visible on the journal and by running your finger you will feel the slightest waviness, don’t even think about it, take it to boring crankshaft. But don’t buy liners for the crankshaft right away; after boring, the driller will tell you which liners to buy, as it happens that due to excessive wear on the crankshaft journals, they bore two sizes larger
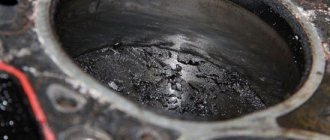
Photo. Heavily worn-out crankshaft journal of the Volga
It rarely happens that the crankshaft journals look good, pay attention to the main bearings and if you see shiny abrasions on the bearings, this indicates that the crankshaft is weakened and has a large gap, and hanging in the bearings it fills with shiny strips
Photo. Liners with signs of heavy crankshaft wear
But don’t get confused, shiny stripes on the liners may also appear when installing the crankshaft when tightening the cushion with the liner, when the crankshaft becomes clamped and barely turns or jams. In this case, firstly, the grinder made a mistake when grinding the crankshaft, secondly, debris got under the liner, so when installing the liners, carefully wipe the beds (the place where the liner is installed is called the bed).
If you simply replace the liners without grinding the worn crankshaft, then it’s like throwing money away; the effect will be zero. Also, if the engine had very low oil pressure before the repair (the pressure light is on at idle), this already indicates that it is necessary to bore the crankshaft for repair bearings.
It’s better not to be lazy and take the crankshaft for boring, and pay a little extra money, than to simply replace the bearings.
You can't fool iron!
Using these tips, you can easily determine without a micrometer whether you need to grind the crankshaft or not.
Features of the work
Replacing crankshaft liners requires compliance with the following rules:
- special dirt traps are located on the connecting rod journals; they must be cleaned during the work;
- the protrusions located at the joints and ensuring the fixation of the liners must fit freely into the grooves (hand effort should be quite enough);
- replacement is carried out without adjustment actions;
- work with the main parts is carried out on a previously removed motor, while when installing connecting rods it is not necessary to remove it;
- Upon completion of all actions, the engine must be run-in.
Replacement
All official manuals recommend replacing the crankshaft liners with a complete disassembly of the engine, but in fact, this is not necessary. Everything can be done directly from the car. And if with connecting rod bearings everything is more or less clear. Simply unscrew the head, pull out the old part, and then install a new liner. But questions arise with the rest, because at first glance you can’t get to them without removing the crankshaft. But here the experience of naval mechanics comes to the rescue. On large marine diesel engines, the length of the crankshaft can reach 10-15 meters; accordingly, it is not removed to replace the bearings. There is a good technique that allows you to do this directly on the engine. The task of the auto mechanic is to adapt it to his goals. Before starting work, you need to drive the car onto an overpass or inspection hole. This will make access to the motor from below absolutely free. The protection (if any) is also removed and the oil is drained. After this you can start replacing:
- The box is removed. It's better to do this in advance. In some cases, you can do without this, but it is better to prepare ahead of time, this will allow you to waste less time in the future;
- The front cover is removed. The camshaft drive belt (chain) becomes loose. It is better to remove it completely;
- The starter is dismantled;
- Next you need to remove the pan. In principle, there should not be any special problems with this work. But, on some models the front beam will interfere. In this case, you will need to unscrew the motor mounting pads and lift it slightly. After this, you can freely pull out the pallet;
- This will take you to the crankshaft. Usually, replacement starts with the connecting rod bearings. Everything is simple here. Unscrew the screws securing the head, pull out the old bearings, and then install new parts. Before installation, lubricate the bearings with engine oil;
- Before replacing the main bearings, the crankshaft should be lowered. To do this, loosen its attachment to the flywheel. It is enough to lower it by 10-15 mm
; - Next, pull out the liners. The easiest way to accomplish this is to make a device like an aluminum rivet. It is inserted into the grease supply hole and the bearing is pushed out. Sometimes drivers use steel rulers for this, but in this case the working surface of the crankshaft can be damaged.
After removing the liner, be sure to inspect its condition. If simple wear is visible without scuffing, then you can safely install new spare parts. In the case of visible damage, it is advisable to remove the crankshaft and grind it. Reinstalling the liners in most engine models is done by hand. If this fails, you can use the same device that was used to remove the bearings. Lubricate the bearings before installation
Pay attention to the correct installation of the parts; the antenna must fit into the groove intended for it. When assembling, you must remember that the screws must be tightened with the force specified by the manufacturer. Therefore, use a torque wrench to final tighten the fasteners. This will prevent parts from unscrewing spontaneously.
Conclusion. Every car enthusiast has encountered engine malfunctions at least once. Moreover, wear can appear after 100,000 kilometers or after 500,000. Much depends on the specific model, as well as the characteristics of operation. Many people are interested in how to replace crankshaft bearings without removing the engine. It is quite possible to do this, but it will still be easier to remove the motor, and the reliability of repairs directly on the car will be lame
This will prevent parts from unscrewing spontaneously. Conclusion. Every car enthusiast has encountered engine malfunctions at least once. Moreover, wear can appear after 100,000 kilometers or after 500,000. Much depends on the specific model, as well as the characteristics of operation. Many people are interested in how to replace crankshaft bearings without removing the engine. It is quite possible to do this, but it will still be easier to remove the motor, and the reliability of repairs directly on the car will be poor.
Insert markings
If you need to select parts with standard parameters, you should start from the color code, which can be found on the elements being replaced. If these markings are missing on them due to significant wear, it is worth looking for markings on the connecting rods, or more precisely on their lower heads. You also need to check the correspondence of the marks on the shaft itself; they determine the parameters of the journals to be installed.
During engine operation, all parts gradually wear out, including the main and connecting rod journals, so crankshaft repair liners are used to restore their functionality. The main journal is the part of the bearing that connects the motor and the shaft and is the main support of the crankshaft. And the connecting rod journal is also a support, but for connecting the shaft with the connecting rods. Therefore, the integrity of these parts is fundamentally important.
In what cases is it necessary to grind the crankshaft?
The crank pulley is a rather complex engine element in design and operation. Its purpose is to convert the reciprocating movements of the pistons into torque. To explain in a nutshell, the crankshaft allows the vehicle to move; without it, no engine can operate.
Engine crankshaft
Before we tell you what crankshaft boring is, let’s figure out what affects its wear:
- In the engine block, the crankshaft is mounted in the lower part on at least five bearings (main bearings). In addition, there is also a number of connecting rod bearings (depending on the number of cylinders). The need to bore a component arises as a result of wear on the connecting rod or main elements.
- This is also affected by the connecting rods, which are connected to the pistons. They are mounted to the eccentric rings using plain bearings.
- If the car is operated for a long time without servicing the rings and so-called bearings, the level of lubricant pressure in the system is significantly reduced. Even the engine can fail from this.
It is in such cases, if you do not want to purchase failed components, that the crankshaft is bored, that is, the process of restoring its performance. Professionals in this industry have long known that the design of the main and connecting rod sliding elements of the crank pulley is carried out using replaceable liners. In the event that their wear reaches critical limits, it is necessary to disassemble the engine and install new components.
Reasons why boring is necessary
In fact, the reasons why the process of restoration and grinding of the crankshaft is carried out are very banal. And they are related exclusively to the operation of the vehicle.
The reasons for the need for restoration are as follows:
- If you regularly use low-quality lubricant. Poor quality lubricant directly affects the wear of all components.
- If you change the engine fluid much less often, without observing the replacement period. This includes filter elements. In addition to this, if the oil is of low quality, then the need for boring will come much earlier.
- Another drawback in operation is insufficient warming up of the engine before driving. This is especially true for operating a vehicle in the winter season. In this case, the car needs to be warmed up properly.
- If the vehicle is regularly used under heavy loads.
- If moisture somehow gets into the internal combustion engine.
- In the event that increased wear of the seats occurs, since the mating elements of the internal combustion engine were initially of low quality. Or, during the operation of the car, the heat treatment regime was violated.
Symptoms of the need to repair crankshaft journals
So, under what symptoms does it become necessary to restore the node and repair the necks?
This usually occurs when the following defects occur:
- If, when dismantling the unit, you notice that scratches have formed on the rubbing surfaces as a result of mechanical impact.
- If the permissible gap sizes have increased significantly, this is also a disadvantage.
- If ring marks have formed on the surface of the necks.
- If the engine overheats, the liners jam or melt.
What are crankshaft repair liners?
All crankshaft connecting rods and main journals have their own repair dimensions (parameters that they can take after grinding during the crankshaft boring process), which must correspond to the dimensions of similar liners used as spare parts. Both types of liners play the role of bearings that significantly improve sliding, so when they wear out, timely replacement must be carried out, accompanied by boring the crankshaft.
For most engines, there are several repair sizes of liners. For example, for classic VAZ models there are four of these sizes. Accordingly, the crankshaft can be bored four times. In essence, this is the usual grinding of the surface of rubbing parts to make it smooth and usable again. The outer size of the liners remains unchanged, but the inner size is adjusted by increasing their thickness. After each replacement of the bearings, the engine should operate for more than one thousand kilometers if it is properly lubricated, i.e. other systems will not act up.
Conclusion
Crankshaft bearings are simple and, at first glance, incredibly durable elements of modern engines. Experience has shown that you only encounter the need to replace liners once or twice during the entire period of using a car. But don’t think that this is the part that shouldn’t break. In contrast, bearings are sometimes called crankshaft protectors because they are one of the first to absorb the impact. If you are faced with the need to replace the earbuds, do not hesitate. Contact an engine specialist and trust him to do everything, or try to do some of the work yourself.
How to determine the wear of the crankshaft liners and help the mechanism?
When repairing an engine, the question very often arises of how to determine the wear of the crankshaft liners and their next repair size (which they will have after the upcoming boring). As a rule, a micrometer is used for measurements (measures linear dimensions), but this can be calculated visually with sufficient accuracy. The possibility of further boring the crankshaft is immediately assessed.
Replacement is required almost immediately if the crankshaft bearings are rotated. The loud knocking of the mechanism and the constant attempts of the engine to stall will tell you this, sometimes the journals jam, then you definitely won’t be able to drive further. In all other cases, a thorough inspection must be carried out, and if wavy grooves that can be felt with your hands are observed on the journals, the crankshaft must be bored and inserts of the appropriate repair size must be installed.
It is recommended to purchase liners only after boring the shaft, since if there is a lot of wear, it can be bored not by one size, but by two.
Crankshaft repair
Repairing or replacing a crankshaft is a labor-intensive process. As a rule, it requires almost complete disassembly of the engine, inspection and troubleshooting of all its components and mechanisms. The crankshaft is removed and axial runout is measured. In case of acceptable wear, the surfaces of the crankshaft journals and connecting rods are ground to fit the repair dimensions of the bearings. The bed with workings is also subject to mechanical processing with “one installation” on a special machine. Boring the crankshaft allows you to install the liner of the next repair size.
Neck sizes have repair tolerances. Simply grinding the crankshaft will not help if the wear or damage is too severe. The crankshaft is not a cheap part, and if we are talking, for example, about large-sized agricultural machinery, the amount will be impressive. Even heavily worn friction surfaces can be restored. The thickness of the excavation is compensated by surfacing using submerged arc welding, plasma spraying of hard alloys, thermal gas spraying, etc. Then the crankshaft is ground and “brought” to the required repair dimensions. This is a technologically complex process, it is better to entrust it to specialists.
High-quality restoration and grinding of the crankshaft can ensure 100% of its service life. It should be taken into account that with an increase in the repair size, the crankshaft may move from its factory seat. Precise installation of the crankshaft with a selection of bearings will be required. A crankshaft with critical damage or axial bending will have to be replaced.
An increased content of metal shavings in the filter and pan indicates wear of the friction pairs. In such cases, it is urgent to find the reason for the formation of such chips.
The diameter of the crankshaft journals can be measured with a regular micrometer. The parameters of unbalance, runout and axial play of crankshafts are determined using special indicators. To do this, you need to either place the shaft on a special stand or machine, or install an indicator with a magnetic stand on the engine block. The measurement is performed while rotating.
To determine the gap between the crankshaft journals and the bearings, a calibrated plastic wire and a paper template with a special scale are used. The method is quite simple and accessible. A piece of wire is placed on the degreased surface of the crankshaft journal. To fix it, you can use a small amount of thick lubricant. The journal is then covered with a bearing and a cap. The covers are tightened, the wire inside is crushed on the plane of the neck (threaded connections must be tightened with a torque wrench). Unscrew the bolts and remove the cover. Next, it remains to measure the width of the flattened strip with a template. The value will correspond to a fairly accurate gap value.
How to install liners on the crankshaft - procedure
In most cases, replacement of liners is carried out at a service station, but if desired, any driver who has repair skills and knows how to use the tool can easily try to carry out this operation on his own. To do this, you need to do the following steps sequentially:
- First of all, it is important to check the gap between the liner and the crankshaft. To do this, a calibrated plastic wire is placed on the desired neck. After this, the cover with the liner is installed and tightened with the required force (approximately 51 N m (Newton per meter), this value can be measured by tightening the unit under test with a torque wrench). After removing the cover, the gap is determined by the degree of flattening of the wire . To evaluate this parameter, there is a nominal gap for each make of car, and if the wire indicates that the gap is larger, then a repair liner will be required.
- After checking the clearances on all connecting rod journals, it is necessary to remove the connecting rods, dismantle the crankshaft and send it to the boring machine. Grinding is carried out on a special machine (centripetal), which, of course, not everyone has. Therefore, it is better to do this with a master. After boring, you need to select the crankshaft liners, here again a micrometer will help and further fitting with measuring the gap.
- When the size of the liners is finally selected, the crankshaft is installed in the reverse order. Its elements must be placed in their seats and the main bearing caps must be screwed on.
- Next, you need to decide how to install the liners on the crankshaft and install the connecting rods in their places. To do this, they are lubricated with engine oil, their caps are screwed on, so that direct installation takes a minimum of time, not to mention preparation. It is important to assemble the crankshaft with the same clutch and flywheel installed in the engine before repair.
We must remember that the crankshaft is one of the expensive parts in any car. In addition, it bears the heaviest load. Therefore, it is necessary to take all measures to extend its service life. In this matter, timely boring of the crankshaft plays a decisive role. After this procedure, all necks become perfectly smooth and ready for further work. It is this factor that determines the quality of the overhaul.
Prevention methods
As mentioned above, partial failure of the liners entails increased wear of the engine, and in particular, its lubrication system. Therefore, in order to prevent such a situation, it makes sense to carry out periodic preventive measures. So, first of all, you need to use the engine oil recommended by the car manufacturer . This is especially true for its viscosity. You should not buy very cheap oil, since there is a high probability that it will contain abrasive particles that negatively affect the engine as a whole, and the liners in particular.
It is also worth periodically checking engine parts, their condition, geometry, and cleanliness. When performing repair work, you must always ensure that no dirt gets into the engine and/or lubrication system (oil). There is a so-called “golden rule” for mechanics, which states that a gap of 0.03 mm more is better than 0.01 mm less . In this case, the liner is guaranteed not to fail, not melt or rattle. Keep your car's engine in good condition and it will serve you for many years.
It is better not to wait until the light on the dashboard lights up indicating low oil pressure. Ideally, you should periodically check the pressure value yourself or at a car service center. After all, the oil can light turns on (that is, the emergency sensor is triggered) only in extreme cases, when the pressure has dropped to critical . It is better to avoid this, especially on engines with significant mileage.
Conclusion
It is necessary to periodically check the condition of the liners, since these seemingly insignificant details can lead to major problems with the engine oil system, thereby significantly reducing its service life. And the sooner the breakdown can be identified and repaired, the lower the costs the car owner will have to face in the future to carry out engine repairs. The replacement procedure can be carried out either independently or at a service station. However, if you decide to carry out the repair yourself, then you must be 100% sure that you will be able to complete the job, since replacement involves a large amount of both dismantling and installation work.
Why does the connecting rod bearing rotate?
The bearings of the connecting rods and crankshaft of the internal combustion engine are plain bearings that must be generously lubricated in order to perform their functions. The crankshaft journals and connecting rod bores fit tightly without play or gaps, but thanks to lubrication, the friction force of the mating pairs is minimal.
Rotation of the connecting rod bearings and crankshaft requires immediate repair. You cannot operate a car with such damage to the engine, because further destruction of parts or components of the internal combustion engine may occur. This breakdown can be determined by ear; a knocking sound of the crankshaft and connecting rod can be heard.
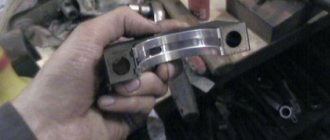
Liners, also known as sliding bearings, are placed in places called bearing beds. The inserts must be fixed. If the liners have holes, they must be aligned with the holes in the mating part.
Did you know that the type of locking and overtension of the differential is responsible for the cross-country ability and controllability of the car?
The main reasons for rotation of the liners:
- The inserts were not fixed sufficiently;
- the inserts are stuck.
The crankshaft rotates relative to the liners, the surface of which is protected by antifriction (anti-rubbing) material. To prevent the liners from shifting and turning along with the engine crankshaft, they are held in place by special antennae. They are also installed in tension, which were calculated by the manufacturers.
The greater the load on the crankshaft, the less the oil film (layer, cushion) is created. And if there is still excessive vibration, then the oil protective layer is destroyed and the friction force increases sharply, which makes it more and more difficult for the liner to stay in bed; the antenna designed to protect against rotation cannot hold the liner.
As a rule, the reason for rotation of the bearings is the lack of lubrication. For lubrication, there are holes on the main bearings, and grooves on the connecting rod bearings. If these oil supply channels are clogged, the holes and channels are completely or partially clogged, the friction force of the rubbing parts increases, and the effect of oil starvation appears. Due to the lack of lubrication, the liner-crankshaft pair becomes very hot. During heating, the rubbing parts stick to each other. After such welding, the liners begin to rotate.
Communities › Lada 2110, 2111, 2112, 112, Bogdan › Blog › Did the liner really turn?
Hello everyone, in general the situation is like this. I bought a 2110 16V, it works great at idle, at rpms of 2500 and above a knocking noise starts, a knocking noise from the manifold. I was doing the undercarriage and casually asked the master “what could it be?”, he said “I guess it’s a liner.” Question: could this be an insert, considering that I have already driven about 2000 km since I bought the car, the sound has not progressed and I don’t know how long they drove before me. The video is not mine, but the sound is very similar and not at idle, but at rpm above 2500.
Comments 51
Well, according to the video, one valve knocks - that’s okay, but the second guttural sound brings up very bad thoughts. And screwed earbuds won't make much sound. Strange mechanics who determine this by ear, I wouldn’t let them fix my car)))
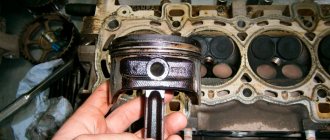
This is something with a piston turned. Either the connecting rod or the piston is moved in the cylinder, but not the liner 100%.
The oil receiver mesh is simply clogged and when you increase the speed you are starved of oil. To replace: oil, oil filter, oil receiver mesh, and most importantly, flush the engine with an intermediate cheap oil filter and oil. To begin with, drain the oil and unscrew the pan - It could be the most banal thing - the sealing ring of the oil pickup tube needs to be replaced or just a bolt has come loose, and at the same time you can check the mesh. It would also be nice to know when and how the oil was changed, from which to which and what was done. Don't drive it like that, you'll lock up the engine.
Thank you very much, very good advice, I’ll definitely check it out.
I don’t know about everyone else, but I hear two sounds, especially at the beginning of the video, one is definitely a hydraulic device, and the second is muffled, either the microphone is making so much noise, or there are a lot of options, starting from the pump, ending with the beating of the piston on the cylinder, as it warms up the sound seems to go away. But it’s 100% not the liner, if the liner turns, you won’t be able to drive for a long time, the pressure will drop (the hydraulics will definitely rattle) and you can even catch the wedge. So my advice is to measure the oil pressure, if it doesn’t drop below 1.5-1.7 when hot, then replace the hydraulics, and it’s better not to look for which one, but to change everything at once, it will be cheaper.
Source