Sometimes, car enthusiasts and novice mechanics wonder how to replace crankshaft bearings without removing the engine. There are several reasons for this interest. In many cases, it is simply not possible to remove the motor from the car. This unit is quite heavy, so you will need a hoist or the help of several strong men. If these conditions for removing the engine do not exist, then you will have to get rid of it and do the work directly on the car. But keep in mind that repairs without removing the engine somewhat resemble a perversion, which means you will have to tinker thoroughly. Therefore, still try to get helpers to remove the motor.
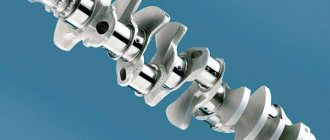
How to replace crankshaft bearings without removing the engine? Before answering this question, let's figure out what earbuds are and why they should be changed. Everyone knows that bearings are used to ensure long-term operation of all rotating parts. They can be very different; in the engine, sleeve bearings are installed on the crankshaft - liners. They are a steel sheet of a certain shape, which is installed in the engine bed (main) or in the lower connecting rod heads. They have fasteners in the form of a tendril, which allows you to avoid bearing displacement during operation.
There is also a special groove or hole for supplying lubricant. The inner surface has an anti-friction coating
, which significantly reduces the level of wear of the part. Please note that different engine models use different coatings; when selecting replacement liners, pay attention to this factor.
Inserts are changed for several reasons, the initial one being wear, but the consequences can be different:
- Backlash
. In this case, the crankshaft will knock. It is recommended to carry out repairs as soon as possible. In this case, replacement can be done even without removing and disassembling the engine; - Cranking
. As a result of excessive wear, the bearing tendril pops out of it and turns around the crankshaft journal. Sometimes this happens due to insufficient lubrication. Here, scuffs can form on the journal; the only option is to remove the crankshaft and grind it.
As you can see, the reasons for such repairs can be different. When the bearings rotate, further use of the car is impossible; the engine simply jams.
Replacement
All official manuals recommend replacing the crankshaft liners with a complete disassembly of the engine, but in fact, this is not necessary. Everything can be done directly from the car. And if with connecting rod bearings everything is more or less clear. Simply unscrew the head, pull out the old part, and then install a new liner. But questions arise with the rest, because at first glance you can’t get to them without removing the crankshaft. But here the experience of naval mechanics comes to the rescue. On large marine diesel engines, the length of the crankshaft can reach 10-15 meters; accordingly, it is not removed to replace the bearings. There is a good technique that allows you to do this directly on the engine. The task of the auto mechanic is to adapt it to his goals.
Before starting work, you need to drive the car onto an overpass or inspection hole. This will make access to the motor from below absolutely free. The protection (if any) is also removed and the oil is drained. After this you can start replacing:
- The box is removed. It's better to do this in advance. In some cases, you can do without this, but it is better to prepare ahead of time, this will allow you to waste less time in the future;
- The front cover is removed. The camshaft drive belt (chain) becomes loose. It is better to remove it completely;
- The starter is dismantled;
- Next you need to remove the pan. In principle, there should not be any special problems with this work. But, on some models the front beam will interfere. In this case, you will need to unscrew the motor mounting pads and lift it slightly. After this, you can freely pull out the pallet;
- This will take you to the crankshaft. Usually, replacement starts with the connecting rod bearings. Everything is simple here. Unscrew the screws securing the head, pull out the old bearings, and then install new parts. Before installation, lubricate the bearings with engine oil;
- Before replacing the main bearings, the crankshaft should be lowered. To do this, loosen its attachment to the flywheel. It is enough to lower it by 10-15 mm
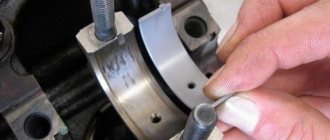
; - Next, pull out the liners. The easiest way to accomplish this is to make a device like an aluminum rivet. It is inserted into the grease supply hole and the bearing is pushed out. Sometimes drivers use steel rulers for this, but in this case the working surface of the crankshaft can be damaged.
The difference between main bearings and connecting rod bearings
The radical semirings sit in the lower cavity of the BC. They are also located in separate beds, like the connecting rod ones. Their purpose is to facilitate smooth rotation of the crankshaft and serve as supports for it when the latter is installed in the BC of the power unit. They are in direct contact with the root journals. On 4-cylinder engines, 5 main plain bearings are usually used. They are equipped with grooves and holes for better lubricant supply.
The connecting rod bearings are installed at the very bottom of the pan. They are pressed into the connecting rod (head) caps. Mounted on connecting rod journals. Compared to radical half rings, they have a simpler design.
Specialists and experienced drivers are able to distinguish wear of main and connecting rod bearings by sound:
- the main ones knock dully, a metallic clang is heard - usually during sharp acceleration or at idle;
- connecting rod ones are almost the same, but the sound is much sharper, and the frequency of the noise increases with increasing speed.
Video text
Subscribe to my channel “My Leisure” where I post various videos about my life and more
Subscribe to my channel “Earning money in the village” where I breed and keep pets, and also try to make money from it.
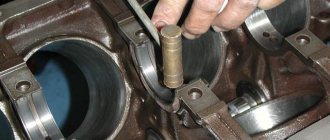
Sometimes it becomes necessary to replace the main bearing shells on an assembled engine, and if everything is clear with the connecting rods, then replacing the main bearings becomes a rather difficult operation. But after watching this video, you can replace the main bearing shells without the slightest problem, you just need to take a small bolt or screw that will fit into the oil channel and with its head it pushes out the liner when the crankshaft is turned. If there is no oil channel in the journal, then the liner is pushed out with a thin screwdriver or a knitting needle. Subscribe to my channel “My leisure” where I post different videos about my life and not only
Subscribe to my channel “Earnings in the village” where I do breeding and keeping pets, as well as trying to make money on it.
Sometimes there is a need to replace the liners on the assembled engine and if everything is clear with the connecting rods, the replacement of the molars becomes quite difficult. But after watching this video you can replace the bearing shells of the main bearings without the slightest problems; you just need to take a small bolt or screw that will fit into the oilcan and his hat pushes the liner, when turning the crankshaft. If there is no oil channel in the neck, then the liner is pushed by a thin screwdriver or spoke.
AutoNews / Reviews / Tests
How to Change the Crankshaft Without Removing the Engine
How to change the front crankshaft oil ?
A leak in the front crankshaft oil seal is one of the most common failures associated with rubber elements included in the engine design. Oil seals are used to seal the points where the shaft exits the housing. In the case of the crankshaft, these elements are installed at the outlet holes of the cylinder block.
To bore the crankshaft or not
Now you need to determine whether the crankshaft should be bored or not, pay attention to the crankshaft journals, marks and wavy grooves are visible on the journals, run your finger along the journal, if marks and grooves are visible on the journal and by running your finger you will feel the slightest waviness, don’t even think about it, take it to boring crankshaft. But don’t buy liners for the crankshaft right away; after boring, the driller will tell you which liners to buy, as it happens that due to excessive wear on the crankshaft journals, they bore two sizes larger
Photo. Heavily worn-out crankshaft journal of the Volga
It rarely happens that the crankshaft journals look good, pay attention to the main bearings and if you see shiny abrasions on the bearings, this indicates that the crankshaft is weakened and has a large gap, and hanging in the bearings it fills with shiny strips
Photo. Liners with signs of heavy crankshaft wear
But don’t get confused, shiny stripes on the liners may also appear when installing the crankshaft when tightening the cushion with the liner, when the crankshaft becomes clamped and barely turns or jams. In this case, firstly, the grinder made a mistake when grinding the crankshaft, secondly, debris got under the liner, so when installing the liners, carefully wipe the beds (the place where the liner is installed is called the bed).
If you simply replace the liners without grinding the worn crankshaft, then it’s like throwing money away; the effect will be zero. Also, if the engine had very low oil pressure before the repair (the pressure light is on at idle), this already indicates that it is necessary to bore the crankshaft for repair bearings.
It’s better not to be lazy and take the crankshaft for boring, and pay a little extra money, than to simply replace the bearings.
You can't fool iron!
Using these tips, you can easily determine without a micrometer whether you need to grind the crankshaft or not.
Causes of leakage. Determining the location of the leak
The reason for the leak is that the oil seal is skewed
An oil seal can leak for several reasons:
- Natural wear and tear. In previous articles I explained how you can remove the engine from a VAZ 2109 without removing the gearbox and disassemble it yourself at home. No matter how carefully the elements of the crank mechanism (CCM) are adjusted to each other, the crankshaft still vibrates during rotation, which leads to wear on the inner surface of the oil seal. how to change the front pads on a Kia Rio 2014? Everything is very simple, you don’t need to contact. Because of this, it no longer fits tightly to the shaft and lubricant leaks out through the gap;
- Loss of elasticity. This happens due to the rubber drying out, it becomes “tanned” and the tightness of the seal decreases;
- Installation is skewed. Incorrect installation leads to the appearance of leaks through which lubricant under pressure leaks;
- Low quality rubber element installed when replacing a leaking oil seal. There are many fake spare parts on the market and the likelihood of purchasing a defective product is high.
Since the oil seal is located in a place where inspection is not very convenient, the problem is judged by traces of oil under the car and severe contamination of the lower part of the engine. But it is worth noting that lubricant can also leak in other places - from under the pan gasket, oil filter. Therefore, before eliminating a leak, it is necessary to carefully inspect the lower part of the power unit in order to accurately determine the location of the leak.
This can be done on an overpass or inspection hole, after first dismantling the crankcase protection (if there is one). In the case where it is impossible to determine the location of the leak due to severe contamination, the bottom of the engine is cleaned, and then, after a short trip, everything is inspected again. Dust will stick to the leak site, which is used to determine the location of the leak.
What are piston rings and their purpose
Piston rings are elastic, open elements that are installed in special grooves on the piston body.
They are made of high-strength steel or cast iron, and covered with an alloying material on top. The alloy coating further increases strength and also reduces wear rates. Typically, 3 rings are inserted into the piston: 2 compression rings (occupying the 2 upper grooves) and 1 oil scraper ring (the lower groove). The purpose of the compression rings is to prevent hot gases from breaking through along the piston into the engine crankcase. Oil scraper - removes excess oil from the cylinder mirror, preventing it from entering the combustion chamber. In addition, the rings reduce the temperature of the piston, transferring almost half of the heat from its surface to the cylinder walls.
When the piston rings no longer cope with the tasks assigned to them due to their wear, the car engine signals this by displaying the corresponding symptoms.
Signs of piston ring wear
Blue or black smoke from the exhaust pipe indicates that wear has reached a critical stage. This indicates that excess oil entered the combustion chamber past the oil scraper ring and burned there along with the fuel. Black smoke coming out of the crankcase ventilation tube indicates that the compression rings, due to wear, allow gases to escape from the combustion chamber into its cavity.
Critical wear is accompanied by a decrease in compression (the ability to maintain pressure) in the engine cylinders. This means that some of the gases formed during the combustion of the fuel mixture, which was supposed to push the piston, broke into the crankcase without performing useful work. This is what will lead to a drop in pressure in the cylinder, therefore, the engine will lose some power. Increased oil consumption is observed.
Compression is checked with a special device - a compression meter. When the nominal pressure values are unknown (there are no operating instructions), it is first measured in a dry cylinder, then a little engine oil is poured through the spark plug hole, and the measurement is made again. If the compression increases, then the rings need to be replaced. Similar signs can be observed in the case of their “occurrence”.
This problem, if the case is not very advanced, can be corrected with the help of special fuel additives. For an engine with a carburetor system, you can try cleaning it with a carbon remover spray that is injected directly into the carburetor. If removing carbon deposits from the combustion chamber has no effect, then there is only one way out - replacing the piston rings and cleaning the grooves.
Algorithm for replacing the crankshaft oil seal
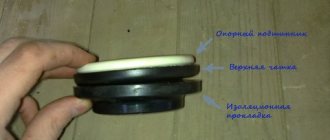
To replace the front crankshaft oil seal, you will need a standard set of wrenches, specialized tools (wrenches for unscrewing the crankshaft pulley bolt), a gear puller (for cars with a timing belt drive), and truings for pressing in a new rubber element .
Video: A simple method for removing the oil seal
If you take cars equipped with engines with a timing belt drive, then the replacement technology is as follows:
- We place the car in the pit and immobilize it.
- We provide access to the attachment drive pulley mounted on the crankshaft.
- Remove the accessory belt.
- We provide access to the timing belt.
- We set TDC according to the marks (on the camshaft gear, crankshaft pulley, flywheel). Sometimes, car enthusiasts and novice mechanics wonder how to replace crankshaft bearings without removing the engine. We fix it in this position.
- Unscrew the crankshaft pulley mounting bolt. Once again we check the installation of marks.
- Loosen the timing belt tension roller.
- We remove the belt.
- We pull the drive gear off the crankshaft (carefully so as not to lose the key). That no one has stabilizer bars on a Polo sedan. Change it yourself. Work like me. Usually the gear is pulled off by hand, but sometimes a puller is required.
- Thoroughly wash and clean the surface near the crankshaft end switch.
- Pry off the oil seal with a screwdriver or pliers. We do this carefully so as not to damage the seating surfaces, since even the slightest scratch will lead to a loss of density and renewed oil leakage.
- We wipe the seating surfaces with a rag.
- Lubricate the new oil seal and put it in place, making sure that the edges do not turn under.
- We hammer the rubber element until it stops using a straightener (a piece of pipe of the appropriate diameter).
- We put everything back together, making sure that the marks match and the drive belts are tensioned correctly.
How to repair a piston VAZ 2109
If wear in the cylinders exceeds 0.15 millimeters, the cylinders need to be bored and the pistons and rings replaced to the following repair size:
Replacement of a VAZ 2109 piston must be carried out taking into account the compliance of each piston class with a new piston ring. When choosing a ring, you need to pay attention to its markings:
- if it is absent on the parts, then the product has nominal dimensions;
- “40” - an increase of 0.4 millimeters in the diameter of the repair ring is marked;
- “80” - corresponds to the marking of an increase in size by 0.8 millimeters.
Piston repairs in a BC are performed as follows:
Cylinder wear is checked. Using a bore gauge, the diameter of the cylinder is measured in two directions—longitudinal and transverse—in four zones.
Measuring cylinder diameter with a bore gauge
In the area of the first belt there is practically no wear on the cylinder. Therefore, the amount of wear in the remaining belts of the part can be determined by the difference in diameters between this cylinder belt and the others.
Cylinder wear control belts
- If the amount of wear is more than 0.15 millimeters, the cylinders are bored to the closest repair size. It should be taken into account that the final operation for processing the cylinder is honing. Therefore, it is necessary to leave an allowance for processing of a diameter of 0.03 millimeters.
- After the final operation, the repair size of the piston and the diameter of the cylinder differed in the range of 0.025 - 0.045 millimeters.
- A new piston is installed.
- In the same way, all remaining pistons on the VAZ 2109 are replaced.
- The engine is assembled in the reverse order of disassembly after the last piston is installed.
The replacement of VAZ 2109 pistons is well shown in the video.
How to properly break in an engine after replacing a piston
Proper running-in of the car is of great importance after the entire piston engine on the VAZ 2109 has been replaced. This must be treated very carefully, as well as repairs
Particular attention should be paid to those units in which the parts are connected to each other by friction, and the efficiency depends on the optimal clearances with which they should be adjacent to each other. So:
- The speed of the car, after installing new pistons, should not exceed more than 60 kilometers in one hour per 1000 kilometers. This is necessary for grinding in parts that rub against each other.
- The main purpose of running in is to smooth out all micro-irregularities. This occurs by friction between the parts until their complete fit is ensured. Increased heating of engine parts occurs when there is high friction during “grinding in.”
- This indicates that the engine should operate with gentle, minimal loads.
Features of replacement on different engines
Video: Oil leak from under the front crankshaft oil seal of VAZ 2114, how to change the oil seal!
For example, if you take VAZ models starting from 2108, equipped with an 8-valve timing belt, then replacement is the easiest to do. Having turned the crankshaft, there is no need to replace it, since this does not require removing the engine from. The problem can only arise with unscrewing the pulley mounting bolt. To avoid this, engine rotation is blocked by turning on the gearbox and squeezing the brakes.
On 16-valve engines, work is more difficult. How to change the tie rod on a Ford Focus 2? It’s not an easy task, I’ll tell you right away. But everyone can do it, because the one who walks can master the road! This is due to the difficulty of fixing the camshaft after installation according to the marks. Replacing the oil seal and packing without removing the crankshaft. For example, on Renault Logan cars, this will require a special locking plate for the shafts, as well as a lock for the crankshaft. And in general, to provide access to the timing belt on 16-valve engines, you have to remove many elements from the engine; in some cases, you also need to jack up one side of the engine, having first removed its support.
If we take engines in which the timing belt is driven by a chain, then they have their own nuances. On the one hand, it is easier to change a leaking oil seal on them, since there is no need to disassemble the timing drive. But on the other hand, access to the oil seal is very limited and replacing it is not easy. For example, on a VAZ-2107, to replace the oil seal, you just need to remove the auxiliary equipment drive belt and unscrew the pulley. And then we simply pick up the leaking oil seal and install a new one.
But this car has a longitudinal engine layout. Good day! How to change the main bearings without removing the crankshaft Because of this, the space between the engine cover and the radiator is very small, and it is almost impossible to install the oil seal without distortion. Therefore, to carry out work more conveniently, it is better to remove the lower timing cover. And this increases the labor intensity of the work. In addition, under this cover there is a gasket that must be changed or at least coated with sealant. Ford Max 2008 I want to change the fuel filter, no one knows where it is. More precisely, they know, but somehow they don’t say it with confidence. Many people say that it’s in the tank, the trader at the market said that it only changes. But on such engines, after replacement, you will not have to install the shafts according to the marks, since the gas distribution mechanism drive is not affected during work.
In general, before starting work on any car, you should familiarize yourself with the features of the replacement and be sure to follow the technology for carrying out the work.
Restoration of crankshafts
You can also use a crankshaft restoration workshop, but I do not recommend restoring the crankshaft and having it welded on. I've heard a lot of disapproving reviews about restored crankshafts, firstly, these crankshafts break, secondly, they wear out quickly.
Photo. Broken crankshaft VAZ-2103, last boring crankshaft (liners size 1.00)
In the photo you see a broken crankshaft from the last boring; after boring this crankshaft and installing it on the engine, it covered 45,000 km before it broke. True, the owner of this six did not spare the engine much and gave it gas.
Therefore, if your car has a last-bored crankshaft, then don’t drive it, driving such a car should be calm.