The uninterrupted operation of the power unit depends on the serviceability of each individual element. If a characteristic metallic knock is noticed during its operation, this is usually caused by wear or rotation of the upper/lower sliding element. In this case, replacing the engine liner is carried out quickly in order to protect the engine from major repairs.
How to replace bearings without removing the engine?
To replace the liners successfully, it is not at all necessary to dismantle the motor. If you are assured that it is impossible to get to them without removing and pulling the engine out of the hood, urgently change the car service center. But be sure to take into account one condition - the crankshaft (CV) should not be worn out. Otherwise, you won’t be able to do without removing the engine and completely disassembling it!
Without dismantling the power unit, it is easier to change the connecting rod bearings; it is more difficult to change the main bearings. For the latter case, you need to loosen the fastenings and release the crankshaft by 10-15 cm. Although there is another method, adopted by our grandfathers from ship motorists. The main bearings are pushed out using a soft rivet or bolt, which is inserted into the desired lubrication passage and rotated clockwise. The main thing is that the size of the aluminum insert should be slightly smaller than the hole and not scratch the crankshaft.
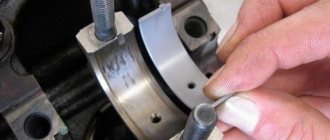
After removing the half rings, it is imperative to evaluate their condition. If there are no visible scuffs or damage, you can get by with a simple replacement. However, if it is very worn, polishing the HF is mandatory. Therefore, you will have to remove it from the mounts, and to do this, pull out the motor.
More information about condition assessment:
- pits or pockets - fatigue wear;
- scratches and ingrained dirt - low-quality motor oil;
- worn surface - insufficient amount of lubricant;
- chamfers on the edge - taper of the necks.
Replacement procedure and marking of liners
Below are instructions for independent work. Replacing the engine liner will be faster and easier if you do it consistently.
- Place the car in a repair pit. Remove the power unit protective cover, if present. Place a jack under one of the drive wheels. Be sure to drain the engine oil.
- Remove exhaust pants and other components that interfere with work from below. Also unscrew the suspensions connecting the engine to the gearbox. Loosen the camshaft chain, remove the starter, and on some cars, the beam.
- Remove the oil pan bolts, nuts and studs.
- Rotate the wheel to move the connecting rods to the most convenient position for unscrewing the bolts. They are tightened with a force of approximately 3 kg, so you need to select the appropriate tool (usually a socket of the appropriate size with an extension). After tearing off the pins, you can continue to unscrew them by hand.
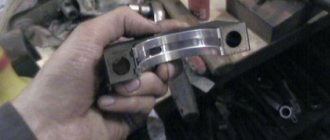
- Remove the half rings along with the connecting rod caps by pulling down. Be sure to check the condition of the internal surfaces of the half rings.
- Pull out the main bearings using a pusher - a bolt of a suitable size or rivet.
- Install a new set of half rings, tighten and reassemble everything in reverse order.
For quick installation of half rings, the connecting rod is completely raised up, moved to the side and lowered. Now nothing will interfere with the work, the sliding element can be inserted faster. Then the connecting rod is put in place.
It is important to tighten the fastener bolts tightly so that they do not loosen after the car has been driven for a long time and cause a malfunction, such as spinning. To do this, tightening is carried out at a specific moment:
The connecting rod bearings are marked with numbers directly on the head. After the initial grinding of the HF, bearings with a size of 0.25 mm are installed. After the second - 0.5 mm, and after the third - 0.75 mm. The latest size is 1 cm. There is no point in processing the crankshaft further.
To ensure that replacing the crankshaft liners without removing the crankshaft is successful, it is recommended to entrust the selection of parts to a specialist. It will correctly calculate the size and you won’t have to reinstall the parts again.
How to install liners on the crankshaft - procedure
In most cases, replacement of liners is carried out at a service station, but if desired, any driver who has repair skills and knows how to use the tool can easily try to carry out this operation on his own. To do this, you need to do the following steps sequentially:
- First of all, it is important to check the gap between the liner and the crankshaft. To do this, a calibrated plastic wire is placed on the desired neck. After this, the cover with the liner is installed and tightened with the required force (approximately 51 N m (Newton per meter), this value can be measured by tightening the unit under test with a torque wrench). After removing the cover, the gap is determined by the degree of flattening of the wire
. To evaluate this parameter, there is a nominal gap for each make of car, and if the wire indicates that the gap is larger, then a repair liner will be required. - After checking the clearances on all connecting rod journals, it is necessary to remove the connecting rods, dismantle the crankshaft and send it to the boring machine. Grinding is carried out on a special machine (centripetal), which, of course, not everyone has. Therefore, it is better to do this with a master. After boring, you need to select the crankshaft liners, here again a micrometer will help and further fitting with measuring the gap.
- When the size of the liners is finally selected, the crankshaft is installed in the reverse order. Its elements must be placed in their seats and the main bearing caps must be screwed on.
- Next, you need to decide how to install the liners on the crankshaft and install the connecting rods in their places. To do this, they are lubricated with engine oil, their caps are screwed on, so that direct installation takes a minimum of time, not to mention preparation. It is important to assemble the crankshaft with the same clutch and flywheel installed in the engine before repair.
We must remember that the crankshaft is one of the expensive parts in any car. In addition, it bears the heaviest load. Therefore, it is necessary to take all measures to extend its service life. In this matter, timely boring of the crankshaft plays a decisive role. After this procedure, all necks become perfectly smooth and ready for further work. It is this factor that determines the quality of the overhaul.
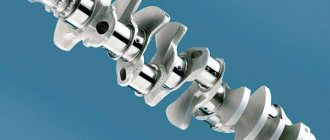
An internal combustion engine is a complex mechanism consisting of hundreds of parts. And each and every one of them is important for the balanced and correct operation of a complex system, to one degree or another. But at the same time, in no case can the degree of importance of each of them be assessed equally. One of the most important elements, of course, is the crankshaft and all its parts that interface with it, which transmits the energy of the burning fuel to the wheels, thereby rotating them. We will further discuss the components of this mechanism, namely the crankshaft liners, which are small half-rings made of soft metal with an anti-friction coating. During long-term operation of the car’s engine, they should be the very first to leave their post, and not the crankshaft journals.
What are crankshaft repair liners, their types
Essentially, crankshaft bearings are plain bearings for the connecting rods that rotate the crankshaft.
This rotation is the result of a micro-explosion in the combustion chambers of the engine cylinders. This system is dominated by high speed and heavy loads, as a result of which it is necessary to minimize the friction of parts, otherwise the engine will simply fail, and instantly. In order for friction to be reduced as much as possible, all significant parts of the internal combustion engine are coated in a so-called “oil film” - a thin micron film, which is ensured by a special lubrication system of the automobile engine. The appearance of a film that envelops metal parts is only possible if the oil pressure is strong enough. And between the crankshaft journal and its bearings there is also a similar oil layer. And only thanks to it the friction force is minimized as much as possible. From this we can conclude that the crankshaft liners represent a certain protection, the effect of which increases the service life of such an important part for the engine.
To begin with, crankshaft bearings must be divided into two categories: connecting rod
and
indigenous. The connecting rod bearings, as we said above, are located between the crankshaft connecting rods and its journals.
The radicals, in turn, play a similar role, but they are located between the crankshaft and the places where it passes through the engine body.
For different engines, factories produce crankshaft liners that differ in their inner diameter. Repair inserts differ from each other and, of course, from new ones installed on a newly released car. Their minimum difference is calculated from a quarter of a millimeter and increases with a similar step. Thus, we have a size range of crankshaft repair liners in increments of 0.25 mm along the internal diameter: 0.25; 0.5; 0.75; 1 mm, etc.
Reasons for replacing crankshaft bearings?
Under conditions of extreme temperature and physical stress that the crankshaft constantly endures, only the crankshaft liners help it stay on the axis, ensuring the operation of the crank mechanism. The main and connecting rod journals operate on the principle of internal races, and the crankshaft liners serve as external races, respectively. The engine block system has a whole network of oil lines through which engine oil is supplied to the bearings under high pressure. It is this that creates the very microscopic film mentioned above, which allows the crankshaft to rotate.
The primary reason for replacing crankshaft bearings is their physical wear.
. Whatever the desire to protect the liners from wear, physics is physics. The surfaces of the journals of the crankshaft liners wear out over time, increasing the gap between them, which leads to free movement of the crankshaft and less oil supply due to a sharp decrease in pressure. And this already leads to breakdowns of car engines.
The second reason for forced repairs is the rotation of the crankshaft liners
. Probably every car owner has heard about such situations, but, alas, not everyone knows about the reasons for this state of affairs. So how and why does this happen? The thinnest plate of the liner goes into a makeshift bed. The outer walls of the half rings are framed by special protrusions, which in the new engine rest against the front parts of the block. Under certain conditions, the antennae simply cannot withstand the liner, and it begins to rotate, sticking to the crankshaft journal. If this happens and the liner turns, the engine simply stops functioning. Typical causes of such failure are:
- extreme viscosity of the lubricant, penetration of abrasive compounds into it or its disappearance altogether;
Insufficient tension of installed bearing caps;
Too thin a lubricant and operating the engine in constant overload modes.
How to determine the wear of the crankshaft liners and help the mechanism?
Once it has happened that engine repair is already inevitable, the question arises of how to further determine the wear of the crankshaft liners and what size will they need to be purchased for the next replacement? Basically, a micrometer is used for measurements, but it is still calculated quite accurately visually, as they say, “by eye.” Immediately evaluate the possibility of the next crankshaft boring.
Immediate replacement is necessary if the crankshaft bearings are rotated. An indicator of this problem will be a loud knocking of the crankshaft and constant attempts by the engine to stall.
If the necks jam, then you won’t be able to drive any further. In any case, a detailed inspection of the mechanisms should be carried out. If you find wavy potholes on the journals that you can easily feel with your hands, then you cannot avoid boring the crankshaft and then installing repair liners of the appropriate size. We strongly recommend that you purchase inserts only after boring them. After all, a lot of wear can lead to carrying out this procedure by one, or even two sizes.
How to install liners on the crankshaft - procedure?
In most cases, car enthusiasts go to a service station to replace crankshaft liners. But with a strong desire, each of you who has repair skills and good handling of tools can completely cope with the task assigned to him in this situation. To do this, you just need to follow the sequence of the following steps:
1.
The very first and most important thing is to check the gap between the crankshaft and its liner.
To do this, you need to use a calibrated plastic wire, which is located on the corresponding neck. Afterwards, install the cover with the liner and tighten it with the required force, which is 51 Nm (this value can be measured using a torque wrench). After the cover is removed, the size of the gap will be equal to the degree of flattening of the wire. To evaluate this parameter, you need to use the nominal gap, which corresponds to each car brand. And if the degree of flattening of the wire indicates that the gap is more than nominal, then installation of a repair liner is necessary.
2.
After all the clearances have been checked, the connecting rods should be removed from all the journals, the crankshaft should be dismantled and bored. Grinding of the crankshaft is carried out on a centripetal, the presence of which, of course, not everyone can boast of. Therefore, it is better to have this part of the procedure done by a specialist. After the crankshaft has been bored, you can start selecting repair liners. Here again a micrometer will come to your aid and further fitting of the crankshaft repair liners.
3.
When the liners are finally selected, install the crankshaft in the reverse order. When the elements are inserted into their seats, tighten the main bearing caps.
4.
Next, we solve the issue of installing the crankshaft liners and connecting rods in their places. To do this, simply lubricate the bearings with engine oil and tighten their caps. So, as you can see, their installation takes very little time, unlike preparatory work and preparations.
Remember that the crankshaft is one of the most expensive parts of every car. In addition, he experiences enormous loads. Therefore, it is worth taking all possible measures to extend its service life. And the actual action will be timely boring of the crankshaft, which will play a fundamental role. After performing this procedure, all cervixes are again perfectly smooth and ready for subsequent “workdays”.
Important!
A
car engine is a rather complex and specific unit. Many car enthusiasts and craftsmen completely disassemble, repair and reassemble it, one might say with their eyes closed. But installing crankshaft liners requires additional special skills. It is better to entrust this work to an experienced mechanic. This is necessary to avoid insufficient or excessive tension, which can lead to rotation of the liners.
When is it necessary to replace crankshaft bearings?
The HF engine experiences heavy loads. Just look at the vibration on the axis, which invariably occurs during the operation of the crankshaft. It is clear that the sliding bearings also suffer, because they take the blow first.
- Physical wear is the main reason when an engine liner needs to be replaced. The surfaces of parts wear out, backlash and vibration increase. Naturally, in such conditions the engine is in danger of knocking.
- Rotation is the second reason. More details about this are written below.
Thus, replacement of liners is required in several cases. Problems can be judged by various signs. For example, by the absence or presence of abrasive inside the lubricant. Also, a symptom of half-ring wear is low interference when installing the connecting rod cap.
Regarding factors that lead to wear or turning:
- dirty or too viscous lubricant - impurities and abrasive particles reduce the properties of the lubricant, and in general its cleanliness is one of the key rules of prevention;
- constant overload of the internal combustion engine - you cannot drive for a long time at high speeds, from time to time you need to pause, slowing down to 80-90 km/h;
- incorrect installation of half rings during a previous repair - as a rule, this occurs due to weak tension (insufficient clamping torque), so tightening must be carried out using a torque wrench.
How to determine the wear of the crankshaft liners and help the mechanism?
When repairing an engine, the question very often arises of how to determine the wear of the crankshaft liners and their next repair size (which they will have after the upcoming boring). As a rule, a micrometer is used for measurements (measures linear dimensions), but this can be calculated visually with sufficient accuracy. The possibility of further boring the crankshaft is immediately assessed.
Replacement is required almost immediately when. The loud knocking of the mechanism and the constant attempts of the engine to stall will tell you this, sometimes the journals jam, then you definitely won’t be able to drive further. In all other cases, it is necessary to carry out a thorough inspection, and if there are wavy grooves on the journals that can be felt with your hands, it is necessary to bore and install liners of the appropriate repair size.
Rotated liners: what does this mean and why do they rotate?
Rotating the engine bearings is a change in their position relative to the crankshaft journal or block. As mentioned above, this is caused by the colossal loads to which the parts are subjected. Shifting the bearings from their place immediately negatively affects the flow of oil. His pressure worsens, starvation begins and the power unit is destroyed. And all because the half rings are equipped with holes that must clearly coincide with the channels for the passage of lubricant.
The main reasons for cranking
There are several known reasons that cause elements to rotate:
- banal wear - the end parts of the sliding bearings wear out (support collars, stops, antennae), which are no longer able to hold the parts in one place;
- weak, incorrect fixation of the covers - the half-rings must be tightened with a certain torque specified in the passport data.
And of course, this arises due to a violation of the design operating conditions of the plain bearings themselves. In other words, due to a large and uneven load. This happens especially often with half rings with weak tension.
Rotating sliding parts can cause big troubles and therefore requires urgent intervention. The most dangerous is the shift of the main bearings. In this case, the power unit will definitely need an expensive overhaul.
It is noteworthy that when the connecting rod half ring rotates, it is simply updated. However, it is wrong to do so - because the resource of the mating connecting rod-pin pair in this case is reduced by almost 70%. Therefore, it is necessary to replace the connecting rod itself, in which a broken lock can often be found. And the most optimal method of repair is considered to be boring the crankshaft and replacing the complete liners, along with the connecting rods.
Aluminum, copper, lead: pros and cons
The advantage of aluminum liners is that they are quite inexpensive and wear-resistant. In addition, aluminum hardly wears off during operation and, therefore, its particles do not contaminate the oil.
The weak point of aluminum liners is their too soft surface, which is not resistant to scratches. Therefore, if the oil is contaminated, foreign particles will leave grooves on the metal of the liner. Parts made of copper and lead are more resistant to scratches; foreign particles simply stick to them without causing much harm.
Manufacturers have learned to mitigate this drawback by grinding the surface of the liners rather than rolling it. In this case, microscopic grooves remain on the surface of the part, which do not affect the characteristics, but increase the ability to absorb contamination. Foreign inclusions settle in them, at the same time, such a surface better retains the oil film.
Another advantage of aluminum is that it can withstand higher melting temperatures than copper or lead. Therefore, an engine with an aluminum liner is more stable during overheating that occurs during detonation or overloads.
Therefore, we can confidently say that aluminum liners are suitable for any type of engine, of course, subject to the oil change period. At the same time, parts made of lead and copper alloys are not so picky about oil cleaning or uneven shaft journals.
Nevertheless, sports car manufacturers still prefer to equip engines with copper-lead elements, since they can withstand overloads better than aluminum ones.
Typically, copper and lead liners are made of three layers. It is based on steel, onto which babbitt is applied in a layer of 0.0125 to 0.015 millimeters. For decorative purposes, the element can be coated with tin spraying. This layer is characterized by the ability to accumulate solid inclusions and provide wear resistance and strength. The part can easily withstand pressure up to 25 thousand kPa per square cm, while aluminum can withstand only 13 thousand kPa.
Despite the good performance of aluminum and copper-lead alloys, automakers continue to experiment and develop in this area. For example, they recently released a liner made of pure copper, coated with tin and nickel. The top layer in it is the same babbitt. With the same characteristics in terms of strength, such elements are much more environmentally friendly and durable, but their price has become noticeably higher.
Since the most common cause of liner failure is detonation, such parts with a high safety margin can withstand loads. But still, not everyone can afford the price of such elements.
Another option for the liner is a combination of aluminum with Teflon coating, which gives the aluminum surface additional scratch resistance.
The difference between main bearings and connecting rod bearings
The radical semirings sit in the lower cavity of the BC. They are also located in separate beds, like the connecting rod ones. Their purpose is to facilitate smooth rotation of the crankshaft and serve as supports for it when the latter is installed in the BC of the power unit. They are in direct contact with the root journals. On 4-cylinder engines, 5 main plain bearings are usually used. They are equipped with grooves and holes for better lubricant supply.
The connecting rod bearings are installed at the very bottom of the pan. They are pressed into the connecting rod (head) caps. Mounted on connecting rod journals. Compared to radical half rings, they have a simpler design.
Specialists and experienced drivers are able to distinguish wear of main and connecting rod bearings by sound:
- the main ones knock dully, a metallic clang is heard - usually during sharp acceleration or at idle;
- connecting rod ones are almost the same, but the sound is much sharper, and the frequency of the noise increases with increasing speed.
Selection of crankshaft liners
In most cases, the selection is entrusted to a specialist. But after studying the information in detail, you will be able to do this on your own. In addition to the fact that it is necessary to combine spare parts with the car model, the general condition of the vehicle is also taken into account.
Selection of main liners
Some useful recommendations for selecting a new HF when replacing the crankshaft liners:
- it is better to buy basic elements of the same color as the standard ones (used, old);
- Be sure to check the markings directly on the shaft.
A special identification color selection card is issued for main bearings. For example, for a 4-cylinder engine, the markings applied to the BC and the CV assembly are used. If marked C3, then you can install yellow and green elements. More details about the colors in the picture below.
And this is an identification card for 6-cylinder engines.
Selection of connecting rod bearings
And here, if the HF is new, the plain bearings are selected according to the diagram. If the color code is lost, you need to look at the markings on the connecting rod caps.
Below is an identification card for selecting connecting rod half rings for four-cylinder power units.
And this is the color map for 6-cylinder units.
The choice of bearings also depends on the antifriction coating. As a rule, it consists of several layers:
- biometallic with a steel base (1-4 mm) - lead, copper, zinc, tin, silicon and aluminum;
- trimetallic - lead, tin, copper.
Use the correct engine oil that meets all the requirements and approvals of the engine manufacturer. It is also necessary to update the filter promptly to prevent abrasive particles from entering the lubricant. It is also not recommended to overload the engine. All this will extend the service life of the liners by almost 2-3 times.