Probably everyone knows the morning winter symphonies of various sounds in the courtyards. First, the wipers break the snow crust and rake tons of snow with iron shovels, and then the sounds are born, thanks to other wipers - the ones that are stuck to the windshields of most cars parked in the yard. This is especially true when the temperature fluctuates near zero and the thawed water on car windows turns into ice. Until recently, this was the only method to prepare a car windshield for driving in the cold season.
Fortunately, engineers from automobile companies noticed this problem not long ago and provided an excellent way out of it - a heated windshield. This technology did not pass by the new Lada Vesta cars. In this article, we will look in detail at the question of how to turn on the heated windshield on Vesta, and also find out in which trim levels this option can be found.
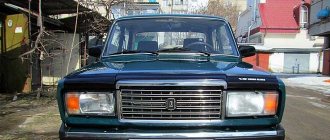
1 — air flow distribution buttons, 2 — air conditioning button, 3 — recirculation mode button, 4 — air temperature adjustment handle.
Removing the windshield
You will need : a piece of string.
Procedure:
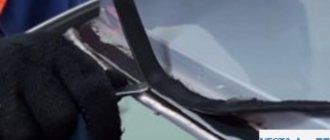
_x000D_
- _x000D_
- We place the string behind the edge of the glass and cut off part of the sealant, moving from side to side (with an assistant). _x000D_
- We pull one end of the string inside the cabin and continue to cut off the sealant around the perimeter of the windshield. _x000D_
- We remove the glass from the car. _x000D_
_x000D_
Place the string behind the edge of the glass and cut off part of the sealant. Pull one end of the string into the interior. Remove the windshield from the Lada car.
Sequence of actions to independently replace the windshield on a Lada Vesta car
Required materials and tools:
- rags;
- stationery knife;
- plastic spatula;
- new glass as needed;
- gloves;
- tube of glue - sealant.
- We place the car on a flat platform, surface.
- We provide safety measures: squeeze the parking brake, turn on first gear.
- Open the hood, unscrew the frill housing and the windshield wiper blades.
- We pierce the adhesive seam on the rubber seal of the windshield.
Windshield Installation
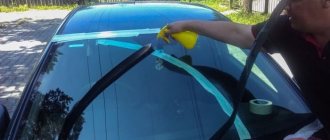
You will need : a sharp knife, a repair kit for gluing the windshield (read the instructions), a glue gun, a heated room (recommended air temperature 23°C, humidity 50%).
Procedure:
_x000D_
- _x000D_
- We remove the remaining sealant; the permissible residual thickness at the seam is no more than 2 mm. _x000D_
- We degrease the painted edges of the windshield with an activator. _x000D_
- Degrease the edges of the body opening. _x000D_
_x000D_
We remove the remaining sealant from the body. We degrease the painted edges of the windshield with an activator. We degrease the edges of the body opening.
_x000D_
- _x000D_
- Apply glue around the perimeter of the glass, retreating 8-10 mm from the edge. The height of the layer should be 10-12 mm and the width no more than 8 mm. _x000D_
- We place the glass in the body opening using suction cups. There should be even gaps between the side edges of the glass. _x000D_
- Install the wedges from below so that the upper edge is pressed against the front side of the body roof. We press the glass to the body. _x000D_
_x000D_
Apply glue around the perimeter of the windshield Place the windshield in the body opening and install wedges at the bottom of the glass
To prevent the glass from “sliding down”, secure it with three pieces of adhesive tape to the body 250 - 300 mm long.
The entire process (removing and installing the windshield) is also shown in the video:
How does heated glass work?
- Buttons distribute air flow.
- Starting the air conditioner.
- Air recirculation mode (intake from the cabin or outside).
- Temperature setting.
Vesta's heated windshield is similar in design to other cars. Its button is indicated in the picture in the center and surrounded by a red circle.
This system consists of several parts:
- switch in the cabin;
- in expensive versions of Vesta, a “Defrost Max” button is installed, which, together with heating, activates the air conditioner and maximum air pressure;
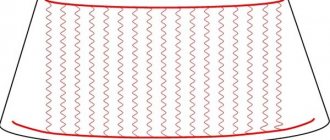
- heating filaments inside the windshield, they can only be seen in the sun;
- electrical wiring, relay, fuse link are located under the front panel.
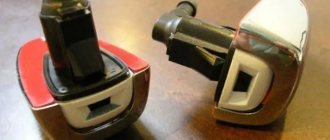
Defrost Max button on the Lada Vesta “Lux” configuration
The “Defrost Max” button activates a relay that supplies current to the filament. As a result, the windshield heats up and thaws away ice and snow.
The system is configured in such a way that after a while the automation turns off the power so as not to waste extra energy.
Lada Vesta windshield dimensions. Manufacturer prices
| Name of original product | Size in millimeters | Price in rubles |
| Head-on | 1076 * 468 | From 4000 |
| Heated rear | 1074*438 | From 4000 |
| Front side (2 pieces) | 975*560 | From 8000 |
| Rear side (2 pieces) | 727*430 | From 4000 |
| *prices are as of 04/06/2019. | ||
How to turn on the heated glass on Vesta
There is no separate heating button on regular Vesta trim levels. The heated front window starts working from one button, which is responsible for heating the rear window and side mirrors.
The operation of the system depends on the ambient temperature. If the temperature outside is down to -10 degrees, then heating will quickly melt the icing on the glass. But if it gets colder, the efficiency decreases noticeably. The greater the temperature difference between the cabin and the outside air, the less power the windshield heating is turned on. This is done to prevent the glass from breaking.
To speed up the process of defrosting the windshield, additionally turn on the heater at the highest blowing speed. To prevent fogging, turn on the air conditioner additionally.
Attention! Do not rush to turn on the wipers - they may fail if they do not have time to thaw. Wait until the snow starts rolling down the glass, then you can turn them on.
If the heated windshield does not work
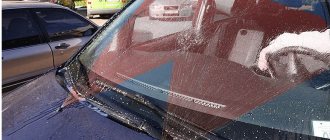
The effect of the option can be observed in cold weather with frozen glass. If after several minutes you do not see the result, then the glass heating is not working.
The Lada Vesta may have the following causes of malfunction:
- The fuse has blown . Check the integrity of the fuse by its number and location according to the manual. Typically this is a 60 amp fuse number F75. If it is faulty, you will have to replace it with a new one.
- Individual sections of the filament have burned out . It happens that heating does not work completely, but in separate areas. At the same time, you can see on the glass where heating occurs and where it does not. In this case, the windshield will need to be replaced. But many drivers are in no hurry to do this. It's better to drive without heating than to pay for expensive glass. After all, there are no cracks, and nothing interferes with driving the car.
Windshield replacement under warranty
By the way, if your car is under warranty, and the damage to the windshield was not caused by mechanical impact (there are no chips), try contacting an authorized dealer on a warranty basis. Most likely, your request will be satisfied and your cracked windshield will be replaced completely free of charge.
There are known cases of replacing the windshield on Lada Vesta cars even in the presence of mechanical damage. The fact is that on the first cars the wipers were not of the correct design and over time they rubbed the windshield (it is these mechanical damages that we are talking about). AvtoVAZ recognized the manufacturing defect and replaced the glass for the customers who contacted us.
Which Vestas are heated?
The basic configuration is not equipped with this function. You will find Vesta's heated windshield starting with the "Comfort" version. The minimum price of such a car is 592,000 rubles, and it is constantly being adjusted. Compared to the basic configuration, the difference in cost is about 75 thousand rubles.
If you need this function, but don’t have enough money for an expensive package, you can do it differently. You can install the option after purchasing the car. It will be much cheaper, especially if you install it yourself.
The “luxury” configuration will have “Defrost Max” - the button discussed above. It simultaneously connects rear and front heating, as well as heated side mirrors, air conditioning and air supply.
Probably everyone knows the morning winter symphonies of various sounds in the courtyards. First, the wipers break the snow crust and rake tons of snow with iron shovels, and then the sounds are born, thanks to other wipers - the ones that are stuck to the windshields of most cars parked in the yard. This is especially true when the temperature fluctuates near zero and the thawed water on car windows turns into ice. Until recently, this was the only method to prepare a car windshield for driving in the cold season.
Fortunately, engineers from automobile companies noticed this problem not long ago and provided an excellent way out of it - a heated windshield. This technology did not pass by the new Lada Vesta cars. In this article, we will look in detail at the question of how to turn on the heated windshield on Vesta, and also find out in which trim levels this option can be found.
1 — air flow distribution buttons, 2 — air conditioning button, 3 — recirculation mode button, 4 — air temperature adjustment handle.
Reviews
| № | Positive |
| 1. | Valery , 43 years old (www.otzovik.com): the car is in its fourth year, the windshield is intact, the seal is sealed. |
| 2. | Kirill , 39 years old (www.zr.ru): survived two winters, the interior and seals are in good condition. |
| 3. | Vitaly , 23 years old (www.autobann.su): comrades advised replacing the seal with a new one after four years, since cracks and contour deformation often form. |
| 4. | Georgy , 33 years old (www.lada-vesta.net): I won’t complain about the quality of the Lada Vesta, the car is good, there were no critical breakdowns. He eliminated minor defects on his own. |
| 5. | Vladlen , 41 years old (www.otzovik.com): the car overwintered for two seasons in an open parking lot, there is no garage. There are no comments on the interior or seals. |
| 6. | Dmitry , 43 years old (www.zr.ru): mileage 80,000 km, no capital investments. I systematically carry out technical inspections and buy original consumables. |
| 7. | Vitalievich , 25 years old (www.autobann.su): I recommend the car for purchase, good quality, affordable price, wide range of spare parts. |
| 8. | Zheka , 33 years old (www.lada-vesta.net): over four years of use, the rubber has cracked in places, but this is not so critical for me. |
| 9. | Konstantin Vladislavovich , 49 years old (www.otzovik.com): the car is like a car, I won’t praise it, there are defects. For daily trips to work - from work will do. |
| 10. | Leonidovich , 33 years old (www.zr.ru): in comparison with Granta, Priora, Lada Vesta - this is something perfect. I am satisfied with the quality, no comments. |
| 11. | Vasily , 36 years old (www.autobann.su): I have had a car for two years, no special comments, no complaints. |
| Negative | |
| 12. | Ivan , 42 years old (www.zr.ru): a year and a half after buying the car, the seals in the interior dried out. I will have it replaced by an authorized dealer under warranty. |
| 13. | Vitaly , 38 years old (www.otzovik.com): constantly taps the glass when driving, especially on rough roads. |
| 14. | Ivan Vasilyevich , 47 years old (www.autobann.su): the quality of the fit of the windshield and the sealing is poor. It is necessary to modify it yourself, which entails additional expenses. |
Related link:
Lada Vesta - which color to choose
How does the heated windshield work on Vesta?
The windshield heating device on the Lada Vesta is no different from similar installations on other cars. This node can be divided into several elements:
- A switch located inside the car.
- In expensive Vesta configurations there is a “Defrost MAX” button, which, in combination with heating, turns on the air conditioning and maximum heater fan speed.
- Transparent filaments located inside the windshield (between the layers). They directly carry out heating. If you carefully examine the glass in sunny weather or take a photo, you can see them.
- Wires, fuse and relay located under the dashboard.
When you press the button, the relay closes the “plus” to the contact of the grid of incandescent filaments, after which the windshield is heated by current. After some time, the electronic control unit automatically turns off the heating to avoid unnecessary energy consumption.
How to connect a heated windshield if it was not present initially
The work is difficult, but garage craftsmen take on it. First they buy glass. It should be transparent: the threads in a good product are not visible.
Windshield for Vesta: price and article number
A sign of a quality product is reliable packaging. Prices for a windshield with a heating function for the Lada Vesta - original and analogue - vary slightly.
Windshield markings. Photo source: https://www.drive2.ru/l/477567928795922907/?m=477892559604023790
The original with electric heating and DD goes under catalog number 8450007325, price 14,500 rubles. Heated, but without a rain sensor - costs 13,500 rubles, article number 8450007326.
Analogue - AGC with electric heating and rain sensor - RUB 13,600.
Replacement
Do-it-yourself installation is carried out with a thermometer reading from +10 to +35°C.
In what order does the replacement take place:
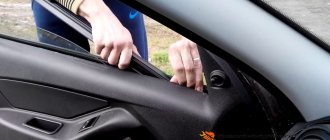
- The door windows are lowered to eliminate pressure on the new part when they are closed.
- The hood, fenders, and front seats are covered with special material. Also protect the paintwork around the windshield with masking tape.
- Facing panels, molding, wipers, mirrors are dismantled.
- Using a special knife or cutting string, cut off the adhesive sealant and dismantle the old glass.
- Remove particles of debris and remnants of old adhesive-sealant from the opening.
- Clean and degrease the opening.
- Apply two coats of primer to areas with damaged paint.
- Trying on a new element. At this time, masking tape is glued in several places: one end on the glass, the other on the body. Cut it at the joints - these will be marks.
- The new part is treated around the perimeter with a degreaser.
- Apply a special primer without interruption at a time around the perimeter of the glass and allow to dry.
- The molding is installed and temporarily secured with tape. Apply sealant around the perimeter of the glass. The strip should be 10 mm wide, 12-16 mm high.
- Suction cups with handles carry the glass to the car.
- The part is applied to the installation site, aligning the marks.
- Press the glass and secure it with a special plastic tape.
They don't move the glass anymore. You can drive with caution after 3 hours, but during the day the car should not be unevenly loaded and jacked.
Heating connection
To connect the function, standard wires are used.
It's convenient to work like this. The wire from the glass comes out in the ceiling area - where the rear view mirror is installed. From there the cord leads to the right or left front side pillar:
- The decorative plastic cover is removed from it.
- A connector is found under it, through which a wire is led under the dashboard to the standard plug (located in the area where the air conditioner and audio system are turned on).
- The plug is removed. They install a button purchased in advance, to which they connect a wire from the windshield.
- Next, the simplest option is to connect the wire to the heated rear window button.
Heating control relay. Photo source: https://www.drive2.ru/l/500769548287345985/
Another route for the wires from the power button is into the engine compartment. Only the “+” needs to be left inside and connected to any peripheral consumer (stove, air conditioner, ceiling light). It cannot be connected to the cigarette lighter, since the heating will work continuously. The fuse is installed A10 or an analogue of A15.
How to use heating correctly
Unfortunately, the heated windshield of a Lada Vesta does not provide adaptability to the ambient temperature. Therefore, defrosting time varies depending on weather conditions. As the practice of using Lada Vesta cars shows, at temperatures just below zero, the snow begins to “slide” within 3 minutes. At -20 degrees, you can wipe off the thawed snow with your wipers in 5-10 minutes. At lower temperatures, the heating time will correspondingly increase.
Thanks for subscribing!
In order to significantly reduce the heating time, simultaneously with heating, turn on the stove fan to maximum power. To prevent the windows from fogging up, it is also recommended to turn on the air conditioning. Do not rush to use the wipers under any circumstances - if you turn them on too early, the wiper drive mechanisms may be damaged. Wait for the snow to move and then turn on the wipers.
Which Vesta configurations include heated car glass?
Unfortunately, in the basic configuration of the Lada Vesta, you are unlikely to find such an option as a heated windshield. The minimum configuration that includes heating is Comfort. The cost of Vesta with a set of Comfort options is at least 592,000 rubles (at the end of March 2022). If you compare it with the base, the difference in price is a little more than 75,000 rubles.
If you fundamentally need this option, but there is no way to overpay almost a hundred thousand rubles, then you can install a heated windshield on your car in the future - it will cost much less, especially if you do this work yourself.
In Luxe trim levels you will receive the “Defrost MAX” button, which was already mentioned above. This button comprehensively launches all possible systems to speed up the heating of all windows and side mirrors of the car.