VAZ 2108, 2109, 21099 cars with a carburetor engine are equipped with a fuel tank ventilation system.
It is part of the power supply system. The ventilation system of the gas tank is necessary to prevent the occurrence of excess pressure in it, which is created by the fuel vapors generated here (especially at high temperatures in the summer or when the car is strongly rocked while driving).
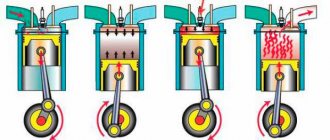
Operating principle of the gas tank ventilation system
Through two drainage tubes located in the fuel tank, fuel vapors, which create excess pressure in the tank, enter the separator through a hose. They condense in it, and the resulting gasoline flows back into the fuel tank. Fuel vapor is removed through a two-way valve connected by a hose to the separator.
Installation of the fuel tank ventilation system for VAZ 2108, 2109, 21099
Elements of the fuel tank ventilation system for VAZ 2108, 2109, 21099 cars
— Drainage tubes inside the tank
Two drain tubes are inserted into one another, their ends are located at the edges of the fuel tank to prevent fuel from leaking out when the car turns. They have a common outlet to the drain hose to the separator.
— Gasoline vapor separator
A sealed plastic tank installed in the rear right side of the car on a bracket. Connected by hoses to the fuel tank and a two-way check valve. Serves to condense fuel vapors entering it from the tank. Capacity 7 liters. The gasoline condensate from the separator is drained back into the fuel tank, and the vapors are released into the atmosphere through a two-way valve.
— Two-way check valve
Located near the fuel tank filler neck. Connected by a hose to the separator. Double-acting check valve: it introduces atmospheric air into the gas tank and, when the pressure of fuel vapors in it increases, releases them into the atmosphere.
Malfunctions of the gas tank ventilation system
— Breakdown of the two-way check valve
The result of a valve failure or clogged hoses will be that the pressure in the tank exceeds the norm, which can lead to its deformation, damage to the hoses and separator. As a result, a fuel leak may occur and a persistent smell of gasoline may appear both in and around the car.
Notes and additions
— On the injection engine 2111 of VAZ 21083, 21093, 21099 cars, instead of a fuel tank ventilation system, there is a fuel vapor recovery system. It is similar to the ventilation system, but in addition it has an adsorber with a valve that absorbs fuel vapors and, at the command of the control unit (purge of the adsorber), sends them back to the engine for afterburning. This allows you not to release toxic fumes into the atmosphere and comply with certain toxicity standards.
Removing and installing the tank filler neck on a VAZ 2110
So, the first thing you need to do is remove the rear right wheel and first jack up the car to make it easier to carry out all the repairs. After this, unscrew the clamp bolt that secures the hose and pipe.
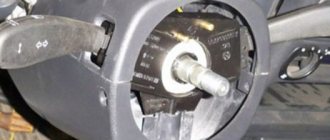
Now we go up a little higher and unscrew the neck fastening nut using a 13 mm wrench. This is clearly shown in the photo below.
And another clamp is located above. There you will need a key for 10.
And remove the clamp, putting it aside so as not to lose it. Next, open the gas tank flap and remove the rubber casing.
And now you can carefully move the filling pipe down to bring it to a more convenient position.
And now all that remains is to disconnect the hose from the top of the pipe, which is shown in the photo. We loosen the clamp that tightens this thin hose.
And after trying a little, we remove the hose from the tube:
Now the neck is almost completely freed, and all that remains is to disconnect it from the hose from below, the clamp of which we unscrewed at the very beginning.
After which we remove it without any problems. The end result is shown in the photo below.
The price of a new neck (filler pipe) of a gas tank on a VAZ 2110 is about 1000 rubles, but the same version can be bought at a disassembly site for half the price. Installation occurs in reverse order.
2.17.1.5 Replacing the fuel tank
If the fuel pump screen frequently becomes clogged, the tank should be removed and washed.
If a leak is detected along the junction line of the upper and lower parts of the tank, you can solder these places (it is recommended to do this in specialized workshops). To do this, pour out the remaining gasoline, thoroughly rinse and dry the tank. Then seal the leak with soft solder.
You can solder only a thoroughly washed and dried tank that does not contain gasoline vapors, otherwise the vapors may ignite during soldering.
To wash the fuel tank, use detergents: Lobomid, MS or ML. Then, to remove any remaining detergent, rinse and steam the tank with hot water. Dry the tank thoroughly.
Replacing the gas tank yourself
The main reason why you have to remove the gas tank on VAZ 2110, 2111 and 2112 cars is its damage, after which further operation is impossible. If the tank is leaking, then the leak can be eliminated only by completely removing it, soldering the fuel passage areas, or replacing the gas tank assembly.
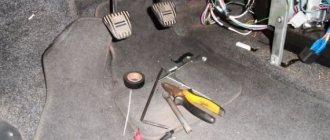
In order to perform this procedure, you will need the following tool:
- Head for 10, 8 and 13 mm
- Screwdrivers with both flat and Phillips blades
- Key 17 (for old-style cars with a 1.5 liter engine)
- Penetrating lubricant
- Ratchet handles or cranks
- Extension Cords
Removing and installing the fuel tank on VAZ 2110, 2111 and 2112 cars
The first step is to jack up the car, or rather its rear part, or carry out this repair in an inspection hole. Of course, the second option will be preferable.
You can immediately unscrew the cover from the passenger compartment under which the fuel pump is located and turn off the power from it, and also unscrew the two fuel pipes using a 17mm wrench. The result is clearly shown below:
After this, from the side of the tank itself, we disconnect the filling pipe from the thick hose.
We release the clamp that holds the second hose from the filler neck.
And we take him aside. Then unscrew the two bolts securing the gas tank, which is clearly shown in the photo below.
Lower the clamps down:
And we carefully try to lower the tank down, moving all the hoses and tubes to the sides so that they do not cling to anything.
Now we are left with one more thinnest hose, which also needs to be disconnected, having first loosened the clamp screw of the clamp.
Well, now you can remove the tank from under the car without any problems. The result of the work done can be seen in the picture below.
If repairs are needed, we will make them. When replacing, we buy a new tank and install it in its place in the reverse order. You can immediately check the internal cavity for debris and foreign particles - and then rinse the container thoroughly.
The price of a new gas tank for VAZ 2110, 2111 and 2112 is from 4,000 rubles, so it is most profitable to buy such parts at a disassembly site. For example, my price tag for such things is only 1,500 rubles.
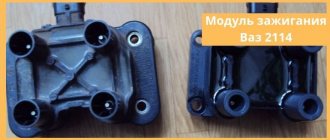
Separator design
The VAZ 2114 gasoline vapor separator is a small, completely sealed tank made of metal or impact-resistant plastic. It is installed in the right rear part of the car on a special bracket. Using a hose system, it is connected to the gas tank (from where vapors flow through drain pipes) and to a two-way valve. The total volume of this device is 7 liters.
Location of the separator VAZ 2114
Once in this tank, the vapors accumulate in it and, due to increased concentration and cooling, condense. Drops of condensation settle on the walls and bottom, after which they gradually flow back into the gas tank. The same vapors that did not have time to condense flow towards the two-way valve. From its name it is easy to guess that it works in both directions at once - “for the intake” of atmospheric air into the tank and “for the release” of fuel vapors outside.
Despite the obvious simplicity of the fuel ventilation system and the minimum of parts located in it, it still breaks down, leading to rather unpleasant consequences.
So, signs of a vapor separator failure may include:
- smell of fuel inside the cabin;
- the smell of fuel near the car (and a lot of time has passed since refueling);
- gasoline stains near the neck of the tank;
- drops of fuel on the ground after a long stay.
Having noticed these signs, we can conclude that the VAZ 2114 gas tank separator is cracked or leaky and is no longer doing its job.
Replacing the filler neck (gas tank pipe)
In my practice, there were many cases when, when removing the gas tank on a VAZ 2110, I had to cut off the hose or even the filler neck, since everything was stuck so tightly that it was simply impossible to do otherwise. If for some reason you have damaged the gas tank filler pipe, then the article below will show you the process of replacing this part with a new one.
Tools you will need to complete this job:
- Phillips screwdriver
- Head for 8 mm, 10 and 13 mm
- Ratchet handles
- Extension Cords
- Penetrating lubricant
- Flat blade screwdriver
Removing and installing the tank filler neck on a VAZ 2110
So, the first thing you need to do is remove the rear right wheel and first jack up the car to make it easier to carry out all the repairs. After this, unscrew the clamp bolt that secures the hose and pipe.
Now we go up a little higher and unscrew the neck fastening nut using a 13 mm wrench. This is clearly shown in the photo below.
And another clamp is located above. There you will need a key for 10.
And remove the clamp, putting it aside so as not to lose it. Next, open the gas tank flap and remove the rubber casing.
And now you can carefully move the filling pipe down to bring it to a more convenient position.
And now all that remains is to disconnect the hose from the top of the pipe, which is shown in the photo. We loosen the clamp that tightens this thin hose.
And after trying a little, we remove the hose from the tube:
Now the neck is almost completely freed, and all that remains is to disconnect it from the hose from below, the clamp of which we unscrewed at the very beginning.
After which we remove it without any problems. The end result is shown in the photo below.
The price of a new neck (filler pipe) of a gas tank on a VAZ 2110 is about 1000 rubles, but the same version can be bought at a disassembly site for half the price. Installation occurs in reverse order.
Replacing the gas tank neck of a VAZ 2110
Removing and installing the fuel tank filler neck
Fuel tank filler neck design
1 — Main hose for filler neck 2 — Clamp 3 — Clamp 4 — Sealing gasket 5 — Mounting flange 6 — Cover
Tightening force of threaded connections, Nm
In my practice, there were many cases when, when removing the gas tank on a VAZ 2110, I had to cut off the hose or even the filler neck, since everything was stuck so tightly that it was simply impossible to do otherwise. If for some reason you have damaged the gas tank filler pipe, then the article below will show you the process of replacing this part with a new one.
Tools you will need to complete this job:
- Phillips screwdriver
- Head for 8 mm, 10 and 13 mm
- Ratchet handles
- Extension Cords
- Penetrating lubricant
- Flat blade screwdriver
DIY fuel tank repair
The first step is to assess the current condition of the gas tank. Does it make sense to repair it or is it easier to buy a new one?
Only soldering (if there are microscopic cracks) or welding (if a small hole has formed on the body) can be considered as a repair. If the VAZ 2110 tank is completely rotten or broken, then no restoration methods will help.
Argon welding allows you to eliminate minor defects and holes on the tank
In any case, the repair of the gas tank on the “ten” begins only after it has been dismantled and thoroughly washed.
Selecting tools and accessories
To independently remove, repair and install the gas tank, you will need a standard set of tools and some auxiliary materials:
heads for 8, 10 and 13;
open-end wrench 17;
extension for keys.
Removing the tank
The dismantling of the tank from the VAZ 2110 must be carried out in an inspection pit or overpass. You can, of course, jack up the body, but this option cannot be called convenient.