How many catchphrases are associated with this detail. And all of them clearly indicate the special role of the steering wheel in a car. Indeed, it is the steering wheel that transmits the driver’s effort to the car’s control system and corrects its movement. Unlike the steering wheels of the first models of passenger cars, the modern steering wheel is a comfortable and pleasant device, even to the touch. But it needs to be changed sometimes. How to do this on Priora?
Life hack: Steering wheel on a Priora - size, price, malfunctions
Do you want to know how to remove the steering wheel on a Priora yourself, without resorting to the services of a car service, and at the same time, without spending a lot of time and effort? Many car enthusiasts prefer not to contact a car service center for any occasion (it’s expensive, or there’s simply no such option), but to resolve issues at home and themselves using improvised means. But drivers do not always have the knowledge to solve a particular issue. In such cases, it makes sense to seek advice from knowledgeable people who can easily help you solve absolutely any problem or find and read the necessary information on the Internet. How to remove the steering wheel on a Priora? If you decide to replace your steering wheel, for example, with a sports steering wheel or want to install heating on it, you will need to remove it first. It is worth noting that all cars are different, which means that certain parts in each car can be disassembled differently, and besides, the disassembly process is different.
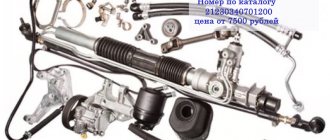
Advantages and disadvantages over power steering
Power steering (power steering) was once the ultimate dream for many, but you had to tinker with it - which only cost the constant addition of working fluid to the reservoir, plus a thrifty attitude towards the mechanism.
Benefits that the owner of a Priora with EUR receives:
More reliable mechanism. It's simple - there is nothing that often breaks (pulleys, hoses) or runs out (liquid). In addition, diagnostic data on faults can be obtained from the ECU. Installation, according to the manufacturer, will take no more than 1.5 hours - with wires everything will be much easier than with connecting hoses. In addition, you don't have to climb into the engine compartment. Passive impact safety Adjustability. Initially, after installation, the force will increase with increasing vehicle speed. This can be changed by reprogramming the data in the ECU - for example, reducing the force from the mechanism with increasing speed. Energy saving. The electric motor inside does not work constantly - it starts only when the driver starts to turn the steering wheel.
It would be wrong to remain silent about the shortcomings:
You don’t “feel” the road - power steering makes the car more sensitive, an experienced driver appreciates this. The EMUR mechanism (electromechanical power steering) is more expensive than power steering. Basic faults
The best plan is to identify the malfunction of the device before starting to move, otherwise a surprise while driving can lead to surprises. It turns out that while driving a person will continue to apply little effort to turning the steering wheel, which is why the car can go straight during the intended turn.
When turning on the ignition, always wait until all the sensor lights come on. The EUR sensor in the form of a steering wheel will also light up. Within two seconds, the electronic control unit diagnoses the entire system; if after this time the sensor does not burn out, the ECU has found a fault.
Not every malfunction of the ECU is reflected on the dashboard:
Shocks in the steering wheel; When the engine is off and when the engine is on, the hand effort is almost the same. As mentioned earlier, the ECU controls everything. Of course, you can find out about any breakdown through the diagnostic connector, to which you can connect yourself. It may produce the following error codes that relate to the EUR:
If the electric power steering on a Priora does not work, and it is not even possible to connect to the diagnostic connector, you can try the old “old-fashioned” method:
Insert the key into the ignition lock. In the eight-pin connector of the control unit, close contacts 6 and 7 (the first one is near the latch, upper right); Turn on the ignition, but do not turn on the engine. In this case, you need to look at the dashboard - at the place where the EMUR icon lights up.
What does the Priora steering wheel hide?
The main distinguishing feature of the Priora steering wheel is the presence of an airbag. That is, it has two electrical devices in its filling:
- Horn switch.
- Airbag kit.
Because of these difficulties, it was necessary to install a special drum with contact tape in it to turn on these devices.
Attention! Not all Prioras are equipped with an airbag, but in any case there is a cavity in the steering wheel for it.
Because of this feature of the Priora steering wheel, removing it requires great care.
Why change or remove it?
The car steering wheel itself is very durable. Therefore, steering wheel replacement is rarely required. But I have to shoot much more often. Replacement is usually done when tuning a car for a “sports” version. Accordingly, such a replacement is only one of the episodes in a complex of alterations.
And the removal of the Priora steering wheel must be carried out for repair and maintenance of electrical components.
Safety system
The Lada Priora has a built-in safety system that is activated in the event of a collision. This system is represented by an inflatable soft pillow that expands at the time of an accident. The Priora has 4 airbags: one for each passenger, including the driver. They operate only in the event of a sharp collision at a speed of over 20 km/h, so they never open accidentally.
The driver's airbag is located directly in the Priora's steering wheel, which can cause some difficulties when trying to remove or replace the steering wheel or its elements. If you are going to install a new steering wheel, then it is worth finding out a little about the features of the location of the cushion.
The design itself is quite simple and consists of the following elements:
- gas generator;
- pillows;
- control module.
In the event of a collision, a special sensor sends a signal to the module, which, in turn, turns on the gas generator. In about a second, the device fills an empty bag with nitrogen, which unfolds towards the driver.
If you bought a used Priora, check for the airbag: press just below the center of the steering wheel. A soft-touch center means the cushion is in place.
Removal sequence
First you need to unscrew two screws on the back of the Priora steering wheel, which are located on both sides. To do this, you will need a 5 mm hexagon, while on both sides it is necessary to compress the spring clamps, preventing the pillow from falling out. It is important to remember that before starting work, you must remove the battery terminals to prevent the airbag from deploying.
After this, carefully remove the cushion from the front of the steering wheel. To do this, you need to carefully pry the clamp together with the wires and move it to the side, and also disconnect the power wires leading to the sound signal.
Dismantling algorithm
- To begin with, the steering wheel is locked by turning in any direction (there should be no key in the ignition switch).
- Next, you need to pry off the trim (also called the horn) located at the top of the steering wheel. At the same time, it is recommended to listen to how the sound signal is triggered.
- After detaching the upper part of the cover from the fastening, you should pry it from below and completely remove it. The power wires are located on the button, so you don’t need to pull the cover too hard to avoid damaging them.
- Now you have to disconnect the wires by pulling them a little, thus removing them from the contacts.
Note. Depending on what year Kalina was produced, the steering wheel mounts may differ. An airbag may or may not be present. If there is one, then you need to use a Phillips screwdriver to unscrew the bolts that secure it.
- It is worth noting that the bolts are fastened quite firmly, so you need to remove them with the utmost care so as not to damage the buttons and contacts.
- Afterwards the cover can be completely detached.
- The next step is to use a socket with a wrench to unscrew the nut that secures the steering wheel to the shaft. The steering wheel must be locked.
- In a situation where the nut is difficult to rotate, you can use a ratchet, with which this can be done faster and easier. There is no need to unscrew the nut completely; it is better to leave it in place, otherwise you might get hit in the forehead when removing the steering wheel.
- The position of the handlebar should be marked with a marker or pencil so that when mounting it back, it should be set straight. Marks can be made either on the steering wheel itself or on the casing.
- Now you need to take the steering wheel with both hands and pull it towards you, removing it from the shaft splines. If he doesn’t give in the first time, you can hit him with his hands from below, alternately left and right.
- After the steering wheel has been removed, you need to unscrew the nut completely and remove the wheel.
see also
On most Lada Priora cars, the steering wheel already comes with a built-in driver airbag, so when removing the steering wheel there are certain points that will need to be completed.
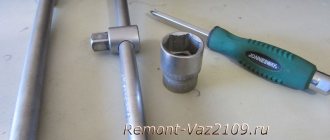
So, in order to remove the steering wheel on a Priora, we need the following tool:
- 24 mm head
- Extension
- Ratchet or crank
- 5 mm hexagon
Step-by-step instruction
1. On the inside of the steering wheel, unscrew the two airbag mounting screws.
The screws are located on the right and left of the inside of the steering wheel.
2. Pry up the airbag and disconnect the power connector from it.
In order to disconnect the power connector, you need to use a flat-head screwdriver to pry it up and remove the latch. After releasing the latch, remove the connector upwards.
3. Disconnect the power connector from the horn buttons. We squeeze the ears and disconnect the connector.
4. Place the steering wheel so that the wheels point straight and make a mark on the steering wheel relative to the steering column casing. This must be done in order to set the steering wheel to its previous position.
The mark can be made with a washable marker.
5. Unscrew the nut securing the steering wheel to the shaft using a twenty-four socket. Do not unscrew the nut completely.
After unscrewing the nut a little, we knock the steering wheel off the splines. This can be done by striking movements of the palms of the hands on both sides of the steering wheel.
After the steering wheel has come off the splines, unscrew the nut completely and remove the steering wheel.
6. When removing the steering wheel, thread the airbag and horn power wires through the hole.
7. Now a few words about reverse installation.
We thread the power supply wires for the pillow and the signal.
We put the steering wheel on the splines and do not forget to align the marks that you made.
8. Screw in and tighten the steering wheel mounting nut.
Tightening torque from 30-50 Nm.
9. Connect the signal power connector.
10. Take the airbag and connect the power connector. After connecting, close the latch.
11. Place the pillow in place and secure it with two screws on the back side.
Video lesson
Source: https://umelyeruki.info/avto/cnyatie-rulya-s-podushkoj-bezopasnosti-lada-priora/
Operating principle
The airbag of any car is a gas generator that is activated when a signal is received from the electronic control unit (ECU). The AirBag has a squib inserted into it. He is able to deploy a special bag and fill it with nitrogen in a matter of seconds. The control unit reads data from sensors that control the speed of movement, direction and force of impact. The airbag will not deploy at speeds below 20 km/h or at light impacts.
AirBag is a gas generator that inflates the bag with nitrogen based on a signal from the electronic control unit
Why is it needed and its device
ESD is an electrical mechanism that reduces the control force with which the driver turns the steering wheel. It turns out that this cunning device takes on most of the effort, leaving the driver responsible for the safety of the maneuver. The design of the EUR is as follows:
Electronic control unit and electric motor;
Controller and peripherals
Mechanical components:
- Steering wheel;
- Output/input shaft;
- Studs, nuts, bolts, etc.;
- Bracket;
- Steering rack;
- Connections;
- Steering wheel tilt adjustment lever.
It works like an ordinary electronic mechanism - for example, like a prosthesis: receiving data from sensors about the resistance of the road surface, vehicle speed, crankshaft speed, the force that the driver applies to turning the steering wheel, the “brain”, the electronic control unit, delivers the electric motor to sufficient power to so that the car can be controlled with one finger.
Difficulties in replacement
Removing the steering wheel on a Priora is quite simple, but putting everything back in place is not always possible.
Many users often have questions when replacing an old steering wheel with a new one. Here are the answers to the most common ones.
Question 1: Are mounts suitable for different models?
Answer: The mounts are identical, so the Priora 2 SE steering wheel is recommended for use on older models as well.
Question 2: I removed the steering wheel, but now I can’t put the new one back, it doesn’t work manually, what should I do?
Answer: If the part has been dismantled, then it can also be installed back. The steering wheel is installed by pressing your hands towards the shaft, without using tools like a hammer, but everything may not work out on the first try. There is no need to make sharp pushes of the steering wheel; a simple smooth press will be enough.
Question 3: Are additional components needed for the mechanism besides the steering wheel?
Photo report on removing the steering wheel yourself
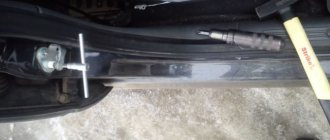
First of all, read the material on removing the driver's airbag on a Priora. Then, when you have dealt with this, you can proceed further. Disconnect the power wires to the sound signal.
Then we put the head on 24 and rip off the nut, but don’t unscrew it completely yet. Before you start knocking it off the shaft, you need to mark the position of the steering wheel relative to the shaft - you can make marks on the steering wheel and casing.
When the nut is loosened, leave it on the shaft for now. Then we take and knock down the steering wheel from the reverse side, tapping it with medium force - on both sides.
When it comes off the splines, you can finally unscrew the nut and remove it from the shaft.
Carefully thread the horn power wires, as well as the airbag power wires, through a special hole.
And now the steering wheel is finally freed and you can remove it completely from the Priora.
If there is a need for replacement, then we perform it in the reverse order. Of course, the installation is carried out according to the marks that were originally set. The fastening nut must be tightened with a torque of 31 to 41 Nm. But you can take the average value and tighten it with a force of 40 Nm.
Tools for work
Let's try to figure this issue out together. Experts say that you can remove it on your own, without involving professionals from a car service center and making do with a small list of tools.
What you will need for this:
- 24 mm socket wrench;
- pipe 30-40 cm long (for support);
- 5 mm hex wrench;
- screwdriver (flat blade).
All these tools will help you easily cope with removing the steering wheel yourself. If you use them correctly, the whole process will seem easy.
Popular questions
Ignition coil repair
Posted: 12/05/2014 Yes, I see everyone knows that problems with ignition coils are very common. I will also say that, as always, replacing coils in different brands of cars is slightly different. To determine which coil...
Remove left headlight
Posted: 07/19/2015Removing a headlight is not as difficult as it seems. Everything, of course, depends on the make of the car, but I will try to give universal advice. First, look to see if your headlights are fixed by the bumper. If yes - …
Replace the lamp in dimensions
Posted: 11/27/2014 I don’t envy those who need to remove the headlight to get to the bulbs, and to remove the headlight, you need to remove the bumper, and on the BMW X5, also the wing. For owners of such cars, the simplest task seems to be…
Oil pressure sensor repair
Posted: 10/13/2016 Tell me where the oil pressure sensor is located on the Peugeot 405 2.0i. I can't figure out where to look for it. Thank you!!
How to replace front shock absorbers
Posted: 06/20/2014 Well, I can’t say about all the cars, but I’ll tell you about the Opel Kadett. First, unscrew the guide bolts and remove the caliper. Loosen the stabilizer link to loosen the bolts...
Posted: 07/07/2014 Make sure that these are exactly the signs of a malfunctioning mass air flow sensor:
– Engine operation is intermittent. – Rough engine operation at idle speed. – Loss of dynamics (poor acceleration “stupid running”). ...
Posted: 07/20/2015 Good day, my name is Ilya. The instructions are very good, everything was done quickly and without unnecessary words. I recently removed the gas tank myself using these instructions. On the Internet I could not find a normal in...
Change the side lamp
Posted: 11/25/2014 Replacing the marker lamp itself will not be difficult. My car is a Citroen C4, the lamp is pulled out by simply turning the socket where the lamp itself is attached. Then you just have to...
How to replace a rear wheel bearing
Posted: 07/07/2014 I got it, I recently bought a VAZ 211093. 5-year-old. (before this I was all interested in foreign cars). Literally the next morning I discovered a hum in the area of the rear right wheel, when “unloading” (small...
Replacing the ball joint
Posted: November 30, 2014 You need to change the ball joint without waiting until it gets loose. My friend and I once changed the brake pads on my car. We decided to take a look at the condition of the ball joint, he then looked at it with sh...
Tools for work
Let's try to figure this issue out together. Experts say that you can remove it on your own, without involving professionals from a car service center and making do with a small list of tools.
All these tools will help you easily cope with removing the steering wheel yourself. If you use them correctly, the whole process will seem easy.